Rods "Spaceship" Scratch built Plasma Cutter build
- islander261
- Offline
- Platinum Member
-

Less
More
- Posts: 757
- Thank you received: 216
11 Jul 2017 00:43 #95633
by islander261
Replied by islander261 on topic Rods "Spaceship" Scratch built Plasma Cutter build
Rod
Take care of this in your probing routine. Using G38.xx you can sense going down to stop and then slowly going up use G38.xx and look for the switch to open (works for both ohmic and float switch). This will compensate for backlash and only having you moving a very short distance at extra slow probing speed. I use this same approach on my present system and it is very accurate and repeatable as measured with feeler gauges. What is not clear to me what kind of debouncing LinuxCNC will require in actual operation. On my present system G38.xx is not supported so I have hard coded probing in the external controller, I have some very crude debounce implemented.
The Kemo unit has been used by folks on plasmaspider. I consider it less than idea because it works with fresh water (high impedance). I think using a sensing current > 5mA is the way to go with the noise around a plasma table. Also the probe contact to the mill scaled covered sheet isn't a real nice switch contact.
John
Please Log in or Create an account to join the conversation.

11 Jul 2017 10:27 #95652
by rodw
Replied by rodw on topic Rods "Spaceship" Scratch built Plasma Cutter build
Well I've bitten the bullet now and wired up my SSR with a current limiting resistor and a couple of diodes on the right hand input side.

I've also wired another diode across a couple of spare terminals. This will let me place this diode forward of R2 (towards the plasma machine) if I want to. I might even add another diode like this. I've still got to mount this in the cabinet and I want to keep it as close to where the cables will exit the case to keep any noise away from the rest of my signals. I hope I can get it to fit!
So one more question. What sort of wire do I use for the ohmic sensor? I had a feeling some people use shielded coax. Is that the way to go?
Please Log in or Create an account to join the conversation.
11 Jul 2017 10:40 - 11 Jul 2017 16:59 #95655
by rodw
Replied by rodw on topic Rods "Spaceship" Scratch built Plasma Cutter build
Double Post, Sorry
Last edit: 11 Jul 2017 16:59 by rodw.
Please Log in or Create an account to join the conversation.
- islander261
- Offline
- Platinum Member
-
Less
More
- Posts: 757
- Thank you received: 216
11 Jul 2017 13:20 #95656
by islander261
Replied by islander261 on topic Rods "Spaceship" Scratch built Plasma Cutter build
Rod
I just used plain 16AWG 19 strand insulated wire. One lead to table star ground and one lead to torch shield. The lead to the torch shield wants be good and flexible as it will be flexed a lot.
John
I just used plain 16AWG 19 strand insulated wire. One lead to table star ground and one lead to torch shield. The lead to the torch shield wants be good and flexible as it will be flexed a lot.
John
The following user(s) said Thank You: rodw
Please Log in or Create an account to join the conversation.
15 Jul 2017 08:46 #95814
by rodw
Replied by rodw on topic Rods "Spaceship" Scratch built Plasma Cutter build
I had a bit of a rethink about the ohmic sensing on my machine. Because there is no shield the tip would be live and I thought the diodes would be under pressure all of the time and there could be a risk of the raw voltage arcing across relay contacts or something.
Anyway, it was easier to just turn the sheet of steel over!
I've been putting this job off for months but today I started wiring up all of the connectors on the case.
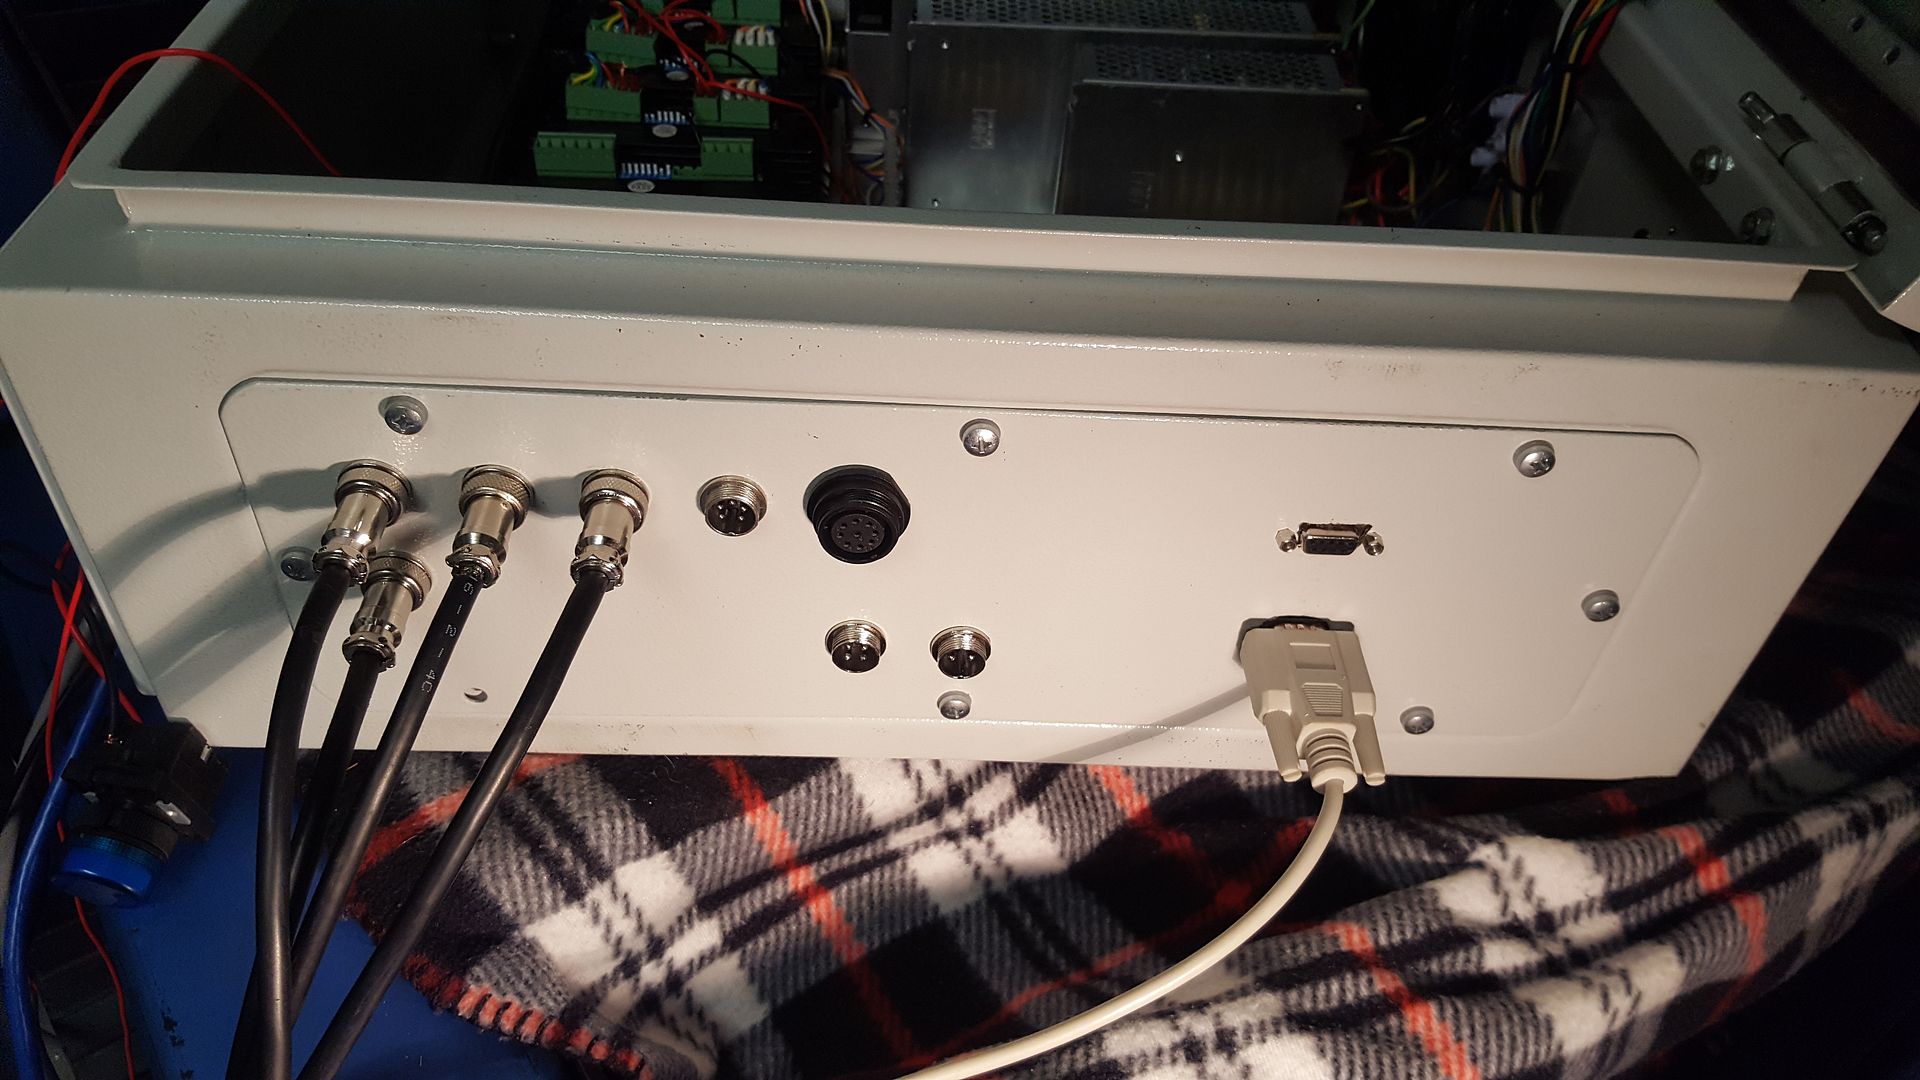
I've made provision for a 5th rotary axis. The DB9 that is plugged in connects up the gantry sensors. The second DB9 still needs wiring in and will be for the table sensors. The large circular connector is the PLasma cutter interface, and the other 2 lower connectors are for my signal light mast and ohmic sensor if I ever add one.
I also spent some time today getting to understand a bit more about Gcode and I wrote a couple of handy Gmoccapy macros for Home, Touch Off X & Y and to park the gantry right down the back out of the road.
Anyway, it was easier to just turn the sheet of steel over!
I've been putting this job off for months but today I started wiring up all of the connectors on the case.
I've made provision for a 5th rotary axis. The DB9 that is plugged in connects up the gantry sensors. The second DB9 still needs wiring in and will be for the table sensors. The large circular connector is the PLasma cutter interface, and the other 2 lower connectors are for my signal light mast and ohmic sensor if I ever add one.
I also spent some time today getting to understand a bit more about Gcode and I wrote a couple of handy Gmoccapy macros for Home, Touch Off X & Y and to park the gantry right down the back out of the road.
Please Log in or Create an account to join the conversation.
20 Jul 2017 08:08 #96126
by rodw
Replied by rodw on topic Rods "Spaceship" Scratch built Plasma Cutter build
Well, last weekend, I got a bit despondent. After 1 1/2 days soldering up all of the connectors, I had problems with the Joint axis homing. Of course, I immediately suspected my soldering ability and I spent hours tracing wires with a multimeter and checking the raw signals in halshow. Everything seemed perfect. Today I got some time to look at it again nad after slowing down all of the homing velocities in the .ini file, I could finally see that the wrong axis was moving after it hit the first homing switch.
So I swapped the home switch signals around between joint 0 and 1 in my HAL file and it finally worked perfectly!
I went off and had a think about it for a while becasue that meant all of the limit switches were wong. Then it finally dawned on me. I grabbed a multimeter and checked the 5V wiring from the Mesa 7i76e stepgens to the stepper controllers. Sure enough, stepgen 0 was connected to joint 1 and vice versa! I must have disconnected these and mixed them up while doing the final wiring. So I reverted the hal file to the original signals, swapped the connectors on the stepper controllers around and everything is hunky dory again!
Thank goodness!
Anyway, I received a SMA coax pigtail 1.0 metre long today thanks to eBay which let me tidy up the last wire out of the cabinet. My wireless pendant has an external antenna so a 6.5mm hole was the last hole I needed to drill in the cabinet.

Once installed, this sits at the top of the case beside the 240V power inlet so it is well away from any signals and located up near the top of the case so the antenna can be mounted up in the air where I want it.
So I swapped the home switch signals around between joint 0 and 1 in my HAL file and it finally worked perfectly!
I went off and had a think about it for a while becasue that meant all of the limit switches were wong. Then it finally dawned on me. I grabbed a multimeter and checked the 5V wiring from the Mesa 7i76e stepgens to the stepper controllers. Sure enough, stepgen 0 was connected to joint 1 and vice versa! I must have disconnected these and mixed them up while doing the final wiring. So I reverted the hal file to the original signals, swapped the connectors on the stepper controllers around and everything is hunky dory again!
Thank goodness!
Anyway, I received a SMA coax pigtail 1.0 metre long today thanks to eBay which let me tidy up the last wire out of the cabinet. My wireless pendant has an external antenna so a 6.5mm hole was the last hole I needed to drill in the cabinet.
Once installed, this sits at the top of the case beside the 240V power inlet so it is well away from any signals and located up near the top of the case so the antenna can be mounted up in the air where I want it.
Please Log in or Create an account to join the conversation.
22 Jul 2017 06:56 #96257
by rodw
Replied by rodw on topic Rods "Spaceship" Scratch built Plasma Cutter build
Its Alive!
We had a lot of trouble this morning. I've had the machine torch for 12 months but this was the first time I had plugged it into the machine. The torch came on with the machine and would not go out. Then we tested the hand torch and we could control it from LinuxCNC without having the trigger pressed. So after comparing wiring between the two torches, I cut one wire inside the machine torch so it looked like there was a switch turned off and everything worked perfectly.Well it sounds simple but the process took sevearl hours of troubleshooting!
I've still got some things to sort out. I was not seeing an ArcOK signal or a torch voltage from the Mesa THCAD. I hope it is just a wiring fault in the cable I made up.
I spent about $300 on air fittings in preparation for setting up an engraver but that can wait for a while...
I have so much work to do to set up Sheetcam and work out the right cutting speeds.
Please Log in or Create an account to join the conversation.
22 Jul 2017 07:45 #96260
by joel0407
Replied by joel0407 on topic Rods "Spaceship" Scratch built Plasma Cutter build
Looking good Rodw.
Happy Days.
Happy Days.
The following user(s) said Thank You: rodw
Please Log in or Create an account to join the conversation.
22 Jul 2017 08:35 #96263
by rodw
Thanks Joel. Should give you some inspiration to get your router going!
Replied by rodw on topic Rods "Spaceship" Scratch built Plasma Cutter build
Looking good Rodw.
Happy Days.
Thanks Joel. Should give you some inspiration to get your router going!
Please Log in or Create an account to join the conversation.
- islander261
- Offline
- Platinum Member
-
Less
More
- Posts: 757
- Thank you received: 216
22 Jul 2017 23:40 #96298
by islander261
Replied by islander261 on topic Rods "Spaceship" Scratch built Plasma Cutter build
Rod
Congratulations on you first cuts! I wish I was closer to actually using LinuxCNC as my controller. If it is any consolation I started with a working Torchmate system and it took me several months of off and on trials to get my own cut files and the machine to work together. SheetCam and Inkscape will be your friends. Both are quite rough compared to AI and Pronest but they will work well together once you figure out how they work with with your equipment. Keep you initial SheetCam PPs simple and add features as you learn. Sorry I can't help with the chinacom cutter hardware. I know that you browse Plasmaspider , there is a wealth of good technical information buried there.
John
The following user(s) said Thank You: rodw
Please Log in or Create an account to join the conversation.
Time to create page: 0.143 seconds