GLADE Signals IN and OUT - Buttons won't work.

23 Dec 2017 07:36 - 24 Dec 2017 07:05 #103478
by Askjerry
GLADE Signals IN and OUT - Buttons won't work. was created by Askjerry
I have written a BUNCH of pyVCP panels... and they work great.
Now i am trying to write a GLADE VCP panel so that I can lean how it works and share this information on my YouTube channel.
I created some input devices... labels for example... and I have a spiffy job timer and spindle cmd speed indicator working perfectly. I even figured out how to get the text to display nicely.
BUTTONS... they are killing me... I can go to the "Show HAL Configuration" from within AXIS and select my gladevcp buttons...
I can see that they are indeed correctly changing as I press and release the buttons... the watch status LED changes exactly the same as in a pyVCP panel. But for some reason... the JOG does nothing... pretty much the same code... but doesn't work. I know I'm missing something very minor... but I can't seem to figure it out. And even after reading the tutorials... I'm so close.
custom_postgui.hal for the working pyVCP
custom_postgui.hal for the failing gladevcp
What am I missing?
File attached.
Thanks!
Jerry
Now i am trying to write a GLADE VCP panel so that I can lean how it works and share this information on my YouTube channel.
I created some input devices... labels for example... and I have a spiffy job timer and spindle cmd speed indicator working perfectly. I even figured out how to get the text to display nicely.
BUTTONS... they are killing me... I can go to the "Show HAL Configuration" from within AXIS and select my gladevcp buttons...
- x-minus / x-plus
- y-minus / y-plus
- z-minus / z-plus
I can see that they are indeed correctly changing as I press and release the buttons... the watch status LED changes exactly the same as in a pyVCP panel. But for some reason... the JOG does nothing... pretty much the same code... but doesn't work. I know I'm missing something very minor... but I can't seem to figure it out. And even after reading the tutorials... I'm so close.
custom_postgui.hal for the working pyVCP
# Connect the X PyVCP buttons
net panel-jog-x-minus 		<= halui.jog.0.minus 		<= pyvcp.x-minus
net panel-jog-x-plus 		<= halui.jog.0.plus 		<= pyvcp.x-plus
custom_postgui.hal for the failing gladevcp
# Connect the X gladevcp buttons
net panel-jog-x-minus 		<= halui.jog.0.minus 		<= gladevcp.x-minus
net panel-jog-x-plus 		<= halui.jog.0.plus 		<= gladevcp.x-plus
What am I missing?
File attached.
Thanks!
Jerry
Last edit: 24 Dec 2017 07:05 by Askjerry.
Please Log in or Create an account to join the conversation.
- raglanlittlejohn
- Offline
- Senior Member
-

Less
More
- Posts: 76
- Thank you received: 9
23 Dec 2017 08:46 #103479
by raglanlittlejohn
Replied by raglanlittlejohn on topic GLADE Signals IN and OUT - Buttons won't work.
Jerry.
I'm interested in this, as I've only used pyVCP panels up to now, and would like to try gladevcp. If you look in Show Hal Configuration, and do a watch on the signal panel-jog-x-minus, does it change when you press the jog minus button?.
John.
I'm interested in this, as I've only used pyVCP panels up to now, and would like to try gladevcp. If you look in Show Hal Configuration, and do a watch on the signal panel-jog-x-minus, does it change when you press the jog minus button?.
John.
Please Log in or Create an account to join the conversation.
23 Dec 2017 10:50 #103481
by cmorley
Replied by cmorley on topic GLADE Signals IN and OUT - Buttons won't work.
looks like you forgot to set the jog speed.
linuxcnc.org/docs/2.7/html/gui/halui.html#_halui_pin_reference
halui.jog-speed [SOMETHING]
In linuxcnc each GUI keeps it's own jog speed setting - linuxcnc has no concept or global jog speed.
In master GSTAT is expanded to help with this.
It was very useful to post your config thank you.
It would be even better if you can use the simulated hardware option to create a sample that can run on any hardware - my laptop didn't have a parport")
Hopefuly the option should make it easy to make a simulated parport config.
Hope that helps
Chris
linuxcnc.org/docs/2.7/html/gui/halui.html#_halui_pin_reference
halui.jog-speed [SOMETHING]
In linuxcnc each GUI keeps it's own jog speed setting - linuxcnc has no concept or global jog speed.
In master GSTAT is expanded to help with this.
It was very useful to post your config thank you.
It would be even better if you can use the simulated hardware option to create a sample that can run on any hardware - my laptop didn't have a parport
Hopefuly the option should make it easy to make a simulated parport config.
Hope that helps
Chris
The following user(s) said Thank You: Askjerry
Please Log in or Create an account to join the conversation.
23 Dec 2017 17:36 - 23 Dec 2017 21:05 #103489
by Askjerry
Replied by Askjerry on topic GLADE Signals IN and OUT - Resolved
raglanlittlejohn - Yes, the signals went through.
Ok... I was telling it to move forward at 0.0 ipm so it was doing exactly what I told it to do.
I added a Jog Slider... and should have known better... EVERY pyVCP panel I have ever written had that feature.
I will make this note for others following in my footsteps... unlike a pyVCP slider... there are a couple of differences.
Here is the code added to the custom_postgui.hal file:
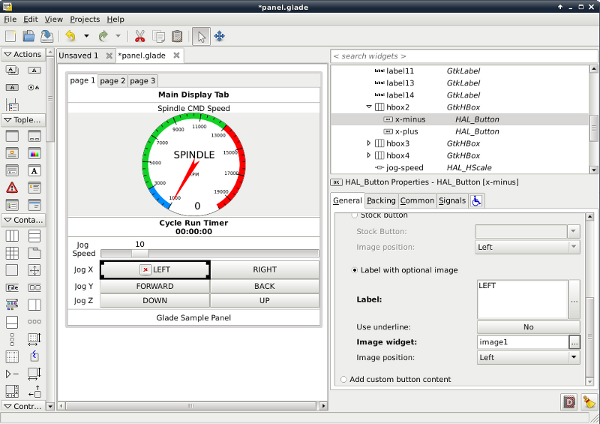
To make the addition of the adjustment, from within GLADE do the following...
Attached is Version GLADE (1.1)
cmorley -
-- First, thanks for the pointer... spot on!
-- Second... If I take my CONFIG "GLADE (1.1)" and put a copy into "GLADE (1.1) SIM"
-- what do I need to do with that to make it a simulation? (Never done that process before.)
Thanks,
Jerry
Ok... I was telling it to move forward at 0.0 ipm so it was doing exactly what I told it to do.
I added a Jog Slider... and should have known better... EVERY pyVCP panel I have ever written had that feature.
I will make this note for others following in my footsteps... unlike a pyVCP slider... there are a couple of differences.
- In the pyVCP if you named it "jog-speed" in the panel... you had to reference it as "pyvcp.jog-speed-f" to indicate it was a floating point number. But in GLADE, if you do that, it fails to find the device. If you name it as "jog-speed" in the panel, then you reference it as "gladevcp.jog-speed" as it already knows it's floating point.
- In the pyVCP just putting in a slider with a HAL pin is enough. In GLADE, it will show up but be absolutely stupid... just a paperweight. You need to add more values to it by including an "adjustment".
Here is the code added to the custom_postgui.hal file:
# connect the gladevcp jog speed slider
net panel-jogspeed 		halui.jog-speed 		<= gladevcp.jog-speed
To make the addition of the adjustment, from within GLADE do the following...
- Click on the slider.
- In the GENERAL tab of the slider, click on the "..." next to ADJUSTMENT.
- A dialog box will open up, click NEW to add the adjustment.
- In the box at the top with all the stuff... click this new adjustment to get to it's values.
- Make some changes to this adjustment...
Rename it something that makes sense, I used "jog-adjustment" for example.
- Fill out the following information at a minimum...
- VALUE = The starting value for the slider
- MINIMUM VALUE = The slowest allowable speed
- MAXIMUM VALUE = The fastest allowable speed
- STEP INCREMENT = Step size for the allowable movement.
Attached is Version GLADE (1.1)
cmorley -
-- First, thanks for the pointer... spot on!
-- Second... If I take my CONFIG "GLADE (1.1)" and put a copy into "GLADE (1.1) SIM"
-- what do I need to do with that to make it a simulation? (Never done that process before.)
Thanks,
Jerry
Last edit: 23 Dec 2017 21:05 by Askjerry. Reason: Add data / Clean up.
Please Log in or Create an account to join the conversation.
24 Dec 2017 01:10 #103509
by cmorley
Hey Jerry.
I saw that it was a stepconf generated config. Stepconf has an option on the start page to produce a 'simulated hardware' config.
It adds a component to substitute for the parport component :
loadrt sim_parport names=parport.0
and adds a HAL file to connect signals for this component and add a sim hardware component for homing and limits:
source sim_hardware.hal
besides that is should be exactly the same.
i'm sure you could hand add it in,if your config is highly modified (which I'm sure it is)
It just makes it easier to test ( i don't have too much linuxcnc running hardware handy with a parport)
It's certainly not the end of the world if you don't do this.
In this case i was familiar enough with the requirements (read that: I've done the same thing) to guess the problem.
Chris M
Replied by cmorley on topic GLADE Signals IN and OUT - Resolved
cmorley -
-- First, thanks for the pointer... spot on!
-- Second... If I take my CONFIG "GLADE (1.1)" and put a copy into "GLADE (1.1) SIM"
-- what do I need to do with that to make it a simulation? (Never done that process before.)
Thanks,
Jerry
Hey Jerry.
I saw that it was a stepconf generated config. Stepconf has an option on the start page to produce a 'simulated hardware' config.
It adds a component to substitute for the parport component :
loadrt sim_parport names=parport.0
and adds a HAL file to connect signals for this component and add a sim hardware component for homing and limits:
source sim_hardware.hal
besides that is should be exactly the same.
i'm sure you could hand add it in,if your config is highly modified (which I'm sure it is)
It just makes it easier to test ( i don't have too much linuxcnc running hardware handy with a parport)
It's certainly not the end of the world if you don't do this.
In this case i was familiar enough with the requirements (read that: I've done the same thing) to guess the problem.
Chris M
The following user(s) said Thank You: Askjerry
Please Log in or Create an account to join the conversation.
24 Dec 2017 01:43 #103512
by Askjerry
Replied by Askjerry on topic GLADE Signals IN and OUT - Resolved
Chris -
I went into STEPCONFIG presuming that I could create a simple mill using a parallel port, then do exactly the same steps to create a simulated one... and view the differences. Unfortunately, STEPCONFIG does NOT have this feature. It has the ability to create a new configuration, or modify an existing one... with ONE parallel port or TWO parallel ports... but no mutton that has any kind of "create simulation" option.
I went looking in the SIM folder of LinuxCNC and unfortunately... all sorts of configurations are in there... hard to tell what is needed for which particular INI file. It would be nice to have two folders... one with a simple PARAPORT machine, and one with SIM... exactly the same machine in simulation... so I could see the differences. (I have a program I use for work called ULTRACOMPARE... it would instantly mark any and all differences between them.)
Anyway... rather than tie up this conversation with that topic... I'll start a new one... hopefully someone can tell me exactly what lines to hand-code and/or what to search/replace to make the changes.
I'll also start a new topic about button decoration... colors, possibly tiled images... any ways to make it look better. But for now... the button issue is resolved and I can make a YouTube video to compare the two so users can decide which way to go.
Thanks,
Jerry
Please Log in or Create an account to join the conversation.
24 Dec 2017 07:09 - 24 Dec 2017 07:11 #103525
by Askjerry
Replied by Askjerry on topic GLADE Signals IN and OUT - Resolved
After a bit of trial and error... I was able to create the same machine with a GLADE and with pyVCP. There are a couple of subtle differences... color on the pyVCP buttons for example... but I'll address artistic stuff for GLADE in another post.
Anyway... here is the final result.
pyVCP Original Panel

GLADE Duplicated Panel
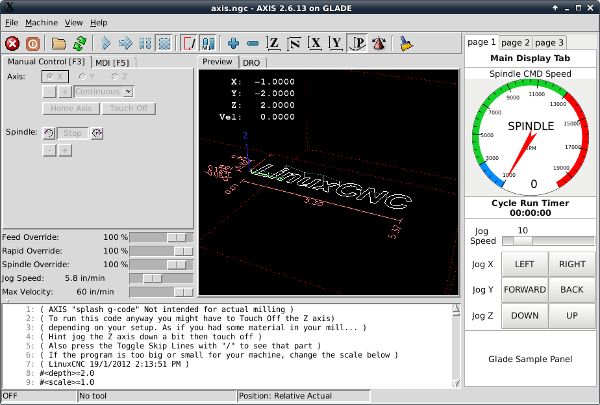
Now to learn the artistic side of the GLADE method... whoo!
Jerry
Anyway... here is the final result.
pyVCP Original Panel
GLADE Duplicated Panel
Now to learn the artistic side of the GLADE method... whoo!
Jerry
Last edit: 24 Dec 2017 07:11 by Askjerry.
Please Log in or Create an account to join the conversation.
24 Dec 2017 08:02 #103529
by cmorley
Replied by cmorley on topic GLADE Signals IN and OUT - Resolved
Looks good!
There are about four ways to change the color of the button - it's more painful then it should be.
- upgrade to 2.7 - there are fancy light buttons widgets that can be colored (and rounded and text changed on state)
-place an image file in the button using the GLADE editor.
You would need the text in the image
-try a technique something like this in a python handler file:
stackoverflow.com/questions/1241020/gtk-...lored-regular-button
python files of course allow you to do almost anything but takes more work.
-use custom themes - probably not worth the effort for just a small panel.
Chris M
Please Log in or Create an account to join the conversation.
24 Dec 2017 13:59 #103548
by Askjerry
Replied by Askjerry on topic GLADE Signals IN and OUT - Resolved
CHRIS -
You said...
The only indication to place an image is what I see below... and that only places a small image next to the text.
I guess I'll have to learn Python now... from what you are saying... and the referenced web page... it sounds like you rewrite the handler.py file into the folder... and do the changes there. The custom_postgui.hal would modify the AXIS signals... and the handler.py would modify the panel.glade appearance after loading.
If I read that correctly... the WYSIWYG of the GLADE program would not look right until you actually ran it in AXIS.
Sort of what I am doing with pyVCP... write it, look at it, change it... repeat.
Yeah?
Jerry
You said...
-place an image file in the button using the GLADE editor.
You would need the text in the image
The only indication to place an image is what I see below... and that only places a small image next to the text.
I guess I'll have to learn Python now... from what you are saying... and the referenced web page... it sounds like you rewrite the handler.py file into the folder... and do the changes there. The custom_postgui.hal would modify the AXIS signals... and the handler.py would modify the panel.glade appearance after loading.
If I read that correctly... the WYSIWYG of the GLADE program would not look right until you actually ran it in AXIS.
Sort of what I am doing with pyVCP... write it, look at it, change it... repeat.
Yeah?
Jerry
Please Log in or Create an account to join the conversation.
24 Dec 2017 19:52 #103571
by cmorley
Replied by cmorley on topic GLADE Signals IN and OUT - Resolved
Jerry:
try selecting 'add custom content', then add an image widget to the button.
Yes WYSIWYG is not quite true... I generally run an editor and a linuxcnc session side by side to see the changes.
Chris M
try selecting 'add custom content', then add an image widget to the button.
Yes WYSIWYG is not quite true... I generally run an editor and a linuxcnc session side by side to see the changes.
Chris M
Please Log in or Create an account to join the conversation.
Time to create page: 0.137 seconds