Py2 - Probe Basic Config Conversion Doc Lcnc 2.8
- Lcvette
-
 Topic Author
- Offline
- Moderator
-

Less
More
- Posts: 1575
- Thank you received: 739
20 Jan 2022 23:06 - 23 Jul 2022 19:59 #232570
by Lcvette
Py2 - Probe Basic Config Conversion Doc Lcnc 2.8 was created by Lcvette
I am making this doc and adding it as a sticky to help those converting a Pncconf config over to a working Probe Basic Config in step by step follow along, hopefully it helps those who are new!
Step 1: Successfully install probe basic and be able to open the probe basic simulation without errors. This guide is for the stable version of Linuxcnc 2.8 and Debian 10 Buster. Installation instructions can be found here:
kcjengr.github.io/probe_basic/quick_start.html
Step 2: Create a configuration for your machine using Pncconf from the linuxcnc menu in the applications drop down in the upper menu bar. It is recommended to use the Axis gui display for this initial build. You should have your machine's wiring schematic premade to make filling in the required information fast, easy and accurate in Pncconf.
After you have completed the Pncconf configuration builder and have created a new machine configuration that has been saved in the linuxcnc config directory, it is advised that you start linuxcnc using your new config to verify there are no errors. It is also advisable to test the machine to verify the base functionality is correct, for example, jogging, spindle function, axis motion is as expected and the commanded distance matches the actual distance moved, and any other sort any gremlins prior to making the switch to probe basic. This will ensure when you transition it goes smoothly. Once completed and found to function correctly, you can proceed to step 3.
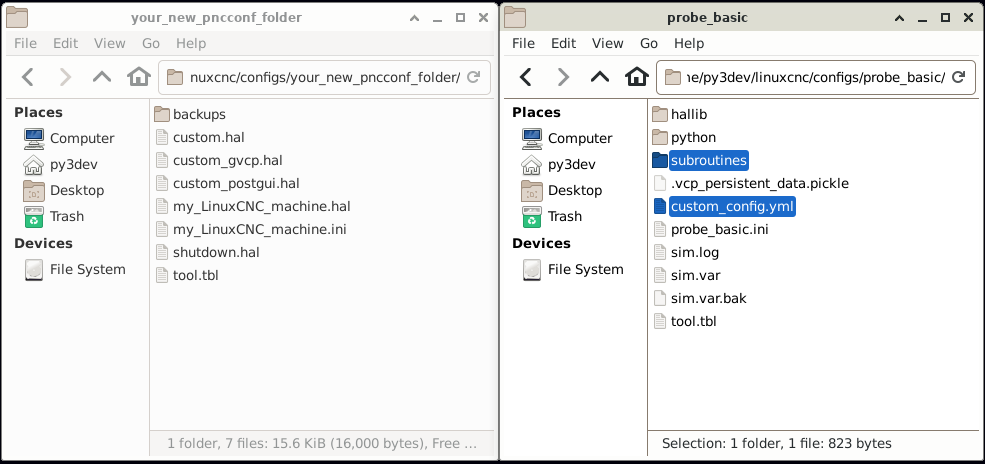
Step 3: In the Linuxcnc config folder, there should now be a config folder from the output of Pncconf, there should also be the probe_basic config folder. Both will be used for copying required files over to the new machine config folder. Open two windows in the file tree, the new Pncconf folder and the probe_basic config folder. Copy the highlighted files shown below from the probe basic config folder to the Pncconf config folder.

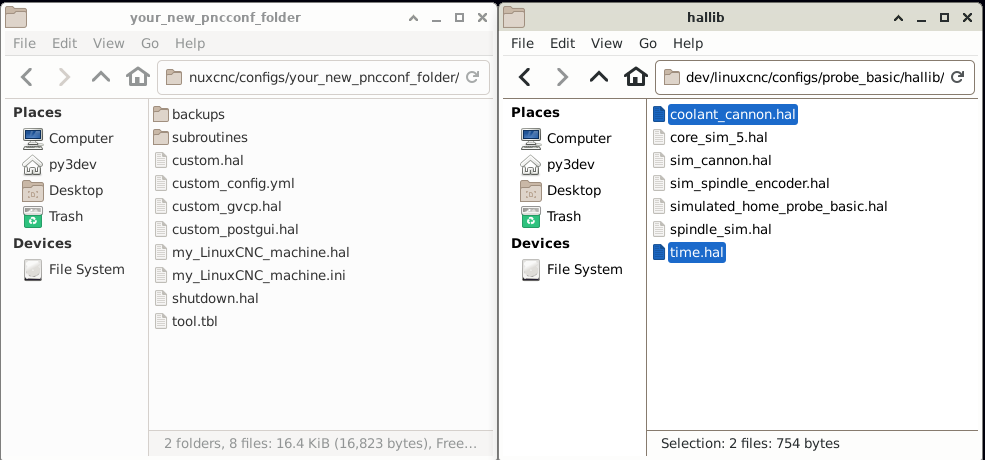
Step 4: In the probe_basic config folder, open the hallib folder. Copy over the two highlighted files shown in the image below to the new Pncconfig folder.

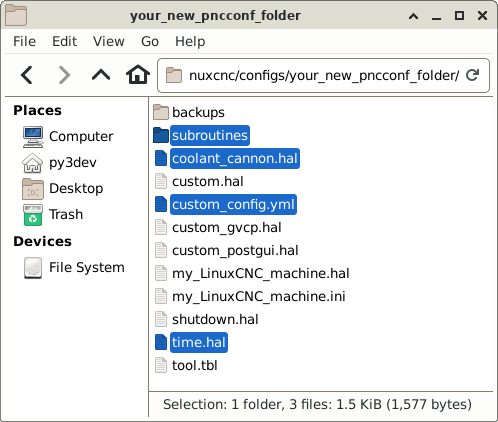
Your new Pncconf folder should now look like this and have the required files in it:

Step 5: Editing the ini and hal files for probe basic requirements. In your text editor, open the new machine config ini file. In the example it is named my_linuxCNC_machine.ini Save the file attached below and open in a second text editor:
File Attachment:File Name: pncconf_to...7-23.ini
File Size:2 KB
[EMC]
MACHINE = (your_machine_name_here)
[DISPLAY]
DISPLAY = probe_basic
CONFIG_FILE = custom_config.yml
FULLSCREEN = True
OPEN_FILE = /home/(your_pc_name_here)/linuxcnc/nc_files/pb_examples/blank.ngc
MAX_FEED_OVERRIDE = 2.000000
MAX_SPINDLE_OVERRIDE = 2.000000
MIN_SPINDLE_OVERRIDE = 0.500000
INTRO_TIME = 1
PROGRAM_PREFIX = /home/(your_pc_name_here)/linuxcnc/nc_files
INCREMENTS = JOG .1in .01in .001in .0001in ***JOG adds the jog button to the increments line in Probe Basic***
[ATC]
# ***If using an ATC, uncomment POCKETS line and add your pocket count***
# Carousel image available for 8, 10, 12, 14, 16, 18, 20, 21, 24
#POCKETS = 12
[PYTHON]
# ***leave the following commented out unless you are using the ATC macros***
#TOPLEVEL = /home/(your_machine_name_here)/linuxcnc/configs/(your_config_folder_name_here)/python/toplevel.py
#PATH_APPEND = /home/(your_machine_name_here)/linuxcnc/configs/(your_config_folder_name_here)/python/
#LOG_LEVEL = 8
[RS274NGC]
RS274NGC_STARTUP_CODE = F10 S300 G20 G17 G40 G49 G54 G64 P0.001 G80 G90 G91.1 G92.1 G94 G97 G98
FEATURES = 30
PROGRAM_PREFIX = ~/linuxcnc/nc_files
PARAMETER_FILE = linuxcnc.var
SUBROUTINE_PATH = /home/(your_pc_name_here)/linuxcnc/configs/(your_config_folder_name_here)/subroutines/
# ***ATC tool change use, uncomment the following remapped M codes at bottom of [RS274NGC] section ***
#REMAP=M6 modalgroup=6 prolog=change_prolog ngc=toolchange epilog=change_epilog
#REMAP=M10 modalgroup=6 argspec=p ngc=m10
#REMAP=M11 modalgroup=6 argspec=p ngc=m11
#REMAP=M12 modalgroup=6 argspec=p ngc=m12
#REMAP=M13 modalgroup=6 ngc=m13
#REMAP=M21 modalgroup=6 ngc=m21
#REMAP=M22 modalgroup=6 ngc=m22
#REMAP=M23 modalgroup=6 ngc=m23
#REMAP=M24 modalgroup=6 ngc=m24
#REMAP=M25 modalgroup=6 ngc=m25
#REMAP=M26 modalgroup=6 ngc=m26
[EMCMOT]
COMM_WAIT = 0.010
[HAL]
HALUI = halui
HALFILE = (your_config_halfile_name_here).hal
#HALFILE = coolant_cannon.hal ***leave commented out unless using programmable coolant nozzle***
POSTGUI_HALFILE = time.hal
[TRAJ]
AXES = 5 ***this line sets probe basics DRO axes display count, set as required for your machine***
COORDINATES = X Y Z A B
This file contains the required ini entries that are missing or different from the Pncconf ini file for running probe basic. Copy each section or edit the appropriate lines that are there but are different to the appropriate section on the Pncconf ini. note that there are sections that require editing for paths specific to your machine computer name and your machine configuration folder name. Be sure to exchange the placeholder text with your unique path information so the files can be found at startup. Once complete save the ini file.
NOTE*** only copy the ATC Remap section if you have a machine ready to be configured for the atc, otherwise leave it off the new config ini file.
Step 6: Editing the hal file. In the text editor, open your Pncconf hal file, show in the example as my_linuxCNC_machine.hal. Probe basic uses dio and aio for its various subroutines and macros, the count of these needs to be added to the hal file by editing/adding to the line as shown in the below image:

As long as the information you entered in the Pncconf config builder is correct, this should now give you a working probe basic installation that will run your machine.
if you find any issues, please report them so we can make corrections!
Thanks all!
Chris
Step 1: Successfully install probe basic and be able to open the probe basic simulation without errors. This guide is for the stable version of Linuxcnc 2.8 and Debian 10 Buster. Installation instructions can be found here:
kcjengr.github.io/probe_basic/quick_start.html
Step 2: Create a configuration for your machine using Pncconf from the linuxcnc menu in the applications drop down in the upper menu bar. It is recommended to use the Axis gui display for this initial build. You should have your machine's wiring schematic premade to make filling in the required information fast, easy and accurate in Pncconf.
After you have completed the Pncconf configuration builder and have created a new machine configuration that has been saved in the linuxcnc config directory, it is advised that you start linuxcnc using your new config to verify there are no errors. It is also advisable to test the machine to verify the base functionality is correct, for example, jogging, spindle function, axis motion is as expected and the commanded distance matches the actual distance moved, and any other sort any gremlins prior to making the switch to probe basic. This will ensure when you transition it goes smoothly. Once completed and found to function correctly, you can proceed to step 3.
Step 3: In the Linuxcnc config folder, there should now be a config folder from the output of Pncconf, there should also be the probe_basic config folder. Both will be used for copying required files over to the new machine config folder. Open two windows in the file tree, the new Pncconf folder and the probe_basic config folder. Copy the highlighted files shown below from the probe basic config folder to the Pncconf config folder.

Step 4: In the probe_basic config folder, open the hallib folder. Copy over the two highlighted files shown in the image below to the new Pncconfig folder.

Your new Pncconf folder should now look like this and have the required files in it:

Step 5: Editing the ini and hal files for probe basic requirements. In your text editor, open the new machine config ini file. In the example it is named my_linuxCNC_machine.ini Save the file attached below and open in a second text editor:
File Attachment:File Name: pncconf_to...7-23.ini
File Size:2 KB
[EMC]
MACHINE = (your_machine_name_here)
[DISPLAY]
DISPLAY = probe_basic
CONFIG_FILE = custom_config.yml
FULLSCREEN = True
OPEN_FILE = /home/(your_pc_name_here)/linuxcnc/nc_files/pb_examples/blank.ngc
MAX_FEED_OVERRIDE = 2.000000
MAX_SPINDLE_OVERRIDE = 2.000000
MIN_SPINDLE_OVERRIDE = 0.500000
INTRO_TIME = 1
PROGRAM_PREFIX = /home/(your_pc_name_here)/linuxcnc/nc_files
INCREMENTS = JOG .1in .01in .001in .0001in ***JOG adds the jog button to the increments line in Probe Basic***
[ATC]
# ***If using an ATC, uncomment POCKETS line and add your pocket count***
# Carousel image available for 8, 10, 12, 14, 16, 18, 20, 21, 24
#POCKETS = 12
[PYTHON]
# ***leave the following commented out unless you are using the ATC macros***
#TOPLEVEL = /home/(your_machine_name_here)/linuxcnc/configs/(your_config_folder_name_here)/python/toplevel.py
#PATH_APPEND = /home/(your_machine_name_here)/linuxcnc/configs/(your_config_folder_name_here)/python/
#LOG_LEVEL = 8
[RS274NGC]
RS274NGC_STARTUP_CODE = F10 S300 G20 G17 G40 G49 G54 G64 P0.001 G80 G90 G91.1 G92.1 G94 G97 G98
FEATURES = 30
PROGRAM_PREFIX = ~/linuxcnc/nc_files
PARAMETER_FILE = linuxcnc.var
SUBROUTINE_PATH = /home/(your_pc_name_here)/linuxcnc/configs/(your_config_folder_name_here)/subroutines/
# ***ATC tool change use, uncomment the following remapped M codes at bottom of [RS274NGC] section ***
#REMAP=M6 modalgroup=6 prolog=change_prolog ngc=toolchange epilog=change_epilog
#REMAP=M10 modalgroup=6 argspec=p ngc=m10
#REMAP=M11 modalgroup=6 argspec=p ngc=m11
#REMAP=M12 modalgroup=6 argspec=p ngc=m12
#REMAP=M13 modalgroup=6 ngc=m13
#REMAP=M21 modalgroup=6 ngc=m21
#REMAP=M22 modalgroup=6 ngc=m22
#REMAP=M23 modalgroup=6 ngc=m23
#REMAP=M24 modalgroup=6 ngc=m24
#REMAP=M25 modalgroup=6 ngc=m25
#REMAP=M26 modalgroup=6 ngc=m26
[EMCMOT]
COMM_WAIT = 0.010
[HAL]
HALUI = halui
HALFILE = (your_config_halfile_name_here).hal
#HALFILE = coolant_cannon.hal ***leave commented out unless using programmable coolant nozzle***
POSTGUI_HALFILE = time.hal
[TRAJ]
AXES = 5 ***this line sets probe basics DRO axes display count, set as required for your machine***
COORDINATES = X Y Z A B
This file contains the required ini entries that are missing or different from the Pncconf ini file for running probe basic. Copy each section or edit the appropriate lines that are there but are different to the appropriate section on the Pncconf ini. note that there are sections that require editing for paths specific to your machine computer name and your machine configuration folder name. Be sure to exchange the placeholder text with your unique path information so the files can be found at startup. Once complete save the ini file.
NOTE*** only copy the ATC Remap section if you have a machine ready to be configured for the atc, otherwise leave it off the new config ini file.
Step 6: Editing the hal file. In the text editor, open your Pncconf hal file, show in the example as my_linuxCNC_machine.hal. Probe basic uses dio and aio for its various subroutines and macros, the count of these needs to be added to the hal file by editing/adding to the line as shown in the below image:

As long as the information you entered in the Pncconf config builder is correct, this should now give you a working probe basic installation that will run your machine.
if you find any issues, please report them so we can make corrections!
Thanks all!
Chris
Attachments:
Last edit: 23 Jul 2022 19:59 by Lcvette.
The following user(s) said Thank You: Roguish, billykid, TurBoss, tommylight, sharp_reaper, harindugamlath, Masiwood123, spumco, RobertS, alberto.tyra
Please Log in or Create an account to join the conversation.
- tommylight
-

- Away
- Moderator
-

Less
More
- Posts: 21297
- Thank you received: 7273
22 Jan 2022 23:14 #232842
by tommylight
Replied by tommylight on topic Py2 - Probe Basic Config Conversion Doc Lcnc 2.8
Very nice, thank you.
Now if only i could finish my mini mill ...
Now if only i could finish my mini mill ...
The following user(s) said Thank You: Lcvette
Please Log in or Create an account to join the conversation.
- SimonCNC123
- Offline
- Junior Member
-

Less
More
- Posts: 31
- Thank you received: 5
03 Feb 2023 08:45 - 03 Feb 2023 08:46 #263582
by SimonCNC123
Replied by SimonCNC123 on topic Py2 - Probe Basic Config Conversion Doc Lcnc 2.8
Thanks very much for that. Just one quick comment, in the .ini file example, where you say 'your_pc_name_here', don't you actually mean your user name?
Last edit: 03 Feb 2023 08:46 by SimonCNC123.
Please Log in or Create an account to join the conversation.
- tommylight
-

- Away
- Moderator
-

Less
More
- Posts: 21297
- Thank you received: 7273
03 Feb 2023 12:56 #263596
by tommylight
Replied by tommylight on topic Py2 - Probe Basic Config Conversion Doc Lcnc 2.8
Yes, user name.
PC name can can be something else, and is used mostly for networking.
PC name can can be something else, and is used mostly for networking.
Please Log in or Create an account to join the conversation.
- Lcvette
-
 Topic Author
- Offline
- Moderator
-

Less
More
- Posts: 1575
- Thank you received: 739
05 Feb 2023 16:26 #263756
by Lcvette
Replied by Lcvette on topic Py2 - Probe Basic Config Conversion Doc Lcnc 2.8
The name listed in your file directory that is unique to your machine.
Please Log in or Create an account to join the conversation.
- Lcvette
-
 Topic Author
- Offline
- Moderator
-

Less
More
- Posts: 1575
- Thank you received: 739
08 Mar 2023 17:04 #266126
by Lcvette
Replied by Lcvette on topic Py2 - Probe Basic Config Conversion Doc Lcnc 2.8
Tommy, is there a way to change the title without going through an edit? it seems if you use the edit function the entire post's formatting grenades into chaos. /o\ seems to take 3 hours to make a decent doc and 2.5 hours of that are fixing formatting issues and holy cow if you have to go back in for an edit your done for... 
Please Log in or Create an account to join the conversation.
- tommylight
-

- Away
- Moderator
-

Less
More
- Posts: 21297
- Thank you received: 7273
08 Mar 2023 17:54 #266131
by tommylight
Replied by tommylight on topic Py2 - Probe Basic Config Conversion Doc Lcnc 2.8
Only admins and mods can change the tittle for the topic, users can only change the tittle for the post they made.
What should the tittle be?
-
As a side note, you should really change the project name!
What should the tittle be?
-
As a side note, you should really change the project name!
Please Log in or Create an account to join the conversation.
- Lcvette
-
 Topic Author
- Offline
- Moderator
-

Less
More
- Posts: 1575
- Thank you received: 739
08 Mar 2023 18:30 #266135
by Lcvette
Replied by Lcvette on topic Py2 - Probe Basic Config Conversion Doc Lcnc 2.8
I am a mod but couldnt change the name..
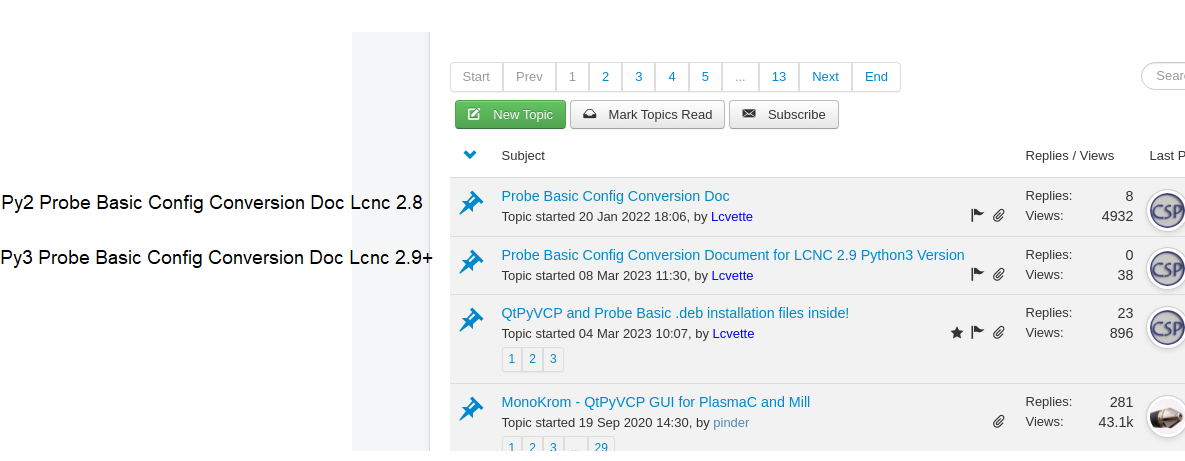
Python2 - Probe Basic Config Conversion Doc
Python2 - Probe Basic Config Conversion Doc
Please Log in or Create an account to join the conversation.
- Lcvette
-
 Topic Author
- Offline
- Moderator
-

Less
More
- Posts: 1575
- Thank you received: 739
08 Mar 2023 18:32 #266136
by Lcvette
Replied by Lcvette on topic Py2 - Probe Basic Config Conversion Doc Lcnc 2.8
and if you could the other one i just posted earlier today could you change it to
Python3 - Probe Basic Config Conversion Doc
that way they are easier to find which one you need
Python3 - Probe Basic Config Conversion Doc
that way they are easier to find which one you need
Please Log in or Create an account to join the conversation.
- Lcvette
-
 Topic Author
- Offline
- Moderator
-

Less
More
- Posts: 1575
- Thank you received: 739
08 Mar 2023 19:41 #266140
by Lcvette
Replied by Lcvette on topic Py2 - Probe Basic Config Conversion Doc Lcnc 2.8
Attachments:
Please Log in or Create an account to join the conversation.
Moderators: KCJ, Lcvette
Time to create page: 0.288 seconds

