Retrofitting 5 axis Willemin W400 with LinuxCNC
- chris@cnc
- Offline
- Platinum Member
-

Less
More
- Posts: 529
- Thank you received: 140
08 Feb 2022 21:54 #234356
by chris@cnc
You are right. Looking 3 times in the bearing catalog and write it wrong down. I'm sorry.
P4 bearings are super high precession bearings or spindle bearings and super high precession expensive.
But over 12K rpm you still need this type. Otherwise, you get horrible noise or vibrations.
And important preload is outer ring to inner ring. Somehow you have to fix the spindle core in the housing. And should not bend your bearing in any direction.
Replied by chris@cnc on topic Retrofitting 5 axis Willemin W400 with LinuxCNC
Thank you Todd.I'm pretty sure that P4 is more precise than P5. (P5 is considered standard precision and P4 is high precision.)
You are right. Looking 3 times in the bearing catalog and write it wrong down. I'm sorry.
P4 bearings are super high precession bearings or spindle bearings and super high precession expensive.
But over 12K rpm you still need this type. Otherwise, you get horrible noise or vibrations.
And important preload is outer ring to inner ring. Somehow you have to fix the spindle core in the housing. And should not bend your bearing in any direction.
Please Log in or Create an account to join the conversation.
- MrK
- Offline
- Junior Member
-

Less
More
- Posts: 27
- Thank you received: 8
08 Feb 2022 23:19 #234363
by MrK
I still think the bearing pairs should be in a back to back configuration in my spindle. cant really see how the bearings would stay in place if not with available parts.
/MrK
Replied by MrK on topic Retrofitting 5 axis Willemin W400 with LinuxCNC
Interesting! Thanks! The colored one looks a bit similar to my spindle and has a tandem arrangement. I suppose though the difference here is that there are two distance "retention pipes", one for each race.Good evening, I found a diagram of spindle with oblique bearings + some other examples
I still think the bearing pairs should be in a back to back configuration in my spindle. cant really see how the bearings would stay in place if not with available parts.
/MrK
Please Log in or Create an account to join the conversation.
- MrK
- Offline
- Junior Member
-

Less
More
- Posts: 27
- Thank you received: 8
09 Feb 2022 00:31 #234366
by MrK
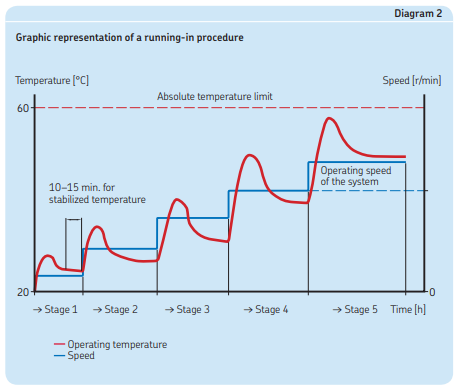
I do not know really how bad it is that one of my bearing pairs is P5 (the mysterious Koyo bearings). I see similar specs. for rpm also for P5 bearings. I should, as you say, check temperature and go slow. In fact I think the 18000 rpm in a back to back configuration with grease is a bit on the edge for my bearings.
If I will have to run the spindle slower, at the moment that is not the end of the world. The machine is right now a "brick" and priority is to get it up and running. If (I mean when...) I do get the machine fully operational then buying some higher grade bearings (still old stock from e-bay I would presume) would be an investment.
The run in process you describe is very similar to what I read about. like in picture below.
/MrK
Replied by MrK on topic Retrofitting 5 axis Willemin W400 with LinuxCNC
Yes indeed. But while P5 might be normal for spindles it is two tolerance classes above what at least SKF uses as "normal" tolerance.I'm pretty sure that P4 is more precise than P5. (P5 is considered standard precision and P4 is high precision.)
I do not know really how bad it is that one of my bearing pairs is P5 (the mysterious Koyo bearings). I see similar specs. for rpm also for P5 bearings. I should, as you say, check temperature and go slow. In fact I think the 18000 rpm in a back to back configuration with grease is a bit on the edge for my bearings.
If I will have to run the spindle slower, at the moment that is not the end of the world. The machine is right now a "brick" and priority is to get it up and running. If (I mean when...) I do get the machine fully operational then buying some higher grade bearings (still old stock from e-bay I would presume) would be an investment.
The run in process you describe is very similar to what I read about. like in picture below.
/MrK
Attachments:
Please Log in or Create an account to join the conversation.
- MrK
- Offline
- Junior Member
-

Less
More
- Posts: 27
- Thank you received: 8
09 Feb 2022 00:53 #234367
by MrK
Replied by MrK on topic Retrofitting 5 axis Willemin W400 with LinuxCNC
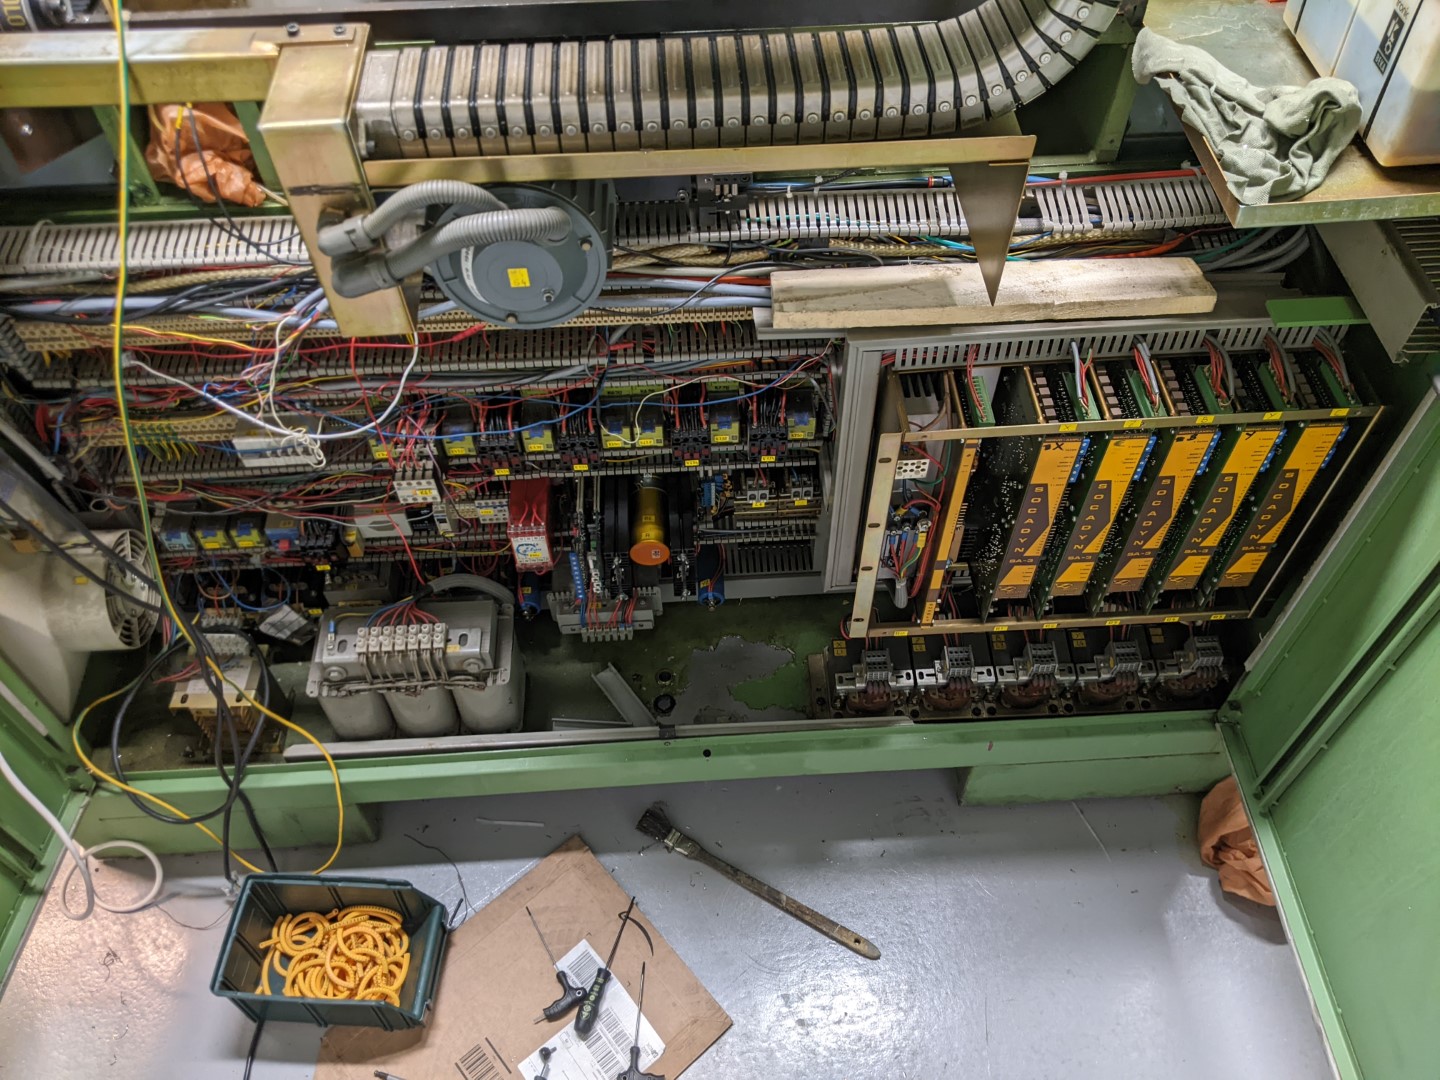
...and this is what it looks like inside the cabinet.
SOCADYN SA-3 servo amplifiers.
Anyone who has any kind of documentation for these drivers?
I suspect one of them is damaged. I can only move the B-axis (head tilt) in one direction. I have to move it in the other direction by hand. My guess is that it maybe (?) is one leg of the H-bridge that is damaged.
I suppose I really should replace the electrolytic capacitors. Both in servo drivers and other places.
/MrK
Attachments:
Please Log in or Create an account to join the conversation.
- billykid
-

- Offline
- Platinum Member
-

Less
More
- Posts: 470
- Thank you received: 80
10 Feb 2022 16:47 #234492
by billykid
Replied by billykid on topic Retrofitting 5 axis Willemin W400 with LinuxCNC
Hello
a friend of mine bought a willemin identical to yours. there is no documentation of those drives, we have repaired one that crashed due to high current. but it's not a mosfet or igbt or bjt drive but a scr! 3 scr double semikron ... we found one defective and as soon as it was replaced it started working fine again.
to tell the truth it doesn't seem like this to me, you can try to see if the analog command voltage arrives.
if my friend still has pictures of the open drive I post them.
Please Log in or Create an account to join the conversation.
- MrK
- Offline
- Junior Member
-

Less
More
- Posts: 27
- Thank you received: 8
11 Feb 2022 07:35 #234554
by MrK
Ok, so it is an SCR drive. Same but different... I am pretty sure the analog voltage arrives because I can drive it in one direction but it could be that this is the case. It could off course also be that the analog command is getting there but the analog drive is corupting the negative portion due to some error.
Base don experience my guess is that it is either a bad soldering, a capacitor or a driver transistor/SCR. Will find out when I open it up... (I hope...)
Is your friend using the NUM-control or converting it? Any other findings from this machine? Would be great if you could get your friend to pay a visit to this thread.
/MrK
Replied by MrK on topic Retrofitting 5 axis Willemin W400 with LinuxCNC
That is very interesting. Someone else having the same machine and been fixing the drives.Hello
a friend of mine bought a willemin identical to yours. there is no documentation of those drives, we have repaired one that crashed due to high current. but it's not a mosfet or igbt or bjt drive but a scr! 3 scr double semikron ... we found one defective and as soon as it was replaced it started working fine again.
to tell the truth it doesn't seem like this to me, you can try to see if the analog command voltage arrives.
if my friend still has pictures of the open drive I post them.
Ok, so it is an SCR drive. Same but different... I am pretty sure the analog voltage arrives because I can drive it in one direction but it could be that this is the case. It could off course also be that the analog command is getting there but the analog drive is corupting the negative portion due to some error.
Base don experience my guess is that it is either a bad soldering, a capacitor or a driver transistor/SCR. Will find out when I open it up... (I hope...)
Is your friend using the NUM-control or converting it? Any other findings from this machine? Would be great if you could get your friend to pay a visit to this thread.
/MrK
Please Log in or Create an account to join the conversation.
- MrK
- Offline
- Junior Member
-

Less
More
- Posts: 27
- Thank you received: 8
11 Feb 2022 12:18 #234566
by MrK
Replied by MrK on topic Retrofitting 5 axis Willemin W400 with LinuxCNC
Hi!
I have started to think through the spindle assembly.
I plan to make three press tools to be able to put in the new bearings and assemble the spindle. I have attached an animation showing the assembly order.... Any comments are most welcome.
I need to make the toolings. After that I also have "lint free" paper towels on the shopping list. Then I should be good to go, I think...
/MrK
Please Log in or Create an account to join the conversation.
- billykid
-

- Offline
- Platinum Member
-

Less
More
- Posts: 470
- Thank you received: 80
11 Feb 2022 12:53 #234567
by billykid
Replied by billykid on topic Retrofitting 5 axis Willemin W400 with LinuxCNC
My friend got the original numerical control working for now but wanted to change it later with mesa cards. I asked him if he can find the photos but it's been at least four years that will be difficult. we do not live very close, the drive was in current limitation we tried to lubricate guides but it was not a mechanical problem ... so we swapped the drive with another and the defect passed to the other axis. after a few days he decided to open it and he sent me the photos, I told him the measures to do and he found a shorted scr. he ordered and assembled it by himself. less than a month ago my phone died irremediably and with it the photos. I would try the reference if it is right then if you open it and post the photos I will gladly help you. for my friend it's a very busy time he doesn't want distractions. sorry for bad english i use translator. regards Mauro
Please Log in or Create an account to join the conversation.
- OT-CNC
- Offline
- Platinum Member
-

Less
More
- Posts: 617
- Thank you received: 75
13 Feb 2022 22:07 #234762
by OT-CNC
Replied by OT-CNC on topic Retrofitting 5 axis Willemin W400 with LinuxCNC
I would (again I'm no spindle expert) put the ac bearings on the spindle shaft first (the 2 at the nose), press the rear ones into the housing, then assemble the shaft to the housing. This would help guide it in straight. You can preheat the bearings that go on the shaft. I have used bathroom heater lamps for that which work great. Set the bearing on the lamp for a few minutes and monitor the temps. They may just slip onto the shaft if you're lucky and let that cool . Then you can preheat the housing and lightly press together. I don't recommend chilling/freezing. Condensation can form and ruin the assembly.
Please Log in or Create an account to join the conversation.
- MrK
- Offline
- Junior Member
-

Less
More
- Posts: 27
- Thank you received: 8
14 Feb 2022 18:08 #234845
by MrK
Replied by MrK on topic Retrofitting 5 axis Willemin W400 with LinuxCNC
Thanks for the feedback!
The assembly order in the animation was aiming at never having any press force going through the balls.
However, while that might be a good idea when forces are high maybe that doesn't make sense in this case. In fact I think I will do as you suggest.
I did some tests with one of the old bearings. There is a press fit between bearing and spindle body. Won't slide in. However I tried to heat up the body. Maybe to 60C. It was warm but not hot to the touch. At this temperature the bearing was sliding in position (I quickly took it out but I could see that it works).
On the shaft the bearings have no press fit or very light press fit. I can slide them on with my hands.
In fact with heating of only the spindle body I can probably do as you suggested and get it all in place without press toolings... Saves some time to not have to make the tools...
Get your point about cooling. On my adventures trying to get the "nose nut" lose (before I found out it was a left hand thread) in one of my attempts I heated the body and cooled the nut with dry ice. Lots of condensation on the nut.
/MrK
Please Log in or Create an account to join the conversation.
Moderators: piasdom
Time to create page: 0.168 seconds


