Compact Keyboard Control Console...
- Waldemar
-
 Topic Author
- Offline
- Junior Member
-

Less
More
- Posts: 34
- Thank you received: 11
20 Aug 2023 13:00 - 20 Aug 2023 13:03 #278543
by Waldemar
Compact Keyboard Control Console... was created by Waldemar
Hello all, just thought I'd share my new toy. I'll eventually get around to building my own 28 key compact keyboard, but thought I'd try out this AliExpress programmable (via a web portal) mechanical keyboard in the meantime.
www.aliexpress.com/item/1005004556641317.html
I've got it set up in the following way:

...and when the FN1 key is depressed (bottom left) it functions like so:

So it's a little cumbersome to begin with, but once key positions have been memorised (or keycaps uv printed onto) it's just fine - and a million times better than a pendant..!!
There's also a 24 key version available, but the way I use LinuxCNC I kinda need 28 keys to cover all I do when setting work up at the machine, which is why I'll persevere on my 28 key non-layered self-build.
Wal.
www.aliexpress.com/item/1005004556641317.html
I've got it set up in the following way:
...and when the FN1 key is depressed (bottom left) it functions like so:
So it's a little cumbersome to begin with, but once key positions have been memorised (or keycaps uv printed onto) it's just fine - and a million times better than a pendant..!!
There's also a 24 key version available, but the way I use LinuxCNC I kinda need 28 keys to cover all I do when setting work up at the machine, which is why I'll persevere on my 28 key non-layered self-build.
Wal.
Last edit: 20 Aug 2023 13:03 by Waldemar.
The following user(s) said Thank You: tommylight, Clive S
Please Log in or Create an account to join the conversation.
- Waldemar
-
Topic Author
- Offline
- Junior Member
-
Less
More
- Posts: 34
- Thank you received: 11
30 Aug 2023 22:35 - 30 Aug 2023 22:39 #279421
by Waldemar
Replied by Waldemar on topic Compact Keyboard Control Console...
Had a play around with a 24 key version of the programmable keyboard and I think I've got it working as completely as I need it to when setting work up on the router bed:
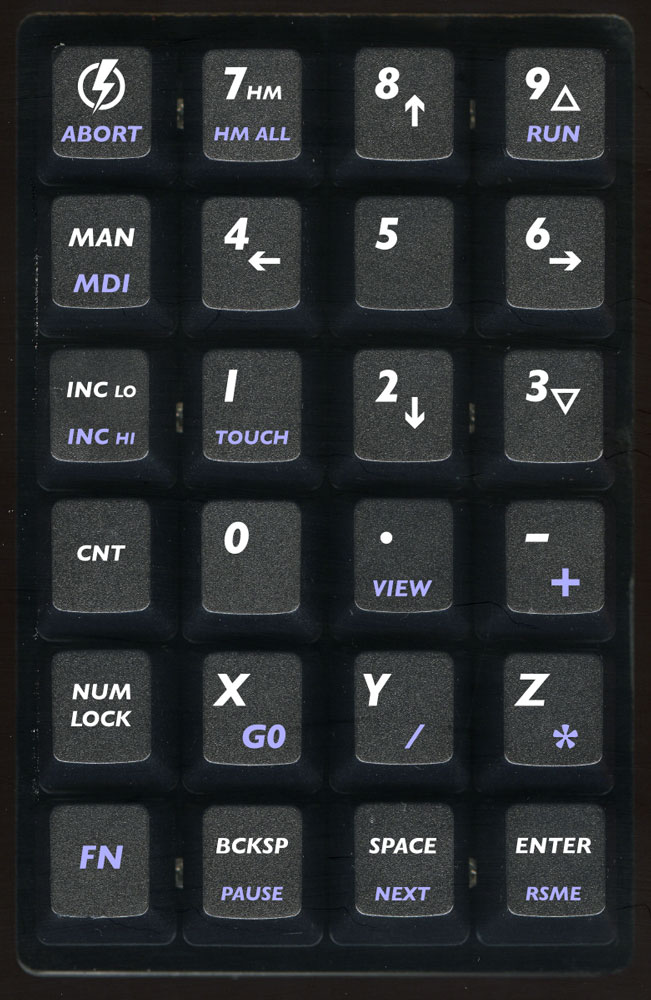
I'll get this UV printed onto the keycaps once my local print guy comes back off his vacation. Also attached is a hi-res jpeg with details of what each key does. It's pretty straightforward, but I'm including it here for the sake of completeness.
I've intentionally left the keys around the RUN command empty to avoid any sausage fingered execution of the program BUT if I were to put an extra couple of keys in under the FN1 mode then they would be:
Left Cursor = decrease feed over-ride
Right Cursor = increase feed over-ride
(Currently this is via the standard KB 1 thru 0 keys)
I found a file over on Industry Arena by a fella called John B that details how to change the key bindings.
It's an OLD post (made over ten years ago). Is this still relevant info, or best avoided?
Here's the contents of the .doc:
Well it took little bit to figure out but is actually pretty simple. I wound up mapping the "%" and "^" keys for incrementally increasing and decreasing the feed override. I figure I'll post what I did so that someone else that wants to do something similar can see how I did it.
What I wound up doing is modifying the "axis" file which was located in the \usr\bin directory. My installation was from the live CD, so if you installed differently I suppose the "axis" file could be somewhere else. I had to change the permissions on the file in order to edit it. First copy the unmodified file to another location and change the permissions. Do the following:
1- open a terminal window (applications/accessories/terminal)
2- type cd /usr/bin to get to the directory containing "axis"
3- type cp axis ~/Desktop/axis This will create a copy on your desktop
4- type ls -l axis (this will list the permissions at the front, mine showed -rwxr-xr-x indicating no write permissions for group and others.
5- change the permissions by typing sudo chmod 777 axis (this will give everyone read, write and execute permissions on the file.
6- you will be asked for your password - enter it.
7- type ls -l axis again. The permission string should read -rwxrwxrwx
8- close the terminal window
Now that the permissions are changed and a safe copy made, you can navigate to the file and open it for editing.
1- click Places/Home Folder to open a file browser window
2- click the up arrow at the top bar twice to get to the root directory of the drive
3- click the usr folder icon then the bin folder icon
4- scroll down and double-click the "axis" file
5- a window will pop up asking if you want to "Run in terminal" or "display". Select "Display".
6- The "axis" file should now be open in an editor window.
Below is the code I added to the file. I added it just above the set_feedrate function. You can search for the function by using the search tool in the editor and using def set_feedrate(n) as the search string.
############################################################
################### Added by John B ########################
### This is the stuff I added to create two keyboard ###
### shortcuts to incrementally increase or decrease ###
### the feed override parameter in EMC2. ###
############################################################
# initialize new global variable for feedrate control
myfeedrate = 100
# create keyboard bindings for % and ^ keys. These bindings
# pass a value of -1 or 1 to the new function "feedup"
root_window.bind("%", lambda event: feedup(-1))
root_window.bind("^", lambda event: feedup(1))
# The new function "feedup" which either incrementally
# increases or decreases the value of the "myfeedrate"
# global variable, and sends the new value to the existing
# function "set_feedrate"
def feedup(n):
global myfeedrate
if n==1:
myfeedrate=myfeedrate+1
if myfeedrate>max_feed_override:
myfeedrate=max_feed_override # keep value less than max override
set_feedrate(myfeedrate)
else:
myfeedrate=myfeedrate-1
if myfeedrate<0:
myfeedrate=0 # keep value greater than 0%
set_feedrate(myfeedrate)
############################################################
### End of code Added by John B ###
############################################################
I also had to add a couple lines to the existing set_feedrate function itself in order to keep the feed override from jumping about if you use the predefined keyboard shortcuts (~,1...9,0), along with the new incremental feed override adjustment keys.
def set_feedrate(n):
global myfeedrate # added by John B
myfeedrate=n # added by John B
widgets.feedoverride.set(n)
At this point save the file and run EMC2. You should be able to adjust the feed override using the % (shift-5) and ^ (shift-6) keys. You can map any keys you like to this by changing what is in the quotes in the lines that start with root_window.bind, but remember that many of the keys on the keyboard are already mapped by default. I chose "%" and "^" because they had no pre-existing mapping.
Hope this helps someone out.
John B
Last edit: 30 Aug 2023 22:39 by Waldemar.
The following user(s) said Thank You: Clive S, ContinenteCNC
Please Log in or Create an account to join the conversation.
Time to create page: 0.118 seconds