Installing on RPi with GPIO and software stepping
- 109jb
- Offline
- Premium Member
-

Less
More
- Posts: 97
- Thank you received: 15
02 Dec 2022 21:42 - 02 Dec 2022 22:00 #258371
by 109jb
Installing on RPi with GPIO and software stepping was created by 109jb
Hello,
I am currently using LinuxCNC on an Orange Pi on one of my machines which is mostly successful, and I always like experimenting and trying new things. I would like to try a Raspberry Pi using software stepping through the GPIO as in the video I found which is presented below. The video indicates that 10 kHz step rates are the minimum, but 10 kHz will actually be fine for the machine I intend to put this on. If not, I can always add a MESA card later but would like to try GPIO stepping first.
I have been able to successfully implement LinuxCNC for my CNC projects in x86 and Orange Pi, but am really a Linux amateur. I only really use Linux on those CNC machines and have a SBC with Linux to play with but that's about it.
For these reasons, I would like the easiest path possible and I have done some searching but could probably spend a year reading all the RPi related posts. The questions I have before diving in are:
- Have read that certain RPi variants don't play well with LinuxCNC. Which one is most likely to provide success for me? From my research it seems like a RPi4 4GB might be a solid choice.
- Does the downloadable LinuxCNC image for RPi support the GPIO right out of the box? Of course I know it will require machine specific hal file definitions, but other than machine specific stuff will the SD image work?
- I have also found some supporting documents like the hal_pi_gpio_demo.hal file, and an Italian pdf that I translated but would appreciate any other pointers for this endeavour.
Thanks in advance
John Brannen
Last edit: 02 Dec 2022 22:00 by 109jb.
Please Log in or Create an account to join the conversation.
- andypugh
-

- Offline
- Moderator
-

Less
More
- Posts: 19770
- Thank you received: 4600
05 Dec 2022 00:09 #258540
by andypugh
Replied by andypugh on topic Installing on RPi with GPIO and software stepping
I think that the Pi4 4GB should work. You might want to look at the 64-bit image here rather than the 32-bit one on the LinuxCNC website.
forum.linuxcnc.org/9-installing-linuxcnc...cnc?start=150#253623
forum.linuxcnc.org/9-installing-linuxcnc...cnc?start=150#253623
Please Log in or Create an account to join the conversation.
- elovalvo
- Offline
- Elite Member
-

Less
More
- Posts: 205
- Thank you received: 127
07 Dec 2022 16:33 #258816
by elovalvo
Replied by elovalvo on topic Installing on RPi with GPIO and software stepping
If you have already used Linuxcnc I think this link
forum.linuxcnc.org/9-installing-linuxcnc...-io-pins-only#203365
and the attached file may be useful for you
forum.linuxcnc.org/9-installing-linuxcnc...-io-pins-only#203365
and the attached file may be useful for you
Attachments:
Please Log in or Create an account to join the conversation.
- elovalvo
- Offline
- Elite Member
-

Less
More
- Posts: 205
- Thank you received: 127
22 Dec 2022 18:14 - 25 Dec 2022 09:02 #260086
by elovalvo
Replied by elovalvo on topic Installing on RPi with GPIO and software stepping
To try to meet those who want to use LinuxCNC a Raspberry Pi 4 via GPIO only I can describe my approach, starting from which many variants can be studied.
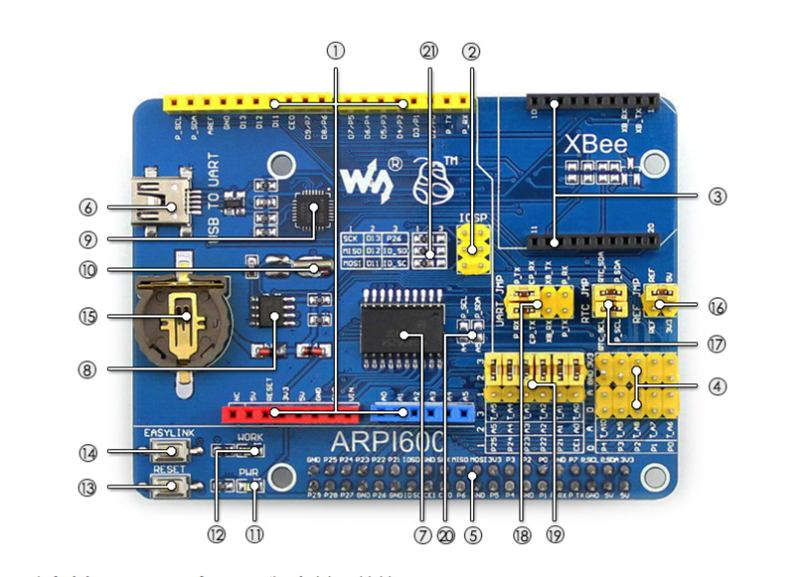
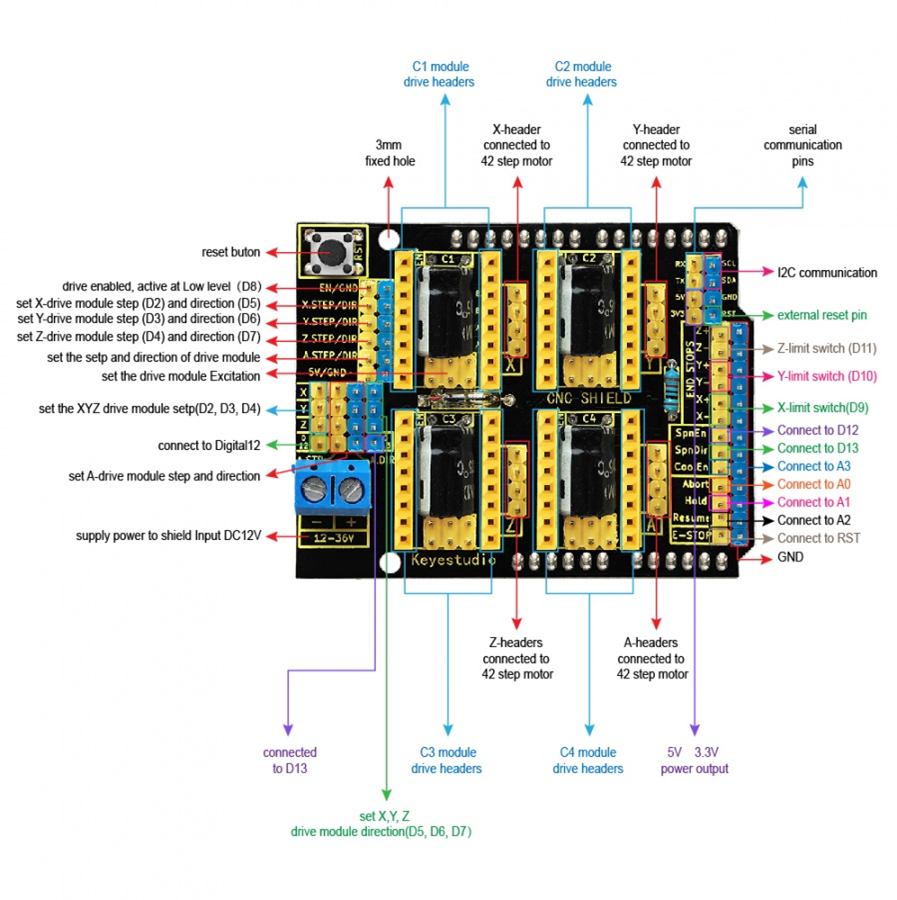
For convenience and in view of future expansions, rather than a classic breadboard where to connect the stepper motor drivers and other devices (limit switches, spindle relay and coolant) I preferred to use an ARPI600 board
(it.aliexpress.com/item/1005004137466369.html)
The choice of the ARPI600 is also linked to the fact that this board supports Arduino shields, including the CNCShield, which is widely used for driving mini milling machines via the GRBL protocol.
(it.aliexpress.com/item/1005002807506440.html)
However, nothing prevents you from connecting the CNCShield pins to the Raspberry pins without the ARPI600.
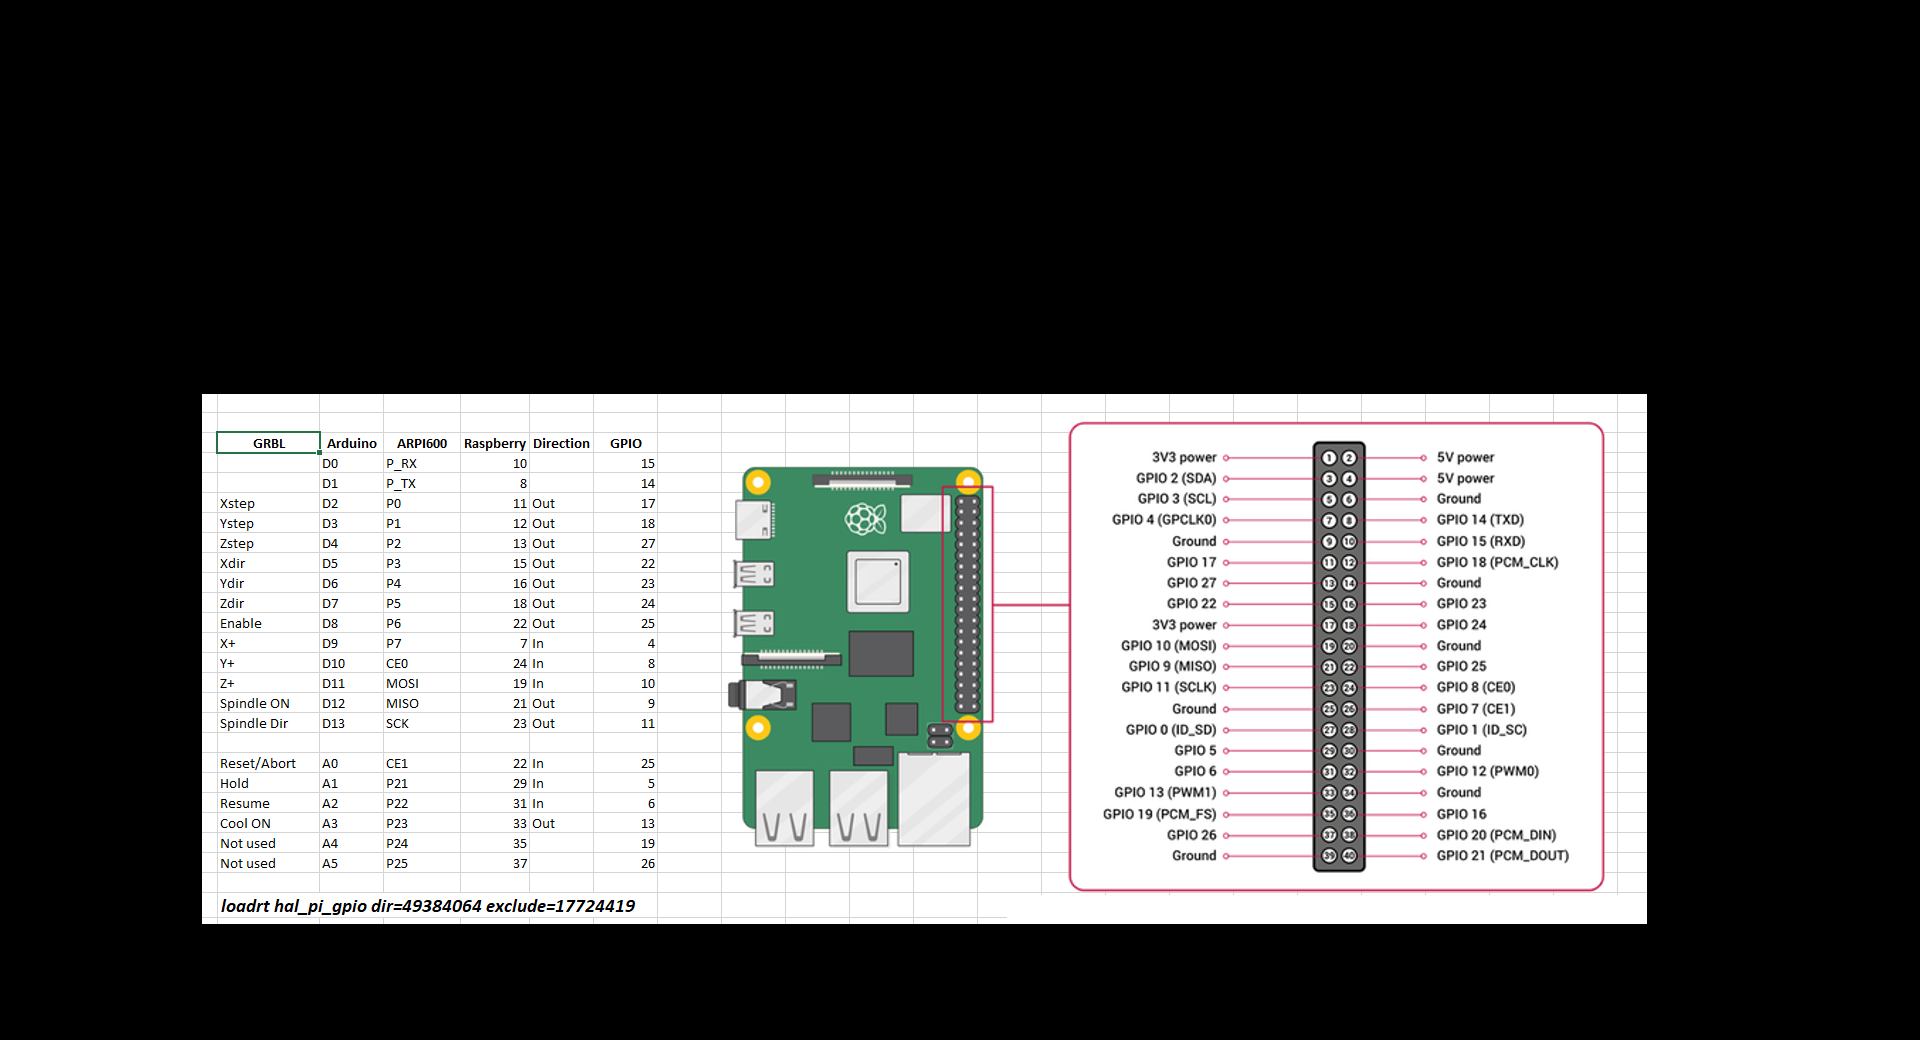
For this configuration (ARPI600 + CNCShield) the pins used are the following:
First you need to identify which pins of the raspberry will be used as input and output to define the command loadrt hal_pi_gpio.
For this you can use the rpi4_gpio utility (github.com/jethornton/rpi_gpio)
The arm64 version is available here (forum.linuxcnc.org/18-computer/43353-rpi4-hal-question?start=10)
Once this is done, you need to initialize the pins with the raspi-gpio command.
At this point, to verify the connections before using LinuxCNC, I used the following HAL program:
with the command
halrun -I -f test_arpi600.hal
In this file the values of period1 and period2 are chosen conservatively but can be varied in relation to the latency values.
Similarly the position-cmd values must be adjusted in relation to the step/rev values of the motor and the microsteps to which the drivers are configured.
At this point at the halrun prompt it is possible to verify the operation of the motors in position via various commands like:
sets X-pos 3
sets Y-pos 2
sets Z-pos -1
Also you can check the operation of the relays with commands as:
sets COOL True
sets SPINDLE 1
Finally, the operation of the switches is visible with the halmeter.
If everything works, you can configure LinuxCNC with the files in the arpi600.zip attachment :
Just copy the arpi600 folder in the linuxcnc/configs folder to find it in the LinuxCNC menus
In any case it is my intention to prepare soon an image with all these files ready for use
Attachments:
Last edit: 25 Dec 2022 09:02 by elovalvo.
The following user(s) said Thank You: andypugh
Please Log in or Create an account to join the conversation.
- kannonballer
- Offline
- New Member
-

Less
More
- Posts: 1
- Thank you received: 0
03 Mar 2023 13:30 #265776
by kannonballer
Replied by kannonballer on topic Installing on RPi with GPIO and software stepping
How were you able to implement LinuxCNC on your Orange PI?
Please Log in or Create an account to join the conversation.
- rufino
- Offline
- New Member
-

Less
More
- Posts: 5
- Thank you received: 0
17 Jan 2024 01:34 #290921
by rufino
Replied by rufino on topic Installing on RPi with GPIO and software stepping
Is a working image of linuxcnc using gpio already available?
Please Log in or Create an account to join the conversation.
- rodw
-

- Away
- Platinum Member
-

Less
More
- Posts: 11613
- Thank you received: 3907
17 Jan 2024 09:39 #290932
by rodw
It works for the Pi 4 & Pi 5 (the 5 may need different pin values)
Replied by rodw on topic Installing on RPi with GPIO and software stepping
Yes, refer to the Drivers section in the 2.9 docs for the gpiod driverIs a working image of linuxcnc using gpio already available?
It works for the Pi 4 & Pi 5 (the 5 may need different pin values)
Please Log in or Create an account to join the conversation.
- andypugh
-

- Offline
- Moderator
-

Less
More
- Posts: 19770
- Thank you received: 4600
17 Jan 2024 11:44 #290943
by andypugh
Replied by andypugh on topic Installing on RPi with GPIO and software stepping
Yes: www.linuxcnc.org/downloads/Is a working image of linuxcnc using gpio already available?
Please Log in or Create an account to join the conversation.
- masawee
- Offline
- Senior Member
-

Less
More
- Posts: 56
- Thank you received: 0
19 Dec 2025 19:11 #340313
by masawee
Replied by masawee on topic Installing on RPi with GPIO and software stepping
but were is rpi 3 and 4 linuxcnc os.
Please Log in or Create an account to join the conversation.
- tommylight
-

- Away
- Moderator
-

Less
More
- Posts: 21157
- Thank you received: 7224
19 Dec 2025 21:31 #340321
by tommylight
Replied by tommylight on topic Installing on RPi with GPIO and software stepping
No RPI3 image, for RPI4 and RPI5 see here
www.linuxcnc.org/iso/
www.linuxcnc.org/iso/
Please Log in or Create an account to join the conversation.
Time to create page: 0.232 seconds


