30XP hand torch into a Machine torch - Conversion
- JTknives
-
 Topic Author
- Offline
- Elite Member
-

Less
More
- Posts: 243
- Thank you received: 32
03 Jun 2019 17:37 #135766
by JTknives
30XP hand torch into a Machine torch - Conversion was created by JTknives
First up I am not telling you to do this, the power these machines can put out is lethal. I am just showing how I modified my torch. I do not claim to be an expert or know what I am doing. Only reason i am posting this is because there is a lack of information about converting hand torches.
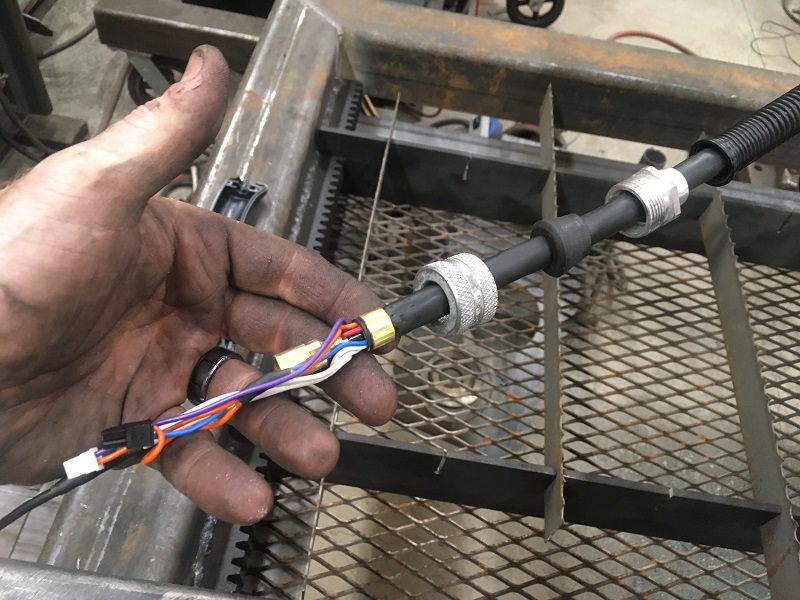
So lets begin at the beginning. Inside the plastic handle is whats called a "main body" and it looks like this.
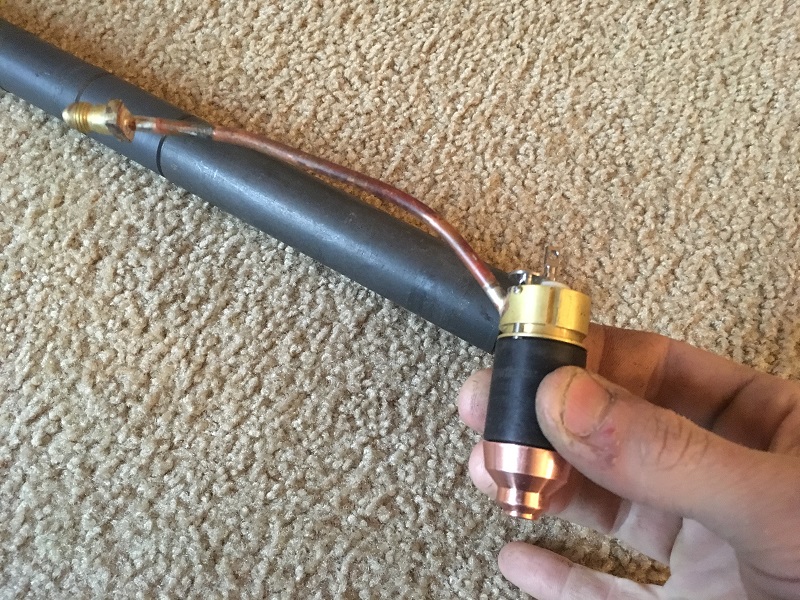
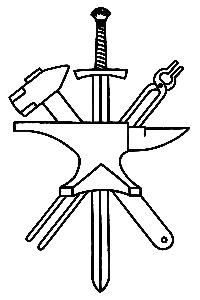
As you can see the troublesome bit is the air line coming off the side. But not to worry, it's soft copper and will move easily. I was vary careful as I bent it because copper will work harden if you keep bending it over and over.

I then made a collar out of plastic that pressed over the main body and had a notch for the gas line. At this point I realized the tubing was not going to clear the outside of the bushing. I used a tiny hammer and gently flattened the hump. I knew I could only go so far before I completely pinched off the inside opening. But I had already come this far so no turning back now. In hind sight I should have chosen a larger tube for my body and made the bushing larger in diameter. Reason I went this small was because I was shooting for the standard machine torch body diameter of 1.3125"

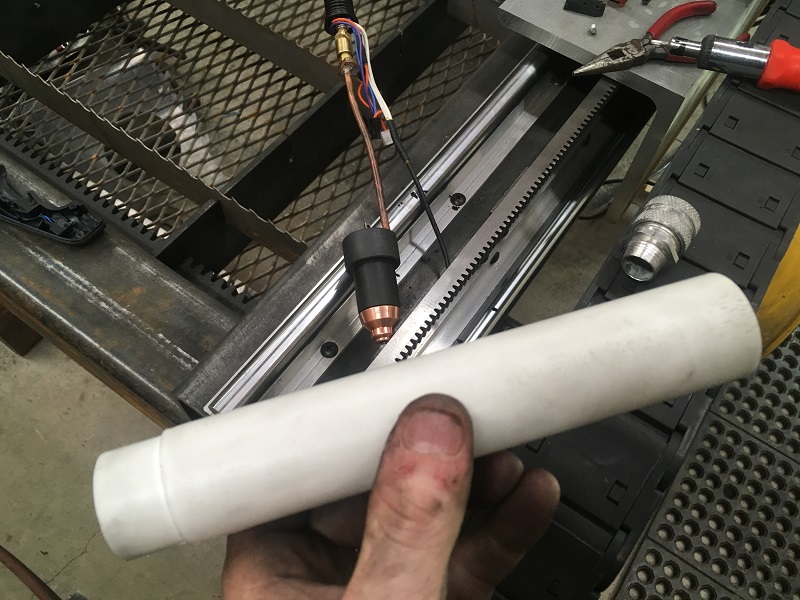
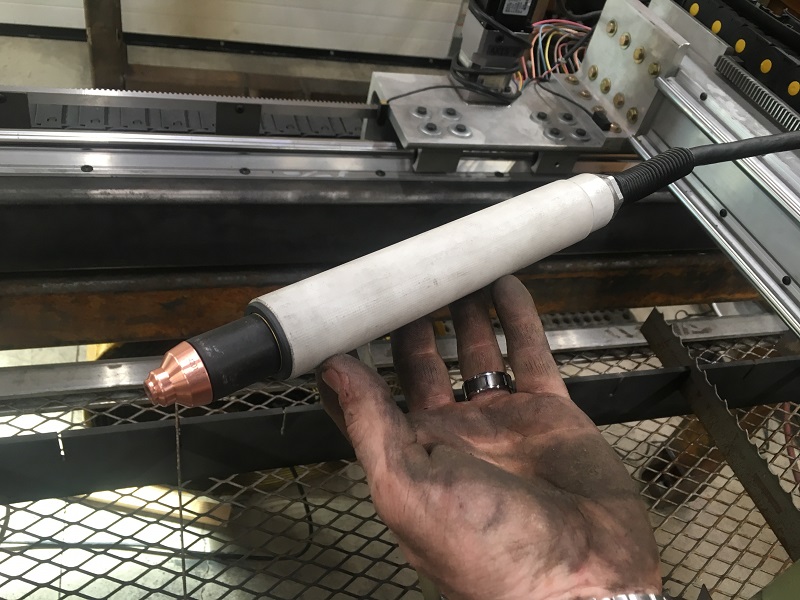
Next was to get the torch body tube cut to length. The tubing I used was a plastic leg for one of those cheep shelves. It had a 1.25" ID and a 1.3125" OD, was light weight and fit perfect. I kept the step down area that's designed to fit into another tube section for cable lead retention.
Now time to get into the meat and potatoes of the torch. I had a cable retention fitting that uses a rubber grommet so all that went on first. You will notice it went on backwards, there is a reason for that.
Now on to the wires. The center pin on the main body is arc voltage so keep that in mind. The wire attaches with a screw and a lock nut. I made sure the wire was sticking straight back because that pin can turn. I did not want it to turn and get closer to the air line coming in. I then taped the arc wire to the gas line. When you take apart the torch you will see that its taped just like this. The center pin on the main body moves back every time the torch fires. So you need some flex in the wire to take up this movement without stressing the wire. You will also notice I installed a jumper between 2 wires. This jumper closes the switch that detects when you remove the consumables. There was no way that I could keep this switch in my set up. For us its not a problem because we turn the plasma cutter off before changing consumables. Never trust any electronic device with your safety EVER. It is dangerous because I have removed a safety interlock. I think its less dangerous because there is no external firing switch on the machine torch like there is on a hand torch that you could trigger while changing out consumables.
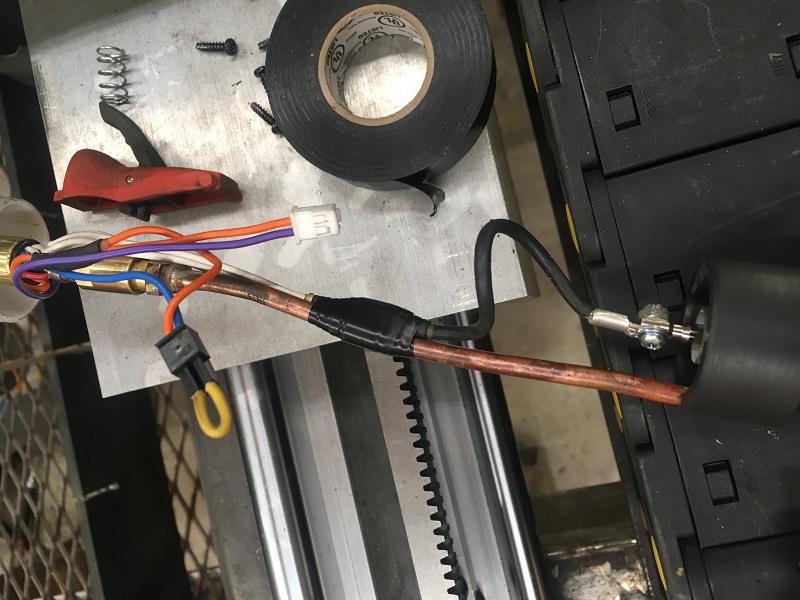
"I added this diode after I built the machine torch but It would be done at this time in the build process."
Here I tied into the red wire which is crimped to the gas line. This is the positive wire that goes to the nozzle to start the arc. The 30XP is a blow back start so the tip of the electrode touches the inside of the nozzle and when you fire the torch there is voltage that heads down the red wire and back up the the electrode. The gas now separates the electrode from the nozzle by pushing the electrode back which strikes the arc. This is why the center arc pin on the main body moves back when fired. The electrode pushes against this spring loaded pin. What this diode and wire is allowing me to do is ohmic right off the nozzle. When using fine cut consumables the nozzle sticks out past the shield. Fine cut nozzle is designed to be touching the steel or just off of it.

I will continue this on the next post
So lets begin at the beginning. Inside the plastic handle is whats called a "main body" and it looks like this.
As you can see the troublesome bit is the air line coming off the side. But not to worry, it's soft copper and will move easily. I was vary careful as I bent it because copper will work harden if you keep bending it over and over.
I then made a collar out of plastic that pressed over the main body and had a notch for the gas line. At this point I realized the tubing was not going to clear the outside of the bushing. I used a tiny hammer and gently flattened the hump. I knew I could only go so far before I completely pinched off the inside opening. But I had already come this far so no turning back now. In hind sight I should have chosen a larger tube for my body and made the bushing larger in diameter. Reason I went this small was because I was shooting for the standard machine torch body diameter of 1.3125"
Next was to get the torch body tube cut to length. The tubing I used was a plastic leg for one of those cheep shelves. It had a 1.25" ID and a 1.3125" OD, was light weight and fit perfect. I kept the step down area that's designed to fit into another tube section for cable lead retention.
Now time to get into the meat and potatoes of the torch. I had a cable retention fitting that uses a rubber grommet so all that went on first. You will notice it went on backwards, there is a reason for that.
Now on to the wires. The center pin on the main body is arc voltage so keep that in mind. The wire attaches with a screw and a lock nut. I made sure the wire was sticking straight back because that pin can turn. I did not want it to turn and get closer to the air line coming in. I then taped the arc wire to the gas line. When you take apart the torch you will see that its taped just like this. The center pin on the main body moves back every time the torch fires. So you need some flex in the wire to take up this movement without stressing the wire. You will also notice I installed a jumper between 2 wires. This jumper closes the switch that detects when you remove the consumables. There was no way that I could keep this switch in my set up. For us its not a problem because we turn the plasma cutter off before changing consumables. Never trust any electronic device with your safety EVER. It is dangerous because I have removed a safety interlock. I think its less dangerous because there is no external firing switch on the machine torch like there is on a hand torch that you could trigger while changing out consumables.
"I added this diode after I built the machine torch but It would be done at this time in the build process."
Here I tied into the red wire which is crimped to the gas line. This is the positive wire that goes to the nozzle to start the arc. The 30XP is a blow back start so the tip of the electrode touches the inside of the nozzle and when you fire the torch there is voltage that heads down the red wire and back up the the electrode. The gas now separates the electrode from the nozzle by pushing the electrode back which strikes the arc. This is why the center arc pin on the main body moves back when fired. The electrode pushes against this spring loaded pin. What this diode and wire is allowing me to do is ohmic right off the nozzle. When using fine cut consumables the nozzle sticks out past the shield. Fine cut nozzle is designed to be touching the steel or just off of it.
I will continue this on the next post
Attachments:
The following user(s) said Thank You: phillc54, chimeno, WinstonTodge
Please Log in or Create an account to join the conversation.
- JTknives
-
Topic Author
- Offline
- Elite Member
-
Less
More
- Posts: 243
- Thank you received: 32
03 Jun 2019 17:51 #135768
by JTknives
Replied by JTknives on topic 30XP hand torch into a Machine torch - Conversion
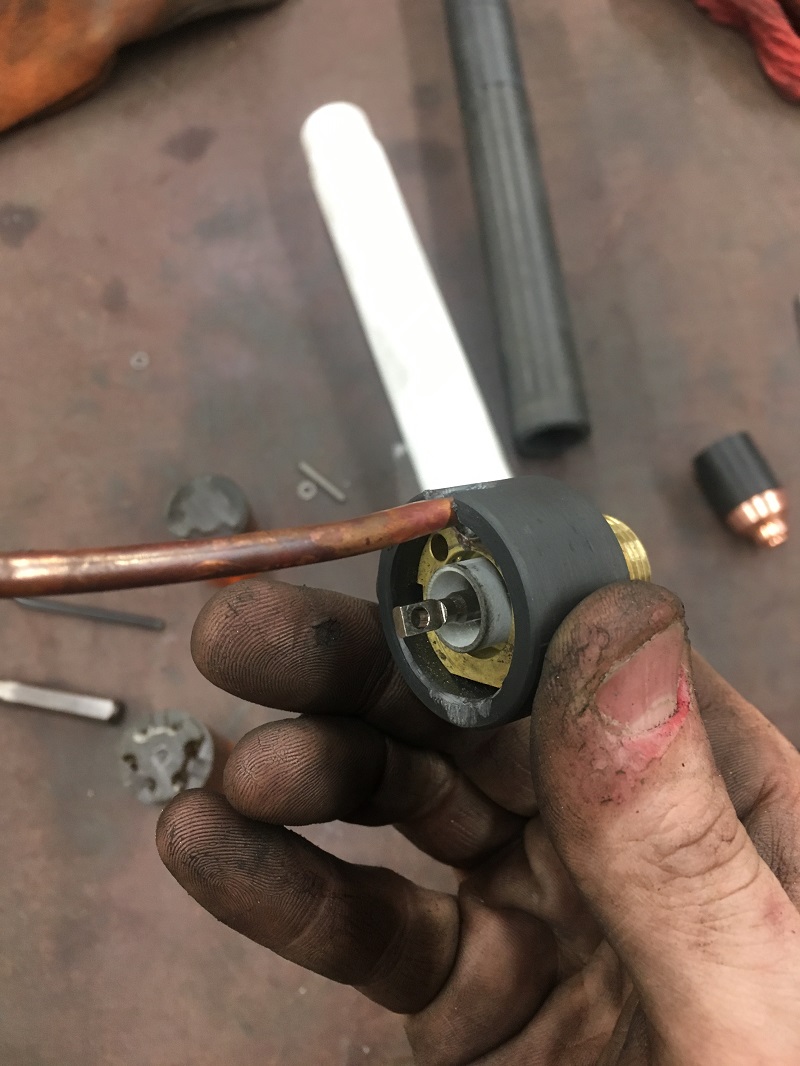
Make sure to get the tube on before connecting everything up. I put one wrap of electrical tape around the outside of the nut on the cable clamp. This made it a very snug fit inside the end of the tube.
Here is everything all buttoned up and ready to assemble. The ohmin wire was not installed at this time when I first built the torch.
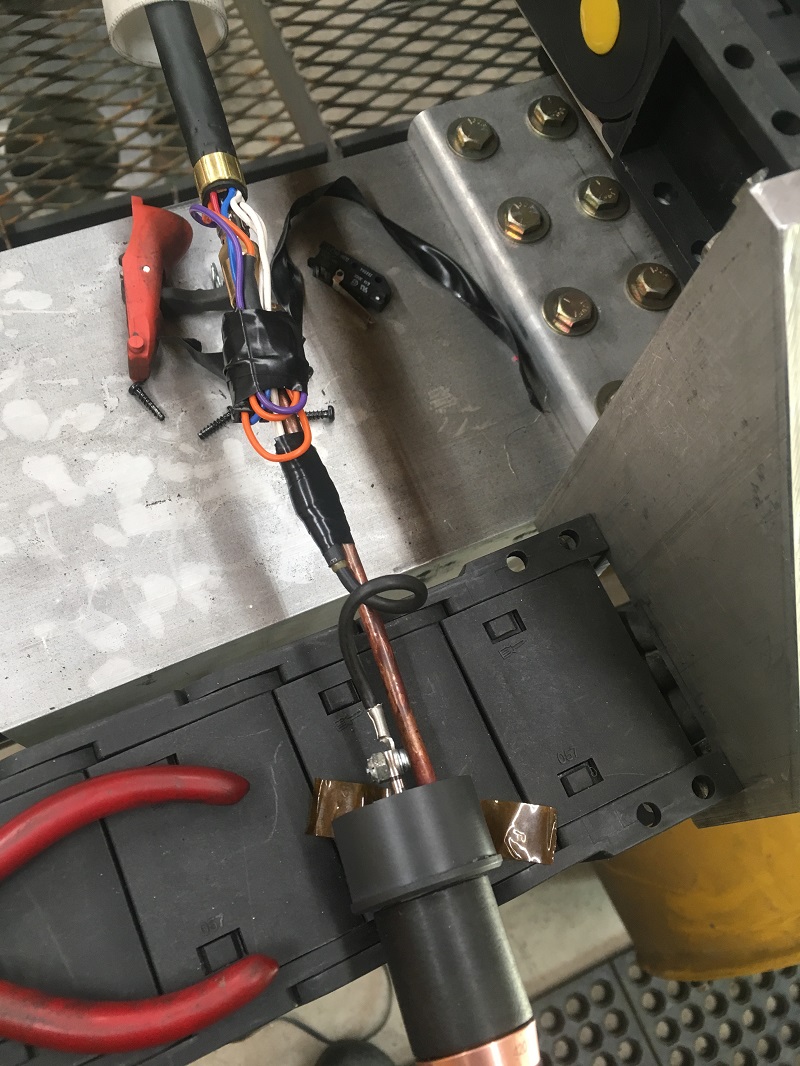
Now just push everything together and snug it down. I had to turn the plastic bushing down little as it was to big. So when i did this i left a shoulder for the tube to rest up against. you can see the shoulder in the last pic.
Here you can see why i flipped this around backwards.

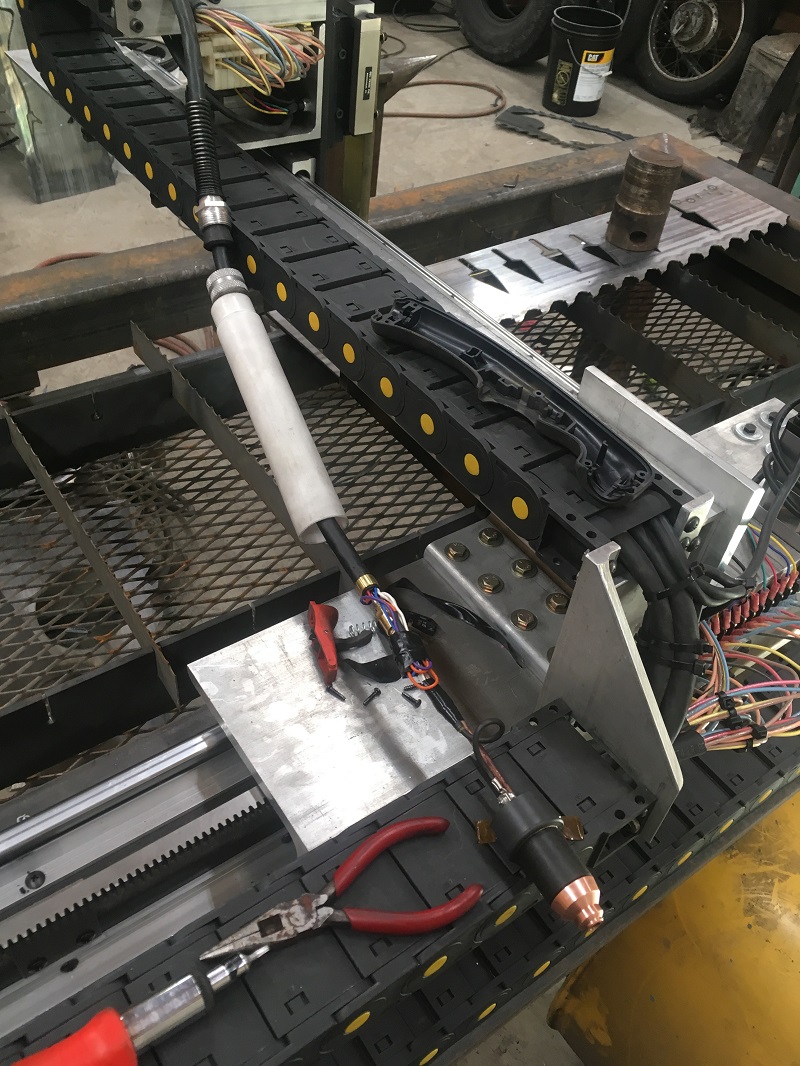
I am more then happy with the conversion and it works so good. I probably would have never converted from the hand torch but my torch lead was to short to have the handle stick out the side. I had to have it sticking out backwards under the Y axis which was dangerous as my retract wanted to smash the handle into the aluminum tubing.

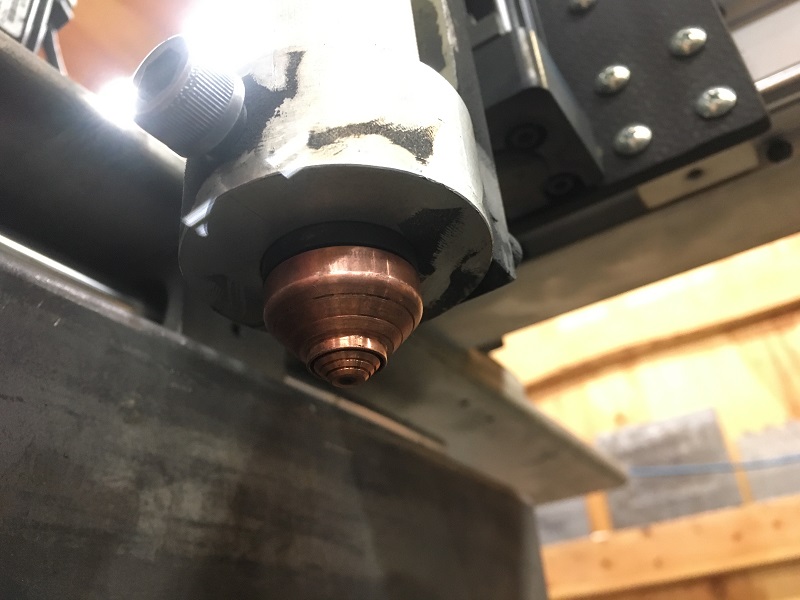
here you can see the fine cut consumable and matching gas shield. The new ohmic sensing off the nozzle works PERFECT.
Here is everything all buttoned up and ready to assemble. The ohmin wire was not installed at this time when I first built the torch.
Now just push everything together and snug it down. I had to turn the plastic bushing down little as it was to big. So when i did this i left a shoulder for the tube to rest up against. you can see the shoulder in the last pic.
Here you can see why i flipped this around backwards.
I am more then happy with the conversion and it works so good. I probably would have never converted from the hand torch but my torch lead was to short to have the handle stick out the side. I had to have it sticking out backwards under the Y axis which was dangerous as my retract wanted to smash the handle into the aluminum tubing.
here you can see the fine cut consumable and matching gas shield. The new ohmic sensing off the nozzle works PERFECT.
Attachments:
The following user(s) said Thank You: phillc54, chimeno, tommylight
Please Log in or Create an account to join the conversation.
- pl7i92
-

- Offline
- Platinum Member
-

Less
More
- Posts: 1872
- Thank you received: 358
03 Jun 2019 18:08 #135772
by pl7i92
Replied by pl7i92 on topic 30XP hand torch into a Machine torch - Conversion
cool
soldering that near to the nozzle the diod might be not the best it gets realy hot there
why dident yu use a p200 or for lower cuts a p80
that goes best with your cable set
soldering that near to the nozzle the diod might be not the best it gets realy hot there
why dident yu use a p200 or for lower cuts a p80
that goes best with your cable set
Please Log in or Create an account to join the conversation.
- islander261
- Offline
- Platinum Member
-
Less
More
- Posts: 757
- Thank you received: 216
03 Jun 2019 19:44 #135789
by islander261
Replied by islander261 on topic 30XP hand torch into a Machine torch - Conversion
JTknives
Nice job.
May I suggest the way others have solved the ohmic probing with the xp30 torch or old 45 torch was to connect a stiff piece of copper wire ( 12 or 10ga in US) to the shield with a small hoes clamp. Then use an offset to do the probing. I know this will not work with the plasmac branch but you can bend the probe so it is close to the nozzle.
I think you have the diode connected to a cool enough location, only time will tell. All of the air flow passes through that fitting so it should stay cool.
John
Please Log in or Create an account to join the conversation.
- tommylight
-

- Away
- Moderator
-

Less
More
- Posts: 21700
- Thank you received: 7417
03 Jun 2019 23:17 #135809
by tommylight
Replied by tommylight on topic 30XP hand torch into a Machine torch - Conversion
Agreed!
I think you have the diode connected to a cool enough location, only time will tell. All of the air flow passes through that fitting so it should stay cool.
John
Please Log in or Create an account to join the conversation.
Moderators: snowgoer540
Time to create page: 0.430 seconds