My attempt at a breakaway torch mount
- dlv
- Offline
- Junior Member
-

Less
More
- Posts: 35
- Thank you received: 16
06 Jan 2023 19:36 #261118
by dlv
My attempt at a breakaway torch mount was created by dlv
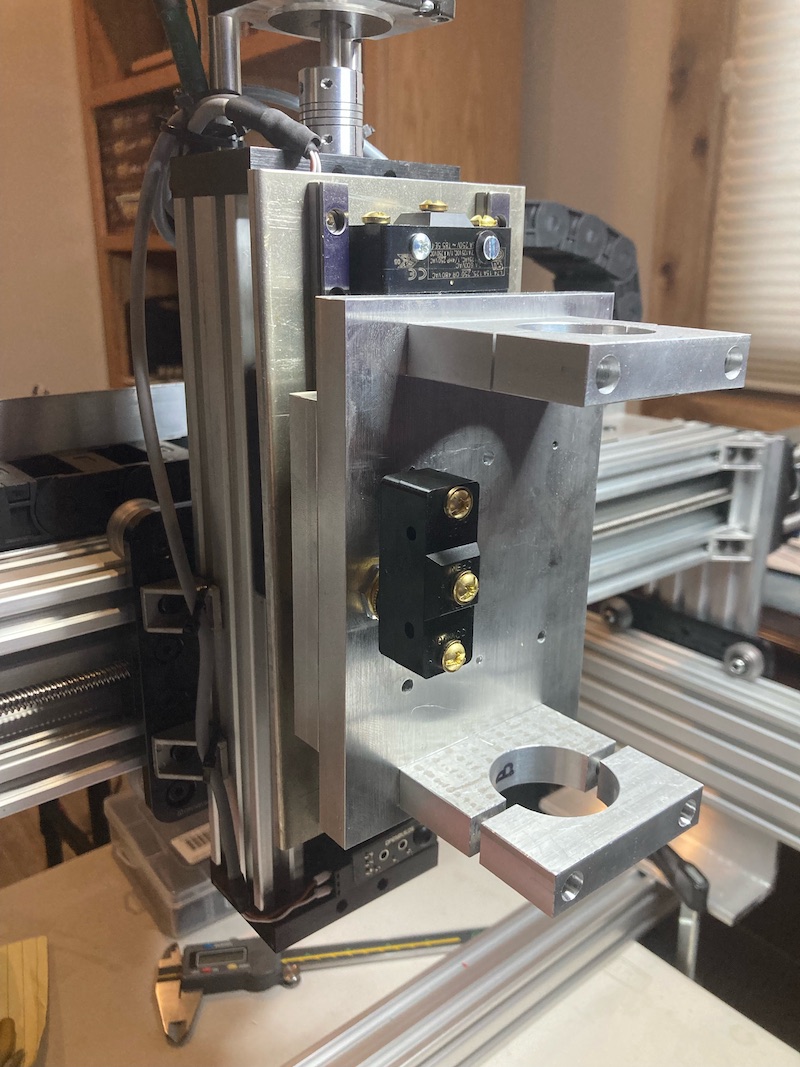
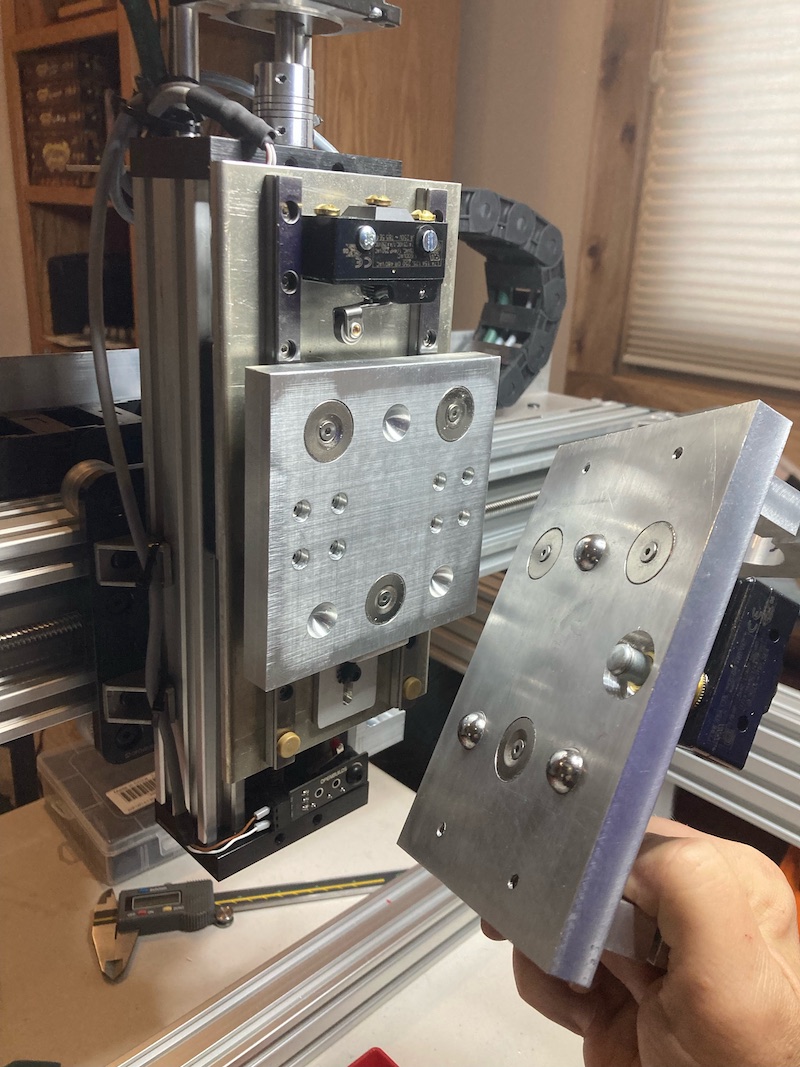
I finally got around to machining my breakaway mount and I'm pretty happy how it turned out. Thought I'd share this in case it helped someone else with a design. I kinda made this up as I went along so apologies for the lack of drawings. My mill (a restored Bridgeport) is all manual so the DRO helped a lot to ensure alignment of the ball bearings and divots. The two plates of the breakaway are 1/2" aluminum. I set the 0.500" ball bearings into a 0.001" undersized hole exactly 0.300" leaving 200 thou of protrusion. Used the Z axis DRO to set the 0.500" ball end mill depth to 0.200" and plunged it to create the divots. I got the 20x3mm magnets off Amazon and they fit perfectly in a recess I created with a 0.750" end mill and I secured them with 3mmx0.5 screws. With inverted polarity of course. You can see the probe and breakaway switches mounted but not yet wired. For reference the dimensions of the rear plate are 4"x4" and the front is 4"x6".
I was worried about the holding and breakaway force and how many magnets to use. With 3 would it even stay on? Would it be so hard to knock off to cause damage in an impact? Thankfully it worked out quite well. It snaps into place and locks in very nicely. No play and no worry about it falling off. Measuring at the torch mount brackets, the lightest is about 1.5lbs of force to knock it off in a rear impact (i.e. torch impacting moving backwards). That's the easiest due to the single magnet on the bottom. The hardest is a sideways (parallel to the gantry) impact at about 5lbs of force needed to cause the ball bearings to pop out of the divots and disengage the magnets. I'm ok with that. There will be even more leverage of course when the torch is in the mount but all forces in my tests feel light enough not to cause any damage.
I have more finishing to do, rounding off sharp corners and making it look pretty. Maybe milling out some of the excess material to lighten the assembly a bit. I'll put a short retaining cable or something to catch the breakaway from dropping hard on the table. To describe the remainder of the mount you can see the 4 holes (with 3mm screws) holding the rear breakaway face to the two mini linear rail blocks I'm using for probing and those rails are on a piece of 1/4" aluminum plate that is then mounted to the Z-axis actuator via a spacer block that provides clearance and contacts the upper limit/home switch you can't see.
The CNC portion is nearly complete. Soon I'll be welding up the table frame in the shop and moving this out of my office to start mounting it and hopefully testing some cuts! At my pace that's probably still months away! LOL
Attachments:
The following user(s) said Thank You: tommylight, rodw
Please Log in or Create an account to join the conversation.
- rodw
-

- Offline
- Platinum Member
-

Less
More
- Posts: 11557
- Thank you received: 3877
06 Jan 2023 21:43 #261127
by rodw
Replied by rodw on topic My attempt at a breakaway torch mount
Looks great!
A couple of ideas for you.
1. Think about how you could add some adjustment for float switch hysteresis. The shorter the mechanical movement, the faster probing will be!
2. The style of motor coupling you've used is easilly overpowered and will introduce backlash on the Z axis drive shaft. I had this problem and moved to an oldham style coupling to eliminate the backlash but that was pre-plasmac. Plasmac THC will probably be able to compensate for this backlash...
The following user(s) said Thank You: dlv
Please Log in or Create an account to join the conversation.
- dlv
- Offline
- Junior Member
-

Less
More
- Posts: 35
- Thank you received: 16
07 Jan 2023 00:50 #261148
by dlv
Replied by dlv on topic My attempt at a breakaway torch mount
Thanks Rod! Regarding the switch I can adjust the bottom stop (the slotted thing just below the back breakaway block) such that it will be nearly or even fully in contact with the switch. That would significantly cut down the probing movement. If I'm understanding correctly what you're referring to.
Yeah I saw in your build thread where you had to replace the couplers. If I see a problem with that I'll definitely replace them. I've read and re-read your journey on the Spaceship. When it comes time to getting the THCAD working I'm sure I'm going to have some questions about that for you.
Yeah I saw in your build thread where you had to replace the couplers. If I see a problem with that I'll definitely replace them. I've read and re-read your journey on the Spaceship. When it comes time to getting the THCAD working I'm sure I'm going to have some questions about that for you.
The following user(s) said Thank You: rodw
Please Log in or Create an account to join the conversation.
Moderators: snowgoer540
Time to create page: 0.104 seconds


