Advanced Search

Search Results (Searched for: raspberry)

16 Jul 2023 15:44

RPI4b Revision 7 not supported by HAL_PI_GIO

Category: HAL

However it would be useful to completely review the functioning of the cpuinfo.c and hal_pi_gpio module as suggested in this link www.raspberrypi.com/documentation/comput...ry-pi-revision-codes


cpuinfo.c was changed last night.
github.com/LinuxCNC/linuxcnc/commit/2cb7...602d279d0bf5aca40e26
16 Jul 2023 15:39

RPI4 Raspbian 64 bit & LinuxCNC

Category: Installing LinuxCNC

Some additional information:

I installed xrdp on the RPi.
The ifconfig terminal command outputs 3 sections; etho, lo and wlan0.
The eth0 section contains this line:

inet 192.168.0.111 netmask 255.255.255.0 broadcast 192.168.0.255

On my Windows machine I opened the Remote Desktop application, entered “192.168.0.111” in the PC name field, with username linuxcnc and password cnc.

But when I connect I only see a blue greenish empty screen.
After a couple of minutes it shows a "Connection Log" (first photo), when I click the Ok button it opens the "Login to raspberrypi" window (second photo), but entering my username/password brings me back to the empty screen for a couple of minutes, until the  "Connection Log" window appears again.


Rather than using the Windows Remote Desktop, I prefer to use MobaXterm
mobaxterm.mobatek.net/
16 Jul 2023 15:17

RPI4b Revision 7 not supported by HAL_PI_GIO

Category: HAL

The problem is that the cpuinfo.c module needs to be updated.

To temporarily overcome the problem, copy the file /proc/cpuinfo in /tmp with the following command:
cp /proc/cpuinfo /tmp/cpuinfo.txt

Edit the contents of the /tmp/cpuinfo.txt file by changing the Revision to this

Revision: c03112

and then use the following command
mount --bind /tmp/cpuinfo.txt /proc/cpuinfo

and start LinuxCNC.

However it would be useful to completely review the functioning of the cpuinfo.c and hal_pi_gpio module as suggested in this link www.raspberrypi.com/documentation/comput...ry-pi-revision-codes

Let me know what revision your new Raspberry has.
To find out  you need to type
cat /proc/cpuinfo |  grep Revision
15 Jul 2023 11:11

RPI4 Raspbian 64 bit & LinuxCNC

Category: Installing LinuxCNC

Some additional information:

I installed xrdp on the RPi.
The ifconfig terminal command outputs 3 sections; etho, lo and wlan0.
The eth0 section contains this line:

inet 192.168.0.111 netmask 255.255.255.0 broadcast 192.168.0.255

On my Windows machine I opened the Remote Desktop application, entered “192.168.0.111” in the PC name field, with username linuxcnc and password cnc.

But when I connect I only see a blue greenish empty screen.
After a couple of minutes it shows a "Connection Log" (first photo), when I click the Ok button it opens the "Login to raspberrypi" window (second photo), but entering my username/password brings me back to the empty screen for a couple of minutes, until the  "Connection Log" window appears again.


14 Jul 2023 08:29 - 14 Jul 2023 08:32

First sparks - Thanks everyone!

Category: Plasma & Laser

Last night I made my first cuts on my "home handyman" level plasma CNC table. It's still a messy experiment, but it's getting there. Thanks to everyone that helped me get to this point!

Here's a high level look at the build for the curious:
  • Raspberry Pi 4 with PREEMPT_RT kernel
  • LinuxCNC 2.9 + QtPlasmaC
  • Mesa 7i96S
  • THCAD-10 
  • Proma voltage divider
  • Reed switch for ARC_OK signal
  • 24V Meanwell motor power supply
  • 5V Meanwell logic power supply
  • Ohmic initial height sensing circuit
  • Shielded P-80 machine torch
  • 40 amp plasma cutter with HF Pilot Arc
  • Rails from OpenBuilds V-slot
  • 3D printed plates
  • Magnetic torch breakaway
  • Belt-and-pinion X and Y axis drive
  • Acme screw Z axis

    Once I can cut reliably I'll use it to make it's own aluminum plates. I also plan to swap the Raspberry Pi for an Odroid N2+ once rodw releases support for the PREEMPT_RT kernel.
12 Jul 2023 15:24

RPI4b Revision 7 not supported by HAL_PI_GIO

Category: HAL

I received a new Raspberry 4b (4Gig) and after switching it with an older one Linuxcnc refuses to start.
There is an error message that Revision 7 is not supported by HAL_PI_GPIO...

How can this be resolved?
03 Jul 2023 14:25

LinuxCNC-RIO - RealtimeIO for LinuxCNC based on FPGA (ICE40 / ECP5)

Category: Computers and Hardware

tang 9k & pi (orange & raspberry), table pick&place for test.

How about w5500 for link normal computer ?
29 Jun 2023 00:54
Replied by cakeslob on topic BOB wiring

BOB wiring

Category: Driver Boards

Hi everyone,

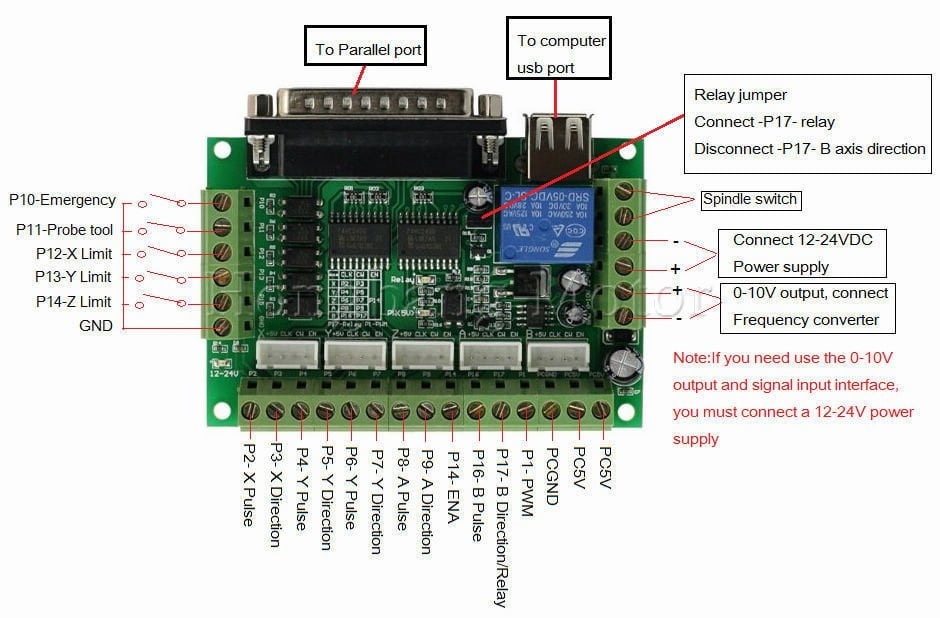
I would like to ask some questions regarding the wiring of the well known Chinese BOB, mostly referred to as something like “5 Axis CNC Breakout board MACH3” (see photo below). I will use this in combination with a Mesa 7C81.
Although some of the questions have been discussed in other topics, I have unfortunately not found a clear answer to them.

The PUL+, DIR+ and ENA+ of each motor drive is wired to the BOB PC5V.
The PUL- and DIR- are wired to the corresponding inputs on the BOB for each axis.

Question 1)
I don’t understand why the ENA- of each axis is connected to the same pin on the BOB.
Perhaps I am misunderstanding, but that means that when the motors are enabled for X or Y movements, the Z axis is automatically also enabled so it will fall down due to gravity. I guess I am wrong because otherwise everyone would run into this issue, but maybe can someone explain this?

Question 2)
To my understanding the USB port is only used to supply 5V to the BOB.
Can I use an external power supply for that? Because I don't want to risk damaging my computer (Raspberry Pi) if something goes wrong in the wiring.

Question 3)
If it is possible to use an external power supply, can that be the same 5V power supply that is used to power the Mesa 7C81? (Actually the Raspberry Pi is also powered via the Mesa card.)
This external 5V power supply shares a common ground with the 48V power supply for the stepper motors and the 24V power supply that is used for both the limit switches and the 24V input on the BOB itself.

Question 4)
It is not clear to me whether or not the BOB GND and the BOB PCGND need to be connected. Although I read about the optocouplers on the BOB, it feels strange to me not to create a common ground.


Any help would be greatly appreciated!


let me dust off the ol breakout card i used when first setting up my 7c81

Q1 - ENA is connected to all axis, so stepper drivers are turned on all at the same time, usually with machine power button. Its probably to save on i/o pins. Im not understanding exactly what you mean, but the opposite, since all axis are enabled, you would not fall on z.

q2 - yeah, go for it, should be fine

Q3 - Based on these wires, I was using GND for 12v and 5v at the time, I dont know if thats kosher or not but it looks like thats what I was doing

Q4 - I dont think I was using PCGND for anything, but you need GND for the optos
28 Jun 2023 09:52

Raspberry Pi 4 model B 4Gb RAM now available

Category: User Exchange

EuSurplus now have available a low stock (50 units) of the Raspberry Pi 4 model B 4Gb RAM:

eusurplus.com/index.php?route=product/pr...t_id=150&search=rasp

We currently also have 7c80 and 7c81 boards.
Low stock on several Mesa products, but all not in stock are ordered.
27 Jun 2023 18:52
BOB wiring was created by Stef

BOB wiring

Category: Driver Boards

Hi everyone,

I would like to ask some questions regarding the wiring of the well known Chinese BOB, mostly referred to as something like “5 Axis CNC Breakout board MACH3” (see photo below). I will use this in combination with a Mesa 7C81.
Although some of the questions have been discussed in other topics, I have unfortunately not found a clear answer to them.

The PUL+, DIR+ and ENA+ of each motor drive is wired to the BOB PC5V.
The PUL- and DIR- are wired to the corresponding inputs on the BOB for each axis.

Question 1)
I don’t understand why the ENA- of each axis is connected to the same pin on the BOB.
Perhaps I am misunderstanding, but that means that when the motors are enabled for X or Y movements, the Z axis is automatically also enabled so it will fall down due to gravity. I guess I am wrong because otherwise everyone would run into this issue, but maybe can someone explain this?

Question 2)
To my understanding the USB port is only used to supply 5V to the BOB.
Can I use an external power supply for that? Because I don't want to risk damaging my computer (Raspberry Pi) if something goes wrong in the wiring.

Question 3)
If it is possible to use an external power supply, can that be the same 5V power supply that is used to power the Mesa 7C81? (Actually the Raspberry Pi is also powered via the Mesa card.)
This external 5V power supply shares a common ground with the 48V power supply for the stepper motors and the 24V power supply that is used for both the limit switches and the 24V input on the BOB itself.

Question 4)
It is not clear to me whether or not the BOB GND and the BOB PCGND need to be connected. Although I read about the optocouplers on the BOB, it feels strange to me not to create a common ground.


Any help would be greatly appreciated!

18 Jun 2023 12:53

Installing LinuxCNC 2.9 or Master on Linux Mint 21

Category: Installing LinuxCNC

Compiling and building debs almost always worked for Mint, it just takes a bit of time.
Granted, the docs gave issues for as far as i can recall back, then again i rarely build debs.
I always aim to find the simplest way to install, so new users do not have to go through a bunch of hoops and get lost in the way.
As for Python, i really liked it ... i said liked, past tense. Now it has become a headache of huge proportions.
Now with Debian it is very easy, a single line and it is up and running.
Again, granted you do not bump into Debian messes, they also tend to do a lot of those, like, yesterday i downloaded the Hybrid ISO with Mate desktop, installed, installing LinuxCNC fails while building the kernel, but LinuxCNC installs and runs OK, without the RT kernel as it insists on having some raspi (raspberry PI) stuff despite being a 64bit AMD version. Had to delete 3 files for rpi stuff, on a 64bit AMD version!!!
After removing those files, everything works perfectly well.
Just to be clear, that is a Debian Mate issue, XFCE version does not seem to have it, and i have not tested other flavors/versions.
17 Jun 2023 22:00

Keeping Linuxcnc 2.9 current on Debian Bookworm

Category: Installing LinuxCNC

@Rod,
There is the line with 99linuxcnc-uspace that fails since there is no info on creating that file.
The installation works without it, and updates work properly.
For anyone interested in creating that file, go to Rod's howto
vmnet.com.au/linuxcnc/getting-linuxcnc.h...an_bookworm_x86_only
-
On a side note:
I HATE DEBIAN! :)
Why the hell does it have (and insists on using) Raspberry Pi stuff???
To be clear, i used the Hybrid version with Mate desktop environment, so others versions might not have this issue.
The issue:
-Installs OK
-Updates and upgrades OK
-While installing LinuxCNC, it also installs the RT kernel.
-LinuxCNC installs and works OK
-It hangs on kernel install complaining about "raspi" stuff missing
Solution:
-Open terminal
-type sudo caja
-open /etc/ folder
-Press ctrl+f and type z50*
-it will find 3 files, delete all 3
-do a sudo apt upgrade again
Everything works, so far.
15 Jun 2023 16:25
Replied by Donno on topic Schematics for 7c81

Schematics for 7c81

Category: General LinuxCNC Questions

How much to post schematics ? I have been researching the whole day and it will take me some time to design this not to mention to edit configs. I found schematics for 7i92 are the 7c81 and 7i92 close to design ? Can I replace the PI5C16211 with SN74HCT245PWR ? Do use Raspberry 4B for RS422/485 or FGPA ?

I would like 2 x Parallel port and 2 x Serial Port/Modbus ports output from the FGPA Cards
13 Jun 2023 17:11

Install GladeVCP on Raspberry Pi 4

Category: GladeVCP

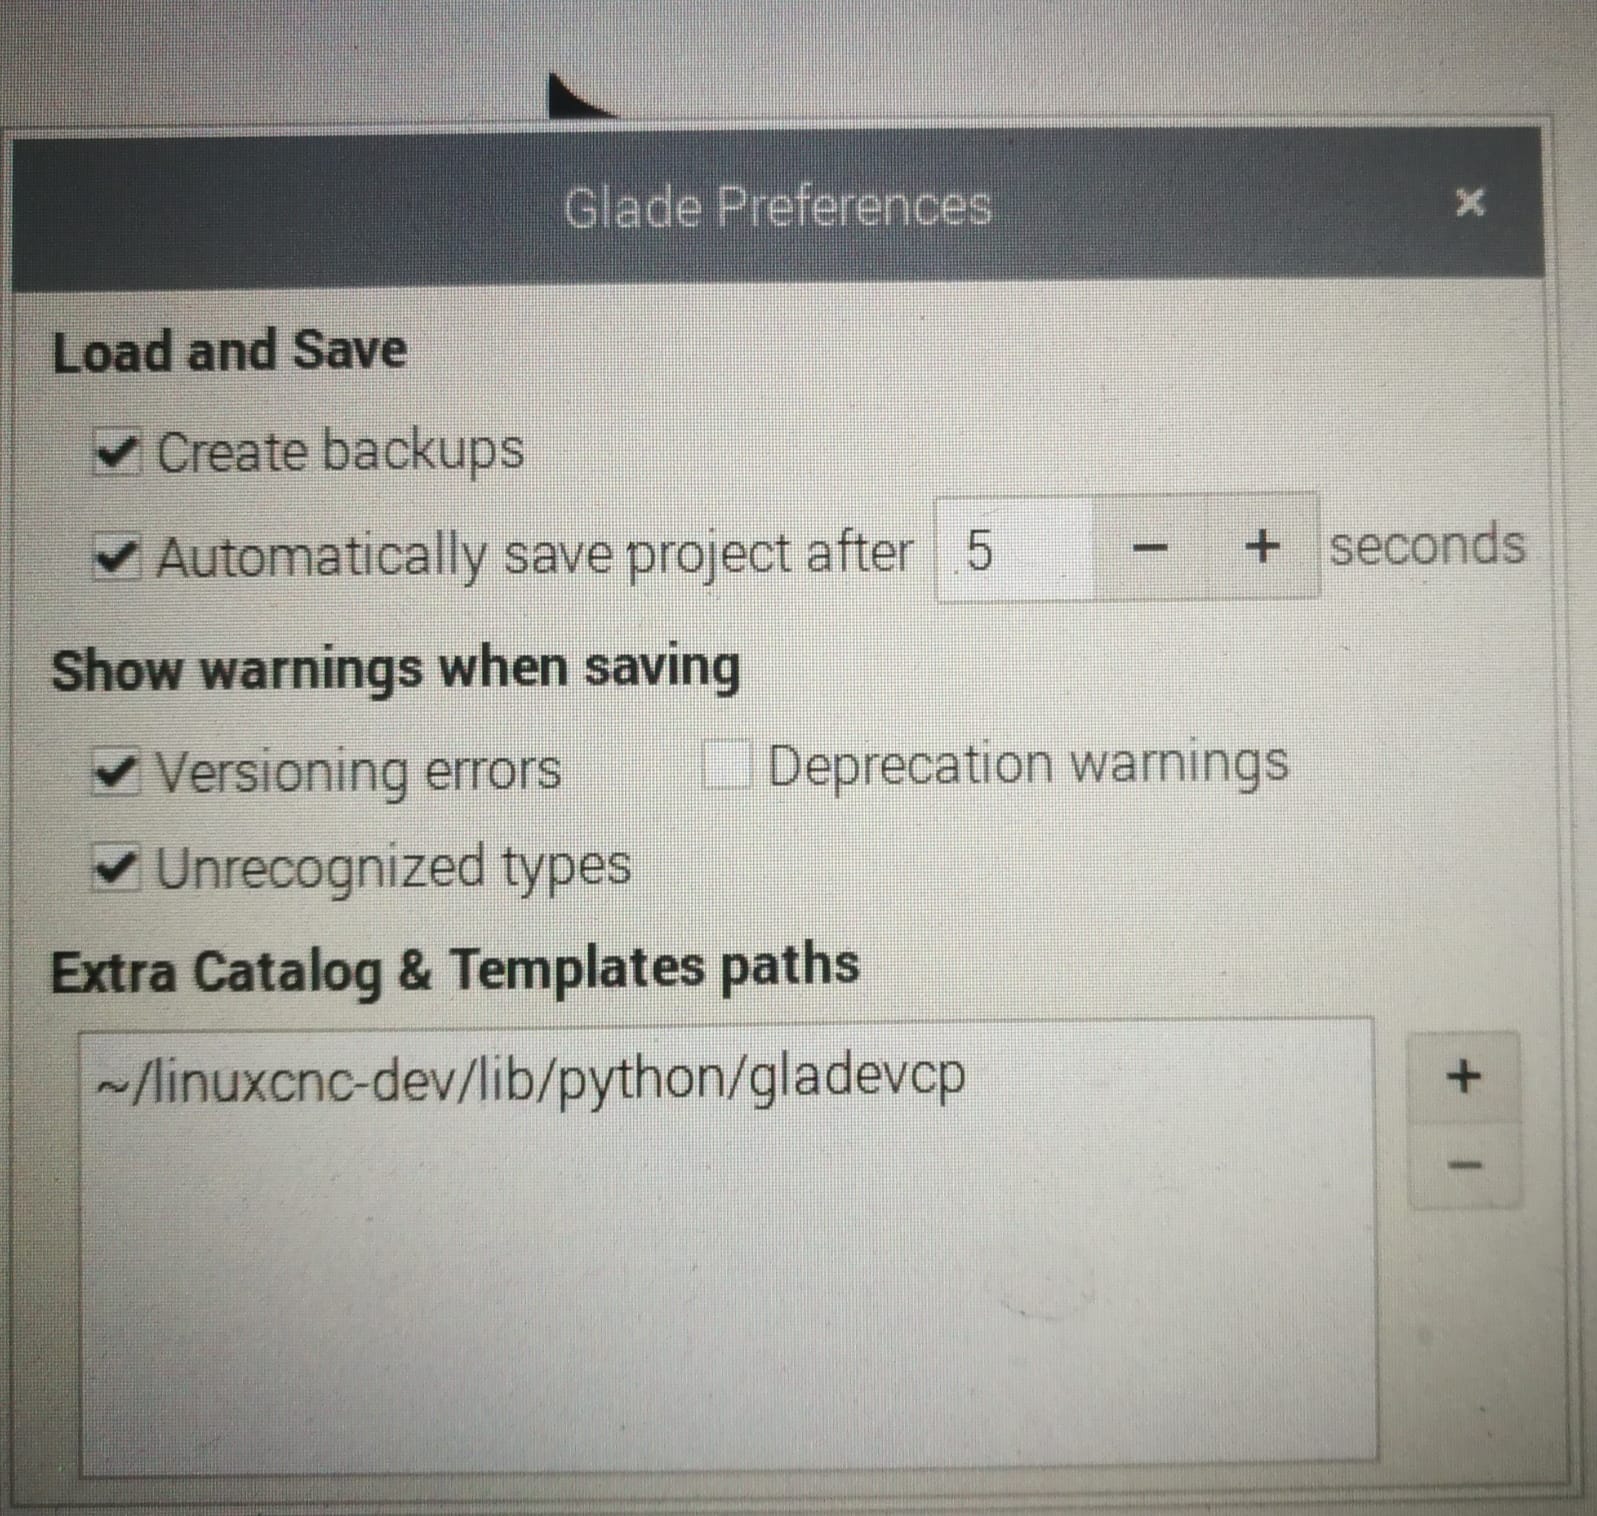
If you already have glade installed, download the corresponding version from Linuxcnc -dev. Then in Glade in preferences add Extra catalog & Templste path , look for the Linuxcnc-dev gladevcp folder which is located in the path /lib/python/.   
13 Jun 2023 11:26

Homebrew Sinker EDM with 3 axis control

Category: Milling Machines

Hello,

the EDM power supply is a pulsed DC constant current type. The requirements are:
  • ignition voltage (in the diagram ui) is adjustable, 30-120V, almost no current. This voltage dictates the distance between electrode and workpiece, at which the spark ignites.
  • burn voltage (ue in the diagram), 10-50V, adjustable, this is where the current flows and metal is being removed. For wire EDM this voltage can even be just a few Volts. Here we need the constant current regulation, because the discharge channel is very low resistance and too much current flowing is going to cause damage to the electrode.
  • frequency of the impulse, few kHz to 500 kHz
  • Duty cycle 10% to 90%
  • current mostly determines the metal removal rate (MMR), the problem is that the higher the current, the more heat is going in the water, so the heat will need to be removed from the system. Right now I think 10A is enough current.
I plan on using the OPA549 high power OP-Amp for the switching and constant current regulation. This chip is a bit expensive, but it offers the switching and current regulation in one package. The micro controller is a RP2040 (raspberry pi pico), it's a normal 32bit ARM Cortex M0+ MCU.
Basically the EDM power supply is going to be linear power supply. Maybe in later iterations a switch mode power supply (like the BAXEDM), but designing a switchmode power supply for EDM is a lot of work.

The main difference between wire EDM and sinker EDM, is that with wire EDM the electrode wear is not a problem at all. The electrode (the wire) is constantly being fed new and unused from the spool.
With sinker EDM, electrode wear will cause a difference between the desired shape (of the electrode) and the actual resulting shape on the work piece. Electrode wear is why sinker EDM machines use many electrodes, that are switched during machining, to spread the wear across many electrodes and to get very close to the desired shape.

The goal of my EDM power supply is to reduce electrode wear as much as possible. The whole EDM machine should be able to to sinker EDM in 3 axis paths, not just in Z. I'm building a sinker EDM, but I think most of the system should be usable for a wire EDM machine.


I will do a write up on the basic principles of EDM in the future, so everybody can quickly understand the process. The information online is quite insufficient, I have been researching EDM for some time now and collecting information. The best source I have found on how a EDM power supply works is a German PhD thesis. I have it scanned, but it's still in German.

 
Displaying 931 - 945 out of 965 results.
Time to create page: 1.993 seconds
Powered by Kunena Forum