- Configuring LinuxCNC
- Configuration Tools
- StepConf Wizard
- Basic Parallel BOB + TSS-TB6560 single axis (x4) + NEMA23 (x3) - No mvmnt
×
Forum Header
Basic Parallel BOB + TSS-TB6560 single axis (x4) + NEMA23 (x3) - No mvmnt
- rbuckland
- Offline
- New Member
-

Less
More
- Posts: 8
- Thank you received: 1
22 Aug 2021 09:43 #218391
by rbuckland
Basic Parallel BOB + TSS-TB6560 single axis (x4) + NEMA23 (x3) - No mvmnt was created by rbuckland
Hi,
I am a new user to linuxcnc: old hat on linux and computers etc.
When i run the stepconf, the Y axis motor clicks, when the test page loads.
I am unable to get any other response as yet.
I have tried about 5 to 10 variations of Setups of in pinouts, they all just click the X stepper motor.
but only when it "loads" .. not when I click a job Arrow left or right - i get nothing when jogging.
Hardware
- I have received my basic AliExpress BOB - a.aliexpress.com/_mOVF3IB (as per excellent suggestion from this thread - www.forum.linuxcnc.org/38-general-linuxc...-bl-usbmach-bob-v2-0)
- 4x TSS-TB6560 V1.0 wired to 3x NEMA23 steppers.
- From Each TSS-TB6560 -> 5V, CLK, CW, EN is wired to CLK, CW, (NE) on the BOB.
- The BOB is blue, not green no silk screen of version or other
- BOB has 24V wired from the PSU, and 5V via USB from PC.
- Both LEDs on BOB are on (24V and PWK-5V)
- Emergency Stop and ZStop detector output are wired in with GND , on Pins P10 and P11 on BOB
PC Hardware
- Parallel port is on 0x378
- 64G RAM Intel Core i3
PC Software
- it is the latest download of LinuxCNC Stable - Debian 10
I am a new user to linuxcnc: old hat on linux and computers etc.
When i run the stepconf, the Y axis motor clicks, when the test page loads.
I am unable to get any other response as yet.
I have tried about 5 to 10 variations of Setups of in pinouts, they all just click the X stepper motor.
but only when it "loads" .. not when I click a job Arrow left or right - i get nothing when jogging.
Hardware
- I have received my basic AliExpress BOB - a.aliexpress.com/_mOVF3IB (as per excellent suggestion from this thread - www.forum.linuxcnc.org/38-general-linuxc...-bl-usbmach-bob-v2-0)
- 4x TSS-TB6560 V1.0 wired to 3x NEMA23 steppers.
- From Each TSS-TB6560 -> 5V, CLK, CW, EN is wired to CLK, CW, (NE) on the BOB.
- The BOB is blue, not green no silk screen of version or other
- BOB has 24V wired from the PSU, and 5V via USB from PC.
- Both LEDs on BOB are on (24V and PWK-5V)
- Emergency Stop and ZStop detector output are wired in with GND , on Pins P10 and P11 on BOB
PC Hardware
- Parallel port is on 0x378
   rbuckland@cnc:~$ sudo dmesg | grep parport
    [    6.957817] parport_pc 00:03: reported by Plug and Play ACPI
    [    6.962302] parport0: PC-style at 0x378, irq 5 [PCSPP,TRISTATE,EPP]
PC Software
- it is the latest download of LinuxCNC Stable - Debian 10
  rbuckland@cnc:~$ uname -a
  Linux cnc 4.19.0-17-rt-amd64 #1 SMP PREEMPT RT Debian 4.19.194-2 (2021-06-21) x86_64 GNU/Linux
Please Log in or Create an account to join the conversation.
- tommylight
-

- Offline
- Moderator
-

Less
More
- Posts: 21617
- Thank you received: 7383
22 Aug 2021 09:54 #218393
by tommylight
Replied by tommylight on topic Basic Parallel BOB + TSS-TB6560 single axis (x4) + NEMA23 (x3) - No mvmnt
Disconnect the "enable" pins from the drive.
They are actually "disable" pins, meaning they will disable the drive when high.
They are actually "disable" pins, meaning they will disable the drive when high.
The following user(s) said Thank You: rbuckland
Please Log in or Create an account to join the conversation.
- rbuckland
- Offline
- New Member
-
Less
More
- Posts: 8
- Thank you received: 1
25 Aug 2021 10:16 #218693
by rbuckland
Replied by rbuckland on topic Basic Parallel BOB + TSS-TB6560 single axis (x4) + NEMA23 (x3) - No mvmnt
@tommylight. Thank you.
I removed the enable pin from each board and indeed, each axis is now responding.
They are moving at about 0.0001mm per jog.")
That's my next job.
So I understand i need to get the revolutions and steps all correct. Before I start there in the stepconf again,
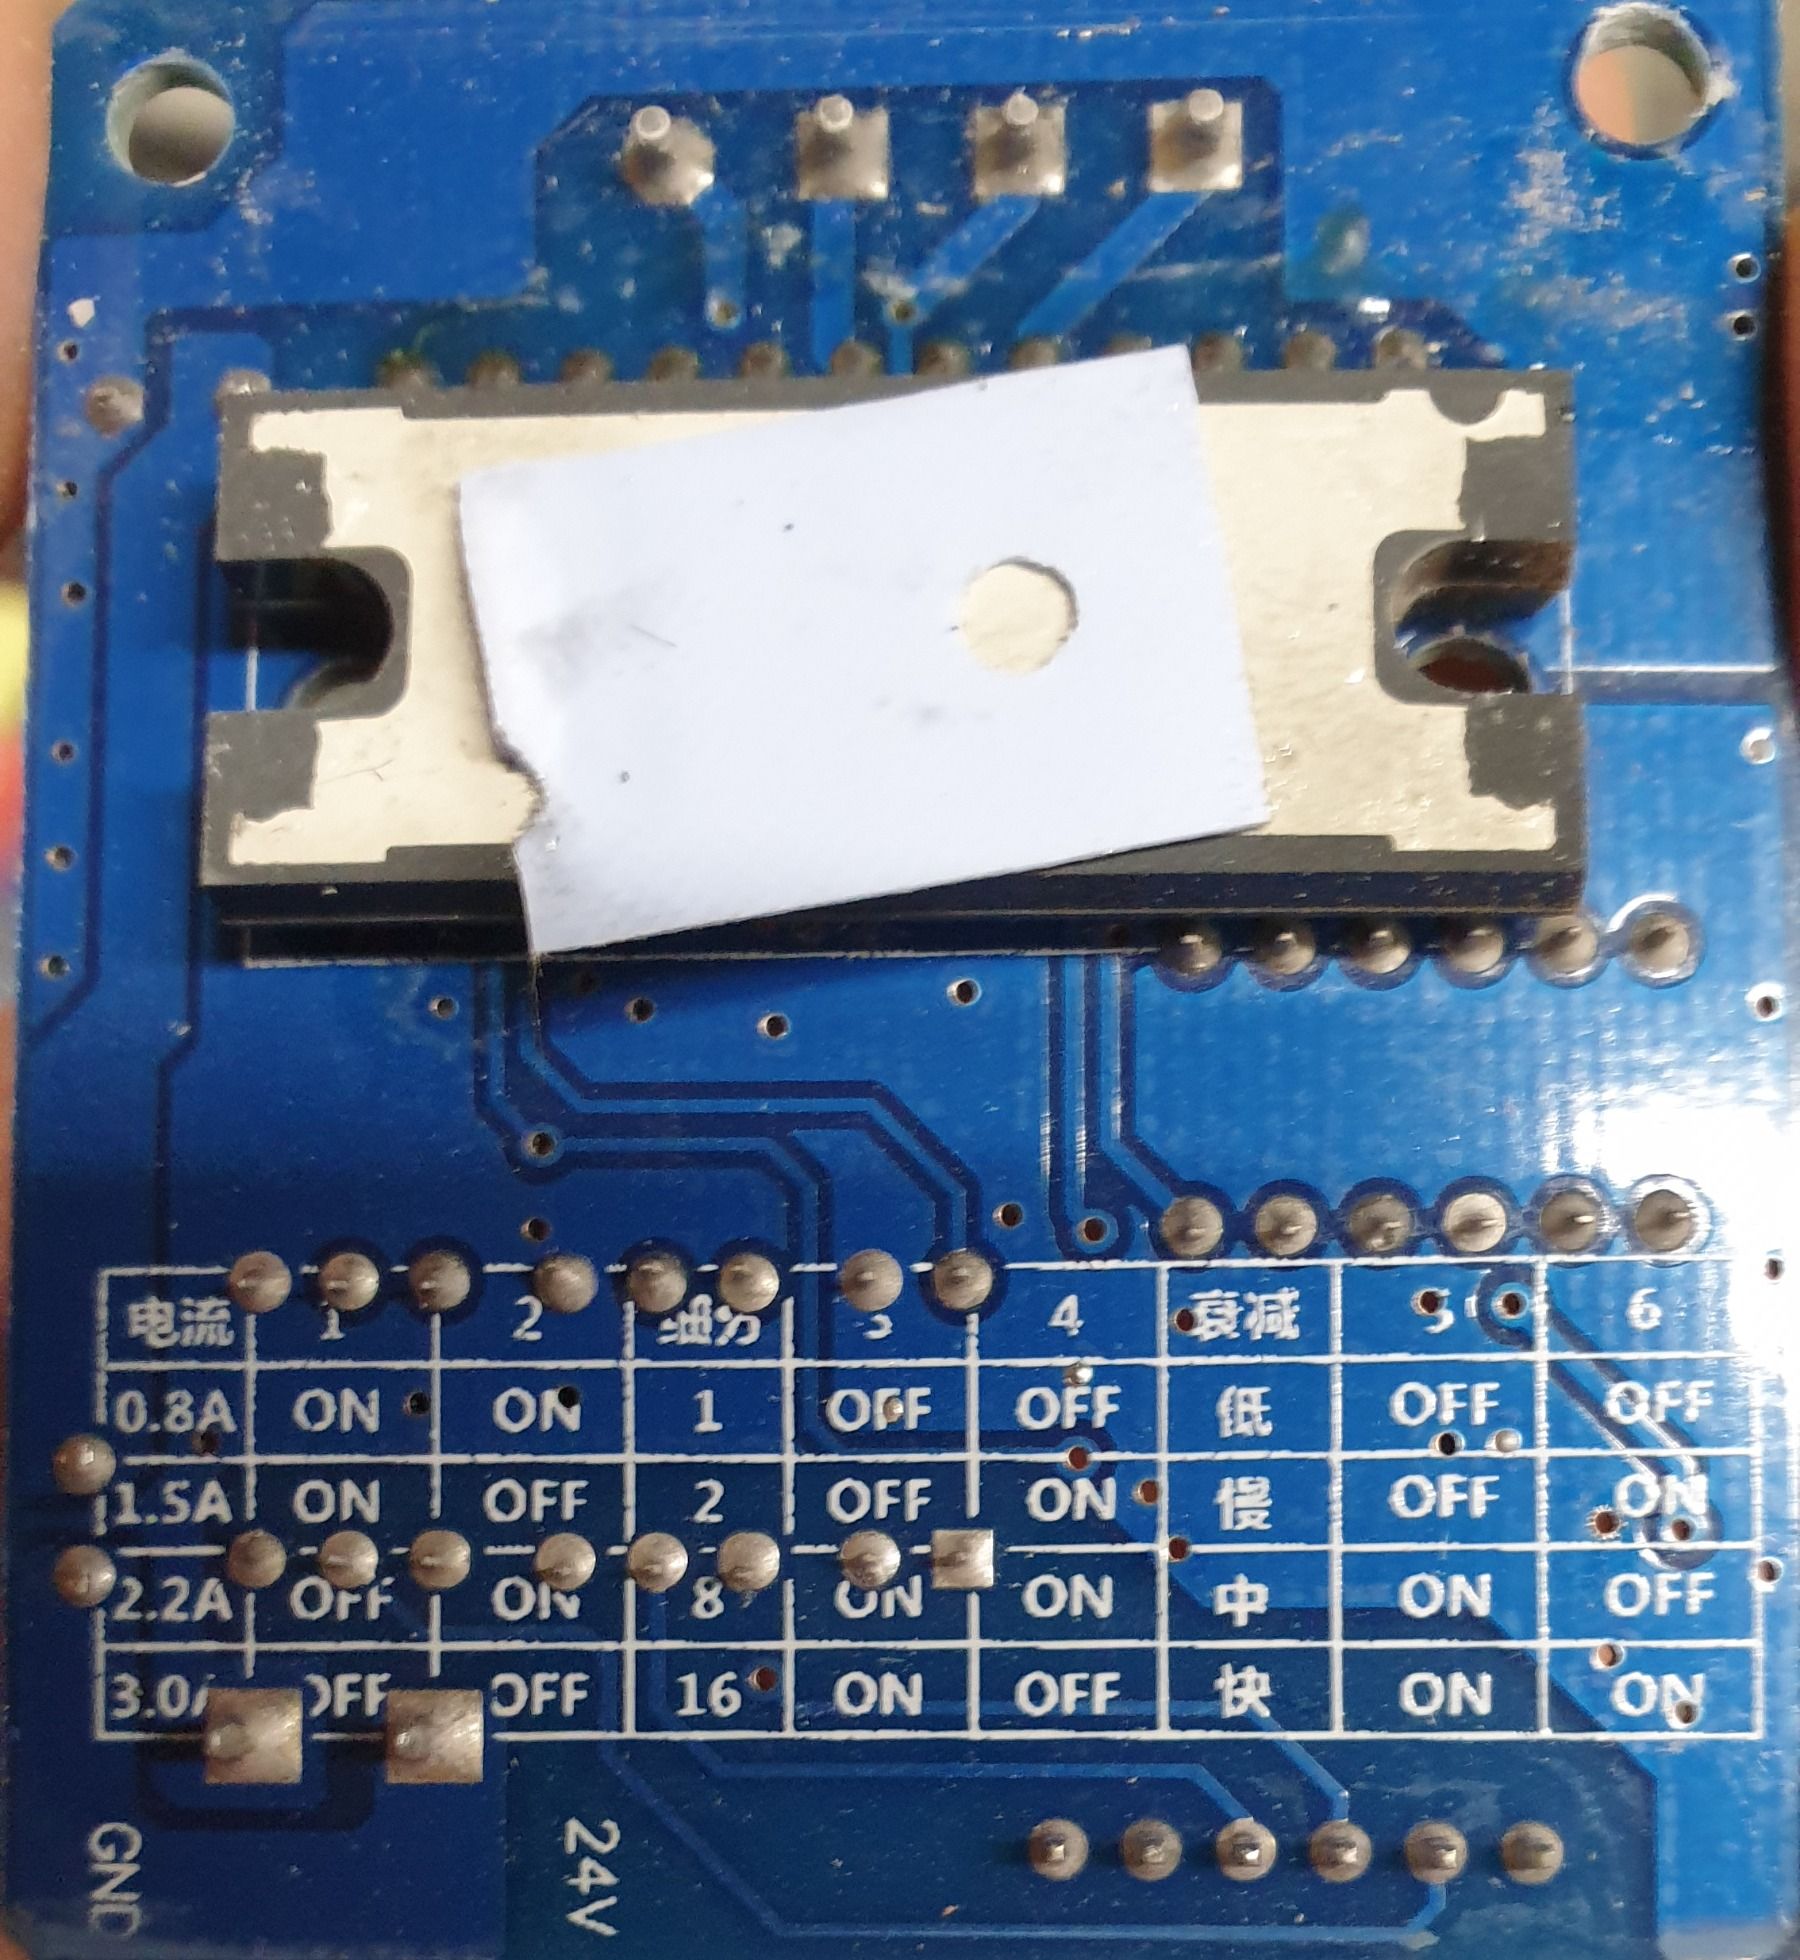
A question. Should I set the dip switches on the boards to a base configuration
The drivers have a 6switch dip block
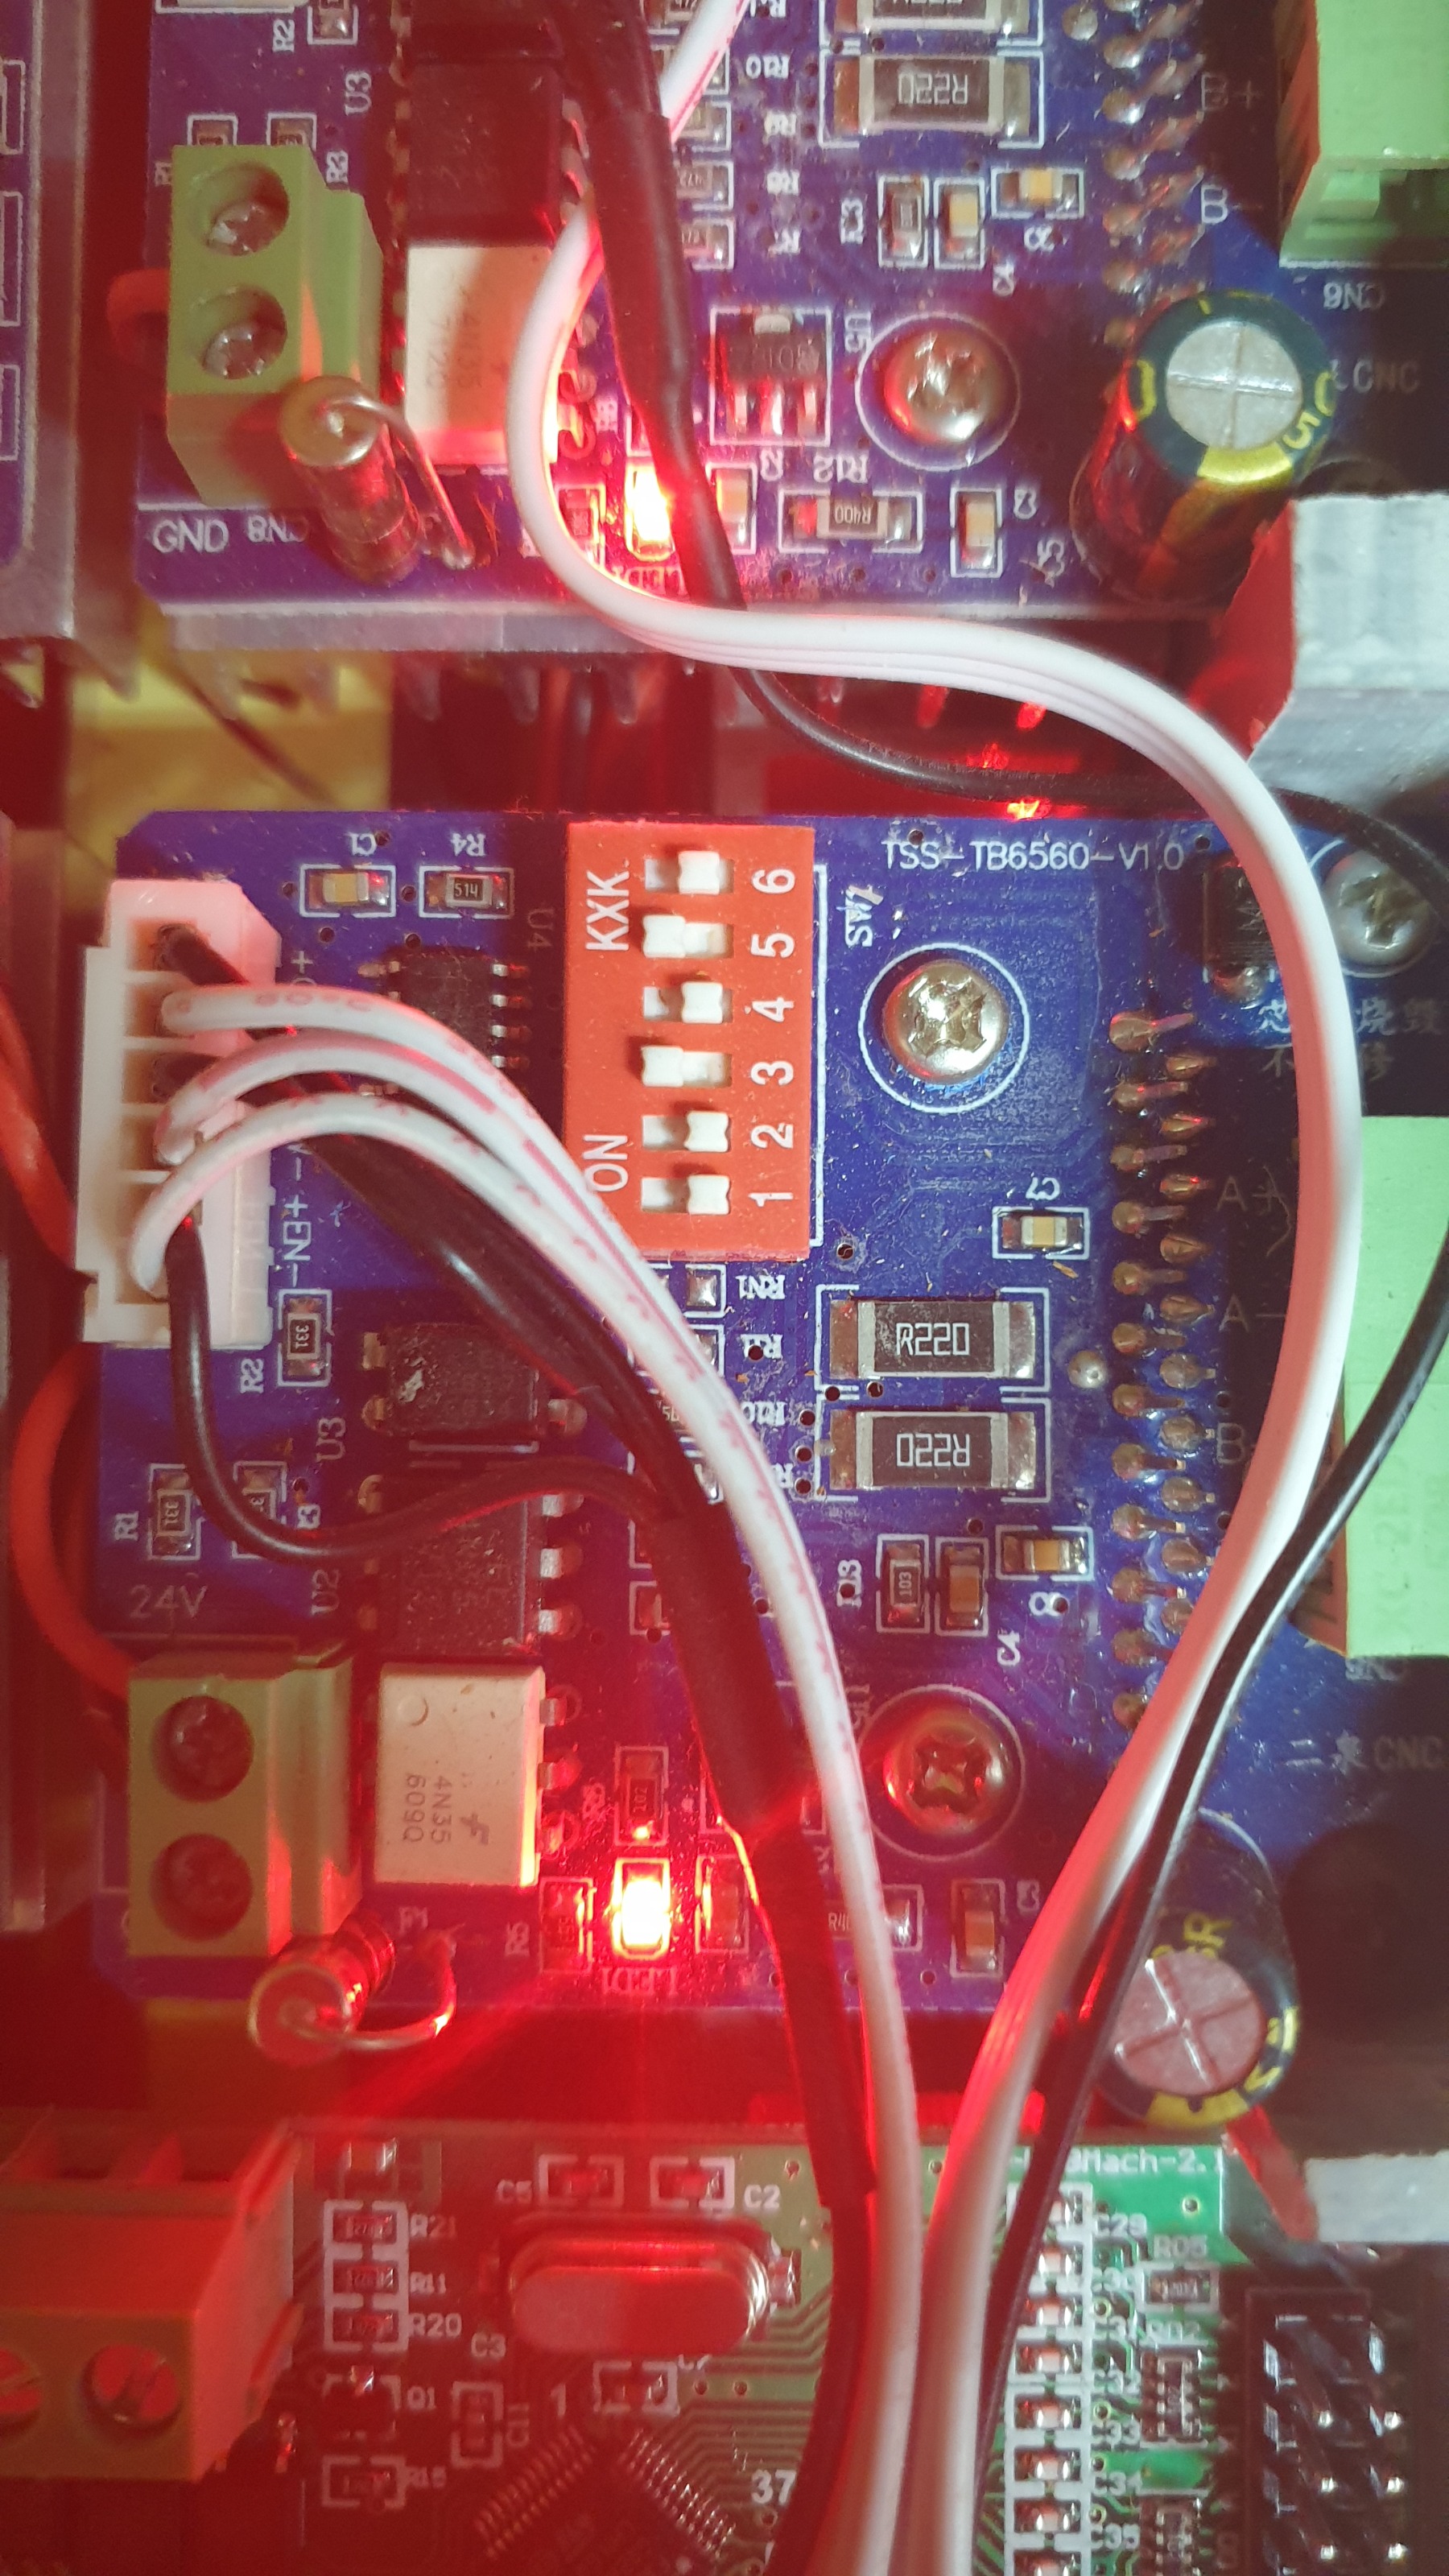
Should I set these to a known value range first before I configure in software. .. like 1/2 or 1/16 etc
Finding the exact manual for them is proving tricky.
I removed the enable pin from each board and indeed, each axis is now responding.
They are moving at about 0.0001mm per jog.
That's my next job.
So I understand i need to get the revolutions and steps all correct. Before I start there in the stepconf again,
A question. Should I set the dip switches on the boards to a base configuration
The drivers have a 6switch dip block
Should I set these to a known value range first before I configure in software. .. like 1/2 or 1/16 etc
Finding the exact manual for them is proving tricky.
Attachments:
Please Log in or Create an account to join the conversation.
- tommylight
-
- Offline
- Moderator
-
Less
More
- Posts: 21617
- Thank you received: 7383
25 Aug 2021 15:07 #218710
by tommylight
Replied by tommylight on topic Basic Parallel BOB + TSS-TB6560 single axis (x4) + NEMA23 (x3) - No mvmnt
Yes you should set them to a known value as that is required for setting the scaling properly.
For the DIP switches you would need the manual or check the board as some do have settings written on them. Those can be figured out manually but could require quite some time and some basic knowledge with a DVM/Amp meter.
For the DIP switches you would need the manual or check the board as some do have settings written on them. Those can be figured out manually but could require quite some time and some basic knowledge with a DVM/Amp meter.
Please Log in or Create an account to join the conversation.
- rbuckland
- Offline
- New Member
-
Less
More
- Posts: 8
- Thank you received: 1
07 Sep 2021 01:01 - 07 Sep 2021 02:07 #219806
by rbuckland
Replied by rbuckland on topic Basic Parallel BOB + TSS-TB6560 single axis (x4) + NEMA23 (x3) - No mvmnt
I now have a handle on a few things and have the motors stepping .. ever so slowly.
Before , the motors didn't move, but I set the DIP switch for each driver to 3Amperes and they now move.
issue 1
Using stepconf/test axis, the motors move too slowly.
I have the microstep at 2, and the steps per resolution at 200 (NEMA23).
I have tried the attenuation in a number of positions but to no avail.
if I lower the stepping, 8, 16 the drives rotate less of course.
I get the most movement when its at microstepping of 1. Of course, but even then it is super slow and doesn't move to the configured test distance of 10 or 15mm. It overshoots, if I wait the 5 to 10 minutes for it to get there.
Issue 2:
If I load the same configuration into linuxcnc, the motors don't move at all.
(Emergency Off, Machine On).
I can see the BOB board LED Relay turn on, and the relay clicks.
But the drives don't move at all, and no noises.
Unlike stepconf testing.
My dip switch settings are currently set at
- 3A
- microstep 2
- attentuation low. (possible attentuation values are,: low, slow, medium and fast.)
Attachments:
Last edit: 07 Sep 2021 02:07 by rbuckland.
Please Log in or Create an account to join the conversation.
- rbuckland
- Offline
- New Member
-
Less
More
- Posts: 8
- Thank you received: 1
09 Sep 2021 13:13 - 09 Sep 2021 13:14 #220053
by rbuckland
Replied by rbuckland on topic Basic Parallel BOB + TSS-TB6560 single axis (x4) + NEMA23 (x3) - No mvmnt
Success.
I had the step and direction around tge wrong way, for all axis
I had the step and direction around tge wrong way, for all axis
Attachments:
Last edit: 09 Sep 2021 13:14 by rbuckland.
The following user(s) said Thank You: tommylight
Please Log in or Create an account to join the conversation.
- tommylight
-
- Offline
- Moderator
-
Less
More
- Posts: 21617
- Thank you received: 7383
09 Sep 2021 21:38 #220084
by tommylight
Replied by tommylight on topic Basic Parallel BOB + TSS-TB6560 single axis (x4) + NEMA23 (x3) - No mvmnt
Ah the joy ...
Please Log in or Create an account to join the conversation.
- Configuring LinuxCNC
- Configuration Tools
- StepConf Wizard
- Basic Parallel BOB + TSS-TB6560 single axis (x4) + NEMA23 (x3) - No mvmnt
Time to create page: 0.147 seconds