- Configuring LinuxCNC
- Basic Configuration
- Do I need a resistor when adding a touch plate (probe) to Mesa 7i76e?
Do I need a resistor when adding a touch plate (probe) to Mesa 7i76e?
- Sray69
- Offline
- Elite Member
-

- Posts: 255
- Thank you received: 13
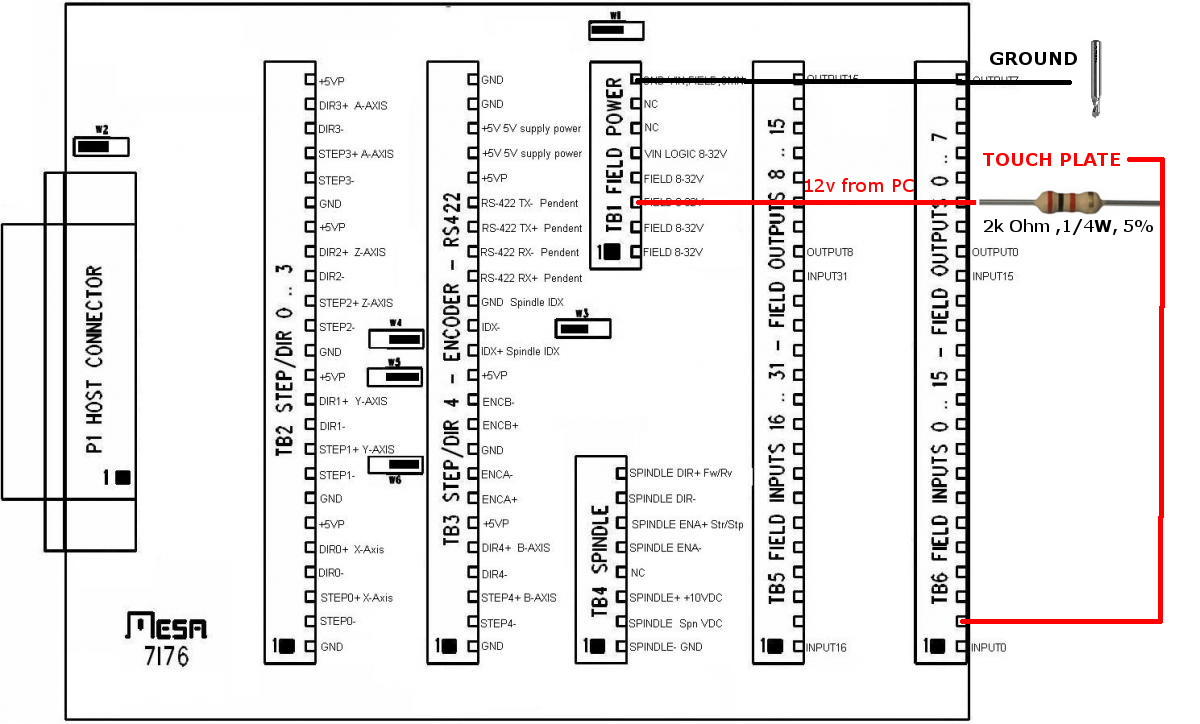
Source: www.diycncdesign.com/linuxcnc-2.8-touch-plate-probe.htmlRun a wire from the +24vdc field power terminal, TB1 pin 4, through a 2k pull up resistor to the input pin, TB5 pin 10.Run two wires to the touch off plate. One will be hardwired to the DC Ground in the electronics box and have an alligator clip or magnet to attach the wire to the cutting tool or spindle. The other wire from the probe should run back to the input pin on the 7i76e, TB5 pin 10.The input can be inverted in the software by adding “-not” to the input number.
Thanks
Please Log in or Create an account to join the conversation.
- Sray69
- Offline
- Elite Member
-
- Posts: 255
- Thank you received: 13
Thanks
Please Log in or Create an account to join the conversation.
- JPL
- Offline
- Platinum Member
-

- Posts: 337
- Thank you received: 118
Please Log in or Create an account to join the conversation.
- Sray69
- Offline
- Elite Member
-
- Posts: 255
- Thank you received: 13
In this blog he uses pin 10 which is a digital input.
www.diycncdesign.com/linuxcnc-2.8-touch-plate-probe.html
Which is the correct input to use?
Shawn
Attachments:
Please Log in or Create an account to join the conversation.
- Sray69
- Offline
- Elite Member
-
- Posts: 255
- Thank you received: 13
Do I have to install Probe Screen? I read another post somewhere that they installed a macro called touch_plate_z.ngc instead. What is the easiest/best way?
Please Log in or Create an account to join the conversation.
- Sray69
- Offline
- Elite Member
-
- Posts: 255
- Thank you received: 13
Is my thinking correct? Or am I way off base and need to go a different route?
JohnnyCNC post=158477 userid=23695
Other info you might want.
I have a button on my homemade touch-plate and this is how I made the connections in the hal file to debounce the signal when the bit touches the plate and recognizes the button press to start the probing process.
This is how I have the debounce setup on my probe. My touch-plate has a spring loaded contact surface and a button to start the probe process. The code below is placed in a file named 100.ng and the file is placed in the folder where you G-Code files are.
#limits debounce to stop false triggers
loadrt debounce cfg=2,1 #change to the number you want
setp debounce.0.delay 100 #this sets the delay 100 iterations of the servo-thread
addf debounce.0 servo-thread
net deb-probe-in debounce.0.0.in <= hm2_5i25.0.7i76.0.0.input-05-not Touch plate contact surface.
net probe-in debounce.0.0.out
net probe-in => motion.probe-input
net run-touch-btn <= hm2_5i25.0.7i76.0.0.input-06 => halui.mdi-command-04 Physical probe start button.
This is the code that is run when I press the button on my touch-plate. I found this on the web but I don't remember where. Probably on this forum. Place this code in a file name 100.ng and place the file in the folder where your G-Code file are.
<pre>
o100 sub
G20
( Set current Z position to 0 so that we will always be moving down )
G10 L20 P0 Z0
( Probe to Z-.5 at F2 [Uses machine units, I work in inch, this is meant to be slow!] )
G38.2 Z-.25 f2
( Set Z0 at point where probe triggers with offset of +1.0095 [this is the thickness of my touch plate. You must adjust this for your plate / setup] )
(G10 L20 = Set Coordinate System // P - coordinate system 0-9 0 = Not active)
G10 L20 P1 Z1.0095
( Rapid up to Z.5 above the material )
(G10 L20 P1)
(Use machine coordinates)
G90
G53 G0
(Incremental mode)
G91
(Rapid Z up 1 inches)
G0 Z1
o100 endsub
</pre>
Please Log in or Create an account to join the conversation.
- JPL
- Offline
- Platinum Member
-
- Posts: 337
- Thank you received: 118
The 7i76 support 3 software mode. In mode 1 & 2 you have 4 analog inputs but in mode 0 you don't have any. The diagram is probably for mode 0.... I notice in the diagram that was post the touchplate positive wire is using pin 01 which is an analog input.
... In this blog he uses pin 10 which is a digital input. ... Which is the correct input to use?
You can use any digital input. Just edit this line:
net probe-in <= hm2_7i76e.0.7i76.0.0.input-25-not
to use the input you want to use.
Please Log in or Create an account to join the conversation.
- JPL
- Offline
- Platinum Member
-
- Posts: 337
- Thank you received: 118
I think the easiest way is to go with gmoccapy screen since touch probe (for tool setting) is integrated. See here: linuxcnc.org/docs/html/gui/gmoccapy.html...uto-tool-measurementDo I have to install Probe Screen? I read another post somewhere that they installed a macro called touch_plate_z.ngc instead. What is the easiest/best way?
Please Log in or Create an account to join the conversation.
- JPL
- Offline
- Platinum Member
-
- Posts: 337
- Thank you received: 118
I'm sorry, can't help you much about this since I'm not even using the 7i76. I can only suggest to first try it the way it is to make sure it's working as expected. Then come back here and ask about what needs to be done or what you tried to make it work the way you want.I found these instructions from JohnnyCNC on how to setup his Touch Plate w/Button. I have read through it and am thinking that maybe I could alter it to work but instead of triggering the Touch Off from a button on the touch plate but instead add a button to the Axis GUI to trigger it.
Is my thinking correct? Or am I way off base and need to go a different route?
Please Log in or Create an account to join the conversation.
- Sray69
- Offline
- Elite Member
-
- Posts: 255
- Thank you received: 13
wiki.printnc.info/en/controllers/linuxcnc/ztouchplate
Please Log in or Create an account to join the conversation.
- Configuring LinuxCNC
- Basic Configuration
- Do I need a resistor when adding a touch plate (probe) to Mesa 7i76e?