QTDragon offsets question
- JohnnyCNC
-
 Topic Author
- Offline
- Platinum Member
-

- Posts: 570
- Thank you received: 111
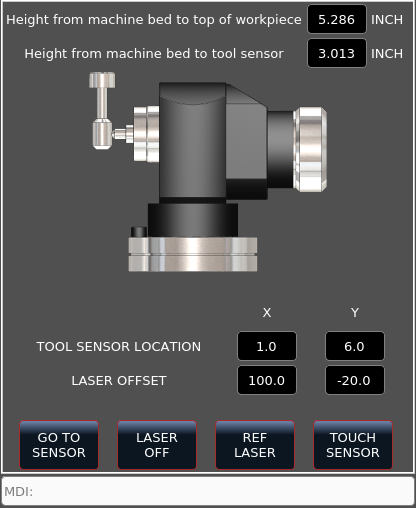
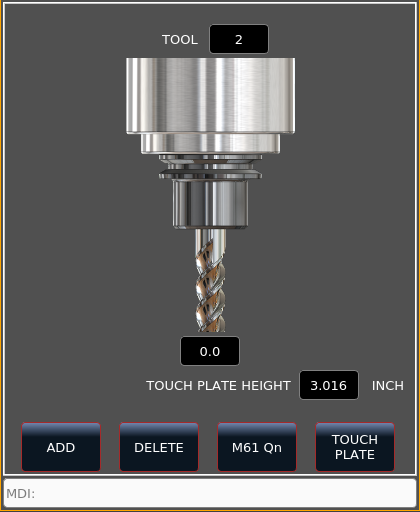
On this screen would it make sense to display the tool length as set in the tool table or as measured when touched off on the touch plate?
I have been playing with a M6 remap macro and it consistently thinks the top of the stock it .65 inches higher than it is. I can get that number to change buy changing some of the values on the above screens but I would have to lie on the value to hit the target. I'm pretty sure it is something I just don't understand. For now I would just like touch off the stock with my 3D probe to get the stock height. And to have zeros in the tool table for the Z measurement and touch off the on tool setter at each tool change and have it calculate the tool length. I have entered the length of the probe in the tool table for tool 99 but I am not sure that is being taken into account.
Thank you.
Please Log in or Create an account to join the conversation.
- persei8
-

- Offline
- Platinum Member
-

- Posts: 398
- Thank you received: 132
The second method uses a tool setter in a fixed position and a known height above the table where the probe signal will be triggered. In order to set Z0 to the top of the workpiece, it has to know how far above the table the probe trigger point is (tool setter height) and how far above the table the top of the workpiece is. This operation has to be done every time the tool is changed as the tool length is not saved. I realize that for an ATC or MTC, the operation is different, where each tool length is compared to a reference tool and stored in the tool table. I'm working with a simple collet spindle. HTH.
Jim
Please Log in or Create an account to join the conversation.
- persei8
-

- Offline
- Platinum Member
-

- Posts: 398
- Thank you received: 132
Jim
Please Log in or Create an account to join the conversation.
- cmorley
- Away
- Moderator
-

- Posts: 7302
- Thank you received: 2134
They appear to be based on work from Qtpyvcp which looks based on wersaProbe v2:
vers.by/en/blog/useful-articles/probe-screen
I have been working/tested on qtvcp's version of this code.
(Qtvcp'd versaprobe_dialog) but haven't finished to toolsetter code yet.
Anyways it looks that the pre process is :
probe the the top of the tool setter and recording that height - it should never change.
Then the usual process is: probe the top of work set 0
change tool and probe it using the toolsetter.
The routine calculates the tool offset using the toolsetter height, work height and probed tool height.
The remap automates the tool change probing process.
I assume qtdragons process is similar - I'm not sure if it requires remap.
Please Log in or Create an account to join the conversation.
- cmorley
- Away
- Moderator
-

- Posts: 7302
- Thank you received: 2134
Thanks Jim
Please Log in or Create an account to join the conversation.
- seebaer1976
- Offline
- Junior Member
-

- Posts: 37
- Thank you received: 5
i noticed that many people cook their own soup in processes and routines. and this leads to problems, confusion and misunderstandings.
Perhaps, so that there is no more confusion and / or there are several different routines for certain processes, one could agree on and establish standard routines
sorry that i'm posting it here too, unfortunately it fits here too
Please Log in or Create an account to join the conversation.
- JohnnyCNC
-
 Topic Author
- Offline
- Platinum Member
-

- Posts: 570
- Thank you received: 111
QtDragon has 2 possible methods for setting Z0. The first is a touchplate, where a metal plate of known thickness is placed on top of the workpiece and then the tool is lowered until it touches the plate, triggering the probe signal. Z0 is set to probe height - plate thickness.
The second method uses a tool setter in a fixed position and a known height above the table where the probe signal will be triggered. In order to set Z0 to the top of the workpiece, it has to know how far above the table the probe trigger point is (tool setter height) and how far above the table the top of the workpiece is. This operation has to be done every time the tool is changed as the tool length is not saved. I realize that for an ATC or MTC, the operation is different, where each tool length is compared to a reference tool and stored in the tool table. I'm working with a simple collet spindle. HTH.
Jim
The first method is how I have always done it until now.
Between what you and Chris are working on it sounds like a solution. Thank you both. I will gladly volunteer to do testing.
In my mind this would be the work flow:
I would do a one-time setup where I would enter the length of the probe in tool 99. Then with the spindle nose sitting on the sensor I would enter the ABS Z value into tool zero in the tool table.
Then for each setup I would probe the work for XYZ.
Then each time I put in a new tool in it would touch off on the sensor and record the tool length.
Please Log in or Create an account to join the conversation.
- persei8
-

- Offline
- Platinum Member
-

- Posts: 398
- Thank you received: 132
It is similar, but not complete. But it should be. To minimize duplication of effort, perhaps we could collaborate on this M6 remap issue. It seems that this would also be applicable to the basic_probe widget.The remap automates the tool change probing process.
I assume qtdragons process is similar - I'm not sure if it requires remap.
Jim
Please Log in or Create an account to join the conversation.
- ikkuh
-

- Offline
- Elite Member
-

- Posts: 273
- Thank you received: 48
It is similar, but not complete. But it should be. To minimize duplication of effort, perhaps we could collaborate on this M6 remap issue. It seems that this would also be applicable to the basic_probe widget.The remap automates the tool change probing process.
I assume qtdragons process is similar - I'm not sure if it requires remap.
Jim
How is the progress on this?
Please Log in or Create an account to join the conversation.
- JohnnyCNC
-
 Topic Author
- Offline
- Platinum Member
-

- Posts: 570
- Thank you received: 111
Please Log in or Create an account to join the conversation.

