
"Probe Height of the current tool" button not active in versatool
- galmiklos
- Offline
- New Member
-

Less
More
- Posts: 13
- Thank you received: 2
20 Jul 2026 19:49 #347888
by galmiklos
"Probe Height of the current tool" button not active in versatool was created by galmiklos
I use LinuxCNC 2.9.8, and trying to use versatool to do manual tool change with a tool length sensor and a touch probe.
I do this sequence.
1. Defined tool 99, and load it: M6 T99,
2. Get a pop up window about manual tool change, install the probe in the spindle and press OK,
3. Go to the TLS by pressing the first button in the first row (Go to Tool Setter),
4. Measure the probe height by pressing the second button in the first row (Probe Tool Setter Z Height),
5. Jog above my stock (aluminum), and measure its height by pressing the button in the middle row (Probe Z Height of material),
6. Load a tool: M6 T3,
7. Get the pop up, install the tool and pressed OK
I can see the PROBE HT and BLOCK HT variables set, as seen in the screen shot below.
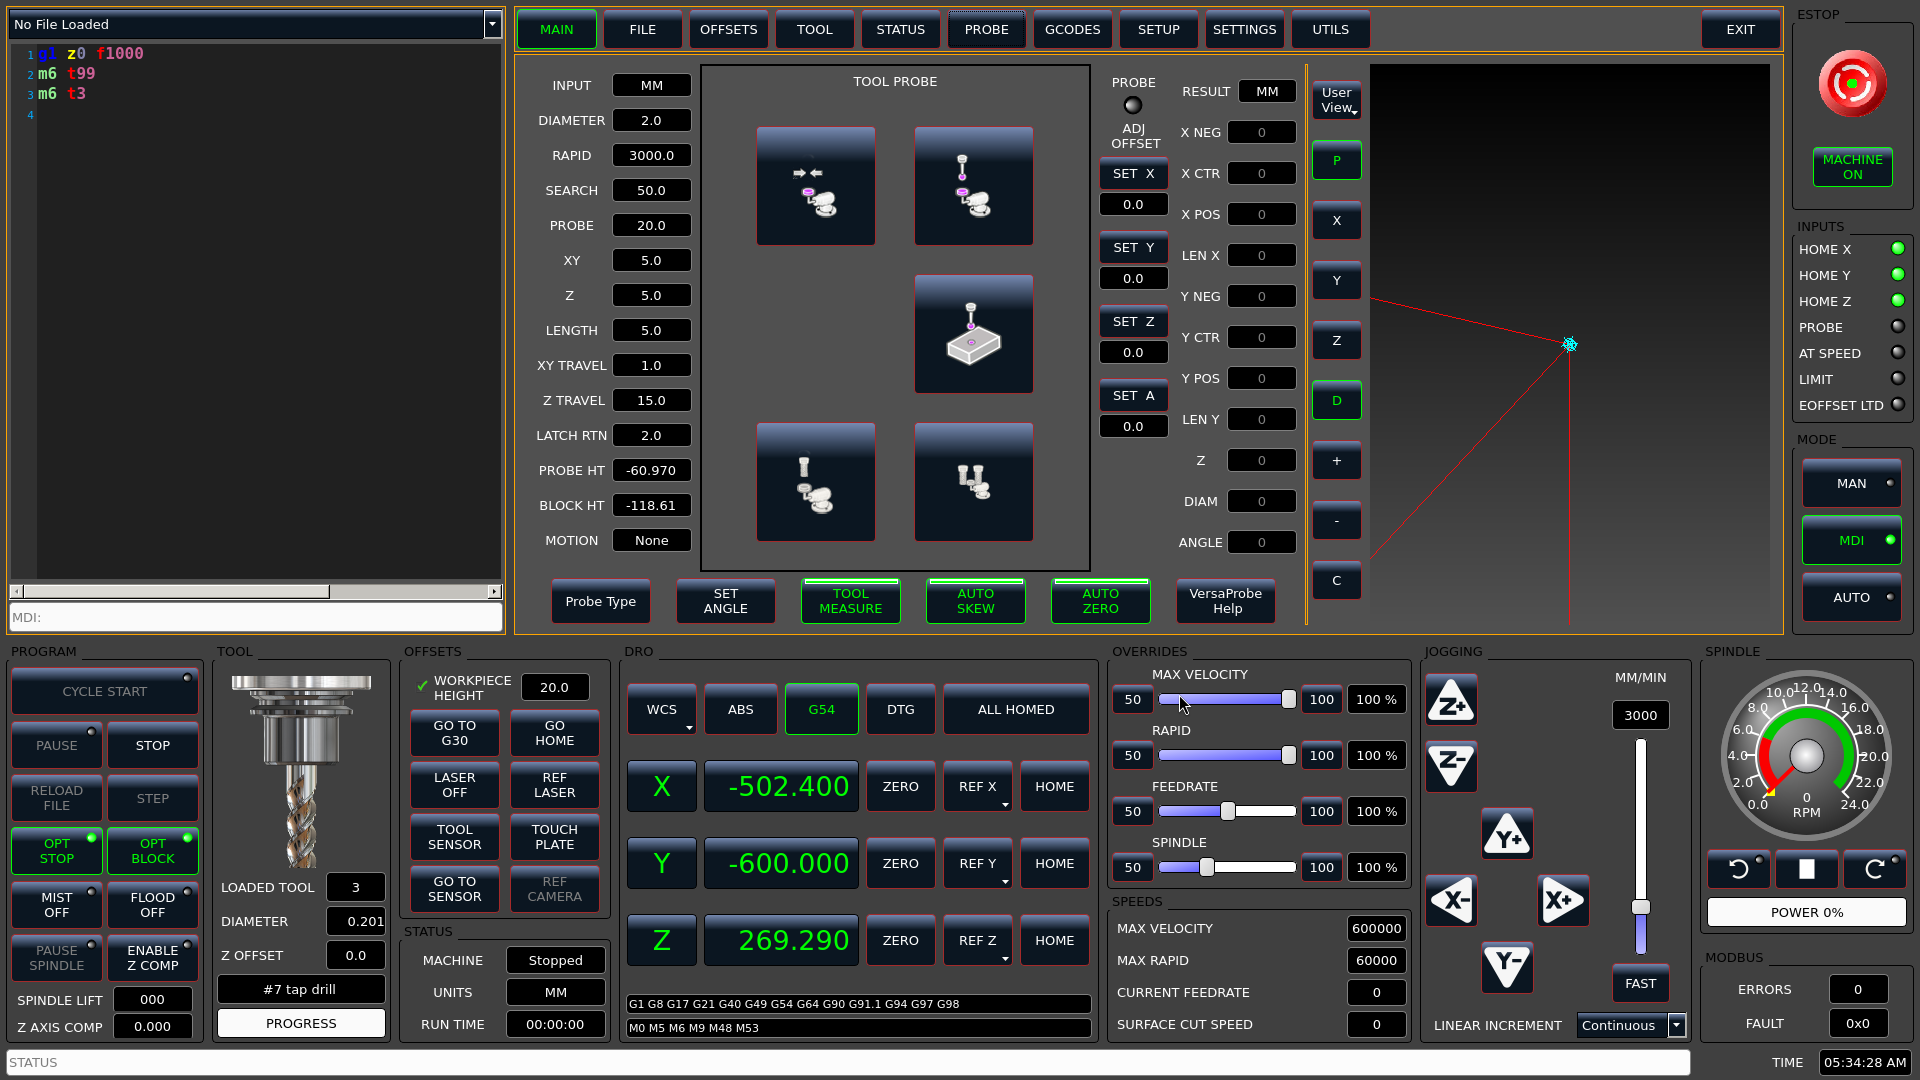
I would then expect to measure the tool height by pressing the first button in the bottom row (Probe Height of the current tool). But I can't, it is not active.
What else do I have to do to be able to measure the tool height?
I do this sequence.
1. Defined tool 99, and load it: M6 T99,
2. Get a pop up window about manual tool change, install the probe in the spindle and press OK,
3. Go to the TLS by pressing the first button in the first row (Go to Tool Setter),
4. Measure the probe height by pressing the second button in the first row (Probe Tool Setter Z Height),
5. Jog above my stock (aluminum), and measure its height by pressing the button in the middle row (Probe Z Height of material),
6. Load a tool: M6 T3,
7. Get the pop up, install the tool and pressed OK
I can see the PROBE HT and BLOCK HT variables set, as seen in the screen shot below.
I would then expect to measure the tool height by pressing the first button in the bottom row (Probe Height of the current tool). But I can't, it is not active.
What else do I have to do to be able to measure the tool height?
Please Log in or Create an account to join the conversation.
- spicybagel
- Offline
- New Member
-
Less
More
- Posts: 7
- Thank you received: 5
21 Jul 2026 18:38 #347928
by spicybagel
Replied by spicybagel on topic "Probe Height of the current tool" button not active in versatool
I don't use that workflow, but the button is also disabled in both my personal config that uses a tool setter and in the probing sim config. There may also be a separate issue even if the “Probe Height of Current Tool” button is enabled. The current BLOCK HT calculation uses the formula origin = float(INFO.INI.find("AXIS_Z", "MIN_LIMIT")) + value. Using the Z minimum limit doesn't really work or make any sense to begin with for me, but even if the machine was setup for that, the formula would only make sense if the probed value was a positive height measured upward from the Z minimum limit.
So doesn't directly answer why the button is disabled, but I can confirm it's not unique to your config and the routine in general is very confusing. Hopefully one of the developers who worked on these routines can clarify why the current BLOCK HT calculation does not produce the expected result and explain what setup or value the routine was originally designed around along with why the “Probe Height of Current Tool” button is disabled.
So doesn't directly answer why the button is disabled, but I can confirm it's not unique to your config and the routine in general is very confusing. Hopefully one of the developers who worked on these routines can clarify why the current BLOCK HT calculation does not produce the expected result and explain what setup or value the routine was originally designed around along with why the “Probe Height of Current Tool” button is disabled.
The following user(s) said Thank You: galmiklos
Please Log in or Create an account to join the conversation.
- cmorley
- Offline
- Moderator
-

Less
More
- Posts: 7368
- Thank you received: 2181
22 Jul 2026 01:35 #347938
by cmorley
Replied by cmorley on topic "Probe Height of the current tool" button not active in versatool
The button is disabled because the routine is not tested enough.
last time we worked on it:
forum.linuxcnc.org/qtvcp/51138-qtdragonh...-maker-space?start=0
last time we worked on it:
forum.linuxcnc.org/qtvcp/51138-qtdragonh...-maker-space?start=0
Please Log in or Create an account to join the conversation.
- galmiklos
- Offline
- New Member
-
Less
More
- Posts: 13
- Thank you received: 2
22 Jul 2026 02:42 #347944
by galmiklos
Replied by galmiklos on topic "Probe Height of the current tool" button not active in versatool
What is the workflow you use? I am not hooked on versaprobe. I wouldn't mind using any workflow to do manual tool change and work piece probing using a tool length sensor and touch probe. But I couldn't make anything work yet.
It was a lot easier to configure it with grblHAL.
It was a lot easier to configure it with grblHAL.
Please Log in or Create an account to join the conversation.
- cmorley
- Offline
- Moderator
-
Less
More
- Posts: 7368
- Thank you received: 2181
22 Jul 2026 12:53 #347957
by cmorley
Replied by cmorley on topic "Probe Height of the current tool" button not active in versatool
If you want to try it, I can give you the files to turn it on later tonight after work.
The following user(s) said Thank You: tommylight, galmiklos
Please Log in or Create an account to join the conversation.
- spicybagel
- Offline
- New Member
-
Less
More
- Posts: 7
- Thank you received: 5
22 Jul 2026 15:48 #347960
by spicybagel
Replied by spicybagel on topic "Probe Height of the current tool" button not active in versatool
I use the auto tool probe remap and it's very simple. I measure the distance of my tool setter from the machine bed, then put that value in for probe HT in the probe tab. Next I measure the distance of the stock top from the machine bed and put that value in for my g5x z offset. block HT is left at 0 no matter what, don't touch it. Now what happens when the auto tool probe remap runs is when you start your g-code, it brings spindle over to a defined change position, you change the tool manually to the one it's asking for, then it drives over to the tool setter location and creates a tool length offset. After it's done, your tool will be offset perfectly to where you programmed your wcs z0 in cam. I can explain more details about what's going on and why it's done like this if you want, but you're referencing everything off the machine bed which is absolute. Even if your on a router style machine and resurface your spoilboard, you just re-measure the probe HT value and you're back in action.
The following user(s) said Thank You: galmiklos
Please Log in or Create an account to join the conversation.
- galmiklos
- Offline
- New Member
-
Less
More
- Posts: 13
- Thank you received: 2
24 Jul 2026 03:33 #348021
by galmiklos
Replied by galmiklos on topic "Probe Height of the current tool" button not active in versatool
What is "the auto tool probe remap"? I mean I know what remap is in general, but it sounds like it is a name of something specific. Is it something one can download from somewhere? A quick googling didn't come back with anything specific.
In the meantime I studied the documentation and the source code a little bit, and I think I now have a clue what's what, and there are multiple ways to achieve tool offsets (G10 L2 vs. G10 L20 for instance). What I was looking for was a simple way and a sequence of click here, enter there kind of set of instructions.
I eventually managed to make the standard tool touchup work. The one where you enter the the tool height in the settings tab, enter the workpiece height in the offsets panel on the main screen, and you just click on the tool sensor button, which will calculate the Z value for the current WCS and sets it with G10 L20 (after touching the sensor with the loaded tool).
In the meantime I studied the documentation and the source code a little bit, and I think I now have a clue what's what, and there are multiple ways to achieve tool offsets (G10 L2 vs. G10 L20 for instance). What I was looking for was a simple way and a sequence of click here, enter there kind of set of instructions.
I eventually managed to make the standard tool touchup work. The one where you enter the the tool height in the settings tab, enter the workpiece height in the offsets panel on the main screen, and you just click on the tool sensor button, which will calculate the Z value for the current WCS and sets it with G10 L20 (after touching the sensor with the loaded tool).
Please Log in or Create an account to join the conversation.
- galmiklos
- Offline
- New Member
-
Less
More
- Posts: 13
- Thank you received: 2
24 Jul 2026 15:03 #348035
by galmiklos
Replied by galmiklos on topic "Probe Height of the current tool" button not active in versatool

Please Log in or Create an account to join the conversation.
- spicybagel
- Offline
- New Member
-
Less
More
- Posts: 7
- Thank you received: 5
24 Jul 2026 16:08 #348038
by spicybagel
Replied by spicybagel on topic "Probe Height of the current tool" button not active in versatool
Yep, that's it. Should be in ~/linuxcnc/nc_files/examples/remap-subroutines on your actual pc. Just know that it's changing the tool length offset (tool table Z) instead of the actual WCS Z offset. So you put the height of your tool setter above the machine bed in "probe HT" of the probe tab (leave "block HT" at 0 as mentioned before). Then you put the height of your workpiece above the machine bed in for your desired WCS Z offset.
So example would be the toolsetter is 1 in above the machine bed and your stock top is 3 in above the machine bed. You set "probe HT" to 1 and your G5x Z offset to +3. You have to turn on the "tool measure" button in the probe tab and now when you run your program, the remap automatically takes over once the M6 line is reached and it will bring the spindle to your defined change position in your .ini, then after you change the tool and hit OK, it will drive over to the defined tool setter position in your .ini and probe the tool which will automatically fill in the tool length offset in the tool tab. Same diagram as figure 7 in section 14 of qtdragon docs, but "block height" is your g5x z offset. If you want to run without the remap, just turn off the "tool measure" button in the probe tab. It will still bring the spindle to the change position, but doesn't probe the tool and doesn't create a tool length offset. Nice thing about running the remap this way is it creates a universal tool measurement independent of the part setup allowing you to run multiple WCS offsets at once.
You need to make sure your .ini has all the things shown in section 14.3.2 of the qt dragon docs for this to work. it's also very important to make sure you are using the qt_auto_probe_tool.ngc file from 2.9 and not the 2.10 master branch as the 2.10 version is different formula and won't work the same. Included my .ini, .hal, and personally modified .ngc remap if you want an example of what it looks like.
So example would be the toolsetter is 1 in above the machine bed and your stock top is 3 in above the machine bed. You set "probe HT" to 1 and your G5x Z offset to +3. You have to turn on the "tool measure" button in the probe tab and now when you run your program, the remap automatically takes over once the M6 line is reached and it will bring the spindle to your defined change position in your .ini, then after you change the tool and hit OK, it will drive over to the defined tool setter position in your .ini and probe the tool which will automatically fill in the tool length offset in the tool tab. Same diagram as figure 7 in section 14 of qtdragon docs, but "block height" is your g5x z offset. If you want to run without the remap, just turn off the "tool measure" button in the probe tab. It will still bring the spindle to the change position, but doesn't probe the tool and doesn't create a tool length offset. Nice thing about running the remap this way is it creates a universal tool measurement independent of the part setup allowing you to run multiple WCS offsets at once.
You need to make sure your .ini has all the things shown in section 14.3.2 of the qt dragon docs for this to work. it's also very important to make sure you are using the qt_auto_probe_tool.ngc file from 2.9 and not the 2.10 master branch as the 2.10 version is different formula and won't work the same. Included my .ini, .hal, and personally modified .ngc remap if you want an example of what it looks like.
Please Log in or Create an account to join the conversation.
Moderators: cmorley
Time to create page: 0.434 seconds