New to LinuxCNC - Trying to add a PPort card and get LinuxCNC to start
- tommylight
-

- Away
- Moderator
-

Less
More
- Posts: 21048
- Thank you received: 7181
24 Apr 2020 17:14 #165421
by tommylight
Replied by tommylight on topic New to LinuxCNC - Trying to add a PPort card and get LinuxCNC to start
No BOB's, for hobby machines directly to parallel port, for bigger machines with steppers i've used Mesa 7i76E. Thinking of getting some 7i96 very soon, or very late, depending on how this pandemics plays out.
To test with parallel port directly, wires from the drive inputs, step/dir - to GND or the connector housing on the PC, step/dir + to pins 2 and 3 on the PC's parallel port, holes there so you can stick in the wires.
To test with parallel port directly, wires from the drive inputs, step/dir - to GND or the connector housing on the PC, step/dir + to pins 2 and 3 on the PC's parallel port, holes there so you can stick in the wires.
Please Log in or Create an account to join the conversation.
- TnW
- Offline
- New Member
-

Less
More
- Posts: 17
- Thank you received: 2
27 Apr 2020 16:50 #165846
by TnW
Replied by TnW on topic New to LinuxCNC - Trying to add a PPort card and get LinuxCNC to start
Been super busy! Lots of people at home buying products which is awesome, but also means Ive only just been able to start on the machine.
Ok so, I tried the step/dir + cables direct into the pport on the cable and nothing on any of the axis. Ive got some longer cable which I will try direct to the PC port tomorrow.
Ive checked the continuity of the wiring and its all good but still no joy with movement on the machine.
Voltage test - USING DVM - Testing points, Red on driver terminal screw and black on GND screw on BOB.
X
STEP starting voltage 0v Left 1.4v Voltage then holds until I hit Right it then drops to 0v and holds even when I stop pressing key.
DIR starting voltage 1.4v Left 1.9v Voltage then holds in that area until I hit Right it then drops to 1.3v and holds while holding the key down.
Y
STEP starting voltage 3v Up NO CHANGE Down NO CHANGE
DIR starting voltage 1.4v Left NO CHANGE Right NO CHANGE
Z
STEP starting voltage 1.4v POS 1.48v voltage then holds until I hit NEG it then drops to 1.03v and holds even when I stop pressing key.
DIR starting voltage 1.4v POS voltage then holds until I hit NEG it then drops to 0v and holds even when I stop pressing key.
Not sure if that all makes sense. I'm guessing there is an issue with the Y Axis but not sure whats going on with the X and Z. Tried again in Axis once all sorted and nothing, no movement on any of the axis. All 3 motors are powered up so that something lol.
I had a look at the 7i96 cards, so they work with an Ethernet port instead of a pport, does that give you any advantages?
Please Log in or Create an account to join the conversation.
- tommylight
-

- Away
- Moderator
-

Less
More
- Posts: 21048
- Thank you received: 7181
27 Apr 2020 18:31 - 27 Apr 2020 18:31 #165851
by tommylight
Replied by tommylight on topic New to LinuxCNC - Trying to add a PPort card and get LinuxCNC to start
Oh cr@p! 
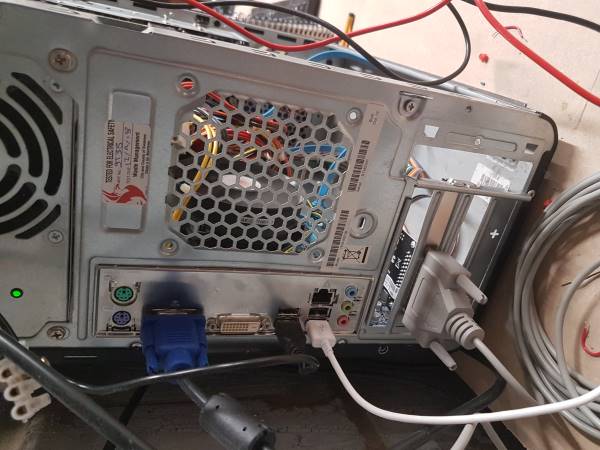
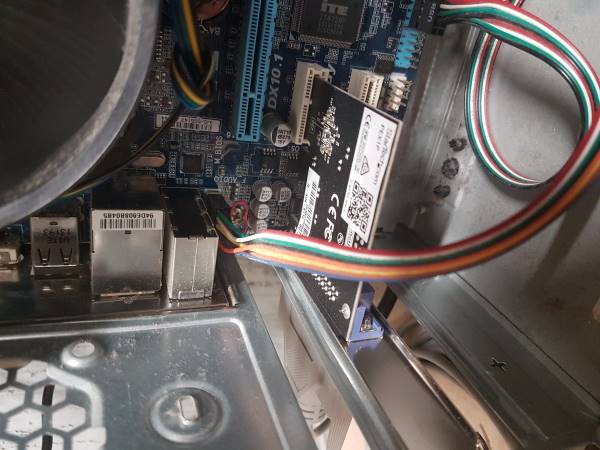
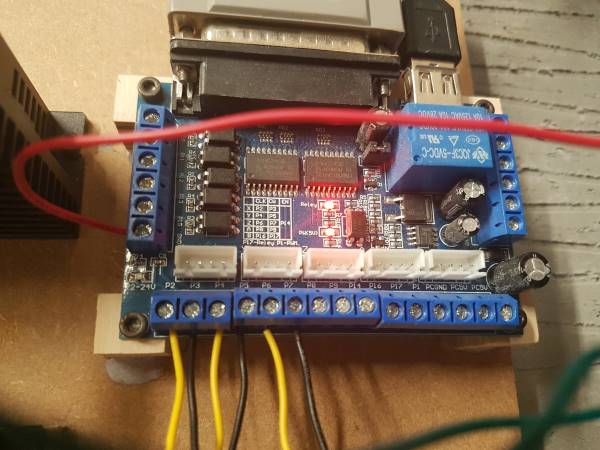
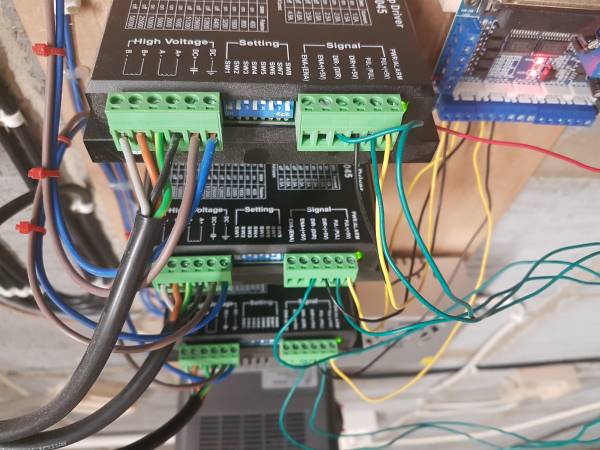
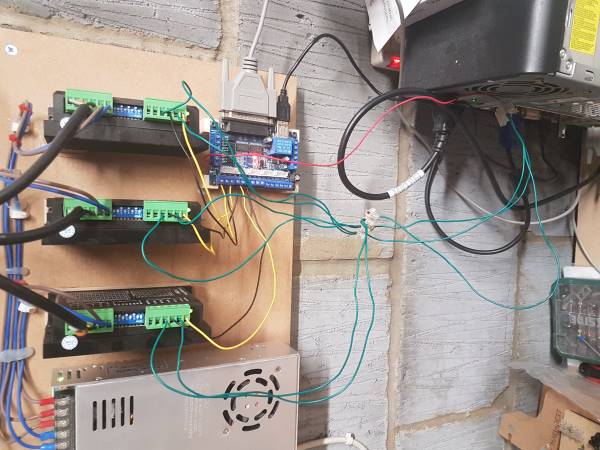
Attach the hal and ini, some picture of the setup as you have it wired now, and the back of the pc.
Also a screenshot of the terminal with
sudo lspci -v | grep port
BTW those voltages look all kind of wrong.
Attach the hal and ini, some picture of the setup as you have it wired now, and the back of the pc.
Also a screenshot of the terminal with
sudo lspci -v | grep port
BTW those voltages look all kind of wrong.
Last edit: 27 Apr 2020 18:31 by tommylight. Reason: info
Please Log in or Create an account to join the conversation.
- TnW
- Offline
- New Member
-

Less
More
- Posts: 17
- Thank you received: 2
28 Apr 2020 10:29 - 28 Apr 2020 10:31 #165944
by TnW
Replied by TnW on topic New to LinuxCNC - Trying to add a PPort card and get LinuxCNC to start
Thanks for the help with this!
Yeah I tried to have a read up last night and Im not sure whats going on!
sudo lspci -v | grep port
I/O ports at f000
Capabilities: [58] Debug port: BAR=1 offset=00a0
Kernel driver in use: pcieport
Kernel driver in use: pcieport
Kernel driver in use: pcieport
Capabilities: [58] Debug port: BAR=1 offset=00a0
I/O ports at f0b0
I/O ports at f0a0
I/O ports at f090
I/O ports at f080
I/O ports at f060
I/O ports at f040
I/O ports at e010
I/O ports at e000
Kernel driver in use: parport_pc
I/O ports at d000
Capabilities: [100] Advanced Error Reporting
.ini file
# Generated by stepconf 1.1 at Wed Nov 30 14:30:16 2016
# If you make changes to this file, they will be
# overwritten when you run stepconf again
[EMC]
MACHINE = SHEETCNC
DEBUG = 0
[DISPLAY]
DISPLAY = axis
EDITOR = gedit
POSITION_OFFSET = RELATIVE
POSITION_FEEDBACK = ACTUAL
ARCDIVISION = 64
GRIDS = 10mm 20mm 50mm 100mm 1in 2in 5in 10in
MAX_FEED_OVERRIDE = 1.2
MIN_SPINDLE_OVERRIDE = 0.5
MAX_SPINDLE_OVERRIDE = 1.2
DEFAULT_LINEAR_VELOCITY = 20.00
MIN_LINEAR_VELOCITY = 0
MAX_LINEAR_VELOCITY = 200.00
INTRO_GRAPHIC = linuxcnc.gif
INTRO_TIME = 5
PROGRAM_PREFIX = /home/sheetcnc/linuxcnc/nc_files
INCREMENTS = 5mm 1mm .5mm .1mm .05mm .01mm .005mm
PYVCP = custompanel.xml
[FILTER]
PROGRAM_EXTENSION = .png,.gif,.jpg Greyscale Depth Image
PROGRAM_EXTENSION = .py Python Script
png = image-to-gcode
gif = image-to-gcode
jpg = image-to-gcode
py = python
[TASK]
TASK = milltask
CYCLE_TIME = 0.010
[RS274NGC]
PARAMETER_FILE = linuxcnc.var
[EMCMOT]
EMCMOT = motmod
COMM_TIMEOUT = 1.0
COMM_WAIT = 0.010
BASE_PERIOD = 54088
SERVO_PERIOD = 1000000
[HAL]
HALUI = halui
HALFILE = SHEETCNC.hal
HALFILE = custom.hal
POSTGUI_HALFILE = custom_postgui.hal
[HALUI]
# add halui MDI commands here (max 64)
MDI_COMMAND = o110 call
MDI_COMMAND = o120 call
MDI_COMMAND = o130 call
[TRAJ]
AXES = 3
COORDINATES = X Y Z
LINEAR_UNITS = mm
ANGULAR_UNITS = degree
CYCLE_TIME = 0.010
DEFAULT_VELOCITY = 20.00
MAX_VELOCITY = 200.00
ARC_BLEND_ENABLE = 1
ARC_BLEND_FALLBACK_ENABLE = 0
ARC_BLEND_OPTIMIZATION_DEPTH = 316
ARC_BLEND_GAP_CYCLES = 40
ARC_BLEND_RAMP_FREQ = 2
[EMCIO]
EMCIO = io
CYCLE_TIME = 0.100
TOOL_TABLE = tool.tbl
[AXIS_0]
TYPE = LINEAR
HOME = 0.0
MAX_VELOCITY = 200.00
MAX_ACCELERATION = 300.0
STEPGEN_MAXACCEL = 450.0
SCALE = 92.4221251174
FERROR = 1
MIN_FERROR = .25
MIN_LIMIT = -0.001
MAX_LIMIT = 2486.0
BACKLASH = 0.095
HOME_OFFSET = 0.0
[AXIS_1]
TYPE = LINEAR
HOME = 0.0
MAX_VELOCITY = 200.00
MAX_ACCELERATION = 300.0
STEPGEN_MAXACCEL = 450.0
SCALE = 92.4410919142
FERROR = 1
MIN_FERROR = .25
MIN_LIMIT = -0.001
MAX_LIMIT = 1255.0
BACKLASH = 0.095
HOME_OFFSET = 0.0
[AXIS_2]
TYPE = LINEAR
HOME = 0.0
MAX_VELOCITY = 100.0
MAX_ACCELERATION = 3200.0
STEPGEN_MAXACCEL = 4000.0
SCALE = 100.0
FERROR = 1
MIN_FERROR = .25
MIN_LIMIT = -245.0
MAX_LIMIT = 0.001
HOME_OFFSET = 0.0
.hal file
# Generated by stepconf 1.1 at Wed Nov 30 14:30:16 2016
# Modified by IB
# DO NOT RUN STEPCONF UNLESS YOU HAVE MADE A BACKUP OF THIS FILE!
loadrt trivkins
loadrt [EMCMOT]EMCMOT base_period_nsec=[EMCMOT]BASE_PERIOD servo_period_nsec=[EMCMOT]SERVO_PERIOD num_joints=[TRAJ]AXES
loadrt hal_parport cfg="0xe010 out"
setp parport.0.reset-time 5000
loadrt stepgen step_type=0,0,0
loadrt pwmgen output_type=1
loadrt classicladder_rt numPhysInputs=15 numPhysOutputs=15 numS32in=10 numS32out=10 numFloatIn=10 numFloatOut=10
loadrt linear8
addf parport.0.read base-thread
addf stepgen.make-pulses base-thread
addf pwmgen.make-pulses base-thread
addf parport.0.write base-thread
addf parport.0.reset base-thread
addf stepgen.capture-position servo-thread
addf motion-command-handler servo-thread
addf motion-controller servo-thread
addf classicladder.0.refresh servo-thread
addf stepgen.update-freq servo-thread
addf pwmgen.update servo-thread
addf linear8.0 servo-thread
setp linear8.0.n 8
setp linear8.0.x0 1260
setp linear8.0.y0 1280
setp linear8.0.x1 4508
setp linear8.0.y1 4508
setp linear8.0.x2 7757
setp linear8.0.y2 7757
setp linear8.0.x3 11006
setp linear8.0.y3 11006
setp linear8.0.x4 14255
setp linear8.0.y4 14255
setp linear8.0.x5 17504
setp linear8.0.y5 17504
setp linear8.0.x6 20753
setp linear8.0.y6 20753
setp linear8.0.x7 24000
setp linear8.0.y7 24000
#net spindle-cmd-rpm => pwmgen.0.value
net spindle-on <= motion.spindle-on => pwmgen.0.enable
net spindle-pwm <= pwmgen.0.pwm
setp pwmgen.0.pwm-freq 0.0
setp pwmgen.0.scale 22740
setp pwmgen.0.offset -0.055489
#setp pwmgen.0.scale 19706.4220183
#setp pwmgen.0.offset -0.058938547486
setp pwmgen.0.dither-pwm true
net spindle-cmd-rpm => linear8.0.in
net spindle-cmd-interp <= linear8.0.out
net spindle-cmd-interp => pwmgen.0.value
net spindle-cmd-rpm <= motion.spindle-speed-out
net spindle-cmd-rpm-abs <= motion.spindle-speed-out-abs
net spindle-cmd-rps <= motion.spindle-speed-out-rps
net spindle-cmd-rps-abs <= motion.spindle-speed-out-rps-abs
net spindle-at-speed => motion.spindle-at-speed
net probe-in => motion.probe-input
setp parport.0.pin-01-out-invert 1
net spindle-pwm => parport.0.pin-01-out
net xstep => parport.0.pin-02-out
setp parport.0.pin-02-out-reset 1
net xdir => parport.0.pin-03-out
net ystep => parport.0.pin-04-out
setp parport.0.pin-04-out-reset 1
net ydir => parport.0.pin-05-out
net zstep => parport.0.pin-06-out
setp parport.0.pin-06-out-reset 1
net zdir => parport.0.pin-07-out
net xenable => parport.0.pin-14-out
net probe-in <= parport.0.pin-13-in-not
setp stepgen.0.position-scale [AXIS_0]SCALE
setp stepgen.0.steplen 1
setp stepgen.0.stepspace 0
setp stepgen.0.dirhold 47000
setp stepgen.0.dirsetup 50000
setp stepgen.0.maxaccel [AXIS_0]STEPGEN_MAXACCEL
net xpos-cmd axis.0.motor-pos-cmd => stepgen.0.position-cmd
net xpos-fb stepgen.0.position-fb => axis.0.motor-pos-fb
net xstep <= stepgen.0.step
net xdir <= stepgen.0.dir
net xenable axis.0.amp-enable-out => stepgen.0.enable
setp stepgen.1.position-scale [AXIS_1]SCALE
setp stepgen.1.steplen 1
setp stepgen.1.stepspace 0
setp stepgen.1.dirhold 47000
setp stepgen.1.dirsetup 50000
setp stepgen.1.maxaccel [AXIS_1]STEPGEN_MAXACCEL
net ypos-cmd axis.1.motor-pos-cmd => stepgen.1.position-cmd
net ypos-fb stepgen.1.position-fb => axis.1.motor-pos-fb
net ystep <= stepgen.1.step
net ydir <= stepgen.1.dir
net yenable axis.1.amp-enable-out => stepgen.1.enable
setp stepgen.2.position-scale [AXIS_2]SCALE
setp stepgen.2.steplen 1
setp stepgen.2.stepspace 0
setp stepgen.2.dirhold 47000
setp stepgen.2.dirsetup 50000
setp stepgen.2.maxaccel [AXIS_2]STEPGEN_MAXACCEL
net zpos-cmd axis.2.motor-pos-cmd => stepgen.2.position-cmd
net zpos-fb stepgen.2.position-fb => axis.2.motor-pos-fb
net zstep <= stepgen.2.step
net zdir <= stepgen.2.dir
net zenable axis.2.amp-enable-out => stepgen.2.enable
net estop-out <= iocontrol.0.user-enable-out
net estop-out => iocontrol.0.emc-enable-in
loadusr -W hal_manualtoolchange
net tool-change iocontrol.0.tool-change => hal_manualtoolchange.change
net tool-changed iocontrol.0.tool-changed <= hal_manualtoolchange.changed
net tool-number iocontrol.0.tool-prep-number => hal_manualtoolchange.number
net tool-prepare-loopback iocontrol.0.tool-prepare => iocontrol.0.tool-prepared
# Load Classicladder without GUI (can reload LADDER GUI in AXIS GUI
loadusr classicladder --nogui custom.clp
Last edit: 28 Apr 2020 10:31 by TnW.
Please Log in or Create an account to join the conversation.
- TnW
- Offline
- New Member
-

Less
More
- Posts: 17
- Thank you received: 2
28 Apr 2020 10:38 #165948
by TnW
Replied by TnW on topic New to LinuxCNC - Trying to add a PPort card and get LinuxCNC to start
Please Log in or Create an account to join the conversation.
- TnW
- Offline
- New Member
-

Less
More
- Posts: 17
- Thank you received: 2
28 Apr 2020 10:43 #165949
by TnW
Replied by TnW on topic New to LinuxCNC - Trying to add a PPort card and get LinuxCNC to start
I know the wiring looks messy but its all working at least. I didn't want to make it look tidy without knowing whats going on as I've got a feeling that its going to need taking apart again at some point lol.
Need any other info let me know.
Need any other info let me know.
Please Log in or Create an account to join the conversation.
- tommylight
-

- Away
- Moderator
-

Less
More
- Posts: 21048
- Thank you received: 7181
28 Apr 2020 10:44 #165950
by tommylight

That is strange, a parallel port should have one or two addresses depending on the type, not 10!
Oh well, you will have to try all of those, but before you do, find a way to measure the voltage on the printer outputs, namely between pin 2 and gnd of parallel port, so at least you know when you get the right address.
Also keep in mind that to be sure the port is accessible, you will have to reboot the PC after any address change as it may hang and subsequent tries will not work.
Replied by tommylight on topic New to LinuxCNC - Trying to add a PPort card and get LinuxCNC to start
WTH is that ???Thanks for the help with this!
Yeah I tried to have a read up last night and Im not sure whats going on!
sudo lspci -v | grep port
I/O ports at f000
Capabilities: [58] Debug port: BAR=1 offset=00a0
Kernel driver in use: pcieport
Kernel driver in use: pcieport
Kernel driver in use: pcieport
Capabilities: [58] Debug port: BAR=1 offset=00a0
I/O ports at f0b0
I/O ports at f0a0
I/O ports at f090
I/O ports at f080
I/O ports at f060
I/O ports at f040
I/O ports at e010
I/O ports at e000
Kernel driver in use: parport_pc
I/O ports at d000
Capabilities: [100] Advanced Error Reporting
That is strange, a parallel port should have one or two addresses depending on the type, not 10!
Oh well, you will have to try all of those, but before you do, find a way to measure the voltage on the printer outputs, namely between pin 2 and gnd of parallel port, so at least you know when you get the right address.
Also keep in mind that to be sure the port is accessible, you will have to reboot the PC after any address change as it may hang and subsequent tries will not work.
Please Log in or Create an account to join the conversation.
- tommylight
-

- Away
- Moderator
-

Less
More
- Posts: 21048
- Thank you received: 7181
28 Apr 2020 10:46 #165952
by tommylight
Replied by tommylight on topic New to LinuxCNC - Trying to add a PPort card and get LinuxCNC to start
What card is it ?
It looks as a PCI-E one.
It looks as a PCI-E one.
Please Log in or Create an account to join the conversation.
- BeagleBrainz
-

- Visitor
-

28 Apr 2020 11:27 #165957
by BeagleBrainz
That command is a bit misleading as it's only showing ports, not what ports are used by what hardware.
Replied by BeagleBrainz on topic New to LinuxCNC - Trying to add a PPort card and get LinuxCNC to start
WTH is that ???Thanks for the help with this!
Yeah I tried to have a read up last night and Im not sure whats going on!
sudo lspci -v | grep port
I/O ports at f000
Capabilities: [58] Debug port: BAR=1 offset=00a0
Kernel driver in use: pcieport
Kernel driver in use: pcieport
Kernel driver in use: pcieport
Capabilities: [58] Debug port: BAR=1 offset=00a0
I/O ports at f0b0
I/O ports at f0a0
I/O ports at f090
I/O ports at f080
I/O ports at f060
I/O ports at f040
I/O ports at e010
I/O ports at e000
Kernel driver in use: parport_pc
I/O ports at d000
Capabilities: [100] Advanced Error Reporting
That is strange, a parallel port should have one or two addresses depending on the type, not 10!
Oh well, you will have to try all of those, but before you do, find a way to measure the voltage on the printer outputs, namely between pin 2 and gnd of parallel port, so at least you know when you get the right address.
Also keep in mind that to be sure the port is accessible, you will have to reboot the PC after any address change as it may hang and subsequent tries will not work.
That command is a bit misleading as it's only showing ports, not what ports are used by what hardware.
Please Log in or Create an account to join the conversation.
- Clive S
- Offline
- Platinum Member
-

Less
More
- Posts: 2202
- Thank you received: 482
28 Apr 2020 11:30 - 28 Apr 2020 11:31 #165958
by Clive S
Replied by Clive S on topic New to LinuxCNC - Trying to add a PPort card and get LinuxCNC to start
Where are the green wires on the drive going to.
See this .just for the bob wiring
Don't wire the enable at this stage
See this .just for the bob wiring
Don't wire the enable at this stage
Last edit: 28 Apr 2020 11:31 by Clive S.
Please Log in or Create an account to join the conversation.
Time to create page: 0.153 seconds

