Useful Plasma Thread
- Grotius
-

- Offline
- Platinum Member
-

Less
More
- Posts: 2419
- Thank you received: 2348
18 Aug 2018 14:53 - 18 Aug 2018 18:11 #116250
by Grotius
Replied by Grotius on topic Useful Plasma Thread
Hi Rod,
I have written the following basic code. This would work good. I can implement it in the code if you agree.
The connections related to mesa
The code related to mesa
I tried the code without probing, it works good. It's real time responding on the screen value's.
Wow man. This component does everything. You only need a g-code starting with G21 and M3 S1 and M5...
Wow.. Never thought we could make this guy's !!
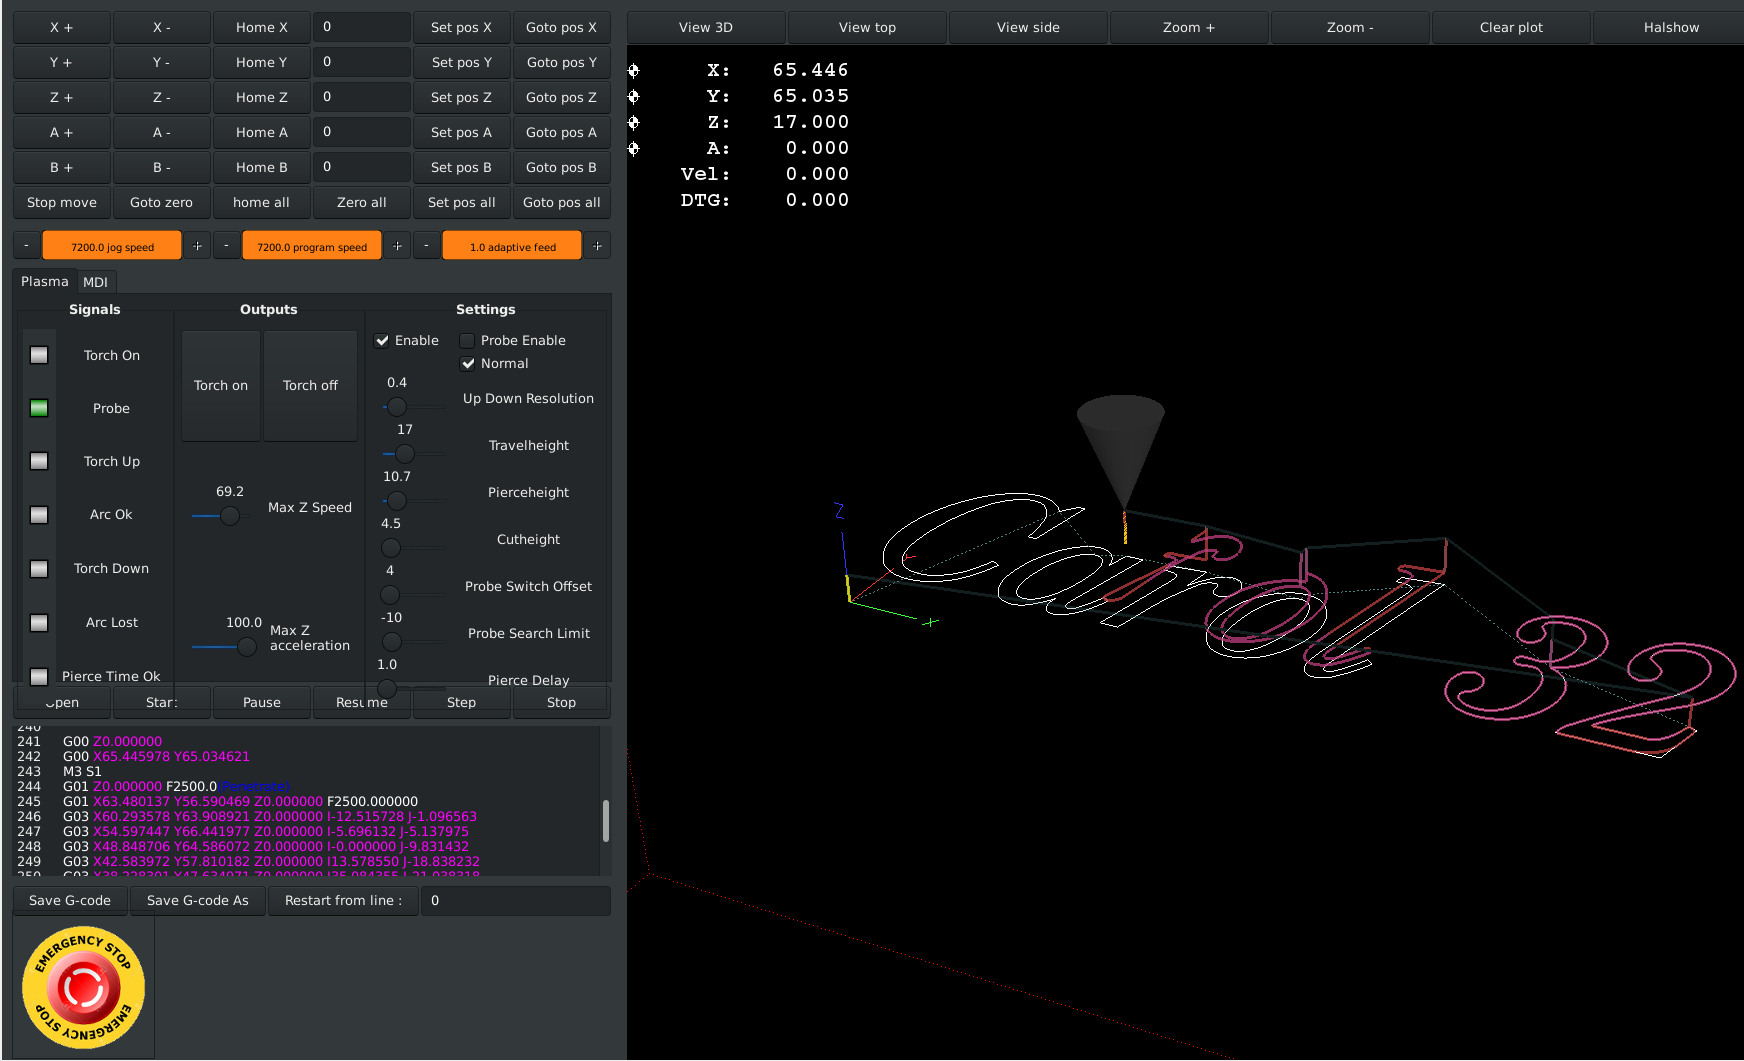
Nice tested code from today. working without probe.
Tomorrow i will write the probe function again, with newer updated code learned from today. Also the previous posted code is working good. But i want it to be in line with today's code. After doing this, i think it's ready to make a gmocappy side screen and
try to investegate some time in making a debian 9, 64 bit, plasma pre configured linux iso install cd. Why this?
It has extra features. Negative Adaptive Feed, Externall Offset's, and this version is 99% up to date with master.
So it's takes some time to get to the top to linux Plasma. But if you are almost get there, the fun increases with the day !!!!
I have written the following basic code. This would work good. I can implement it in the code if you agree.
The connections related to mesa
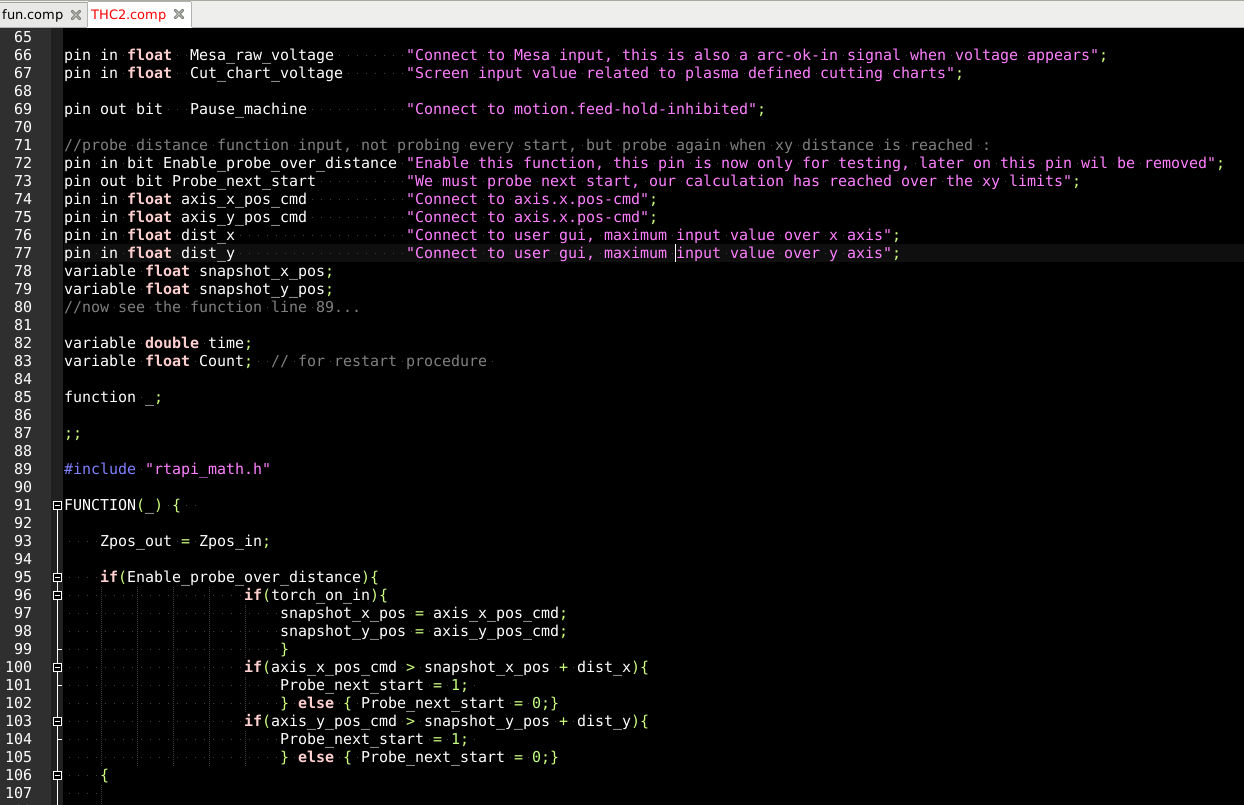
pin in bit Enable_mesa                "Connect to User inferface input";
pin in float  Mesa_raw_voltage        "Connect to Mesa input";
pin in float  Cut_chart_voltage       "Screen input value related to plamsa defined cutting charts";
The code related to mesa
if(Enable_mesa){

                if(Mesa_raw_voltage > Cut_chart_voltage && Mesa_raw_voltage > 0){  // only responce when we see voltage input higher then 0.
                    Offset = Axis_z_eoffset - Up_down_resolution ; // torch down.
                    Pause_machine = 0;
                    }
                if(Mesa_raw_voltage < Cut_chart_voltage && Mesa_raw_voltage > 0){
                    Offset = Axis_z_eoffset + Up_down_resolution ; // torch up.
                    Pause_machine = 0;
                    }
                if(Mesa_raw_voltage == Cut_chart_voltage && Mesa_raw_voltage > 0){
                    Offset = Axis_z_eoffset; // no correction needed, stay stadey.
                    Pause_machine = 0;
                    }


    }
I tried the code without probing, it works good. It's real time responding on the screen value's.
Wow man. This component does everything. You only need a g-code starting with G21 and M3 S1 and M5...
Wow.. Never thought we could make this guy's !!
Nice tested code from today. working without probe.
if(Normal){
        if(!Torch_on_in){
            Offset = Travelheight;
            Pause_machine = 1;
            Torch_on_out = 0;
            Cutting_trigger = 0;
            }
        if(!Torch_on_in && ( (Axis_z_eoffset >(Travelheight-0.1)) && (Axis_z_eoffset <(Travelheight+0.1)) ) ){  // if no torch on in goto travelheight.
            Pause_machine = 0;
            }
        if(Torch_on_in && !Torch_on_out){ // if torch on in goto pierceheight.
            Offset = Pierceheight;
            Pause_machine = 1;
            }
        if(Torch_on_in && !Torch_on_out && ( (Axis_z_eoffset > (Pierceheight-0.1)) && (Axis_z_eoffset <(Pierceheight+0.1)) ) ){  // if at pierceheight.
            Torch_on_out = 1;
            Pause_machine = 1;
            }
        if(Torch_on_in && Torch_on_out && Piercetime_reached){  // if torch on in and piercetime oke, goto cutheight.
            Offset = Cutheight;
            Pause_machine = 1;
            }
        if(Torch_on_in && Torch_on_out && Piercetime_reached && ( (Axis_z_eoffset >(Cutheight-0.1)) && (Axis_z_eoffset <(Cutheight+0.1)) ) ){ // add ark ok signal
            Pause_machine = 0;
            Cutting_trigger = 1;  // we are cutting
            }
        //if(Torch_on_in && Torch_on_out && Piercetime_reached && ( (Axis_z_eoffset >(Cutheight-0.1)) && (Axis_z_eoffset <(Cutheight+0.1)) ) && !Ark_ok_in) {
        //    Pause_machine = 1;
        //      Torch_on_out = 0;
        //    }
        if(Torch_up && Torch_on_out && Cutting_trigger && (Axis_z_eoffset <= Travelheight) ){ // torch up and limited to travelheight
            Offset = Axis_z_eoffset + Up_down_resolution ;
            Pause_machine = 0;
            }
        if(Torch_down && Torch_on_out && Cutting_trigger && (Axis_z_eoffset >= Probe_search_limit) ){ // torch down and limited to probe search limit
            Offset = Axis_z_eoffset - Up_down_resolution ;
            Pause_machine = 0;
            }
        if(!Torch_down && !Torch_up && Torch_on_out && Cutting_trigger){ // if no torch up or down, stay at current height
            Offset = Axis_z_eoffset;
            Pause_machine = 0;
            }

    }
Tomorrow i will write the probe function again, with newer updated code learned from today. Also the previous posted code is working good. But i want it to be in line with today's code. After doing this, i think it's ready to make a gmocappy side screen and
try to investegate some time in making a debian 9, 64 bit, plasma pre configured linux iso install cd. Why this?
It has extra features. Negative Adaptive Feed, Externall Offset's, and this version is 99% up to date with master.
So it's takes some time to get to the top to linux Plasma. But if you are almost get there, the fun increases with the day !!!!
Last edit: 18 Aug 2018 18:11 by Grotius.
The following user(s) said Thank You: tommylight, scubawarm
Please Log in or Create an account to join the conversation.
- rodw
-
 Topic Author
- Offline
- Platinum Member
-
Less
More
- Posts: 11967
- Thank you received: 4078
18 Aug 2018 21:16 #116282
by rodw
Replied by rodw on topic Useful Plasma Thread
This would certainly be a starting point. The THCAD board can be < 0 as there is an offset frequency at 0.0 volts so I think probably your test for > 0 should be more like:
I'm happy to build it out to suit my hardware and test for you.
However, I think once LinuxCNC knows the voltage there are more sophisticated PID based algorithms that could be used than a simple "bang bang" approach as many of the external THC's will have a PID based algorithm in their circuitry. We should work out how to incorporate LinuxCNC's PID component into the adjustment as the next step.
I've also wondered if the offset cannot be calculated likewhere VOLTS_PER_MM has been determined to be what my plasma cutter does from testing and measurements. I think then the system should wait until an adjustment move is completed before its adjusted again. Its widely been accepted that its around 10.0 volts per mm.
Mesa_raw_voltage > 10.0I'm happy to build it out to suit my hardware and test for you.
However, I think once LinuxCNC knows the voltage there are more sophisticated PID based algorithms that could be used than a simple "bang bang" approach as many of the external THC's will have a PID based algorithm in their circuitry. We should work out how to incorporate LinuxCNC's PID component into the adjustment as the next step.
I've also wondered if the offset cannot be calculated like
#define VOLTS_PER_MM 7.53
double mm_per_volt = 1.0/VOLTS_PER_MM
dist_offset = (Mesa_raw_voltage - Cut_chart_voltage ) * mm_per_volt;Please Log in or Create an account to join the conversation.
- Grotius
-
- Offline
- Platinum Member
-
Less
More
- Posts: 2419
- Thank you received: 2348
19 Aug 2018 15:30 - 19 Aug 2018 18:53 #116318
by Grotius
Replied by Grotius on topic Useful Plasma Thread
Hi,
If you want to test the a linuxcnc version with a complete working THC setup, based on a new THC2 component.
I have uploaded the complete Grotius gui to my git channel. The Grotius gui is build on a easy python code to understand.
It is the easyest user gui to use as learning project at this moment.
github.com/michelwijnja/external_offsets_adaptive_feed
The how to build this linuxcnc version is also included, it's not difficult if you follow the readme file.
Have fun!
github.com/michelwijnja/external_offsets...lob/master/README.md
This linuxcnc version has 5 important things to know about :
1. It's up to date with master.
2. It has external offsets.
3. It has negative adaptive feed.
4. It has a plug and play torch height controller user interface based on a standard lpt1 break out board.
5. It is compatible with Mesa torch height controllers.
6. This code will be improved the coming time, see the THC2.comp file for todo instructions.
It's working on parport break out board's directly.
With Mesa change the connection's in the grotius.hal & postgui.hal section.
The Mesa connection's in the component are already working !!
When Grotius is started, first reset emergency button, then home all, then select enable, then choose parport or mesa.
Open ngc file : configs/sim/grotius/nc_files/THC2_example.ngc
When someone has tested the mesa config, please update the modified grotius.hal and postgui.hal to me, then i upload this pre configured Mesa config on the git channel. Also include the board type combination. Then everybody is happy !!!
@Rod,
Calculating the destination mm offset is also a option. I also thought about this.
At this moment to get a functional thc component, that is compatible with all system's it was easy to make only a torch up and down and stay stadey signal. The correction speed is also available. So i think you can test by yourself if you see improvements after changing the code to your needs.
Last edit: 19 Aug 2018 18:53 by Grotius.
The following user(s) said Thank You: scubawarm
Please Log in or Create an account to join the conversation.
- Grotius
-
- Offline
- Platinum Member
-
Less
More
- Posts: 2419
- Thank you received: 2348
19 Aug 2018 17:51 - 19 Aug 2018 20:23 #116337
by Grotius
Replied by Grotius on topic Useful Plasma Thread
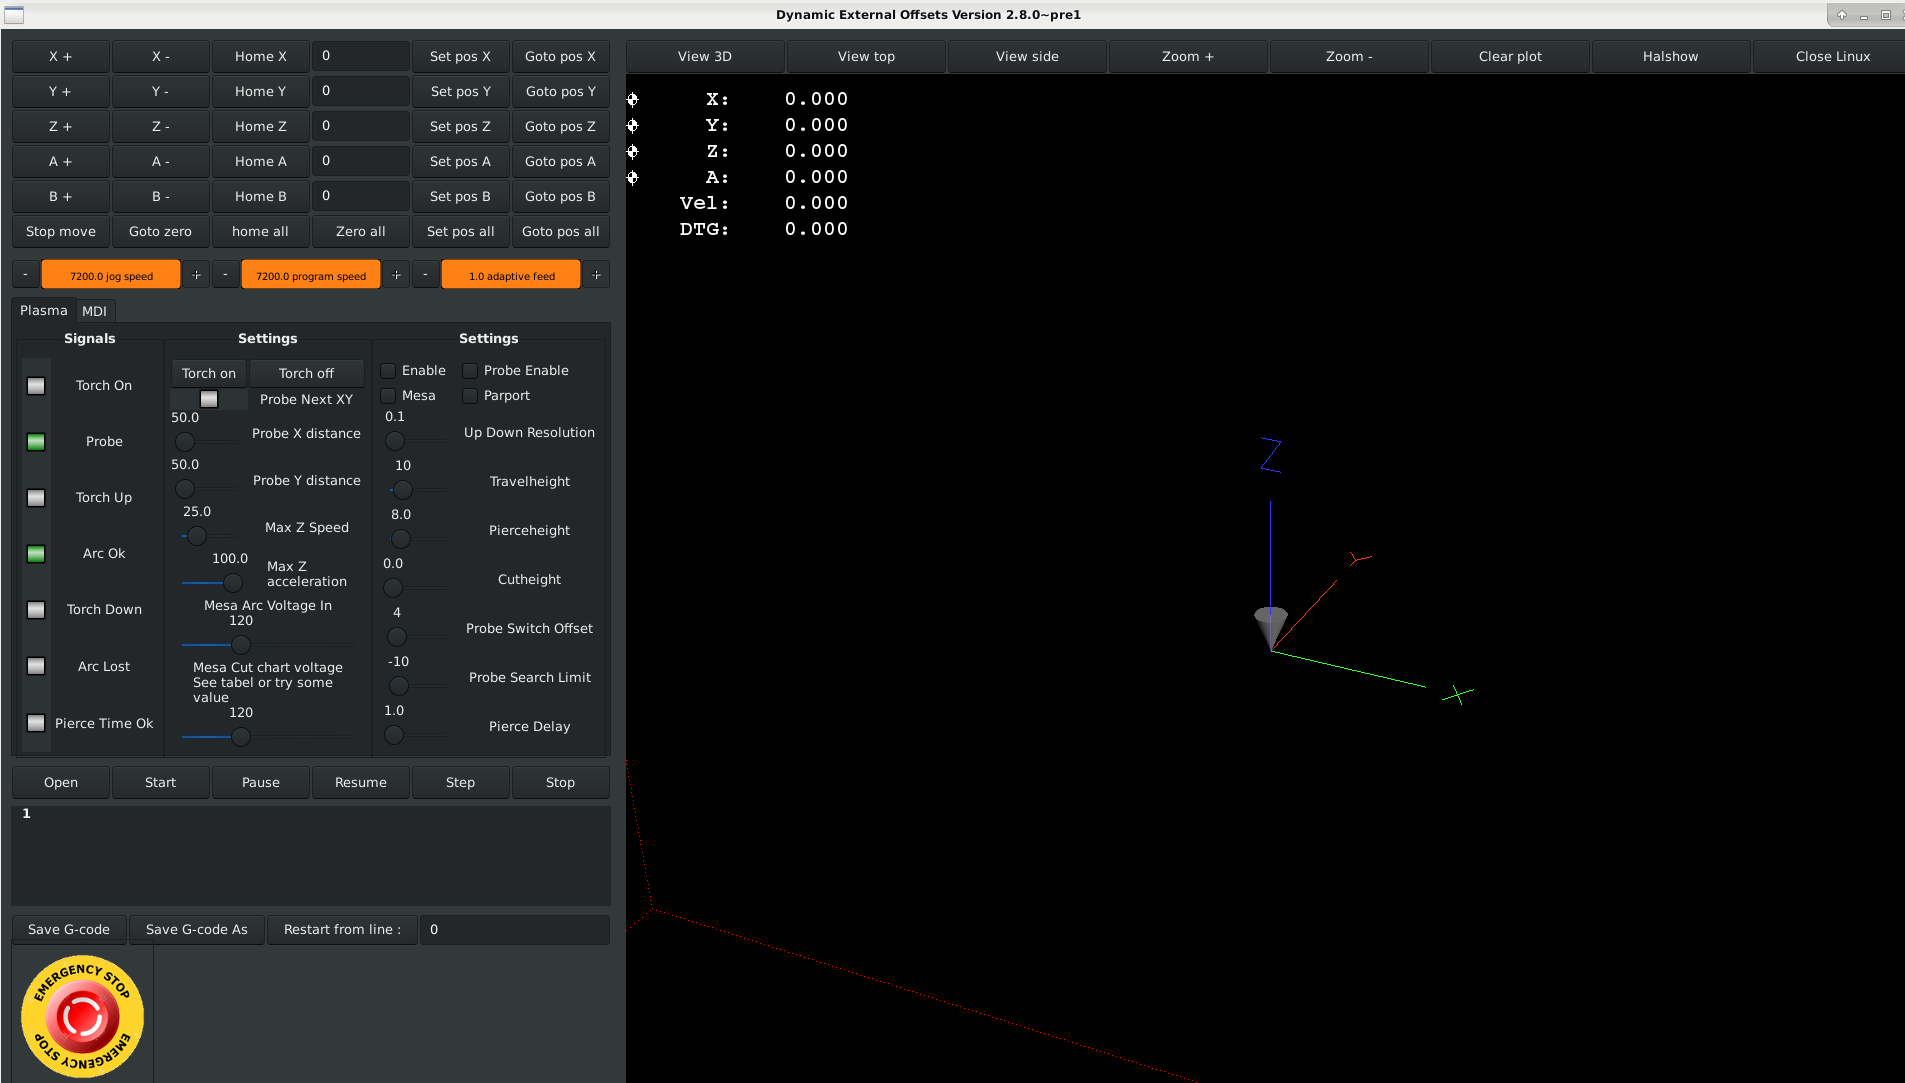
Dear Mesa users,
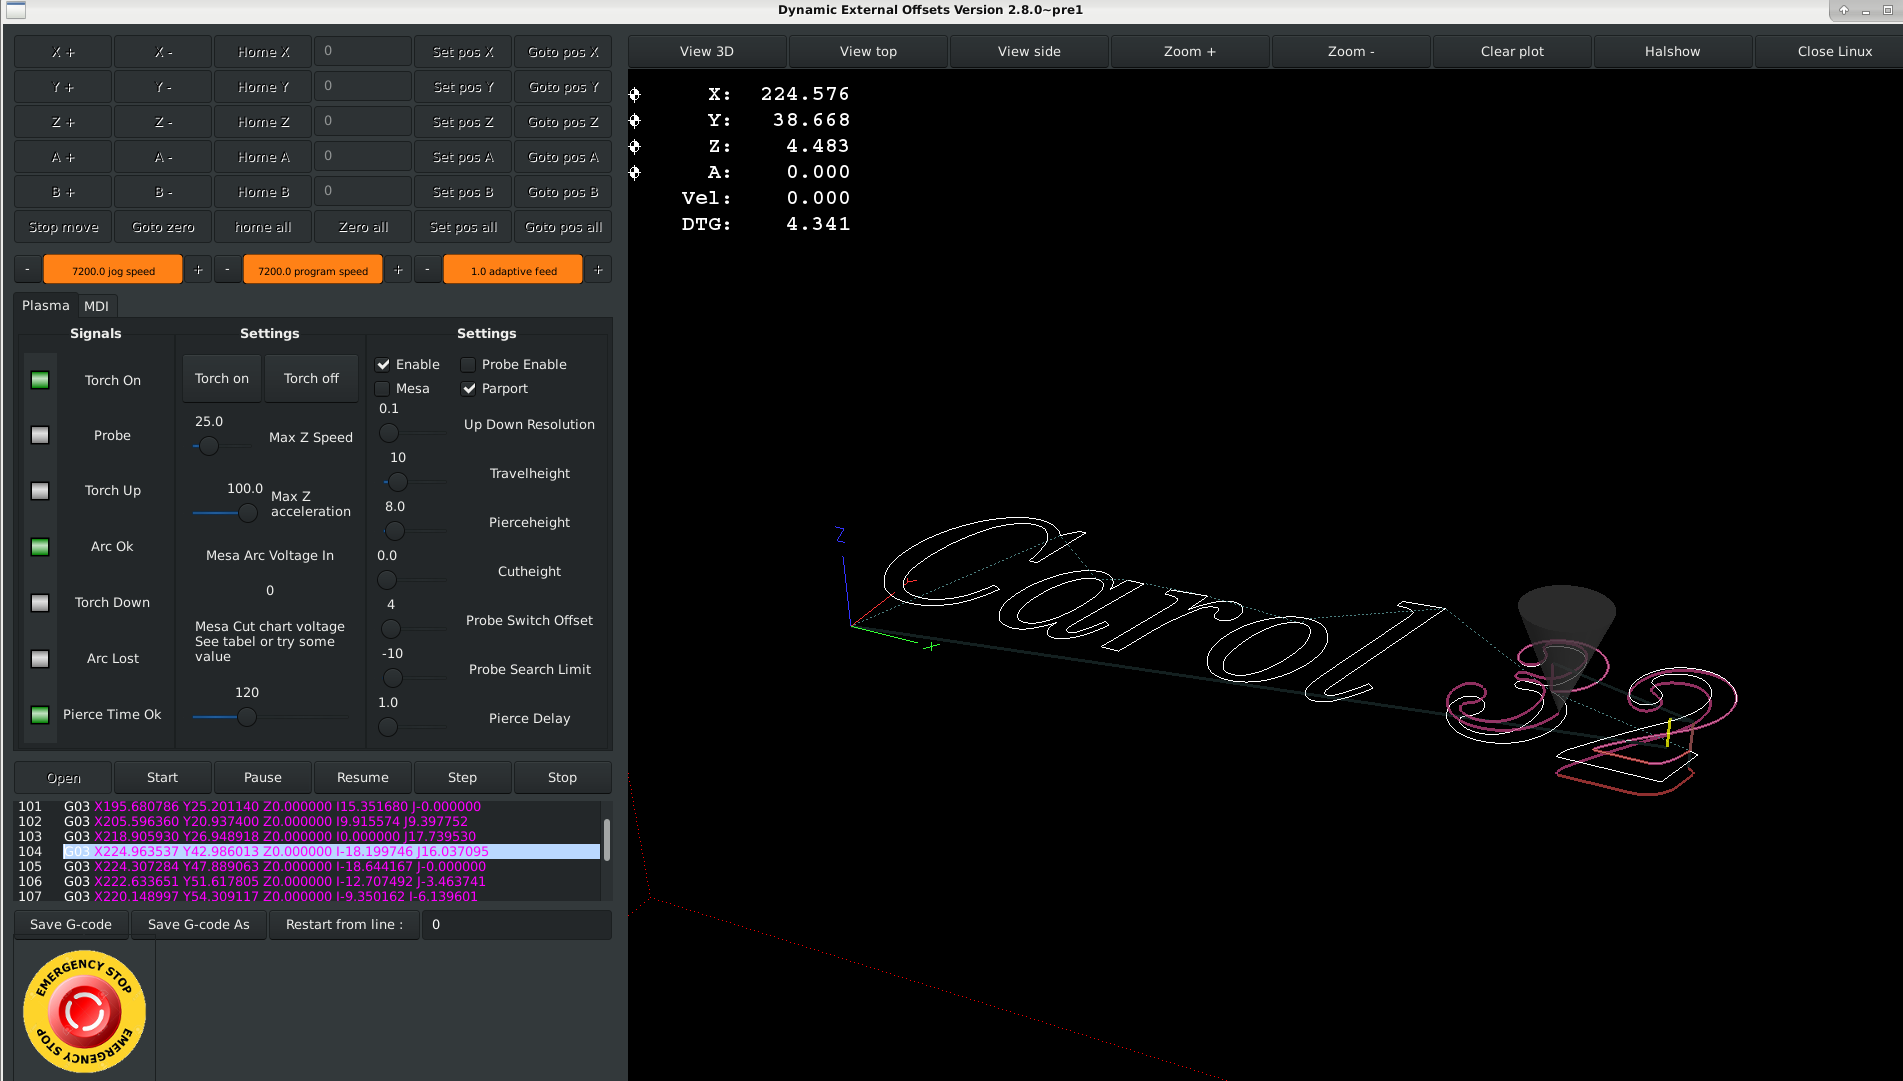
The test screen works without a fysical connection to your mesa equipment.
So you can test this function, and connect your mesa later on in the postgui.hal file.
It is now connected from the THC2.comp to the Glade file like this :
So replace the grotius.gui input for your mesa encoder input ((grotius_gui.Mesa_raw_voltage) replace with your Mesa encoder input) , and you are ready to go !
This feature is already updated on my git channel.
The picture is showing the Mesa feature. It works !
Now i tested the Mesa config a few times. It's a masterpiece code.
It's based for flat g-code. Only need m3 and m5. And a G21 at the begin for mm.
The rest is just like the Professor Toma did years ago, this is only programmed in C and Python.
Thanks to Github, our forum members, specially Rodw !
51 min. Forum is too old to add start time")
Okey now i want to write the code for the probe function, to give a x and y axis offset, instead of probing every start.
Rod has give some code information about this in circuliar formula. I write this in rectangular way because steel plates are
mostly bended over the short lenght. So in my case the Y-axis. So here a example the c code i am writing at the moment to
do make this happen.
The test screen works without a fysical connection to your mesa equipment.
So you can test this function, and connect your mesa later on in the postgui.hal file.
It is now connected from the THC2.comp to the Glade file like this :
net  THC2-Mesa_raw_voltage      THC2.Mesa-raw-voltage         grotius_gui.Mesa_raw_voltage
net  THC2-Cut_chart_voltage     THC2.Cut-chart-voltage        grotius_gui.Cut_chart_voltage
So replace the grotius.gui input for your mesa encoder input ((grotius_gui.Mesa_raw_voltage) replace with your Mesa encoder input) , and you are ready to go !
This feature is already updated on my git channel.
The picture is showing the Mesa feature. It works !
Now i tested the Mesa config a few times. It's a masterpiece code.
It's based for flat g-code. Only need m3 and m5. And a G21 at the begin for mm.
The rest is just like the Professor Toma did years ago, this is only programmed in C and Python.
Thanks to Github, our forum members, specially Rodw !
51 min. Forum is too old to add start time
Okey now i want to write the code for the probe function, to give a x and y axis offset, instead of probing every start.
Rod has give some code information about this in circuliar formula. I write this in rectangular way because steel plates are
mostly bended over the short lenght. So in my case the Y-axis. So here a example the c code i am writing at the moment to
do make this happen.
Last edit: 19 Aug 2018 20:23 by Grotius.
The following user(s) said Thank You: kb8wmc, tommylight
Please Log in or Create an account to join the conversation.
- Grotius
-
- Offline
- Platinum Member
-
Less
More
- Posts: 2419
- Thank you received: 2348
21 Aug 2018 20:26 - 21 Aug 2018 20:27 #116420
by Grotius
Replied by Grotius on topic Useful Plasma Thread
Hi,
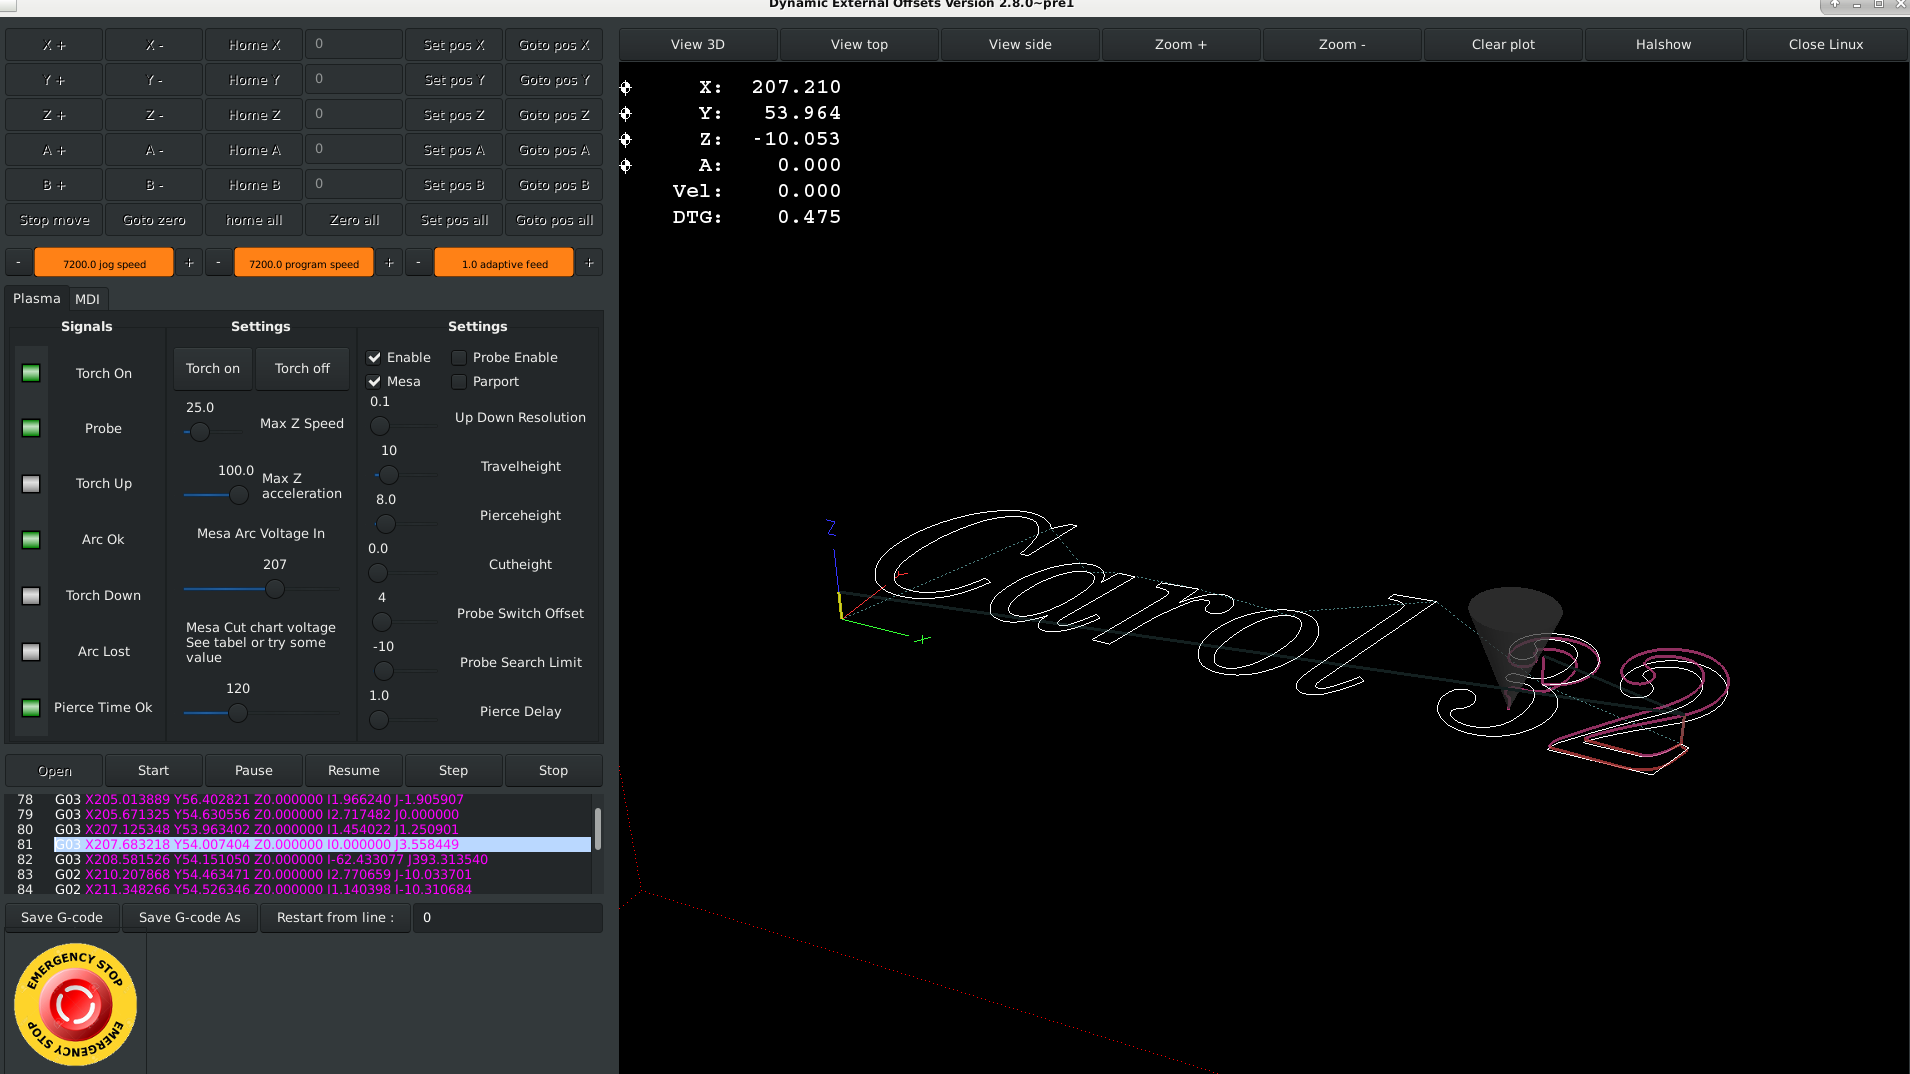
I have now learned how to use switch case in c programming.
The probe function over a certian x-y distance is now working. When this mode is on by selecting Probe Enable on the screen,
the probe is only probing when the screen input limit's are reached over x and y axis, the led is also indicating if the limits are reached.
When no probing is needed, the next start wil be on the last probe height.
When Probe Enable is off, the machine uses the cutheight input. I updated this to github.
The next item will be the auto restart procedure i think.
github.com/michelwijnja/external_offsets...components/THC2.comp
Last edit: 21 Aug 2018 20:27 by Grotius.
Please Log in or Create an account to join the conversation.
- rodw
-
Topic Author
- Offline
- Platinum Member
-
Less
More
- Posts: 11967
- Thank you received: 4078
21 Aug 2018 21:41 - 21 Aug 2018 21:42 #116427
by rodw
Replied by rodw on topic Useful Plasma Thread
Your code is starting to look good, you can streamline a lot of the conditionals which will speed execution. eg
where you do this:
you can skip a whole block if you do it like this:doing it this way will skip whole blocks of code and avoid multiple tests of the same condition. THe same applies for these repeated conditionals
When I get a moment, I'll see if I can edit what you've done.
where you do this:
           if(!Torch_on_in){
                    Offset = Travelheight;
                    Pause_machine = 1;
                    Torch_on_out = 0;
                    Cutting_trigger = 0;
                    Probe_trigger = 0;
                    }
                if(!Torch_on_in && ( (Axis_z_eoffset >(Travelheight-0.1)) && (Axis_z_eoffset <(Travelheight+0.1)) ) ){
                    Pause_machine = 0;
                }
....
....
you can skip a whole block if you do it like this:
           if(!Torch_on_in){
                    Offset = Travelheight;
                    Pause_machine = 1;
                    Torch_on_out = 0;
                    Cutting_trigger = 0;
                    Probe_trigger = 0;
                   if ( (Axis_z_eoffset >(Travelheight-0.1)) && (Axis_z_eoffset <(Travelheight+0.1)) ) ){
                       Pause_machine = 0;
                    }
            else{   //Torch_on_in is true
                   if(Torch_on_out){ // search for probe.
                       Offset = Zpos_probe + Probe_switch_offset + Pierceheight;
                       Pause_machine = 1;
                   }
                if( !Torch_on_out && ( (Axis_z_eoffset >(Zpos_probe + Probe_switch_offset + Pierceheight-0.1)) && (Axis_z_eoffset <(Zpos_probe + Probe_switch_offset + Pierceheight+0.1)) ) ){
                    Torch_on_out = 1;
                    Pause_machine = 1;  // at pierceheight.
                }
            ....
            ....
           }
 if(Parport
if(Mesa
When I get a moment, I'll see if I can edit what you've done.
Last edit: 21 Aug 2018 21:42 by rodw.
The following user(s) said Thank You: Grotius
Please Log in or Create an account to join the conversation.
- Grotius
-
- Offline
- Platinum Member
-
Less
More
- Posts: 2419
- Thank you received: 2348
21 Aug 2018 22:02 - 22 Aug 2018 01:04 #116428
by Grotius
Replied by Grotius on topic Useful Plasma Thread
Hi Rod,
Thanks.
I am now constructing the code in blocks (cases), i think i will improve a lot of code coming time.
Here a temponary example :
github.com/michelwijnja/external_offsets...onents/THC2_REV.comp
When to use the return; / return 0; or return -1; statement is a little difficult for me to understand.
Last edit: 22 Aug 2018 01:04 by Grotius.
Please Log in or Create an account to join the conversation.
- rodw
-
Topic Author
- Offline
- Platinum Member
-
Less
More
- Posts: 11967
- Thank you received: 4078
22 Aug 2018 03:49 #116442
by rodw
Great to see improvement. One day you will be as good as Andy!
the return value can be what you want it to be as the programmer.
Sometimes a return value might be a calculated value. an example of this might be the C pow() functionOther times it might signify an error code or status. Often 1 or 0, for true and false
or a longer version of using istrue
Some coders will decide that -1 always signifies an error so that you can always check that there is no error in a program.
Other coders might make a list of errors in a string array somewhere and the returned value is an index into that array
It all depsnds on what you the programmer want to do. The best way is to read other code. why not look in the src/emc folder and just try and read some code and see how other people do it
Replied by rodw on topic Useful Plasma Thread
Hi Rod,
When to use the return; / return 0; or return -1; statement is a little difficult for me to understand.
Great to see improvement. One day you will be as good as Andy!
the return value can be what you want it to be as the programmer.
Sometimes a return value might be a calculated value. an example of this might be the C pow() function
x2 = pow(x,2) ;// return x raised to the power of 2 (eg. x^2 in an Excel spreadsheet)if(istrue())
printf("istrue returned TRUE\r\n");
else
printf(istrue returned FALSE\r\n");or a longer version of using istrue
int i;
i = istrue();
if(i==1)
  printf("i = TRUE\r\n");
else
  printf("i =  FALSE\r\n");
Some coders will decide that -1 always signifies an error so that you can always check that there is no error in a program.
Other coders might make a list of errors in a string array somewhere and the returned value is an index into that array
It all depsnds on what you the programmer want to do. The best way is to read other code. why not look in the src/emc folder and just try and read some code and see how other people do it
The following user(s) said Thank You: Grotius
Please Log in or Create an account to join the conversation.
- Grotius
-
- Offline
- Platinum Member
-
Less
More
- Posts: 2419
- Thank you received: 2348
23 Aug 2018 08:32 - 23 Aug 2018 08:35 #116475
by Grotius
Replied by Grotius on topic Useful Plasma Thread
Hi,
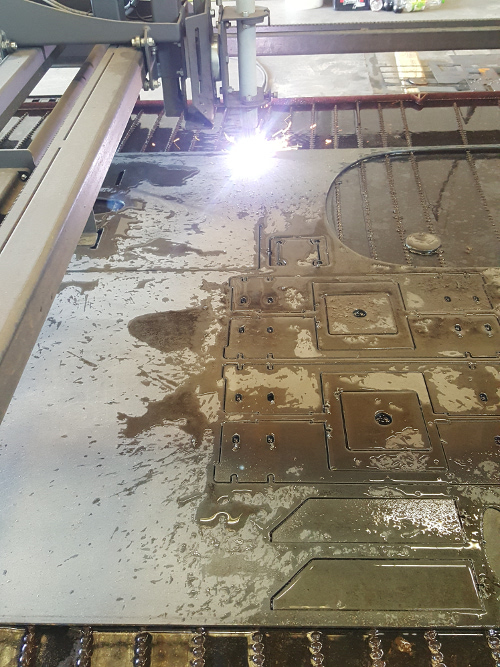
I have cutted several steel plates with linuxcnc.
The probe function over distance works great ! And also normal cutting without probe go's good. I prefer to use the probe function
with a xy distance of 200mm.
If there is a start fault, restart at certain line is a bit of a problem. I also tried this in the Gmocappy screen, same issue.
The error is "arc radius differs from ...." So restart at certain line was not possible for me, only restart from line 1 worked.
But i have a nice solution. Doing some adaptive feed negative, we start where we want at the current cutting path and restart is done by clicking enable off and on. Later in the code i will make a restart button and do this automaticly with adaptive feed negative for about 2 second's. The the machine wil move a little back and fires the torch again. So this is nice.
After loading a new ngc file i want to make a automatic clear plot command in the python code. The old ngc remains in the screen.
After clicking clear plot it is gone.
Proma has the D-t value. this is now 1.5 seconds at my machine. With a value of 0 second's the machine is diving at start a
little bit. So for Mesa and Proma users i will make anti dive button with a timer function.
I have to check the glade auto screen resize option's for different monitor resolution's.
I tried to make a startup ngc code in the ini file, for Macro code's M52 P1, this is not working. Adapting this code as mdi code
in the c code is the solution then i think.
What i am missing also is a feed overide control on my screen, and a control to manage the z axis speed seperatly from x and y axis.
For the rest i coded the component in case's. But with to many cases i mentioned problem's. So what i am using at the moment,
a component with 3 or 4 cases, this is going perfectos.
Almost forgot. Between the M5 and M3, when traveling at travelheight i need to check the arc ok signal / torch volts in. One time the torch stayed on. So when monitoring that, there will be no second time.
Last edit: 23 Aug 2018 08:35 by Grotius.
The following user(s) said Thank You: tommylight, rodw, scubawarm
Please Log in or Create an account to join the conversation.
- scubawarm
-

- Offline
- Premium Member
-

Less
More
- Posts: 96
- Thank you received: 2
23 Aug 2018 12:17 #116483
by scubawarm
Replied by scubawarm on topic Useful Plasma Thread
Just want to say... You are the man! My complete retrofit project has been delayed several times mostly because of manpower shortages BUT I am going to be hitting it full time starting Sept. 4 with a goal of getting it at least functional in 30 days time. As I will be physically leaving the country again and will be impossible to finish without another 2 month delay.
I am so thankful I had these prior delays as now I have something to actually work from. This is a very high voltage machine and will be a testimony to LinuxCNC and your work. BTW mine will be on Mesa. Again Thank you so very much for your time and sharing.
I am so thankful I had these prior delays as now I have something to actually work from. This is a very high voltage machine and will be a testimony to LinuxCNC and your work. BTW mine will be on Mesa. Again Thank you so very much for your time and sharing.
The following user(s) said Thank You: Grotius
Please Log in or Create an account to join the conversation.
Moderators: snowgoer540
Time to create page: 0.687 seconds