- Hardware & Machines
- CNC Machines
- Plasma & Laser
- Configuring Plasmac - a complete THC/plasma config for any hardware
Configuring Plasmac - a complete THC/plasma config for any hardware
- pl7i92
-

- Offline
- Platinum Member
-

Less
More
- Posts: 1872
- Thank you received: 358
30 Apr 2019 10:33 #132337
by pl7i92
Replied by pl7i92 on topic Configuring Plasmac - a complete THC/plasma config for any hardware
it depends on how you work it is usabel and works great
Please Log in or Create an account to join the conversation.
- rodw
-
 Topic Author
- Away
- Platinum Member
-

Less
More
- Posts: 11661
- Thank you received: 3929
30 Apr 2019 10:41 - 30 Apr 2019 10:42 #132339
by rodw
Bevins, absolutely. John (Islander261) is using it in a production setting and says it is the best he's used. I've done enough cutting to know its stable. I think now the next (and probably last) feature is to integrate the LinuxCNC tool changer with the plasmac materials list. This would let the tool number retrieve the materials settings and set the kerf width (tool diameter) offset for both inside and outside cuts.
You may need to rewire ohmic sensing to the plasmac way. This requires a separate isolated power supply, a probe enable output and an ohmic sensor input (so the probe is disconnected at all times by some opto isolated relays unless probing and another relay is used to switch field power to the ohmic input.)
Replied by rodw on topic Configuring Plasmac - a complete THC/plasma config for any hardware
Is this usable for production?
Bevins, absolutely. John (Islander261) is using it in a production setting and says it is the best he's used. I've done enough cutting to know its stable. I think now the next (and probably last) feature is to integrate the LinuxCNC tool changer with the plasmac materials list. This would let the tool number retrieve the materials settings and set the kerf width (tool diameter) offset for both inside and outside cuts.
You may need to rewire ohmic sensing to the plasmac way. This requires a separate isolated power supply, a probe enable output and an ohmic sensor input (so the probe is disconnected at all times by some opto isolated relays unless probing and another relay is used to switch field power to the ohmic input.)
Last edit: 30 Apr 2019 10:42 by rodw.
Please Log in or Create an account to join the conversation.
- bevins
-

- Offline
- Platinum Member
-

Less
More
- Posts: 1942
- Thank you received: 338
30 Apr 2019 14:05 #132351
by bevins
Is that absolutely necessary? Can do the same thing with sheetcam.
Replied by bevins on topic Configuring Plasmac - a complete THC/plasma config for any hardware
Is this usable for production?
Bevins, absolutely. John (Islander261) is using it in a production setting and says it is the best he's used. I've done enough cutting to know its stable. I think now the next (and probably last) feature is to integrate the LinuxCNC tool changer with the plasmac materials list. This would let the tool number retrieve the materials settings and set the kerf width (tool diameter) offset for both inside and outside cuts.
You may need to rewire ohmic sensing to the plasmac way. This requires a separate isolated power supply, a probe enable output and an ohmic sensor input (so the probe is disconnected at all times by some opto isolated relays unless probing and another relay is used to switch field power to the ohmic input.)
Is that absolutely necessary? Can do the same thing with sheetcam.
Please Log in or Create an account to join the conversation.
- rodw
-
 Topic Author
- Away
- Platinum Member
-

Less
More
- Posts: 11661
- Thank you received: 3929
30 Apr 2019 20:07 #132367
by rodw
Replied by rodw on topic Configuring Plasmac - a complete THC/plasma config for any hardware
It comes down to which system will be the single point of truth. Linuxcnc or Sheetcam? WIth Plasmac, it will be LinuxCNC. Don't get me wrong. John and I both use sheetcam with plasmac but it is not mandatory.
Sheetcam will just need to send the ToolID via a Tn M6 command. All I can say is Plasmac is very different in its approach and is following the lead of gold standard plasma CNC systems, not what has been done in the past to work around the weaknesses of Mach3. Give it a try, you will be a convert!
Sheetcam will just need to send the ToolID via a Tn M6 command. All I can say is Plasmac is very different in its approach and is following the lead of gold standard plasma CNC systems, not what has been done in the past to work around the weaknesses of Mach3. Give it a try, you will be a convert!
Please Log in or Create an account to join the conversation.
- JTknives
-

- Offline
- Elite Member
-

Less
More
- Posts: 243
- Thank you received: 32
30 Apr 2019 20:33 #132370
by JTknives
Replied by JTknives on topic Configuring Plasmac - a complete THC/plasma config for any hardware
sorry if this is a dumb question but how does one go about defining inputs and outputs. How is each pin labeled and is there a list of them? I searched but did not seam to find anything to describe how to do it but that could be because i'm not sure what to search for.
jtknives@plasma:~$ . plasmac/scripts/rip-environment
jtknives@plasma:~$ linuxcnc
LINUXCNC - 2.8.0~pre1
Machine configuration directory is '/home/jtknives/linuxcnc/configs/plasmac'
Machine configuration file is 'mymachine.ini'

check_config: (trivkins kinematics) WARNING:
  Unspecified [JOINT_0]MAX_VELOCITY,     default used: 1.0
  Unspecified [JOINT_0]MAX_ACCELERATION, default used: 1.0
  Unspecified [JOINT_1]MAX_VELOCITY,     default used: 1.0
  Unspecified [JOINT_1]MAX_ACCELERATION, default used: 1.0
  Unspecified [JOINT_2]MAX_VELOCITY,     default used: 1.0
  Unspecified [JOINT_2]MAX_ACCELERATION, default used: 1.0

Starting LinuxCNC...
twopass:invoked with <> options
twopass:found ./machine.hal
twopass:found ./plasmac.hal
Note: Using POSIX realtime
hm2: loading Mesa HostMot2 driver version 0.15
hm2_eth: loading Mesa AnyIO HostMot2 ethernet driver version 0.2
hm2_eth: 10.10.10.10: Hardware address: 00:60:1b:10:80:32
hm2_eth: discovered 7I76E-16
hm2/hm2_7i76e.0: Smart Serial Firmware Version 43
Board hm2_7i76e.0.7i76.0.0 Hardware Mode 0 = standard
Board hm2_7i76e.0.7i76.0.0 Software Mode 0 = io_spin
Board hm2_7i76e.0.7i76.0.0 Software Mode 1 = io_ana_spin
Board hm2_7i76e.0.7i76.0.0 Software Mode 2 = io_enc_ana_spin_fv
hm2/hm2_7i76e.0: 51 I/O Pins used:
hm2/hm2_7i76e.0:     IO Pin 000 (P1-01): StepGen #0, pin Direction (Output)
hm2/hm2_7i76e.0:     IO Pin 001 (P1-14): StepGen #0, pin Step (Output)
hm2/hm2_7i76e.0:     IO Pin 002 (P1-02): StepGen #1, pin Direction (Output)
hm2/hm2_7i76e.0:     IO Pin 003 (P1-15): StepGen #1, pin Step (Output)
hm2/hm2_7i76e.0:     IO Pin 004 (P1-03): StepGen #2, pin Direction (Output)
hm2/hm2_7i76e.0:     IO Pin 005 (P1-16): StepGen #2, pin Step (Output)
hm2/hm2_7i76e.0:     IO Pin 006 (P1-04): IOPort
hm2/hm2_7i76e.0:     IO Pin 007 (P1-17): IOPort
hm2/hm2_7i76e.0:     IO Pin 008 (P1-05): IOPort
hm2/hm2_7i76e.0:     IO Pin 009 (P1-06): IOPort
hm2/hm2_7i76e.0:     IO Pin 010 (P1-07): Smart Serial Interface #0, pin TxData0 (Output)
hm2/hm2_7i76e.0:     IO Pin 011 (P1-08): Smart Serial Interface #0, pin RxData0 (Input)
hm2/hm2_7i76e.0:     IO Pin 012 (P1-09): IOPort
hm2/hm2_7i76e.0:     IO Pin 013 (P1-10): IOPort
hm2/hm2_7i76e.0:     IO Pin 014 (P1-11): Encoder #0, pin Index (Input)
hm2/hm2_7i76e.0:     IO Pin 015 (P1-12): Encoder #0, pin B (Input)
hm2/hm2_7i76e.0:     IO Pin 016 (P1-13): Encoder #0, pin A (Input)
hm2/hm2_7i76e.0:     IO Pin 017 (P2-01): IOPort
hm2/hm2_7i76e.0:     IO Pin 018 (P2-14): IOPort
hm2/hm2_7i76e.0:     IO Pin 019 (P2-02): IOPort
hm2/hm2_7i76e.0:     IO Pin 020 (P2-15): IOPort
hm2/hm2_7i76e.0:     IO Pin 021 (P2-03): IOPort
hm2/hm2_7i76e.0:     IO Pin 022 (P2-16): IOPort
hm2/hm2_7i76e.0:     IO Pin 023 (P2-04): IOPort
hm2/hm2_7i76e.0:     IO Pin 024 (P2-17): IOPort
hm2/hm2_7i76e.0:     IO Pin 025 (P2-05): IOPort
hm2/hm2_7i76e.0:     IO Pin 026 (P2-06): IOPort
hm2/hm2_7i76e.0:     IO Pin 027 (P2-07): IOPort
hm2/hm2_7i76e.0:     IO Pin 028 (P2-08): IOPort
hm2/hm2_7i76e.0:     IO Pin 029 (P2-09): IOPort
hm2/hm2_7i76e.0:     IO Pin 030 (P2-10): IOPort
hm2/hm2_7i76e.0:     IO Pin 031 (P2-11): IOPort
hm2/hm2_7i76e.0:     IO Pin 032 (P2-12): IOPort
hm2/hm2_7i76e.0:     IO Pin 033 (P2-13): IOPort
hm2/hm2_7i76e.0:     IO Pin 034 (P3-01): IOPort
hm2/hm2_7i76e.0:     IO Pin 035 (P3-14): IOPort
hm2/hm2_7i76e.0:     IO Pin 036 (P3-02): IOPort
hm2/hm2_7i76e.0:     IO Pin 037 (P3-15): IOPort
hm2/hm2_7i76e.0:     IO Pin 038 (P3-03): IOPort
hm2/hm2_7i76e.0:     IO Pin 039 (P3-16): IOPort
hm2/hm2_7i76e.0:     IO Pin 040 (P3-04): IOPort
hm2/hm2_7i76e.0:     IO Pin 041 (P3-17): IOPort
hm2/hm2_7i76e.0:     IO Pin 042 (P3-05): IOPort
hm2/hm2_7i76e.0:     IO Pin 043 (P3-06): IOPort
hm2/hm2_7i76e.0:     IO Pin 044 (P3-07): IOPort
hm2/hm2_7i76e.0:     IO Pin 045 (P3-08): IOPort
hm2/hm2_7i76e.0:     IO Pin 046 (P3-09): IOPort
hm2/hm2_7i76e.0:     IO Pin 047 (P3-10): IOPort
hm2/hm2_7i76e.0:     IO Pin 048 (P3-11): IOPort
hm2/hm2_7i76e.0:     IO Pin 049 (P3-12): IOPort
hm2/hm2_7i76e.0:     IO Pin 050 (P3-13): IOPort
hm2/hm2_7i76e.0: registered
twopass: Error in file ./machine.hal:
    Pin 'hm2_7i76e.0.7i76.0.0.output-??' does not exist
twopass: Error in file ./plasmac.hal:
    Pin 'joint.3.pos-fb' does not exist
Shutting down and cleaning up LinuxCNC...
hm2_eth: HostMot2 ethernet driver unloaded
hm2: unloading
Note: Using POSIX realtime
LinuxCNC terminated with an error.  You can find more information in the log:
    /home/jtknives/linuxcnc_debug.txt
and
    /home/jtknives/linuxcnc_print.txt
as well as in the output of the shell command 'dmesg' and in the terminal
jtknives@plasma:~$
Please Log in or Create an account to join the conversation.
- rodw
-
 Topic Author
- Away
- Platinum Member
-

Less
More
- Posts: 11661
- Thank you received: 3929
30 Apr 2019 20:53 #132374
by rodw
Replied by rodw on topic Configuring Plasmac - a complete THC/plasma config for any hardware
Easiest way is to click on the halshow button in plasmac and browse to your hearts content. Find the 7i76e and click down a few levels and all will be revealed. Also note how you can click on the watch tab and then click on a pin in the tree and watch it turn on and off. I use this extensively when setting up a new feature.
The other way while you have plasmac open is to open a new terminal window, set the rip-environment then type halcmd show pin
You could save the output for further reference if you typed halcmd show pin > mypins.txt But I always just use halshow which is a standard tool that comes with Linuxcnc.
The other way while you have plasmac open is to open a new terminal window, set the rip-environment then type halcmd show pin
You could save the output for further reference if you typed halcmd show pin > mypins.txt But I always just use halshow which is a standard tool that comes with Linuxcnc.
Please Log in or Create an account to join the conversation.
- rodw
-
 Topic Author
- Away
- Platinum Member
-

Less
More
- Posts: 11661
- Thank you received: 3929
30 Apr 2019 21:02 - 30 Apr 2019 21:03 #132375
by rodw
Replied by rodw on topic Configuring Plasmac - a complete THC/plasma config for any hardware
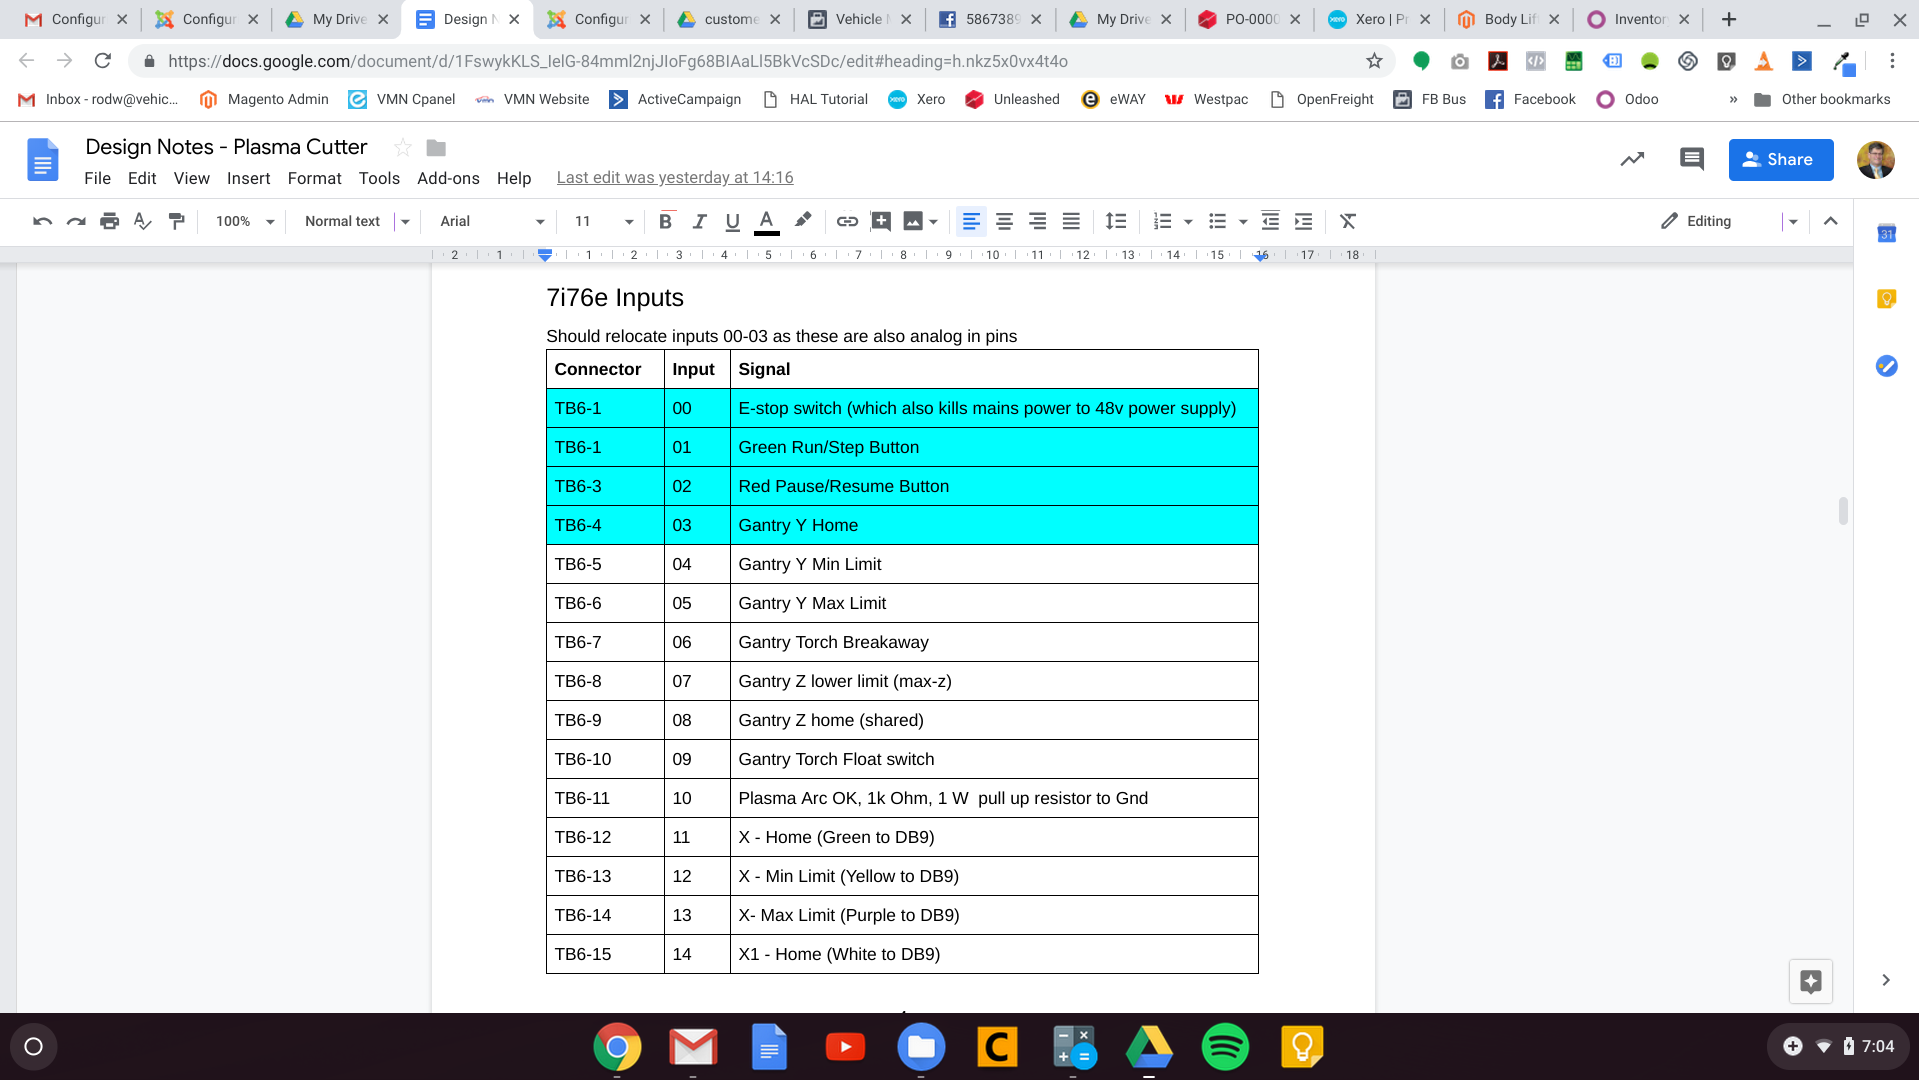
Just looked at your output. You just need to replace the question marks in the hal file John wrote for you with the real pin number. Either use Halshow or use the 7i76e manual. The manual is a bit confusing as the hardware pins are numbered from 1, but the output pins start at INPUT0.
So if you connect a wire to TB6 Pin 5, it will be INPUT4. In halshow, it will be hm2_7i76e.0.7i76.0.0.input-04. You can always check a pin by jumpering field power to it and watching it change state in halshow.
So if you connect a wire to TB6 Pin 5, it will be INPUT4. In halshow, it will be hm2_7i76e.0.7i76.0.0.input-04. You can always check a pin by jumpering field power to it and watching it change state in halshow.
Last edit: 30 Apr 2019 21:03 by rodw.
Please Log in or Create an account to join the conversation.
- rodw
-
 Topic Author
- Away
- Platinum Member
-

Less
More
- Posts: 11661
- Thank you received: 3929
30 Apr 2019 21:06 #132376
by rodw
Replied by rodw on topic Configuring Plasmac - a complete THC/plasma config for any hardware
Attachments:
Please Log in or Create an account to join the conversation.
- JTknives
-

- Offline
- Elite Member
-

Less
More
- Posts: 243
- Thank you received: 32
30 Apr 2019 21:50 #132379
by JTknives
Replied by JTknives on topic Configuring Plasmac - a complete THC/plasma config for any hardware
But how does it know your talking about TB6 and not any of the other TB# inputs/outputs.
Please Log in or Create an account to join the conversation.
- rodw
-
 Topic Author
- Away
- Platinum Member
-

Less
More
- Posts: 11661
- Thank you received: 3929
30 Apr 2019 22:09 #132380
by rodw
Replied by rodw on topic Configuring Plasmac - a complete THC/plasma config for any hardware
Because page 11 of the 7i76e Manual says that Input 4 is on TB6 pin 5.But how does it know your talking about TB6 and not any of the other TB# inputs/outputs.
Please Log in or Create an account to join the conversation.
Moderators: snowgoer540
- Hardware & Machines
- CNC Machines
- Plasma & Laser
- Configuring Plasmac - a complete THC/plasma config for any hardware
Time to create page: 0.136 seconds

