
- Posts: 1635
- Thank you received: 595
Retrofitting a 1986 Maho MH400E
- RotarySMP
- Offline
- Platinum Member
-

Less
More
7 years 5 months ago #132991
by RotarySMP
Replied by RotarySMP on topic Retrofitting a 1986 Maho MH400E
You'll get there. This is the first block of my HAL:
You probably want to comment out Matrix_KB, estop_latch MH400E_gearbox for starters.
#*******************
# HAL COMPONENTS
#*******************
loadrt trivkins
loadrt [EMCMOT]EMCMOT servo_period_nsec=[EMCMOT]SERVO_PERIOD num_joints=[TRAJ]AXES
# Driver for MESA 5i25/7i77/7i84 interface cards
loadrt hostmot2
loadrt hm2_pci config=" num_encoders=3 num_pwmgens=0 num_stepgens=0 sserial_port_0=300xxx"
setp hm2_5i25.0.watchdog.timeout_ns 5000000
loadrt pid names=pid.x,pid.y,pid.z
loadrt mux16 names=jogincr,foincr,mvoincr
#5x5 matrix in scan generation mode to interface the user display panel buttons
loadrt matrix_kb config=5x5s names=maho_panel
#Gearbox Control
loadrt mh400e_gearbox
#external E-stop
loadrt estop_latch
addf hm2_5i25.0.read servo-thread
addf motion-command-handler servo-thread
addf motion-controller servo-thread
addf pid.x.do-pid-calcs servo-thread
addf pid.y.do-pid-calcs servo-thread
addf pid.z.do-pid-calcs servo-thread
addf jogincr servo-thread
addf foincr servo-thread
addf mvoincr servo-thread
addf hm2_5i25.0.write servo-thread
addf maho_panel servo-thread
addf mh400e-gearbox servo-thread
addf estop-latch.0 servo-thread
See the line "encoders ", that is what Andy was referring to.
You probably want to comment out Matrix_KB, estop_latch MH400E_gearbox for starters.
#*******************
# HAL COMPONENTS
#*******************
loadrt trivkins
loadrt [EMCMOT]EMCMOT servo_period_nsec=[EMCMOT]SERVO_PERIOD num_joints=[TRAJ]AXES
# Driver for MESA 5i25/7i77/7i84 interface cards
loadrt hostmot2
loadrt hm2_pci config=" num_encoders=3 num_pwmgens=0 num_stepgens=0 sserial_port_0=300xxx"
setp hm2_5i25.0.watchdog.timeout_ns 5000000
loadrt pid names=pid.x,pid.y,pid.z
loadrt mux16 names=jogincr,foincr,mvoincr
#5x5 matrix in scan generation mode to interface the user display panel buttons
loadrt matrix_kb config=5x5s names=maho_panel
#Gearbox Control
loadrt mh400e_gearbox
#external E-stop
loadrt estop_latch
addf hm2_5i25.0.read servo-thread
addf motion-command-handler servo-thread
addf motion-controller servo-thread
addf pid.x.do-pid-calcs servo-thread
addf pid.y.do-pid-calcs servo-thread
addf pid.z.do-pid-calcs servo-thread
addf jogincr servo-thread
addf foincr servo-thread
addf mvoincr servo-thread
addf hm2_5i25.0.write servo-thread
addf maho_panel servo-thread
addf mh400e-gearbox servo-thread
addf estop-latch.0 servo-thread
See the line "encoders
", that is what Andy was referring to.
The following user(s) said Thank You: Glemigobles
Please Log in or Create an account to join the conversation.
- RotarySMP
- Offline
- Platinum Member
-
Less
More
- Posts: 1635
- Thank you received: 595
7 years 5 months ago #132992
by RotarySMP
Replied by RotarySMP on topic Retrofitting a 1986 Maho MH400E
I just tested the drag engraver. It works really well in aluminium.
Mark
Mark
Please Log in or Create an account to join the conversation.
- Glemigobles
- Offline
- Elite Member
-

Less
More
- Posts: 201
- Thank you received: 18
7 years 5 months ago #132995
by Glemigobles
Replied by Glemigobles on topic Retrofitting a 1986 Maho MH400E
Okay, so I can edit the number to 6 and see if it works. Thanks a lot guys!
Please Log in or Create an account to join the conversation.
- HaMi
- Offline
- New Member
-

Less
More
- Posts: 1
- Thank you received: 0
7 years 5 months ago #133434
by HaMi
Replied by HaMi on topic Retrofitting a 1986 Maho MH400E
Hello Christian
I am an german User and i need a Dokumentation for the Trk6. Van you sendet me this
Tank you very mich
Harald
I am an german User and i need a Dokumentation for the Trk6. Van you sendet me this
Tank you very mich
Harald
Please Log in or Create an account to join the conversation.
- Glemigobles
- Offline
- Elite Member
-
Less
More
- Posts: 201
- Thank you received: 18
7 years 5 months ago #133470
by Glemigobles
Replied by Glemigobles on topic Retrofitting a 1986 Maho MH400E
I solved my problem by actually connecting the field power on the 7i77 and 7i84 to a 24V PSU, instead of the 5V one. Since everything is now visible with a show pin command in halrun and LinuxCNC starts with a sample config (though PNCConf refuses to cooperate with this card combo, unfortunately), I proceeded to mount all the boards and the PC inside the electric cabinet. I used some of the plates from the rack mount case the Philips had, combined with some acrylic I had that was spary painted with conductive paint to create shielding for the EXE board.
Now I have a question to Mark regarding the EXE. Please excuse my being a total electronics noob. In your files you connect 12V to the Heidenhain board, with a red cable. In my wiring diagram for the MAHO, there is no power fed through any of the pins to the EXE board (at least from what I can tell), and the red cables terminate in the CNC controller with "Marker", which I have no idea what it means in the world of German electronics, but it has no voltage.
It looks to me as though 19A4 doesn't get any power from anywhere, and you also write in the beginning of your Word document that the card doesn't get power from the Phlips back plane. So what should I do?
Also, I made one change to your retrofit plan by not removing the pendant and control panel. I'd like to connect them to the 7i73. I just don't have the time to make my own stuff now, but I might end up controlling the mill using a keyboard before I manage to figure out all the connections and interface them with LCNC. Due to this change, I bought an additional 24V PSU for the Mesa boards, since I'm not removing the pendant power connections.
I've been working on this retrofit fulltime for a week now. The most time consuming activities so far included: soldering a DB25M-DB25M cable (they didn't have it on hand when I placed my order; should've ordered it anyway considering how much time it took to make one); drilling and tapping holes in the old case plates for all the cards; splitting, marking and crimping the connections on ribbon cables 28X1 and 28X2. It looks like the drive wiring will be far less of a pain than the relay.
Currently, I'm working on connections to the 7i77. Once everything is wired, I'll start configuring this setup. I'll probably make a new PNCConf file to set up just the drives and then configure the relay board IO to the 7i84 manually. It's ironic how the 7i74 board was implemented to save time on splitting CAT5 cables but then you have to set up the connections by hand in hal instead of using the wizard.
BTW, how did you attach the 7i84 to the cabinet door? Double-sided tape, velcro strips? Or did you drill mounting holes? I was thinking of double-sided tape, since the board is screwed on to a piece of acrylic. I attached pretty much everything (including the Heidenhain EXE) with M3 risers, PC style, as that's pretty much all I know I have no plans to mount the ATX PSU to anything right now.
In the attachments is a pic of my current set-up and the schematic for the EXE connections (blatt 26) from DMG.
Now I have a question to Mark regarding the EXE. Please excuse my being a total electronics noob. In your files you connect 12V to the Heidenhain board, with a red cable. In my wiring diagram for the MAHO, there is no power fed through any of the pins to the EXE board (at least from what I can tell), and the red cables terminate in the CNC controller with "Marker", which I have no idea what it means in the world of German electronics, but it has no voltage.
It looks to me as though 19A4 doesn't get any power from anywhere, and you also write in the beginning of your Word document that the card doesn't get power from the Phlips back plane. So what should I do?
Also, I made one change to your retrofit plan by not removing the pendant and control panel. I'd like to connect them to the 7i73. I just don't have the time to make my own stuff now, but I might end up controlling the mill using a keyboard before I manage to figure out all the connections and interface them with LCNC. Due to this change, I bought an additional 24V PSU for the Mesa boards, since I'm not removing the pendant power connections.
I've been working on this retrofit fulltime for a week now. The most time consuming activities so far included: soldering a DB25M-DB25M cable (they didn't have it on hand when I placed my order; should've ordered it anyway considering how much time it took to make one); drilling and tapping holes in the old case plates for all the cards; splitting, marking and crimping the connections on ribbon cables 28X1 and 28X2. It looks like the drive wiring will be far less of a pain than the relay.
Currently, I'm working on connections to the 7i77. Once everything is wired, I'll start configuring this setup. I'll probably make a new PNCConf file to set up just the drives and then configure the relay board IO to the 7i84 manually. It's ironic how the 7i74 board was implemented to save time on splitting CAT5 cables but then you have to set up the connections by hand in hal instead of using the wizard.
BTW, how did you attach the 7i84 to the cabinet door? Double-sided tape, velcro strips? Or did you drill mounting holes? I was thinking of double-sided tape, since the board is screwed on to a piece of acrylic. I attached pretty much everything (including the Heidenhain EXE) with M3 risers, PC style, as that's pretty much all I know
I have no plans to mount the ATX PSU to anything right now.In the attachments is a pic of my current set-up and the schematic for the EXE connections (blatt 26) from DMG.


Please Log in or Create an account to join the conversation.
- RotarySMP
- Offline
- Platinum Member
-
Less
More
- Posts: 1635
- Thank you received: 595
7 years 5 months ago - 7 years 5 months ago #133473
by RotarySMP
Replied by RotarySMP on topic Retrofitting a 1986 Maho MH400E
You are making good progress I was also tempted to mount the PC side on, or even recycle the Phillips housing.
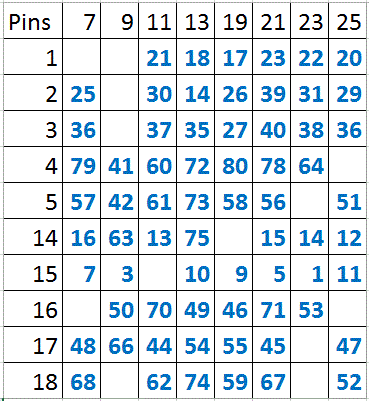
[attachment=19219]Phillip 432 keyboard pinout.gif[/attachment
Realistically, that Phillips keyboard is not that useful, as it is missing the G,M,F, S, O, X, Y, z, I, J, K, R, T buttons you need for ISO G code, at least if you want to use the MDI and canned cycles.
- Yes 24VDC is the field power in the MAHO, as you are switching 24VDC relays.I solved my problem by actually connecting the field power on the 7i77 and 7i84 to a 24V PSU, instead of the 5V one.
- The Heidenhain three axis EXE used in my Phillips had no single PSU. and no back plane connection to the Phillips rack. Actually, the only thing common about the three axis is that they are on one piece of fiberglass circuit board. The three are electrically separate. Have a look on the board. On mine there was test points for gnd, +5V and +12V. The 5V circuit is powered by the MESA. (Note the stand alone EXE 602 only needs this 5V). But until I supplied 12V to the appropriate pin of each EXE, they didn't work. I clipped one of the PC's PSU power cables for a hard drive, and use it as my 12V source, adding a terminal I called 500, with it's ground called 501, and tied with the MEA ground. On the cable from each EXE to the MESA, you need to terminate the red wire from this cable to your new 12V terminal. My original wiring diagram from MAHO was also wrong with EXE wiring. It was the only error I found in the schematics.Now I have a question to Mark regarding the EXE. Please excuse my being a total electronics noob. In your files you connect 12V to the Heidenhain board, with a red cable. In my wiring diagram for the MAHO, there is no power fed through any of the pins to the EXE board (at least from what I can tell), and the red cables terminate in the CNC controller with "Marker", which I have no idea what it means in the world of German electronics, but it has no voltage.
It looks to me as though 19A4 doesn't get any power from anywhere, and you also write in the beginning of your Word document that the card doesn't get power from the Philips back plane. So what should I do?
The MAHO control panel look like it is a simple multiplexed 8x10 matrix, with not all nodes used.. Here is the pinout. Check this carefully, as I never used it. Using LinuxCNC' matrix_kb comp should work. However, As I understand it, you can not use the text entry keys (numbers etc), as the user space is separate from the HAL command space (not sure of the terminology.Also, I made one change to your retrofit plan by not removing the pendant and control panel. I'd like to connect them to the 7i73. I just don't have the time to make my own stuff now, but I might end up controlling the mill using a keyboard before I manage to figure out all the connections and interface them with LCNC. Due to this change, I bought an additional 24V PSU for the Mesa boards, since I'm not removing the pendant power connections.
[attachment=19219]Phillip 432 keyboard pinout.gif[/attachment
Realistically, that Phillips keyboard is not that useful, as it is missing the G,M,F, S, O, X, Y, z, I, J, K, R, T buttons you need for ISO G code, at least if you want to use the MDI and canned cycles.
- Yes the drive interface is very simple, I used chopped up CAT 5E cable for good shielding.I've been working on this retrofit fulltime for a week now. The most time consuming activities so far included: soldering a DB25M-DB25M cable (they didn't have it on hand when I placed my order; should've ordered it anyway considering how much time it took to make one); drilling and tapping holes in the old case plates for all the cards; splitting, marking and crimping the connections on ribbon cables 28X1 and 28X2. It looks like the drive wiring will be far less of a pain than the relay.
-If you use the same pins I did, you should be able to cut paste those sections from my HALCurrently, I'm working on connections to the 7i77. Once everything is wired, I'll start configuring this setup. I'll probably make a new PNCConf file to set up just the drives and then configure the relay board IO to the 7i84 manually. It's ironic how the 7i74 board was implemented to save time on splitting CAT5 cables but then you have to set up the connections by hand in hal instead of using the wizard.
- Drilled two holes through the door and mounted a short length of DIN Rail. since I goo the din mounting kits form MESA: Otherwise I'd drill and use stand offs. DOuble sided tape will fall off sooner or later..BTW, how did you attach the 7i84 to the cabinet door? Double-sided tape, velcro strips? Or did you drill mounting holes? I was thinking of double-sided tape, since the board is screwed on to a piece of acrylic.
- I use a little Micro-ITX PSU, and DIN rail mounted it as well.I attached pretty much everything (including the Heidenhain EXE) with M3 risers, PC style, as that's pretty much all I know
Last edit: 7 years 5 months ago by RotarySMP.
The following user(s) said Thank You: Glemigobles
Please Log in or Create an account to join the conversation.
Time to create page: 0.313 seconds