Fryer MB-11 Bed Mill Retrofit
- andypugh
-

- Offline
- Moderator
-

Less
More
- Posts: 19863
- Thank you received: 4636
12 Aug 2017 15:19 #97384
by andypugh
Replied by andypugh on topic Fryer MB-11 Bed Mill Retrofit
Yes. It should all work normally now.
Please Log in or Create an account to join the conversation.
- adamj12b
-
 Topic Author
- Offline
- Senior Member
-

Less
More
- Posts: 45
- Thank you received: 5
20 Feb 2018 03:11 #106203
by adamj12b
Replied by adamj12b on topic Fryer MB-11 Bed Mill Retrofit
Well Im finally getting to finish this project. Ended up purchasing a new house and got the mill moved over in January. Smaller shop for now, but Ill be building a 46x80 building next year.
I have been working on getting the servos tuned and could use some advice. I have gotten what I feel is acceptable, but also feel like it could be better.
As a refresher, im using Dmm-Tech Dyn4 drives and 1kw servos on all 3 axis. These are running in torque mode as velocity mode is hopeless and cannot be tuned to be stable....
I have tried PCW's tuning suggestions from earlier on: forum.linuxcnc.org/30-cnc-machines/33016...rofit?start=10#97305 but that doesn't seem to work for me. I cannot increase the servo thread speed as it makes the system unstable and I get watchdog errors.
What I have had moderate success with is increase "P" only till oscillations then back it off a bit. The I add as much "D" as I can and still stay stable, and back it off a bit. Next I adjust FF1 and FF2 to stabilize the error as much as I can.
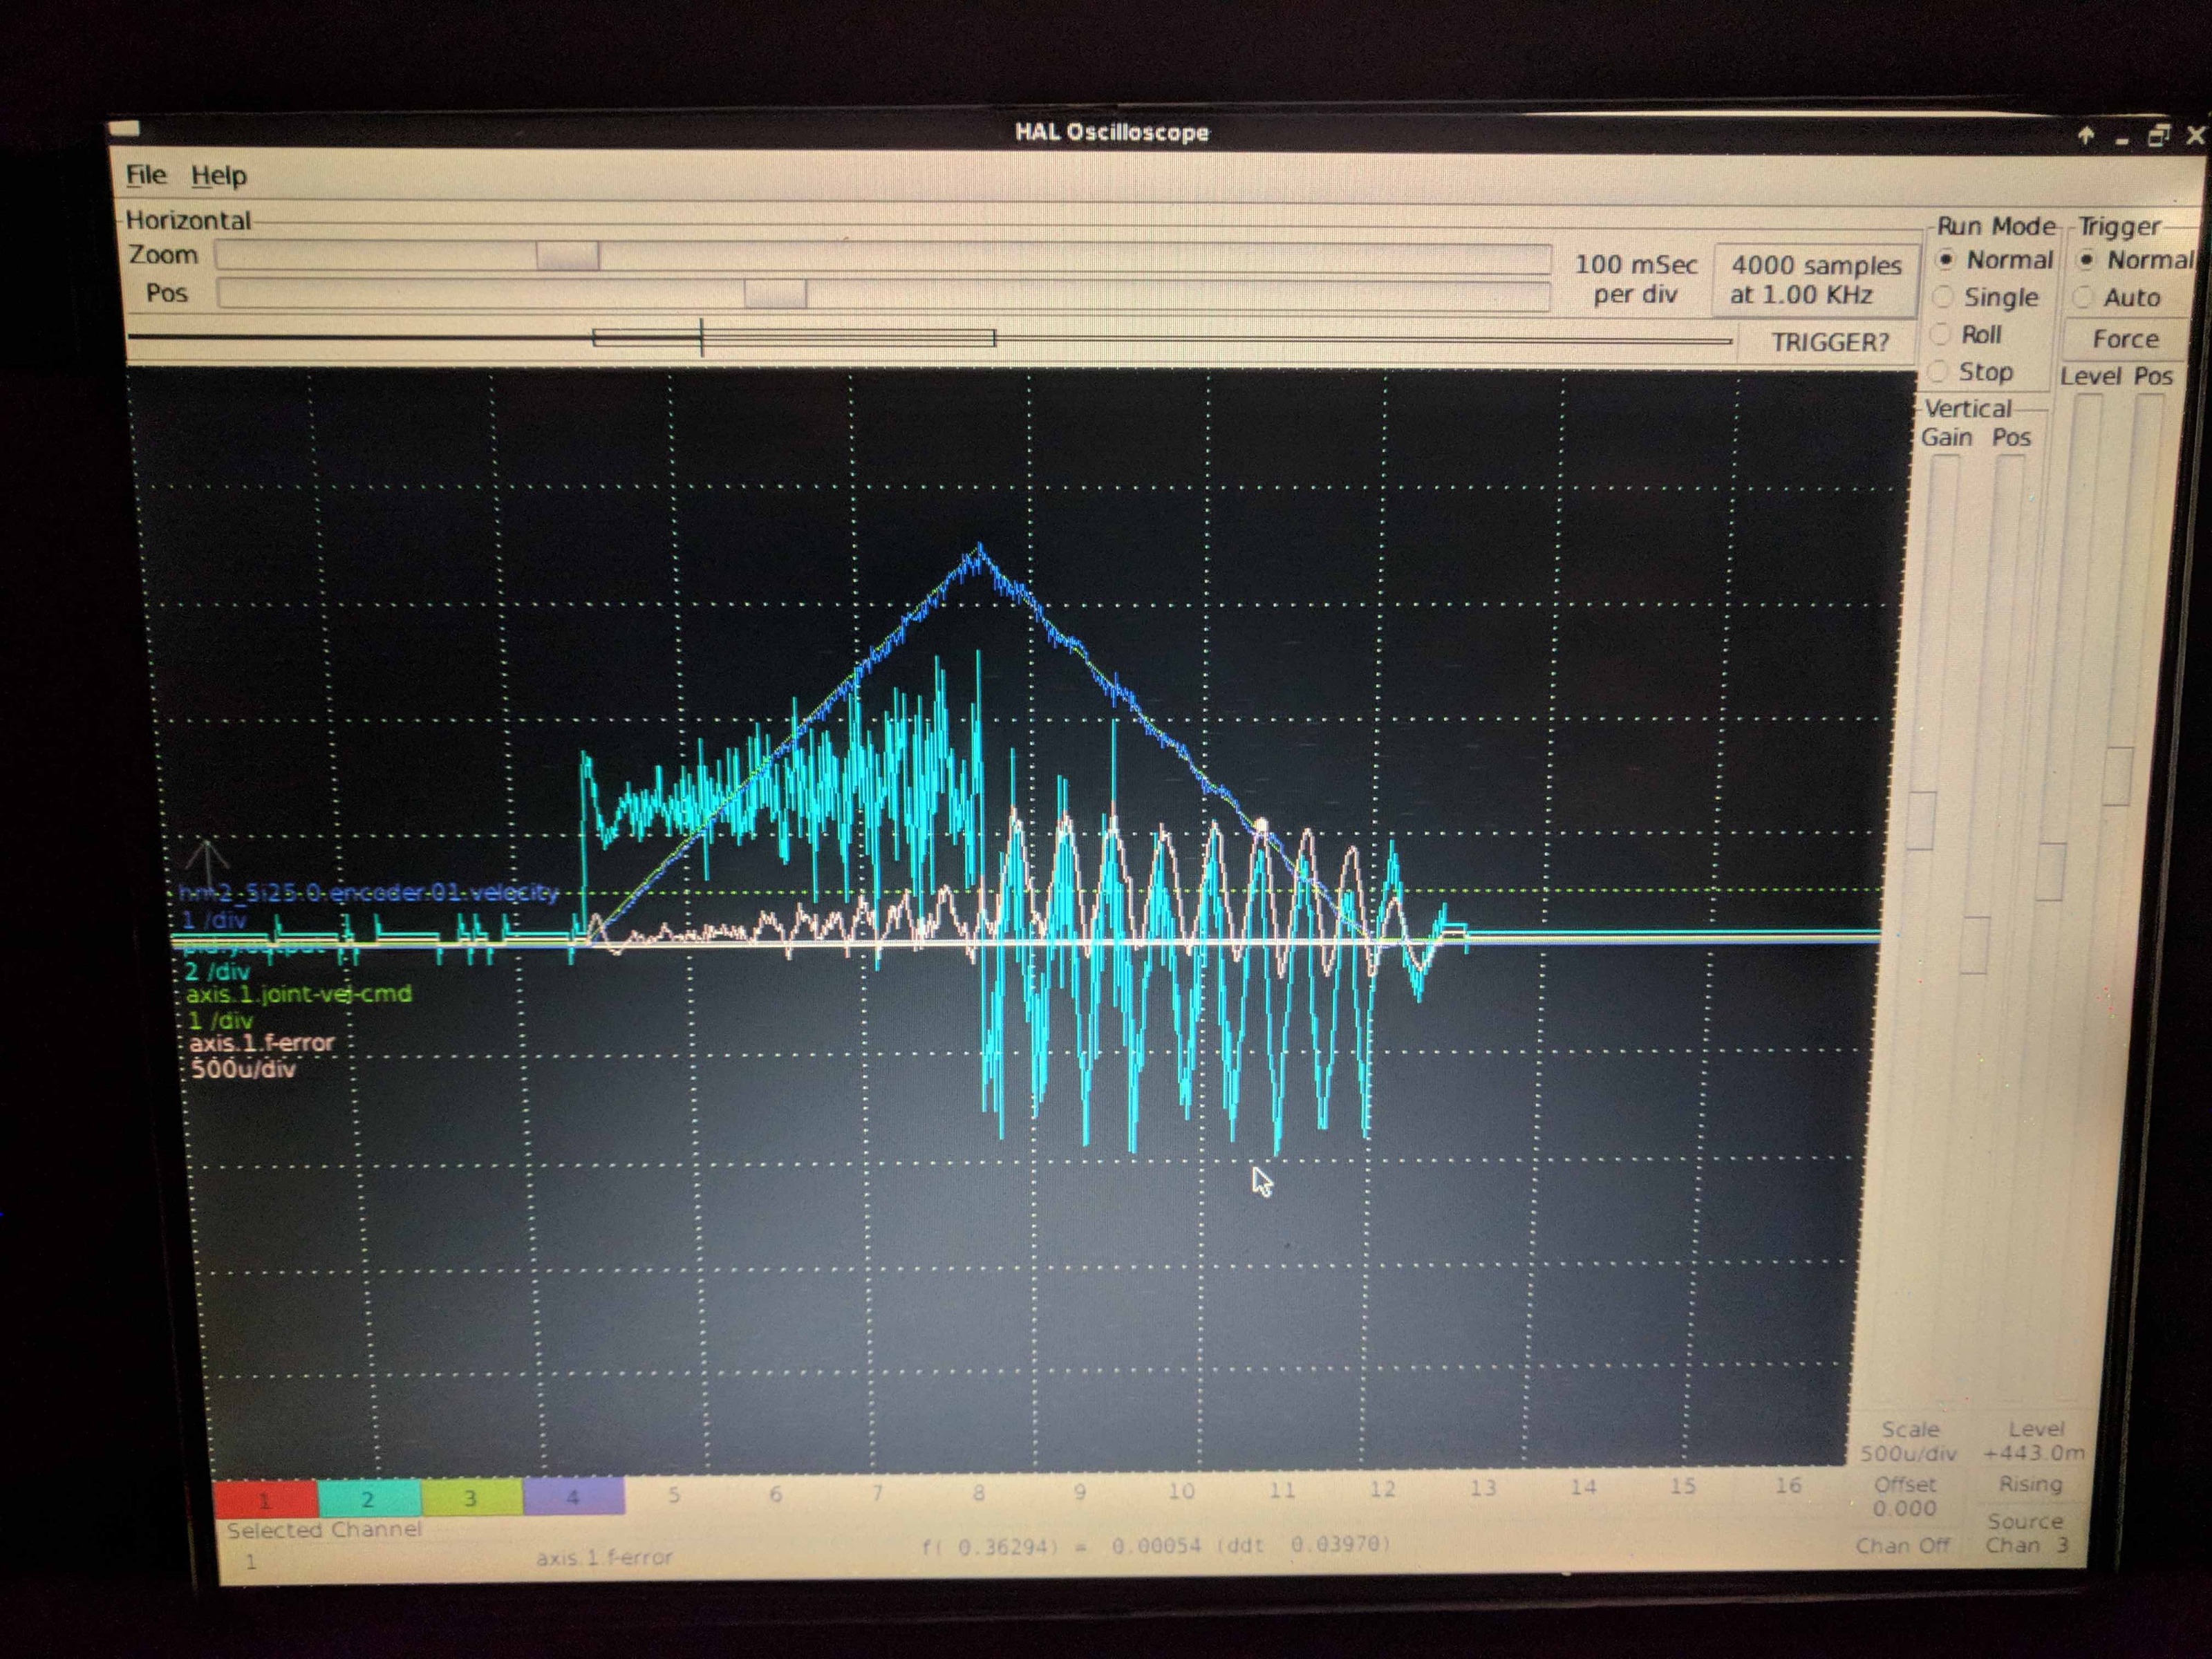
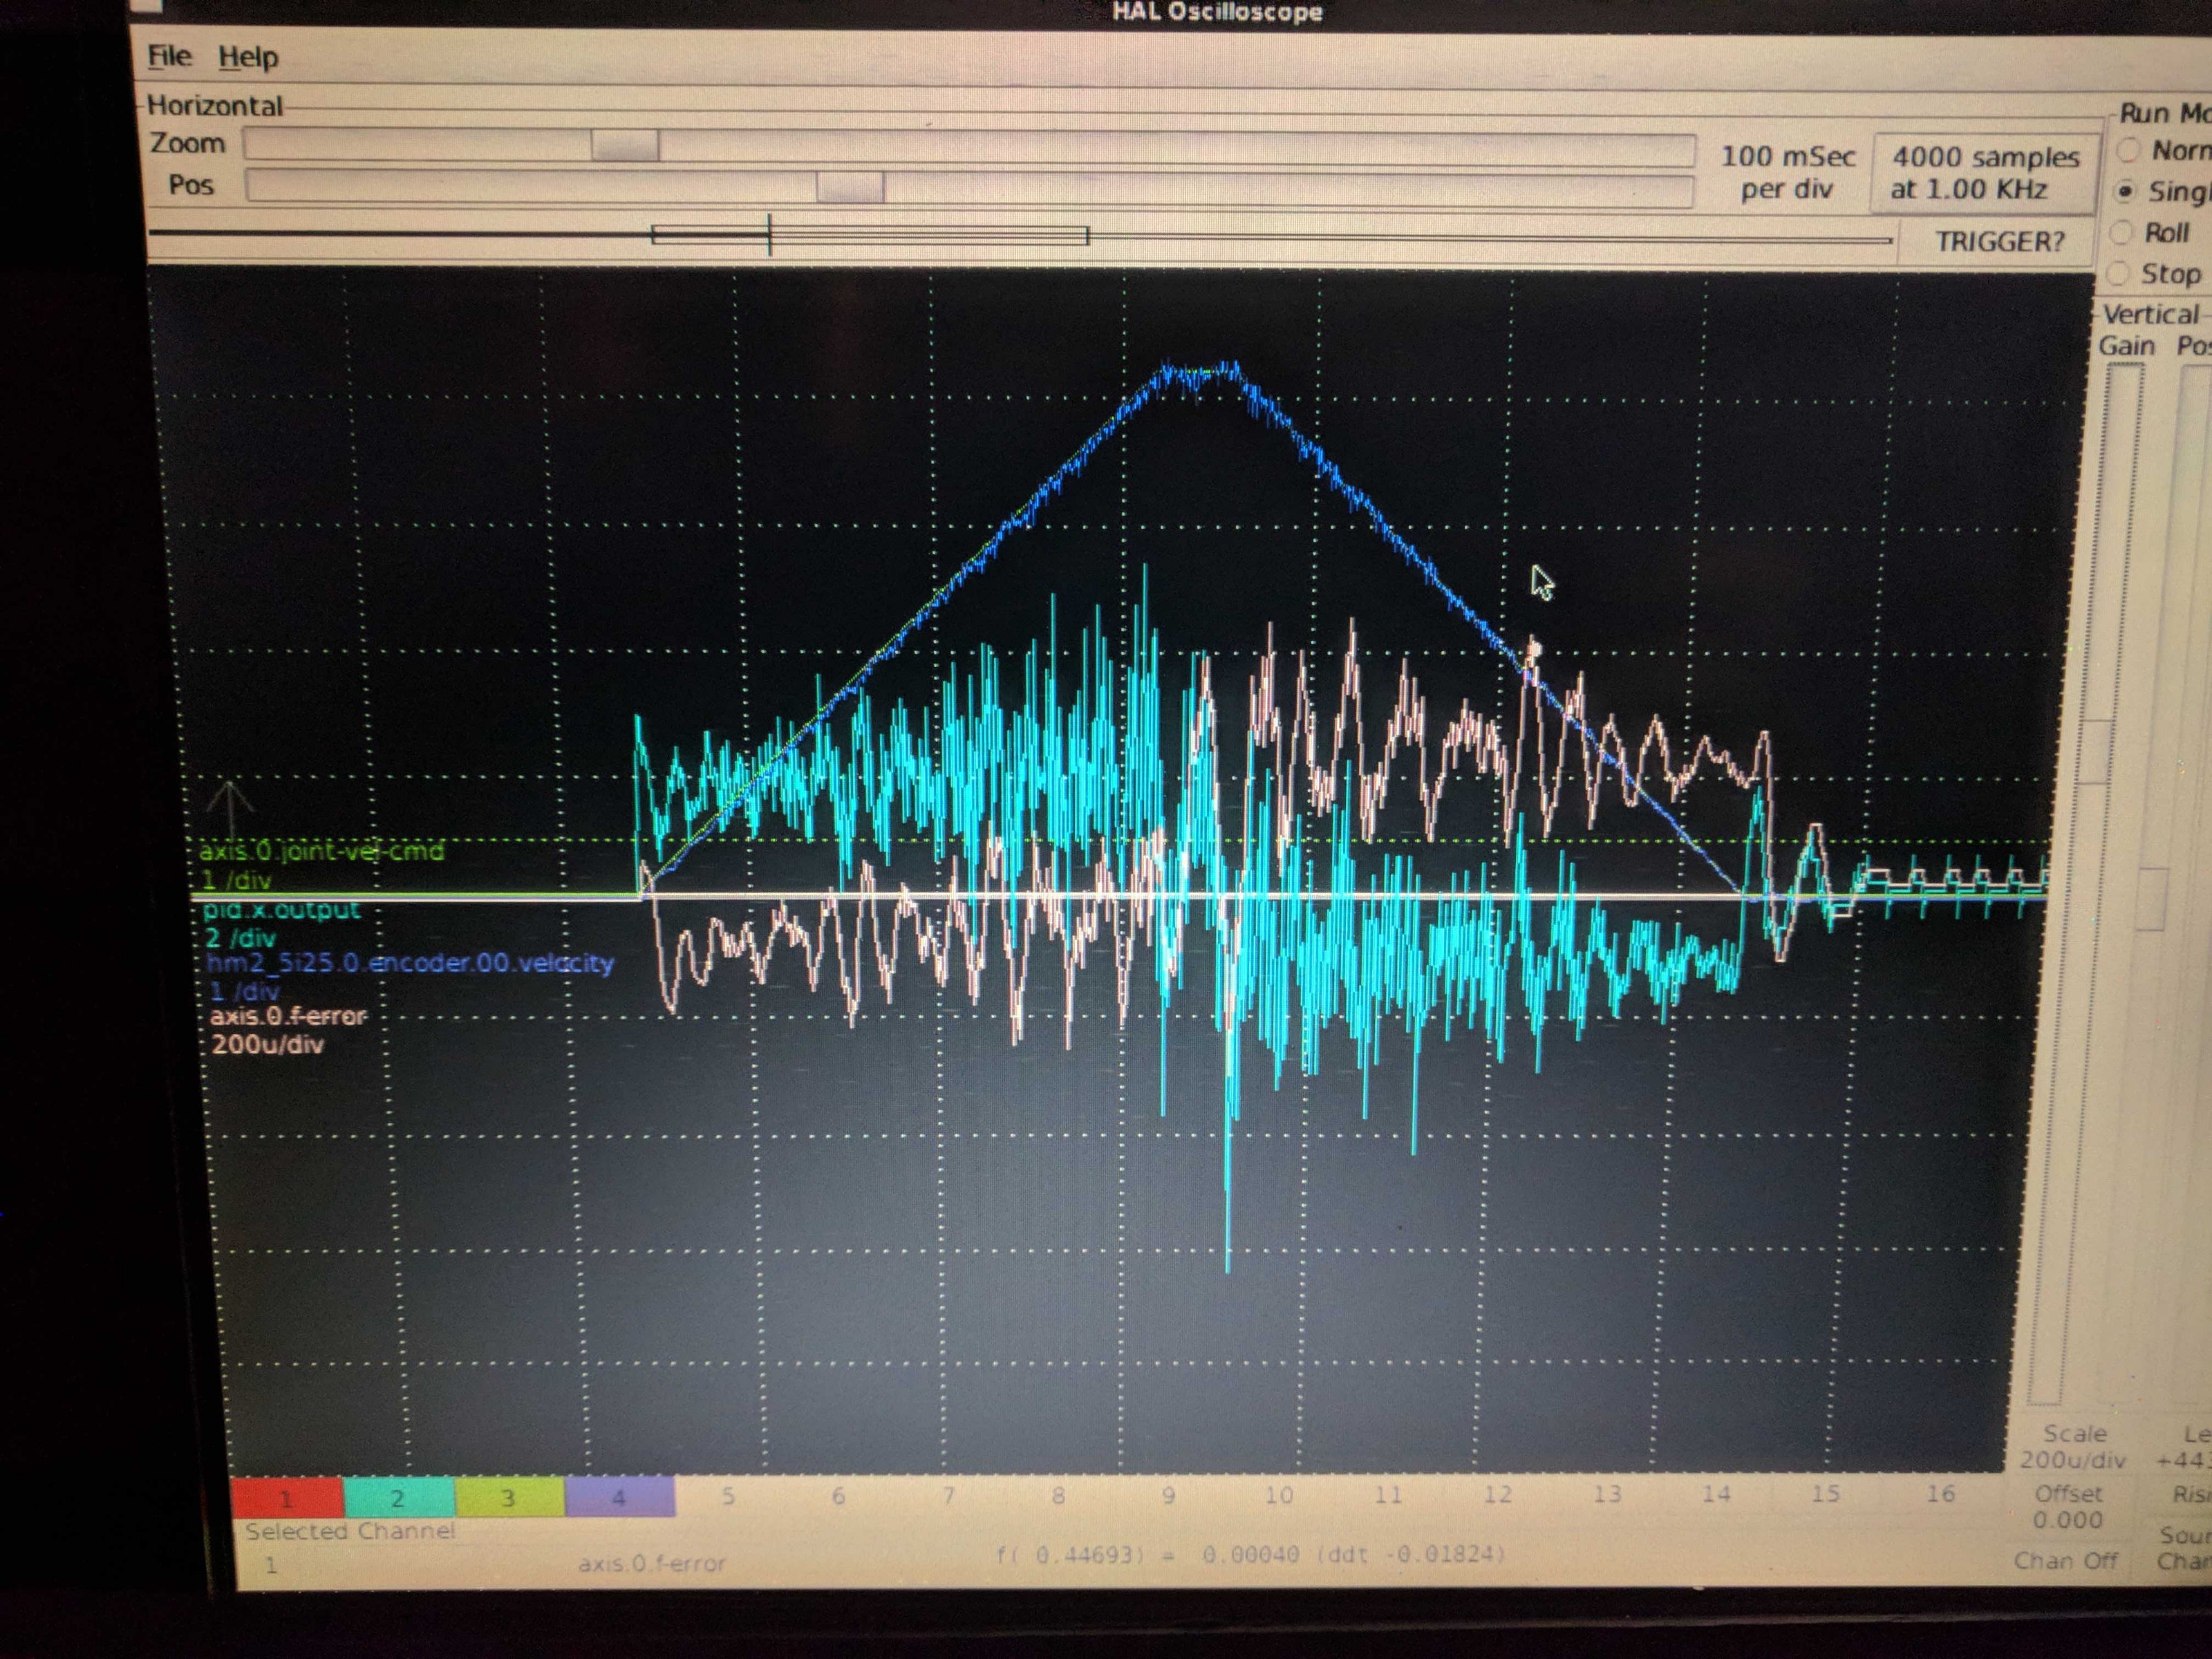
Well this method can seem to only get me so far. Reading the axis error in hal scope, the Y stays below +/- 0.0006 and the X seems to stay below +/- 0.0005.
I was hoping someone could suggest what speeds I should test the tuning at? Rapid speeds seem to be the most harsh...
Both of the following pictures are rapid jog speed of 258IPM.
Y Axis Hal Scope
X Axis Hal Scope
I have attached the current hal and ini file as well.
Lastly, I started creating a custom glade site panel to display some machine specific things. I have not linked it yet in hal, but I have the 0-10v output from the VFD going into one of the 7i77 analog inputs and will be displayed on the spindle load meter. The commanded speed comes from halui and the spindle rpm will come from a spindle encoder once I get that installed. Lube pump on is linked to some lube pump delay code to only activate the pump when the machine is moving. It stays running for 1 minute after the machine stops moving. Low Oil and servo faults are just connected to pins on the 7i77.
This is the screen in the simulator on my laptop.

-Adam
I have been working on getting the servos tuned and could use some advice. I have gotten what I feel is acceptable, but also feel like it could be better.
As a refresher, im using Dmm-Tech Dyn4 drives and 1kw servos on all 3 axis. These are running in torque mode as velocity mode is hopeless and cannot be tuned to be stable....
I have tried PCW's tuning suggestions from earlier on: forum.linuxcnc.org/30-cnc-machines/33016...rofit?start=10#97305 but that doesn't seem to work for me. I cannot increase the servo thread speed as it makes the system unstable and I get watchdog errors.
What I have had moderate success with is increase "P" only till oscillations then back it off a bit. The I add as much "D" as I can and still stay stable, and back it off a bit. Next I adjust FF1 and FF2 to stabilize the error as much as I can.
Well this method can seem to only get me so far. Reading the axis error in hal scope, the Y stays below +/- 0.0006 and the X seems to stay below +/- 0.0005.
I was hoping someone could suggest what speeds I should test the tuning at? Rapid speeds seem to be the most harsh...
Both of the following pictures are rapid jog speed of 258IPM.
Y Axis Hal Scope
X Axis Hal Scope
I have attached the current hal and ini file as well.
Lastly, I started creating a custom glade site panel to display some machine specific things. I have not linked it yet in hal, but I have the 0-10v output from the VFD going into one of the 7i77 analog inputs and will be displayed on the spindle load meter. The commanded speed comes from halui and the spindle rpm will come from a spindle encoder once I get that installed. Lube pump on is linked to some lube pump delay code to only activate the pump when the machine is moving. It stays running for 1 minute after the machine stops moving. Low Oil and servo faults are just connected to pins on the 7i77.
This is the screen in the simulator on my laptop.
-Adam
Please Log in or Create an account to join the conversation.
- RotarySMP
-

- Offline
- Platinum Member
-

Less
More
- Posts: 1627
- Thank you received: 595
20 Feb 2018 10:02 - 20 Feb 2018 10:29 #106224
by RotarySMP
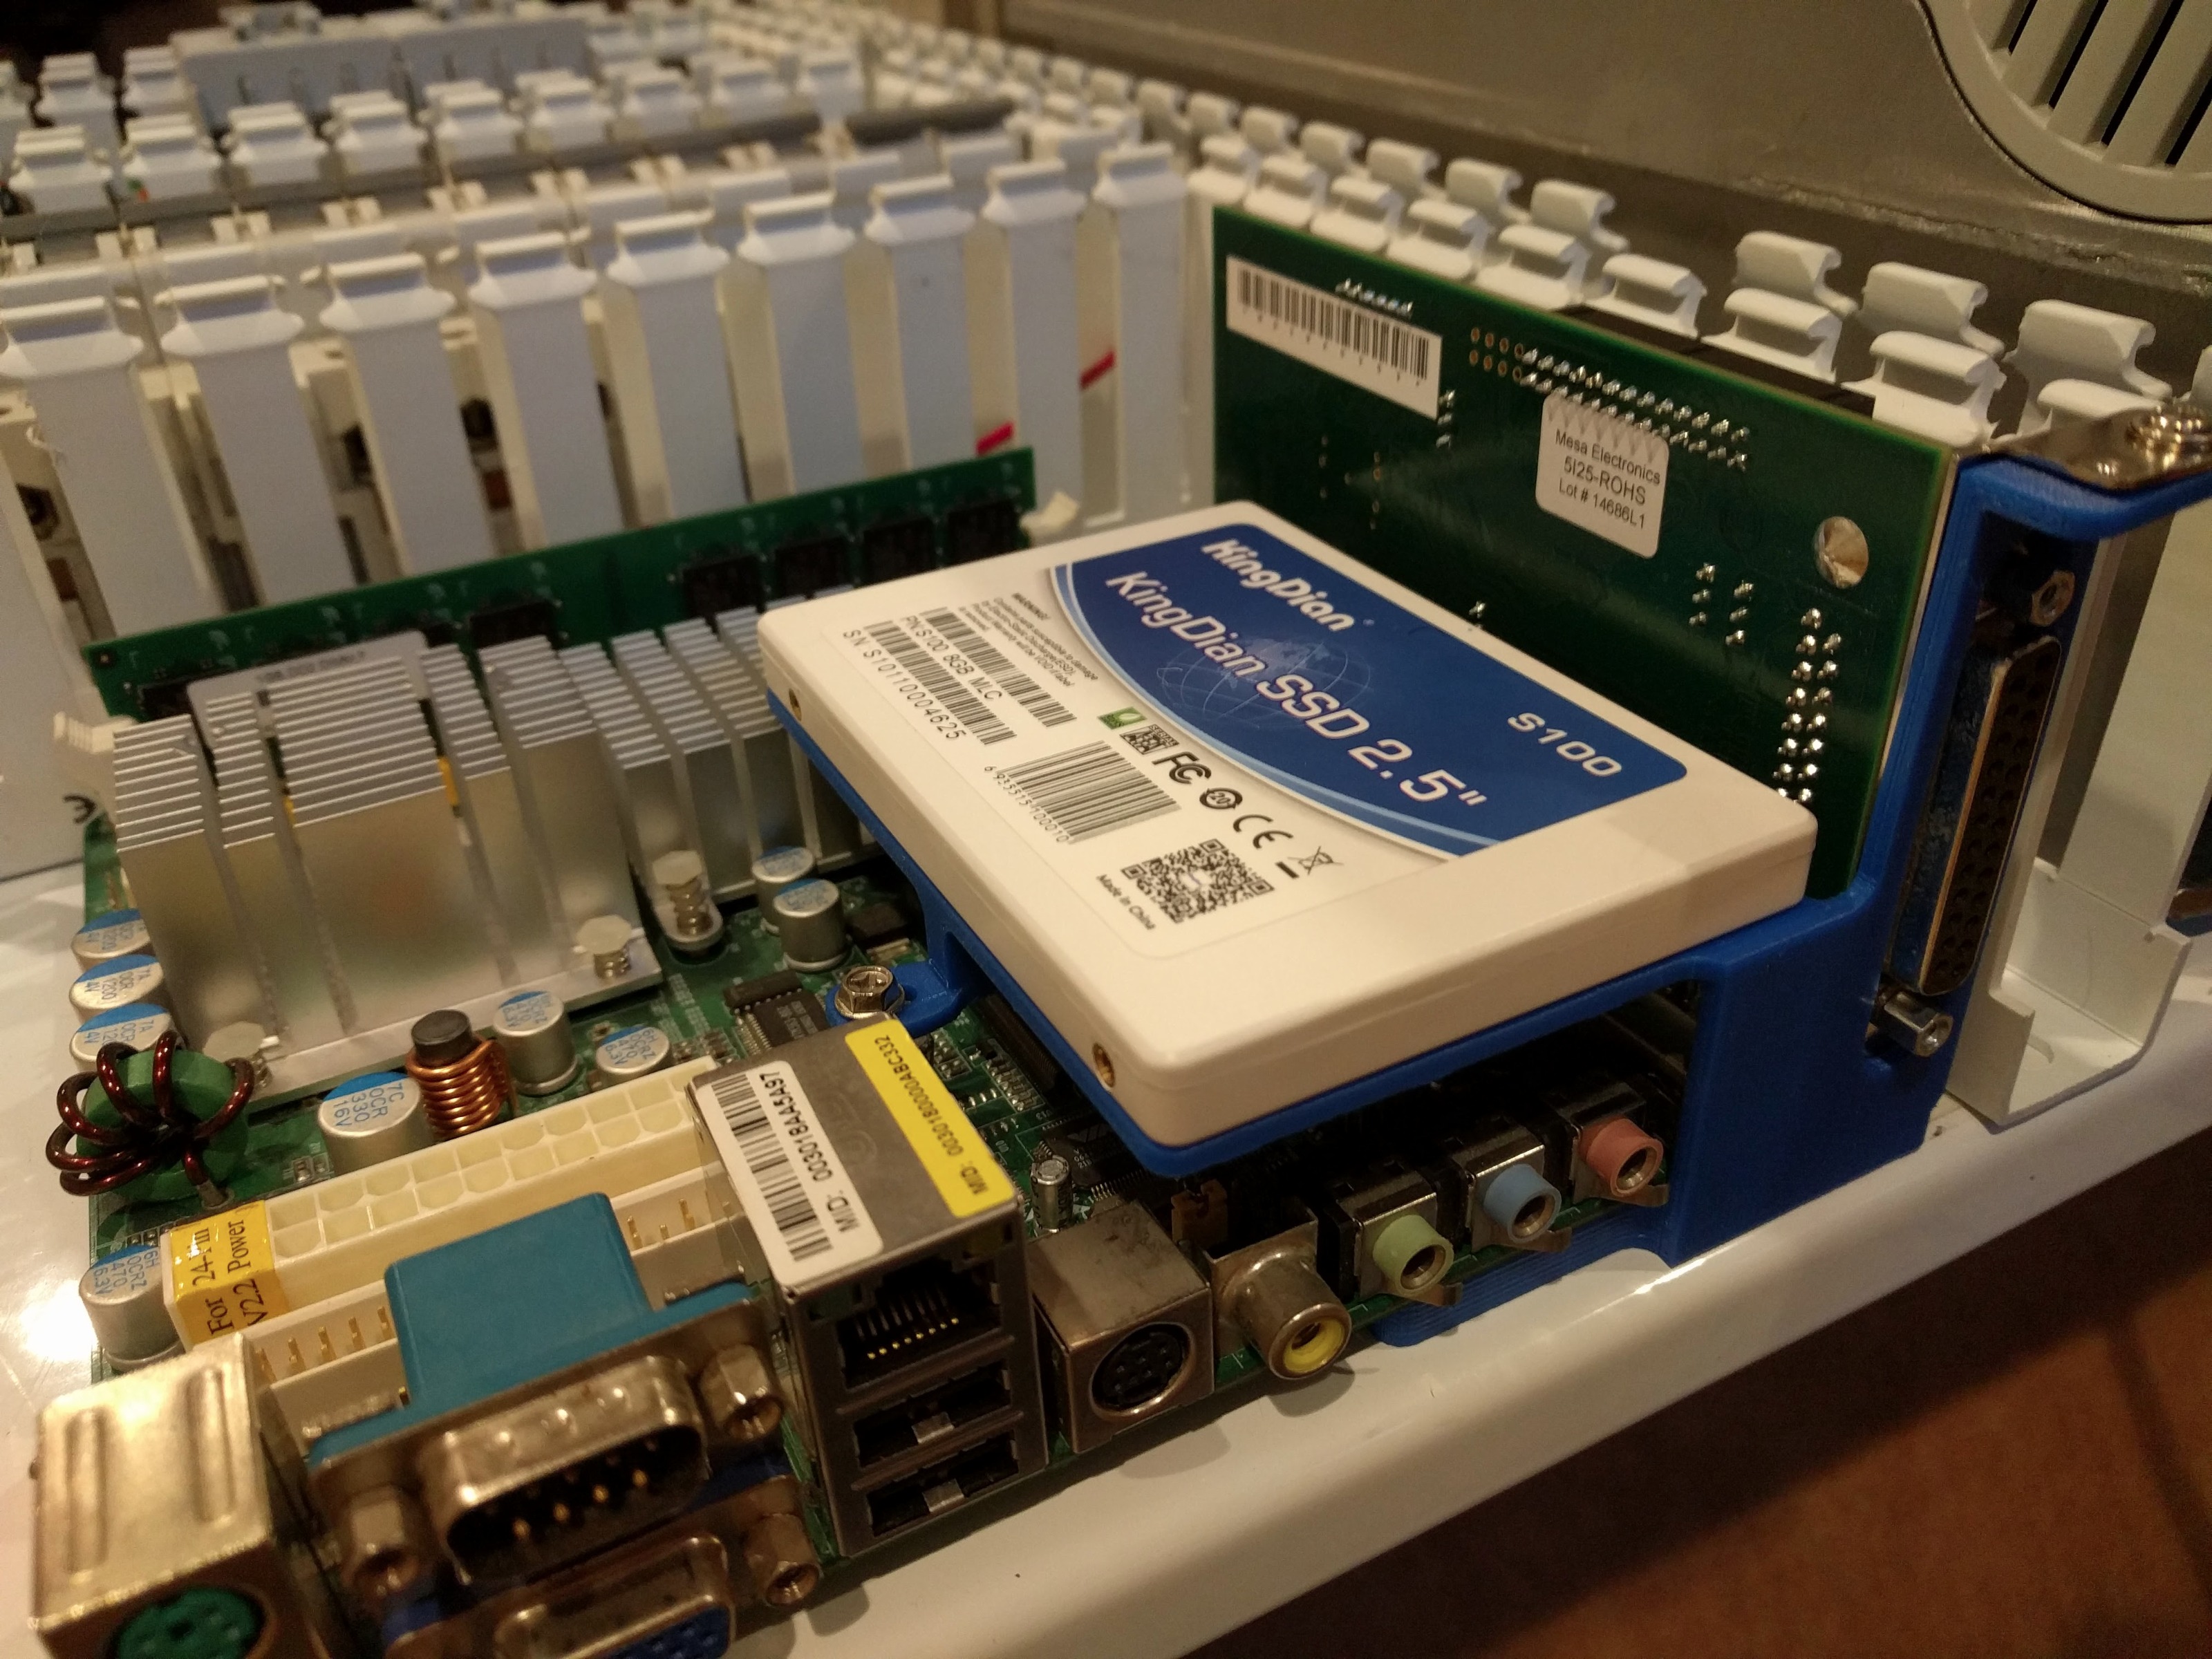
I just saw your ITX/5i25 bracket. Like! much better solution than the ugly sheet metal bracket I bent up to do the same job.
forum.linuxcnc.org/media/kunena/attachments/2917/PB060042.JPG
Would you mind posting your STL please? I would like to print one.
Since you have a touch screen, have you considered Gmoccapy for the GUI? It is very good.
Mark
Replied by RotarySMP on topic Fryer MB-11 Bed Mill Retrofit
I wanted to mount the Mini-ITX motherboard to the back plate, but was unsure how to stabilize the 5i25 PCI card. What I ended up doing was drilling the back plate for the mini ITX mounting pattern and then designing a stabilizer bracket for the PCI card and a mount for the SSD. It just slipped over one mount of the board and gets held down when the mounting screws for the motherboard are screwed down.
I just saw your ITX/5i25 bracket. Like! much better solution than the ugly sheet metal bracket I bent up to do the same job.
forum.linuxcnc.org/media/kunena/attachments/2917/PB060042.JPG
Would you mind posting your STL please? I would like to print one.
Since you have a touch screen, have you considered Gmoccapy for the GUI? It is very good.
Mark
Last edit: 20 Feb 2018 10:29 by RotarySMP.
Please Log in or Create an account to join the conversation.
- adamj12b
-
Topic Author
- Offline
- Senior Member
-
Less
More
- Posts: 45
- Thank you received: 5
20 Feb 2018 13:08 #106232
by adamj12b
Replied by adamj12b on topic Fryer MB-11 Bed Mill Retrofit
Hello Mark,
Glad you like the bracket. Ive uploaded the files to Thingiverse. Here is the link. www.thingiverse.com/thing:2800306 Ive included the Fusion file if you need to make changes.
I have looked at Gmoccapy, but it needs some changes as well before I would be happy. I would be cleaner though as I could stash my faults and status behind a button and check them when I want.
Im less worried about the UI right now and just want to get the machine cutting! Hopefully today I will make the first cuts with it!
One of the things Im working on right now is re-wiring how the machine is powered up and shutdown, as well as how its enabled.
Im stuck at how I should enable and disable the machine. Currently my startup procedure is main power switch on cabinet, start Linuxcnc, release estop and press reset, then hit F2 on keyboard to enable then home button on the console. I have space on the console to add more buttons and could add and enable one. I was thinking of also adding a clear error button... Looking for suggestions here.")
This week I was able to get the console Estop and reset switch working using a modified version of Rodw's estop latch code: forum.linuxcnc.org/10-advanced-configura...tches?start=10#93394
I modified the latch-ok input to be the normal operating state of the estop switch so that when the switch is out, the system is ok. I then connected the reset signal to to the "R" button on the console. I also wanted to estop output to activate when the system is good where Rodw's code activated the output when the system was in fault. To do this, I just added the physical output to the latch ok out line.
Here is the code, Hope it helps someone in the future.
-Adam
Glad you like the bracket. Ive uploaded the files to Thingiverse. Here is the link. www.thingiverse.com/thing:2800306 Ive included the Fusion file if you need to make changes.
I have looked at Gmoccapy, but it needs some changes as well before I would be happy. I would be cleaner though as I could stash my faults and status behind a button and check them when I want.
Im less worried about the UI right now and just want to get the machine cutting! Hopefully today I will make the first cuts with it!
One of the things Im working on right now is re-wiring how the machine is powered up and shutdown, as well as how its enabled.
Im stuck at how I should enable and disable the machine. Currently my startup procedure is main power switch on cabinet, start Linuxcnc, release estop and press reset, then hit F2 on keyboard to enable then home button on the console. I have space on the console to add more buttons and could add and enable one. I was thinking of also adding a clear error button... Looking for suggestions here.
This week I was able to get the console Estop and reset switch working using a modified version of Rodw's estop latch code: forum.linuxcnc.org/10-advanced-configura...tches?start=10#93394
I modified the latch-ok input to be the normal operating state of the estop switch so that when the switch is out, the system is ok. I then connected the reset signal to to the "R" button on the console. I also wanted to estop output to activate when the system is good where Rodw's code activated the output when the system was in fault. To do this, I just added the physical output to the latch ok out line.
Here is the code, Hope it helps someone in the future.
# --- remote estop ---

loadrt estop_latch count=3
addf estop-latch.0 servo-thread
addf estop-latch.1 servo-thread
addf estop-latch.2 servo-thread

net latch-reset <= hm2_5i25.0.7i84.0.2.input-18 # Console Estop Reset Signal
net latch0-ok-in hm2_5i25.0.7i77.0.0.input-04 # Console Inverted Estop Signal

net latch0-ok-in => estop-latch.0.ok-in
net latch0-out <= estop-latch.0.ok-out
net latch0-out => estop-latch.1.ok-in
net latch1-out <= estop-latch.1.ok-out
net latch1-out => estop-latch.2.ok-in

net latch-reset => estop-latch.0.reset
net latch-reset => estop-latch.1.reset
net latch-reset => estop-latch.2.reset

net latch-out hm2_5i25.0.7i77.0.0.output-08 iocontrol.0.emc-enable-in <= estop-latch.2.ok-out

# --- CONSOLE ESTOP SWITCH ---
net console-estop <= hm2_5i25.0.7i77.0.0.input-04-not
net console-estop => estop-latch.0.fault-in

# --- CABINET ESTOP SWITCH ---
net cabinet-estop <= hm2_5i25.0.7i77.0.0.input-05
net cabinet-estop => estop-latch.1.fault-in

# --- SPARE ESTOP SWITCH ---
net spare-estop <= hm2_5i25.0.7i77.0.0.input-06
net spare-estop => estop-latch.2.fault-in
-Adam
The following user(s) said Thank You: RotarySMP
Please Log in or Create an account to join the conversation.
- RotarySMP
-
- Offline
- Platinum Member
-
Less
More
- Posts: 1627
- Thank you received: 595
22 Feb 2018 07:45 #106323
by RotarySMP
Replied by RotarySMP on topic Fryer MB-11 Bed Mill Retrofit
Thanks Adam. I downloaded the files. Do you need separate reset and enable actions? You could also connect the reset button to both HAL pins and do both actions with one button push.
Mark
Mark
Please Log in or Create an account to join the conversation.
- adamj12b
-
Topic Author
- Offline
- Senior Member
-
Less
More
- Posts: 45
- Thank you received: 5
23 Feb 2018 15:00 #106389
by adamj12b
Replied by adamj12b on topic Fryer MB-11 Bed Mill Retrofit
Hey Mark,
I will have to explore that option. I did some looking and im not sure what signal I would need to tie into to toggle an enable. I will have to do some digging.
-Adam
I will have to explore that option. I did some looking and im not sure what signal I would need to tie into to toggle an enable. I will have to do some digging.
-Adam
Please Log in or Create an account to join the conversation.
- DeckelHead
- Offline
- Elite Member
-

Less
More
- Posts: 166
- Thank you received: 2
24 Apr 2018 20:28 #109561
by DeckelHead
Replied by DeckelHead on topic Fryer MB-11 Bed Mill Retrofit
Adam,
I stumbled onto this thread while looking for ideas for my console. After going through some of the pages in the thread, I see that you experienced a bit of the frustration I did but that you also got help from some of the same folks. Simply stellar! The LinuxCNC community is fantastic, as I'm sure you have found.
In my case, I'm working on retrofitting a Hurco KMB1. I thought that my wiring job looked pretty decent but now I'm completely humiliated by yours! It looks very clean and neat, so congrats on that. I did have to grapple with a few existing wiring terminal blocks though, so that was a pain. It is my first conversion and I've learned a lot about what I would do differently in the future. That said, I think it is coming along well. I should probably post pictures in a thread as you have done. I suspect there might be some interest there. Eventually I hope to put the HAL, INI, and schematics out there so others can reference them as a starting point and then change according to their needs and desires (which is also a nice way of saying I warrant nothing and accept zero responsibility... all amateur built!).
Anyhow, back to your console... I think yours is one of the nicest I've seen. The only thing that I'm thinking I might change on mine is to put the EStop lower. I do have a few questions, though. First, can you upload your DXF or DWG file? Second, how did you apply the graphics/labels? I've considered vinyl, but I worry about oil resistance. I've also thought about silk screening and then a layer of clear lacquer, but oil are a concern. The best is probably a polycarbonate graphic membrane, but I cannot find a prototype service that will do a 24x15 (if I stick with my current enclosure) for an affordable price. The DIY options seem to be limited too. So, nice legend results are having me scratch my head.
FWIW, I purchased a VistaCNC p4S-E pendant (think that is right... the one with an exposed physical switch for a real estop chain) and I have to say that this will likely be my main interface. It is pretty slick and surprisingly well made. I had reservations about what to expect from a Chinese no-name commodity product (Vista is just a reseller, but with good US customer service... huge plus), but I have been very pleasantly surprised. If you look at them, be sure to get the one with the exposed estop wiring though. It is just wrong, IMHO, to have an Estop based on a USB driver. I wanted real wires, and to get that I had to special order the pendant.
Alan
Please Log in or Create an account to join the conversation.
- adamj12b
-
Topic Author
- Offline
- Senior Member
-
Less
More
- Posts: 45
- Thank you received: 5
24 Apr 2018 22:37 #109566
by adamj12b
Replied by adamj12b on topic Fryer MB-11 Bed Mill Retrofit
Hello Alan,
Thank You for the compliments!
What I did was draw the layout and hole spacing with a 2D cad program with each different type of object on a different layer. Layout marks, perimeter, buttons, holes and screen.
After this, I imported the DXF file into Adobe Illustrator and added weight to the lines and text so that they could be printed.
I had a guy with a vinyl printer print and laminate them and then run them back through which cuts them out. Its the same printer that prints vehicle wraps.
So far they have held up fine. I will actually be rebuilding the console in the near future as I have a new touchscreen that I want to use.
I have attached the DWG layout file I created and the adobe file. Change the extension of the .zip file to .ai.
www.dropbox.com/s/i8dm51wftklh47w/Console%20Layout.dwg?dl=0
www.dropbox.com/s/huf6o8k1budxgnl/Consol...ngle%20Layer.ai?dl=0
One thing I ran into was the ESTOP deactivates the servos including the encoders. So I dont mind where its placed. Also, I dont have an issue hitting it when needed.
Ive thought about getting a pendant, but Im really liking the console setup. Just need to add a keyboard and I think it will be perfect.
-Adam
Please Log in or Create an account to join the conversation.
- DeckelHead
- Offline
- Elite Member
-
Less
More
- Posts: 166
- Thank you received: 2
25 Apr 2018 00:55 #109569
by DeckelHead
Replied by DeckelHead on topic Fryer MB-11 Bed Mill Retrofit
That is great to know you have had good luck with the vinyl. I will probably go that route then. After all, if it doesn't work, then I can always try something else.... Hmmm, that might not be too easy though. My switches are mounted from the front so I'd have to desolder everything and that sounds like a pain.
For the foreseeable future, I think I am going to try keeping my console back in the location where the Hurco KMB1 originally had it. That is a bit more inconvenient in a tight garage, but I have all the parts and I actually found it to be pretty convenient there. Here is a picture of my machine when I first got it (the little girl there is graduating college in 2 weeks... eek!):
www.cnczone.com/forums/hurco/218478-cnc-software-forum.html
That is interesting about the Estop deactivating the encoders. It would be interesting to see your wiring diagrams. Are your encoders integral to the motors (sorry, not looking through the photos at the moment). My encoders are, essentially, bolt-on devices. It is true that my amps are more 'modern' than the original Hurco amps (Westamp, actually). The Granite Devices amps have a built in SMPS that generates the 5VDC for the encoders. However, the amps have separate high voltage and logic voltage inputs. The logic is what is used to generate the 5VDC and that is never switched off. The EStop, however, does shut down the high voltage side, obviously so there is *no* way the servos can move (although at full tilt they will still go an awfully long way!).
Alan
Please Log in or Create an account to join the conversation.
- DeckelHead
- Offline
- Elite Member
-
Less
More
- Posts: 166
- Thank you received: 2
28 Apr 2018 04:41 #109743
by DeckelHead
Replied by DeckelHead on topic Fryer MB-11 Bed Mill Retrofit
Adam,
I should have asked this before... Is there anything on your console that you wish you had, but don't? Conversely, is there anything there that you don't use often and either wish you didn't put on or about which you are fairly ambivalent?
Needless to say, my motivation is to zero in on some of the necessary keys and avoid extraneous one. Right now, I'm thinking about *not* putting an X/Y gimbal and Z/A jogs on my console. The use case would be to use the selector switch and then press the JOG +/- for the same function.
I'm also torn on whether or not it is really beneficial to have the separate zero buttons for each axis. It strikes me as a nice option but one that is not really all that necessary. For some things I think I can live with the UI.
Basically, I'm just spit balling here, trying to figure out where "gotta have" are located versus the misses. So, I'm very interested in your thoughts.
Please Log in or Create an account to join the conversation.
Time to create page: 0.447 seconds