Fryer MB-11 Bed Mill Retrofit
- andypugh
-

- Offline
- Moderator
-

Less
More
- Posts: 19875
- Thank you received: 4642
12 May 2018 15:17 #110604
by andypugh
Replied by andypugh on topic Fryer MB-11 Bed Mill Retrofit
www.digikey.co.uk/product-detail/en/nkk-.../360-3378-ND/5056758
More expensive, but full colour (I think)
More expensive, but full colour (I think)
Please Log in or Create an account to join the conversation.
- DeckelHead
- Offline
- Elite Member
-

Less
More
- Posts: 166
- Thank you received: 2
12 May 2018 18:20 #110616
by DeckelHead
Replied by DeckelHead on topic Fryer MB-11 Bed Mill Retrofit
Yeah, I saw those. If I went down one the route of a key like this, however, I think I'd stay away from the OLED. I read that they can burn in while the LCD should be immune for that. I don't need a fancy picture anyhow, just some simple graphic or text. Being able to control the color of the backlight would be more beneficial to me.
I've done a fair amount of poking around on these keys over the last day. They are kind of big and klunky. I'm not completely convinced they are a great idea, frankly.
I've done a fair amount of poking around on these keys over the last day. They are kind of big and klunky. I'm not completely convinced they are a great idea, frankly.
Please Log in or Create an account to join the conversation.
- adamj12b
-
 Topic Author
- Offline
- Senior Member
-

Less
More
- Posts: 45
- Thank you received: 5
02 Jul 2018 18:54 #113248
by adamj12b
Replied by adamj12b on topic Fryer MB-11 Bed Mill Retrofit
Well its been a while but things havnt been slow.
Ive been building a full enclosure for the Fryer over the past 7 weeks and it should be making chips again this week!
A few more things to clean up and I will post the details on that, but first, I need to show off what will be the Fryers new console.
I liked the one I built before, but needed something with a better screen. I retrofit my current console with a better touchscreen but I did that as a temporary solution.
Anyways, Here it is:

13.3 inch IPS monitor with capacitive touch.
The housing of the console will be round tube turned on the lathe for a nice finish then slit into 2 halfs and drilled and counter bored for the screws that bolt the front panels in place. One for the monitor, one for the keyboard and one for the button panel. All the panels are 1/8 or 1/2" thick.
The keyboard is my own custom layout based on Cherry MX keyboard switches and custom firmware.
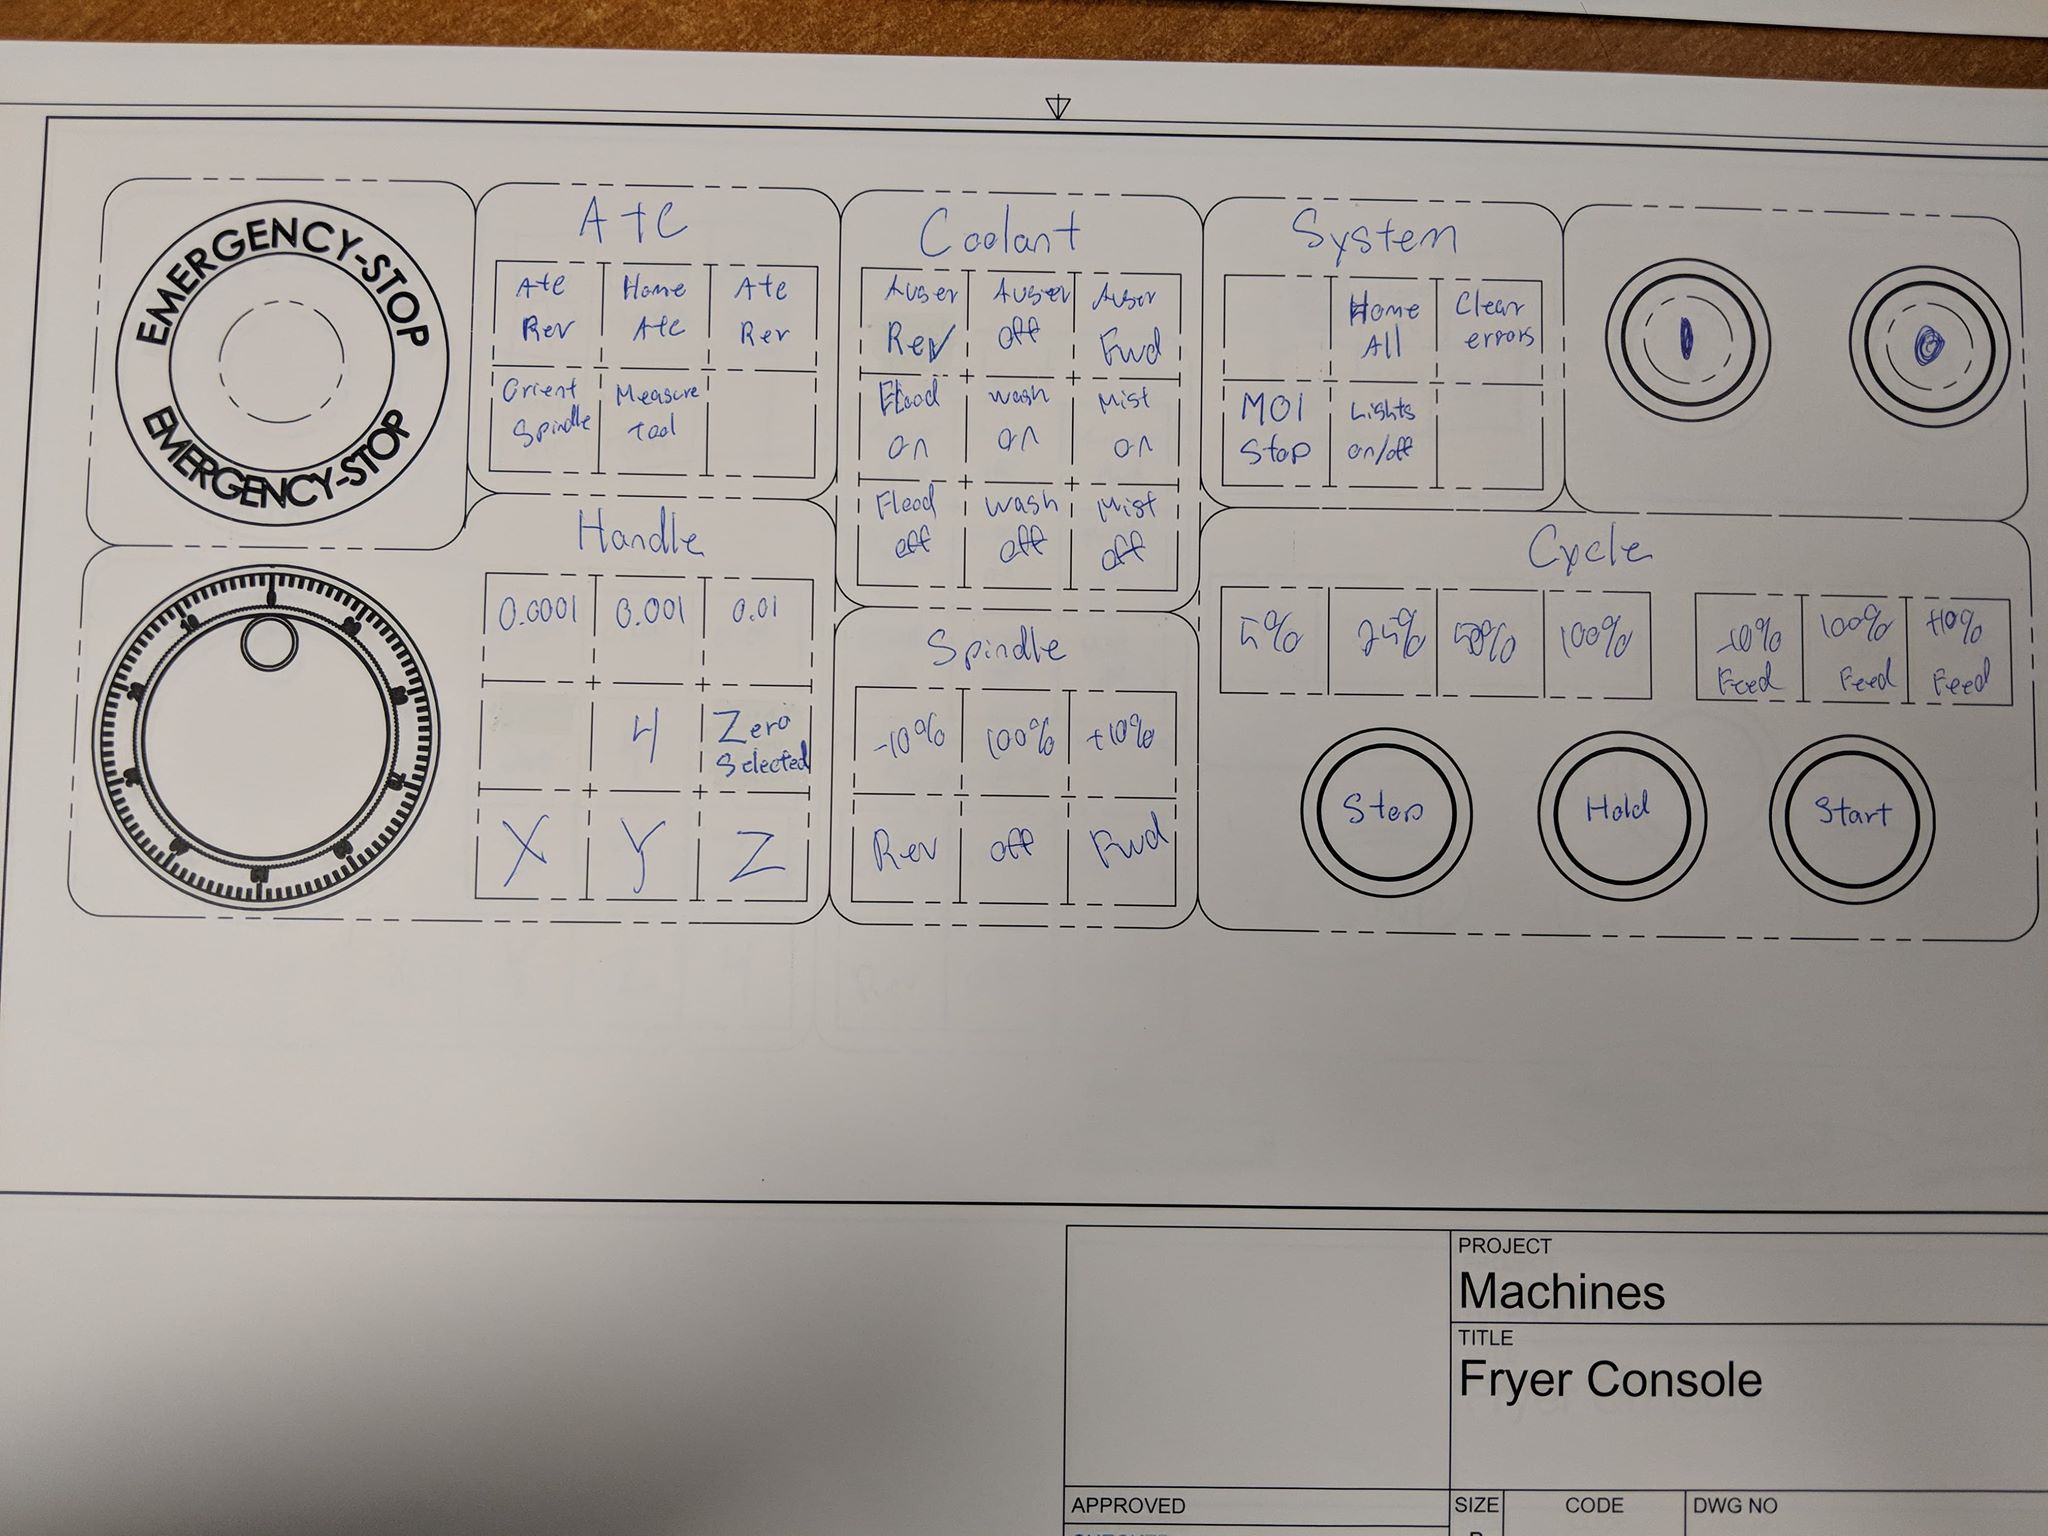
The button panel is based on the same Cherry MX switches and keyboard caps, but will use a Mesa 7i73 for the interface. There is a 60mm MPG in the lower left. Estop upper left. Machine power control in upper right and cycle control (Stop, Feed Hold and Start) Lower right.
Here is a picture of the button layout.
I have ordered everything so far with the exception of the key caps for all the keys.
Let me know what you think and any suggestions you may have. As you can see, there are still a few spaces left.
-Adam
Ive been building a full enclosure for the Fryer over the past 7 weeks and it should be making chips again this week!
A few more things to clean up and I will post the details on that, but first, I need to show off what will be the Fryers new console.
I liked the one I built before, but needed something with a better screen. I retrofit my current console with a better touchscreen but I did that as a temporary solution.
Anyways, Here it is:
13.3 inch IPS monitor with capacitive touch.
The housing of the console will be round tube turned on the lathe for a nice finish then slit into 2 halfs and drilled and counter bored for the screws that bolt the front panels in place. One for the monitor, one for the keyboard and one for the button panel. All the panels are 1/8 or 1/2" thick.
The keyboard is my own custom layout based on Cherry MX keyboard switches and custom firmware.
The button panel is based on the same Cherry MX switches and keyboard caps, but will use a Mesa 7i73 for the interface. There is a 60mm MPG in the lower left. Estop upper left. Machine power control in upper right and cycle control (Stop, Feed Hold and Start) Lower right.
Here is a picture of the button layout.
I have ordered everything so far with the exception of the key caps for all the keys.
Let me know what you think and any suggestions you may have. As you can see, there are still a few spaces left.
-Adam
Please Log in or Create an account to join the conversation.
- DeckelHead
- Offline
- Elite Member
-
Less
More
- Posts: 166
- Thank you received: 2
03 Jul 2018 00:32 #113264
by DeckelHead
Replied by DeckelHead on topic Fryer MB-11 Bed Mill Retrofit
Well, I think it looks very spiffy. I'm moving along with my project too. Your buttons are very interesting to me because, as you know, I'm solidifying what I want on my console. In this case, I have decided to go with four LCD buttons and an On-Off-On momentary next to them to allow me to scroll menus. I decided against the full color OLED because they degrade over time. Yeah, probably don't have to worry about that very much (how often is a CNC on? Not much, really) but I liked the idea of LCD. Besides, I can alway change if I want.
My basic layout hasn't been modified too much since we last spoke. I go over it in my head and I am happy with it. The only thing I really don't know about is the M1 Hold button. I simply don't have a feel as to how often I'll use it.
I really like your "clean" look for the case. I have to give that some serious thought. I was going to bend a box and weld the sides, but that is very "square-ish" whereas yours is very Star Treky. Cool...
I'm not sure I'm too partial to what looks like a QWERTY keyboard directly under the monitor. Although I'm not a fan of a separate keyboard, I finally decided on that because I think I'm an even less fan of a keyboard on a vertical control. That just seems marginally useful.
I was planning on putting some electronics in my console so it will end up being about 3.5" thick. I've waffled on whether or not to go your route and make it uber thin... Not sure about what to do there yet.... But, I'm also repurposing some keys from my old Hurco control, and those are up to 3" which is part of the reason my console is thicker...
Your system is very sleek, indeed. I've opted to use ACM for my front panel to help keep weight down and because I can engrave it directly. We'll see how it pans out. What I don't like, however, is that I could only get white. I'd have preferred a black face.
Please Log in or Create an account to join the conversation.
- DeckelHead
- Offline
- Elite Member
-
Less
More
- Posts: 166
- Thank you received: 2
05 Jul 2018 17:46 - 05 Jul 2018 17:48 #113485
by DeckelHead
Replied by DeckelHead on topic Fryer MB-11 Bed Mill Retrofit
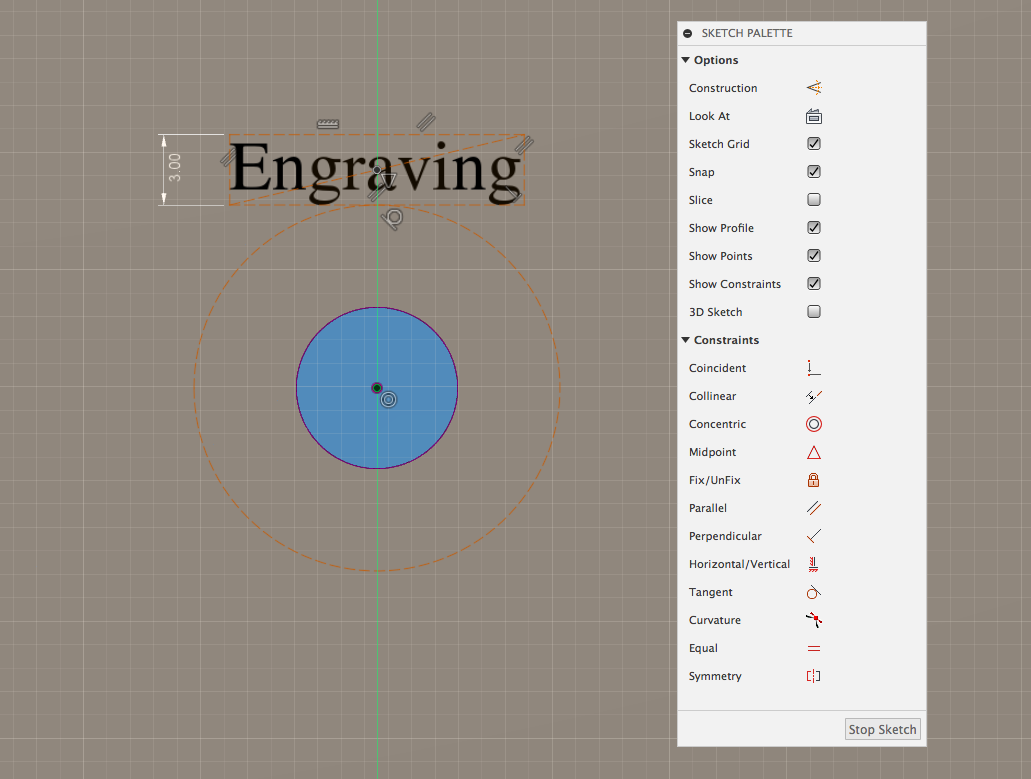
Wow. I ran into an unexpected roadblock with my own console.... I'm fairly green with G-code because my Hurco that I migrated to LinuxCNC was all conversational. I decided to learn Fusion 360 because it has a G-code generator built into it. I'm very good with AutoCAD but Fusion makes more sense moving forward with my new capabilities. I stumble with the application, primarily in the constraint area, but I have the panel all modeled now (excepting text). Great! I thought that engraving would be the easy part. Oh, how wrong I was....
I have found that engraving is the single most frustrating thing I've dealt with thus far on the whole conversion. Either I'm totally missing how to do this well in Fusion or the app simply isn't ready for prime time in this narrow area (don't get me wrong... by and large, it is very cool and I'm a huge supporter). I haven't even cut anything yet, but just getting the text in the right place is a major PITA. The app crashes or the tools are primitive. Vector fonts are, well, not really there, that I can see. And even if they were, for the life of me, I can't see how one can reliably places these such that they are centered on a horizonal line, directly above a button. The 'insertion point' simply is the wrong way to place stuff. Oh, how I miss AutoCAD!
Fusion 360 is so poor/frustrating in engraving that I have tried to find other applications. The problem there, however, is that most of the applications are all centered around a rather simplistic concept of a trophy model--one line of text in a single location. I want text in numerous places around the a piece of material.
So, I'm totally frustrated and sitting here trying to figure out how to engrave my panel. It is an odd place to be. I feel like I have this massively capable CNC machine but would be far better off with a manual pantograph right now.... So, this begs the question... Does anyone have any suggestions on how to extricate myself from this mess? Is there a good piece of software that I can use to generate G-code for engraving attractive vector fonts? Ideally, it would be something that would allow me to engrave different strings in multiple places around a piece of material.
Any suggestions are welcome and appreciated.
Alan
Last edit: 05 Jul 2018 17:48 by DeckelHead.
Please Log in or Create an account to join the conversation.
- adamj12b
-
Topic Author
- Offline
- Senior Member
-
Less
More
- Posts: 45
- Thank you received: 5
05 Jul 2018 18:12 #113487
by adamj12b
Replied by adamj12b on topic Fryer MB-11 Bed Mill Retrofit
Fusions engraving and font stuff has always sucked. Dont let it drive you away though. The pros still outweigh the cons.
That said, to do something like this, I would export the layout of the sketch your trying to have text on to a DXF file. Then import this file into Inkscape or Illustrator and add the text you are looking for there. Once you have it all, do an Object to path to make it all lines, and not text. Do a save as and save it as a SVG (or dxf but I haven't tried this). Import this new file into fusion and align it with your other work. BAM back to where you were. Now you can either extrude the lines or use a 2D trace depending on your font complexity.
This is my plan to do my engraving on the new console.
-Adam
Please Log in or Create an account to join the conversation.
- andypugh
-
- Offline
- Moderator
-
Less
More
- Posts: 19875
- Thank you received: 4642
05 Jul 2018 18:21 #113489
by andypugh
I just had a fiddle, and here is an idea that seems to work.
Insert your text, then select "construction geometry" and draw a line from one corner of the text bounding box to the other.
Then sketch->point and put a point snapped to the midpoint of that line.
Then you can dimension and constrain to that point.
Alternatively draw a construction line constrained horizontal and dimensioned from the hole centres, then make the text bounding box bottom line coincident with that line.
Or draw a construction circle concentric with the button hole and make the text bounding box tangent to that circle.
Replied by andypugh on topic Fryer MB-11 Bed Mill Retrofit
Any suggestions are welcome and appreciated.
I just had a fiddle, and here is an idea that seems to work.
Insert your text, then select "construction geometry" and draw a line from one corner of the text bounding box to the other.
Then sketch->point and put a point snapped to the midpoint of that line.
Then you can dimension and constrain to that point.
Alternatively draw a construction line constrained horizontal and dimensioned from the hole centres, then make the text bounding box bottom line coincident with that line.
Or draw a construction circle concentric with the button hole and make the text bounding box tangent to that circle.
Please Log in or Create an account to join the conversation.
- adamj12b
-
Topic Author
- Offline
- Senior Member
-
Less
More
- Posts: 45
- Thank you received: 5
05 Jul 2018 18:25 - 05 Jul 2018 18:47 #113490
by adamj12b
Replied by adamj12b on topic Fryer MB-11 Bed Mill Retrofit
So Im looking for some advice on controlling LED's for my console buttons.
I have a number of buttons that I want to have backlights to indicate what is active, such as jog increment, axis, rapid speed ect.
I need 17 outputs for my new console and the 7i73 has 16.
I am trying to understand how to interface a 74ACT595 shift register with the controls but there is only a little bit of information available. I dont understand how I would command data to the specific bit and then write the whole straight out to the chips...
This is all I could really find: wiki.linuxcnc.org/cgi-bin/wiki.pl?Shift_Register_Port_Expander Which was edited 5 years ago..
Thoughts?
Last edit: 05 Jul 2018 18:47 by adamj12b.
Please Log in or Create an account to join the conversation.
- andypugh
-
- Offline
- Moderator
-
Less
More
- Posts: 19875
- Thank you received: 4642
05 Jul 2018 18:28 - 05 Jul 2018 18:42 #113491
by andypugh
And have a look for "CAMBAM stick fonts" on Google
Actually, it seems to be more set up for Vee-carving so serif fonts work out best:

Replied by andypugh on topic Fryer MB-11 Bed Mill Retrofit
Actually, it seems to be more set up for Vee-carving so serif fonts work out best:
Last edit: 05 Jul 2018 18:42 by andypugh.
Please Log in or Create an account to join the conversation.
- andypugh
-
- Offline
- Moderator
-
Less
More
- Posts: 19875
- Thank you received: 4642
05 Jul 2018 18:46 #113492
by andypugh
I think that Charlieplexing probably isn't an option with Mesa IO.
If you have a space smart-serial channel then a 7i73 inside the console might be a good choice.
Replied by andypugh on topic Fryer MB-11 Bed Mill Retrofit
I have a number of buttons that I want to have backlights to indicate what is active, such as jog increment, axis, rapid speed ect.
I need 17 outputs for my new console and the 7i72 has 16.
I think that Charlieplexing probably isn't an option with Mesa IO.
If you have a space smart-serial channel then a 7i73 inside the console might be a good choice.
Please Log in or Create an account to join the conversation.
Time to create page: 0.227 seconds