adding auto leveling to linuxCnc
- robertspark
- Offline
- Platinum Member
-

Less
More
- Posts: 915
- Thank you received: 216
22 Mar 2021 21:45 #203301
by robertspark
thats a nice neat component {just started reading about external offsets}
Replied by robertspark on topic adding auto leveling to linuxCnc
github.com/scottalford75/LinuxCNC-3D-Pri.../master/compensation
thats a nice neat component {just started reading about external offsets}
The following user(s) said Thank You: tommylight
Please Log in or Create an account to join the conversation.
- tommylight
-

- Away
- Moderator
-

Less
More
- Posts: 21692
- Thank you received: 7414
22 Mar 2021 22:42 #203311
by tommylight
Replied by tommylight on topic adding auto leveling to linuxCnc
Bumped in it some 10 days back and left the tabs open thinking of putting it somewhere in the forum, then i see the question here. Lucky ! ")
Still i think it is about time we have a 3D printer section on this forum, mainly because i have one and already have all the parts for building another one using servo motors just to see how far i can push it, thinking i need a granite base for it ....
Still i think it is about time we have a 3D printer section on this forum, mainly because i have one and already have all the parts for building another one using servo motors just to see how far i can push it, thinking i need a granite base for it ....
Please Log in or Create an account to join the conversation.
- newbynobi
-
- Offline
- Platinum Member
-
Less
More
- Posts: 1931
- Thank you received: 394
22 Mar 2021 22:42 #203312
by newbynobi
Replied by newbynobi on topic adding auto leveling to linuxCnc
Please Log in or Create an account to join the conversation.
- Ewok2
- Offline
- Senior Member
-

Less
More
- Posts: 60
- Thank you received: 0
23 Mar 2021 19:47 #203421
by Ewok2
Replied by Ewok2 on topic adding auto leveling to linuxCnc
I understand how G code Ripper works, I have installed it and I will test on the Cnc this weekend.
But for LinuxCNC-3D-Printing/compensation I don't understand how the "probe-results.txt" is produced ?
But for LinuxCNC-3D-Printing/compensation I don't understand how the "probe-results.txt" is produced ?
Please Log in or Create an account to join the conversation.
- newbynobi
-
- Offline
- Platinum Member
-
Less
More
- Posts: 1931
- Thank you received: 394
23 Mar 2021 21:46 #203439
by newbynobi
Replied by newbynobi on topic adding auto leveling to linuxCnc
It is created with gcode ")
It is well documented in the help files.
Norbert
It is well documented in the help files.
Norbert
Please Log in or Create an account to join the conversation.
- robertspark
- Offline
- Platinum Member
-
Less
More
- Posts: 915
- Thank you received: 216
24 Mar 2021 00:05 #203467
by robertspark
Replied by robertspark on topic adding auto leveling to linuxCnc
Please Log in or Create an account to join the conversation.
- jbraun
- Offline
- Senior Member
-
Less
More
- Posts: 65
- Thank you received: 15
24 Mar 2021 02:34 - 24 Mar 2021 02:37 #203479
by jbraun
Replied by jbraun on topic adding auto leveling to linuxCnc
I don't use the autoprobe feature but it looks pretty slick. The relevant part of the video starts at around the 1:20 min mark.
Last edit: 24 Mar 2021 02:37 by jbraun.
The following user(s) said Thank You: ds.lithographie
Please Log in or Create an account to join the conversation.
- ds.lithographie
- Offline
- New Member
-

Less
More
- Posts: 6
- Thank you received: 6
28 Jun 2021 09:30 - 29 Jun 2021 04:54 #213111
by ds.lithographie
Replied by ds.lithographie on topic adding auto leveling to linuxCnc
I guess this is my very first post here although Ive been reading the forum posts all the time. .
Over the weekend I decided to implement external offset on my Linuxcnc 3.8-pre (too lazy to update for a long while). Later upgraded to Linuxcnc 3.8.2, and tested following the steps I wrote below, all seemed working.
THE ORIGINAL compensation.py
Great work done by Scott Alford
Github: github.com/scottalford75/LinuxCNC-3D-Pri.../master/compensation
Video:
I adapted this code to my inch-based machine, fixed some bugs and added a pyvcp widget for reference.
If you try to implement Scott's code yourself here are some considerations:
*Essentially what the code does behind the scene: (1) read the latest probe-results.txt, compose a 2d-array of Z-axis compensation values, addressed by rounded X Y values in mm, say when machine moves to X.6 Y.6, the program retrives Z-offset value from Z_compensate[1][1], and tell Linuxcnc to offset by this much; (2) 2-d array is generated by scipy.griddata(), with optionally three candidate methods; (3) When entered into RUNNING state, the program evaluates machine position and tells Linuxcnc to change offset every UPDATE_INTERVAL.
*scipy.griddata() needs to manually set argument fill_value=0.0, instead of defaulting it to fill_value=NaN. NaN will result in error when int()-ing it.
*Only works with mm-based inputs, which can be improved by scaling up input by 25.4 and output down by 25.4 for inch-based systems.
*Grid resolution is 1mm x 1mm, which can be improved by scaling probe map's (x,y) and pos-cmd by n for 1/n mm x 1/n mm resolution. The best resolution you can achieve is limited by the update interval and feed rate.
*Line #72 and #73 might result in off-by-one error, temporarily solved this by using +2 instead of +1. .
The workflow below may seem complicated, but it is very suitable for existing Autoleveller users
Reason:
* Existing Autoleveller work flow: Generate PFG -> run PFG-> load probe result -> load original G code -> generate modified G code -> run modified G Code. One need to work with three separate G code files, and name them, which is a lot of work.
* New work flow: generate PFG -> run PFG -> run G code
* Autoleveller only considers negative Z value as "cut." Autoleveller-modified G code is not very human readable.
* Using native eoffset is much more elegant
* It is definitely possible to develop a custom subroutine to replace Autoleveller in the workflow. Ideally: specify work area and probe automatically -> run G code
THE WORK FLOW
1 Home all axes
2 Move probe to your intended X0 Y0 above your work surface.
3 Set work coordinate origin the same as machine origin (I suggest using G10 L2 P1 X0 Y0), this is for generating the correct probe-results.txt data that compensation.py can use correctly.
4 Enter the X Y coordinate shown on the screen (Machine coordinate or G54 work coordinate do not matter, at this step they are supposed to be the SAME) in Autoleveller. Starting X, Y shoud not be (0,0) if you do not put your work pieces directly below home position.
5 Enter the rest of the parameters in Autoleveller, generate PFG, save somewhere, say ~/linuxcnc/nc_files.
6 Load the PFG. The PFG is supposed to generate probe-results.txt file using (PROBEOPEN probe-results.txt), (PROBECLOSE) command. The PFG filename is likely be PFG~xxx x xxx.ngc. Ideally you will get a new probe-results.txt file under your .ini directory upon successful finish of G code.
7 Load your working G code to Linuxcnc, set your work origin to your intended X0 Y0 (say use G10 L20 P1 X0 Y0 to set current position to G54's X0 Y0)
8 Check "Enable Z Correction" on the PyVCP panel.
9 Run your G code. If you jog above your probed surface, you can see the "Delta Z" bar showing changing values. You can also see changing values in Hal Meter as you jog as well. axis.z.eoffset-enable, axis.z.eoffset, axis.z.eoffset-counts, axis.z.offset-scale are the four pins of interest for debugging.
HOW TO USE THE ATTACHED FILE
* You are using an inch-based machine, AXIS with PyVCP panel.
* If you are a G92 user, make sure to use G92.1 to clear global offset.
* copy paste the attached probe-results.txt file under your .ini directory, otherwise compensation.py will complain file not found upon first starting up.
* Unzip, copy paste compensation/ folder under your .ini directory
* In your .ini file, under section [Axis_Z], add* In your .ini file, under section [HAL], add* add the following lines to your custom_postgui.hal file (I encountered a warning saying 'axis.z.eoffset ' does not exit, fixed it by removing the space. . guess spaces and tabs are treated differently?)* add the following labelframe to your PyVCP's .xml file
RUNNING Autoleveller ON Linux
* Download Autoleveller from www.autoleveller.co.uk/downloads/, for Linux, choose to download the .jar file
* Save it somewhere convenient like ~/autoleveller/
* Download Oracle JDK8 from Oracle. Sign up required. Do not waste time on OpenJDK from apt-get. It does NOT work.
* www.oracle.com/java/technologies/javase/...-jdk8-downloads.html
* Download the .tar.gz file for the CPU architecture of your machine, untar it using tar xvzf filename.tar.gz, move this folder under ~/autoleveller/
* Since the command gets long, write a script to run it, say (exact version may vary, but know that the java binary is always under subfolder bin/)* My custom controller options is attached for reference. There should be improvements. .
RESULTS
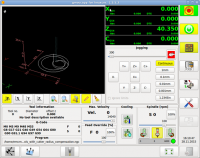
* PyVCP panel screen shot attached
* Engraving result with and without compensation.py enabled. depth of cut is 0.005 inch.
DEBUG RECOMMENDATIONS
* First your machine needs to be a inch-based system, if not, no worries. You will need to change FACTOR_UNIT value from 25.4 to 1 in the compensation.py file, and see if it works. I have not yet tested it.
* If from HAL meter you see numbers change in axis.z.eoffset.counts but axis.z.eoffset shows 0, it is most likely that your axes are not homed (like mine). eoffset REQUIRES the axes be homed.
* compensation.py reads real-time position through axis.x/y/z.pos-cmd, which always give machine positions. Your probe-results.txt position should match this by setting your work coordinate the same as the machine coordinate.
* Debounce the probe seems necessary for 3.8.2, or your Linuxcnc may stop when probe moving up in Z-direction after finishing G38.2 (There could be a short pulse of contact). I did not get this "problem" in 3.8-pre, my G code kept running despite probe being tripped. The solution is here: www.forum.linuxcnc.org/24-hal-components...ng-debounce-to-probe
Best,
Dian
Over the weekend I decided to implement external offset on my Linuxcnc 3.8-pre (too lazy to update for a long while). Later upgraded to Linuxcnc 3.8.2, and tested following the steps I wrote below, all seemed working.
THE ORIGINAL compensation.py
Great work done by Scott Alford
Github: github.com/scottalford75/LinuxCNC-3D-Pri.../master/compensation
Video:
I adapted this code to my inch-based machine, fixed some bugs and added a pyvcp widget for reference.
If you try to implement Scott's code yourself here are some considerations:
*Essentially what the code does behind the scene: (1) read the latest probe-results.txt, compose a 2d-array of Z-axis compensation values, addressed by rounded X Y values in mm, say when machine moves to X.6 Y.6, the program retrives Z-offset value from Z_compensate[1][1], and tell Linuxcnc to offset by this much; (2) 2-d array is generated by scipy.griddata(), with optionally three candidate methods; (3) When entered into RUNNING state, the program evaluates machine position and tells Linuxcnc to change offset every UPDATE_INTERVAL.
*scipy.griddata() needs to manually set argument fill_value=0.0, instead of defaulting it to fill_value=NaN. NaN will result in error when int()-ing it.
*Only works with mm-based inputs, which can be improved by scaling up input by 25.4 and output down by 25.4 for inch-based systems.
*Grid resolution is 1mm x 1mm, which can be improved by scaling probe map's (x,y) and pos-cmd by n for 1/n mm x 1/n mm resolution. The best resolution you can achieve is limited by the update interval and feed rate.
*Line #72 and #73 might result in off-by-one error, temporarily solved this by using +2 instead of +1. .
The workflow below may seem complicated, but it is very suitable for existing Autoleveller users
Reason:
* Existing Autoleveller work flow: Generate PFG -> run PFG-> load probe result -> load original G code -> generate modified G code -> run modified G Code. One need to work with three separate G code files, and name them, which is a lot of work.
* New work flow: generate PFG -> run PFG -> run G code
* Autoleveller only considers negative Z value as "cut." Autoleveller-modified G code is not very human readable.
* Using native eoffset is much more elegant
* It is definitely possible to develop a custom subroutine to replace Autoleveller in the workflow. Ideally: specify work area and probe automatically -> run G code
THE WORK FLOW
1 Home all axes
2 Move probe to your intended X0 Y0 above your work surface.
3 Set work coordinate origin the same as machine origin (I suggest using G10 L2 P1 X0 Y0), this is for generating the correct probe-results.txt data that compensation.py can use correctly.
4 Enter the X Y coordinate shown on the screen (Machine coordinate or G54 work coordinate do not matter, at this step they are supposed to be the SAME) in Autoleveller. Starting X, Y shoud not be (0,0) if you do not put your work pieces directly below home position.
5 Enter the rest of the parameters in Autoleveller, generate PFG, save somewhere, say ~/linuxcnc/nc_files.
6 Load the PFG. The PFG is supposed to generate probe-results.txt file using (PROBEOPEN probe-results.txt), (PROBECLOSE) command. The PFG filename is likely be PFG~xxx x xxx.ngc. Ideally you will get a new probe-results.txt file under your .ini directory upon successful finish of G code.
7 Load your working G code to Linuxcnc, set your work origin to your intended X0 Y0 (say use G10 L20 P1 X0 Y0 to set current position to G54's X0 Y0)
8 Check "Enable Z Correction" on the PyVCP panel.
9 Run your G code. If you jog above your probed surface, you can see the "Delta Z" bar showing changing values. You can also see changing values in Hal Meter as you jog as well. axis.z.eoffset-enable, axis.z.eoffset, axis.z.eoffset-counts, axis.z.offset-scale are the four pins of interest for debugging.
HOW TO USE THE ATTACHED FILE
* You are using an inch-based machine, AXIS with PyVCP panel.
* If you are a G92 user, make sure to use G92.1 to clear global offset.
* copy paste the attached probe-results.txt file under your .ini directory, otherwise compensation.py will complain file not found upon first starting up.
* Unzip, copy paste compensation/ folder under your .ini directory
* In your .ini file, under section [Axis_Z], add
[AXIS_Z]
OFFSET_AV_RATIO = 0.2[HAL]
HALFILE = compensation/compensation.halnet compensation-enable compensation.enable-in <= pyvcp.compensation-enable
net compensation-offset axis.z.eoffset => pyvcp.compensation-offset<labelframe text="Z-compensation">
<hbox>
<checkbutton>
<halpin>"compensation-enable"</halpin>
<text>"Enable Z Correction"</text>
<font> ("Helvetica",12)</font>
</checkbutton>
</hbox>
<hbox>
<label>
<text>"Delta Z"</text>
<font> ("Helvetica",12)</font>
</label>
<bar>
<halpin>"compensation-offset"</halpin>
<font> ("Helvetica",12)</font>
<format>".6f"</format>
<min_>-0.01</min_>
<max_>0.01</max_>
</bar>
</hbox>
</labelframe>RUNNING Autoleveller ON Linux
* Download Autoleveller from www.autoleveller.co.uk/downloads/, for Linux, choose to download the .jar file
* Save it somewhere convenient like ~/autoleveller/
* Download Oracle JDK8 from Oracle. Sign up required. Do not waste time on OpenJDK from apt-get. It does NOT work.
* www.oracle.com/java/technologies/javase/...-jdk8-downloads.html
* Download the .tar.gz file for the CPU architecture of your machine, untar it using tar xvzf filename.tar.gz, move this folder under ~/autoleveller/
* Since the command gets long, write a script to run it, say (exact version may vary, but know that the java binary is always under subfolder bin/)
cd ~/autoleveller/
touch run.sh
echo "#!/bin/bash" >> run.sh
echo "./jdk1.8.0_291/bin/java -jar AutolevellerAE-0.9.5u2.jar" >> run.sh
chmod +x run.sh
./run.shRESULTS
* PyVCP panel screen shot attached
* Engraving result with and without compensation.py enabled. depth of cut is 0.005 inch.
DEBUG RECOMMENDATIONS
* First your machine needs to be a inch-based system, if not, no worries. You will need to change FACTOR_UNIT value from 25.4 to 1 in the compensation.py file, and see if it works. I have not yet tested it.
* If from HAL meter you see numbers change in axis.z.eoffset.counts but axis.z.eoffset shows 0, it is most likely that your axes are not homed (like mine). eoffset REQUIRES the axes be homed.
* compensation.py reads real-time position through axis.x/y/z.pos-cmd, which always give machine positions. Your probe-results.txt position should match this by setting your work coordinate the same as the machine coordinate.
* Debounce the probe seems necessary for 3.8.2, or your Linuxcnc may stop when probe moving up in Z-direction after finishing G38.2 (There could be a short pulse of contact). I did not get this "problem" in 3.8-pre, my G code kept running despite probe being tripped. The solution is here: www.forum.linuxcnc.org/24-hal-components...ng-debounce-to-probe
Best,
Dian
Last edit: 29 Jun 2021 04:54 by ds.lithographie.
The following user(s) said Thank You: andypugh, tommylight, matti.juntunen, robertspark, rajsekhar
Please Log in or Create an account to join the conversation.
- SrLange61
-

- Offline
- Junior Member
-

Less
More
- Posts: 39
- Thank you received: 5
15 Feb 2022 05:01 #234888
by SrLange61
Replied by SrLange61 on topic adding auto leveling to linuxCnc
Hi
I'm having a problem getting the hal commands right on my 'real' machine.
Using the above I have a sim working fine but my machine already has the motors using net _pos-cmd signals as in‘net xpos-cmd joint.0.motor-pos-cmd => stepgen.0.position-cmd’
net xpos-cmd cannot be used twice as it gives a error ?
I’ve tried ‘net xpos-cmd joint.0.motor-pos-cmd => stepgen.0.position-cmd compensation.x-pos’
but I can’t get the compensation to update.
I’m keen to get milling and cutting Depron planes and having the cutting bit following the table will make it a lot easier and precise. Its currently out by .3mm over a metre area.
Any ideas
srl
Please Log in or Create an account to join the conversation.
- ds.lithographie
- Offline
- New Member
-
Less
More
- Posts: 6
- Thank you received: 6
15 Feb 2022 06:08 #234889
by ds.lithographie
Replied by ds.lithographie on topic adding auto leveling to linuxCnc
Depron plane sounds like a great project!
I don't have a solution in mind right now, but here is my checklist when I was debugging mine:
1. open linuxcnc via commandline by just typing in command `linuxcnc`, you should see some additional details of compensation.py output, anything unusual?
2. before you generate the probe-results.txt, there must be an existing probe-results.txt in the folder, or it will fail to load.
3. Documentation on eoffset -- `External offsets apply to axis coordinate letters (xyzabcuvw). All joints must be homed before external axis offsets are honored.` This had me stuck for a long time because my machine did not have home switches linuxcnc.org/docs/html/motion/external-offsets.html
4. Hal scope might be useful, check if anything under eoffset react to your input
Please Log in or Create an account to join the conversation.
Time to create page: 0.170 seconds