Advanced Search

Search Results (Searched for: )

  • spumco
  • spumco
17 Oct 2024 01:38
Replied by spumco on topic Control Box Design

Control Box Design

Category: Milling Machines

Current power supply is a 48v 10 amp meanwell.

Here’s the motor and drivers I currently have.
12 Nm Stepper Online

Just a quick search for toroidal supplies, my driver is rated for 80v, I could possibly do a single 72v supply like this one. 

1440W 72V


Your drives can take 110VDC, or 80VAC.  Antek has toroid transformers or complete toiroid PSU's with rectifiers and caps.

I'd suggest running as close to the max voltage your drives will permit - this will give you better performance at higher RPM.

A simple toroid will be easier to mount (see @Benb's post) than a complete PSU, and be cheaper, too.  Just be sure to check your supply voltage... in my case I'm averaging 240-245VAC, and my "100VDC" PSU from Antek is actually putting out ~104VDC.  Pretty close to my drive max.

So if you get a 78V toroid and your supply voltage is on the high side, you might over-volt your 80V drives.

I didn't see any contactors or other power-handling components (fuses, breakers, etc.) in your layout.  Are you planning to just use the main disconnect switch as your 'off' control?  Yank the plug out of the wall 'estop'?

Do you have a way to start LCNC, your controller, and IO without powering up your VFD and stepper drives?

Print out a page with your components and use a crayon or pen to draw the conductor/cable paths through everything.

VAC-IN -> disconnect -> beakers/fuses -> distribution block -> contactor(s) -> VFD & stepper PSU/transformer & 24vdc/5vdc PSU's for IO & controller
  • Benb
  • Benb's Avatar
17 Oct 2024 01:22
Replied by Benb on topic Control Box Design

Control Box Design

Category: Milling Machines

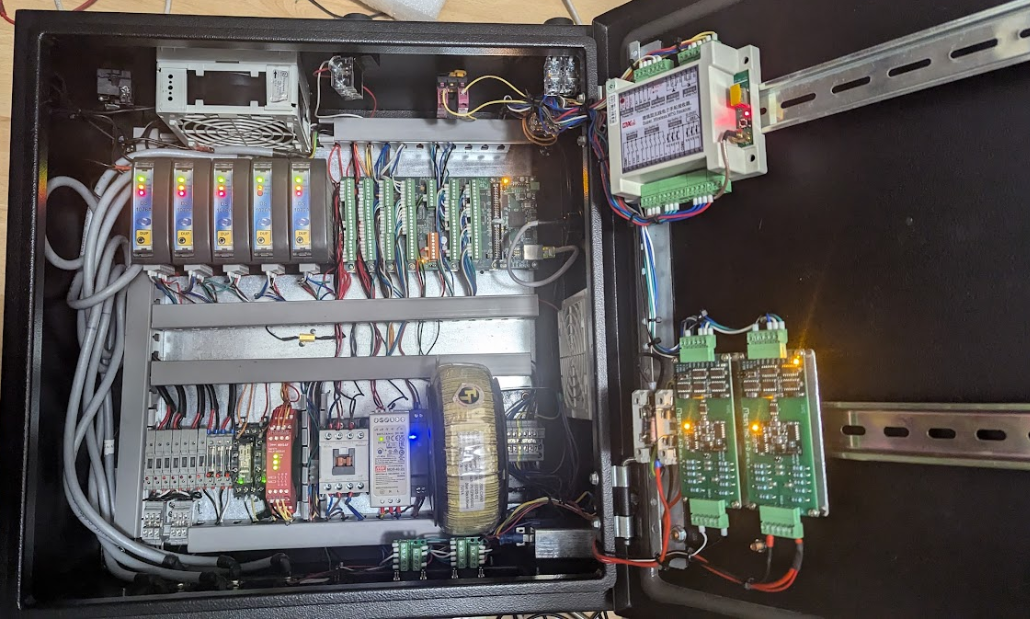
The left wire duct should be twice as large as the others, since it will have bunch of cable going through it from the bottom of the panel to the stepper drives. You will also need room for relays for those heavy loads. It is better to have extra space in the panel. We usually add 10% for unseen. The example below  is pictue of control panel that shows a spider nest of cables hanging on the left. Also, the 1inch or 1.5” wire ducts are too small, they look cut but not practical.However, I like the way the toroidal transformer is mounted.


  • tommylight
  • tommylight's Avatar
17 Oct 2024 01:20
Replied by tommylight on topic MPS2000/Taig Mill Driver Issue

MPS2000/Taig Mill Driver Issue

Category: Driver Boards

I am using 2.7 and it is running great but I tried to install 2.8 and the latest 2.9 and using the same settings from 2.7... both result in the motors running rough like the is electrical noise but swapping it back to 2.7 it runs sweat again?

Most probably due to latency issues as the 2.7 ISO used the RTAI kernel that has better latency on older PC's, while new LinuxCNC versions use the RT-Preempt version of the kernel that is better suited for new-er PC's.
I would stick with 2.7.
  • ant0ny
  • ant0ny
17 Oct 2024 00:51 - 17 Oct 2024 00:57
Replied by ant0ny on topic MPS2000/Taig Mill Driver Issue

MPS2000/Taig Mill Driver Issue

Category: Driver Boards

Tommy,
Thanks but I fixed it... I noticed the socket pins loose when I plugged the Zplug in with the lid off... so I just swapped the sockets around and using the Aaxis socket plugged into the Z driver and it works again. So I have to assume it was just the connection.

I do have another weird issue though, maybe someone could shine a light on.

I am using 2.7 and it is running great but I tried to install 2.8 and the latest 2.9 and using the same settings from 2.7... both result in the motors running rough like the is electrical noise but swapping it back to 2.7 it runs sweat again?

I am assuming it's to do with the drivers and maybe in step config I should be using something other then "other"
  • kennetek
  • kennetek
17 Oct 2024 00:28
Replied by kennetek on topic Axes no longer home/move

Axes no longer home/move

Category: General LinuxCNC Questions

Checked all 16, all of them still read 27 ohm
  • Vair8
  • Vair8
17 Oct 2024 00:01
Replied by Vair8 on topic Control Box Design

Control Box Design

Category: Milling Machines

Current power supply is a 48v 10 amp meanwell.

Here’s the motor and drivers I currently have.
12 Nm Stepper Online

Just a quick search for toroidal supplies, my driver is rated for 80v, I could possibly do a single 72v supply like this one. 
1440W 72V
  • tommylight
  • tommylight's Avatar
16 Oct 2024 23:26
Replied by tommylight on topic Control Box Design

Control Box Design

Category: Milling Machines

How many amps does the power supply have?
If the picture is anything to go by size vise, 2 should be enough, maybe, just maybe 1 ...
  • tommylight
  • tommylight's Avatar
16 Oct 2024 23:19
Replied by tommylight on topic Tool length sensor direction change

Tool length sensor direction change

Category: QtPyVCP

Moved to "QTPyVCP" section.
Thank you.
  • Vair8
  • Vair8
16 Oct 2024 23:08
Replied by Vair8 on topic Control Box Design

Control Box Design

Category: Milling Machines

Good point on hot stuff up top. I’ll definitely be switching that up! So far I’ve only got the one power supply that was left over from another project, so I’m not opposed to switching them out at all.
  • Lcvette
  • Lcvette's Avatar
16 Oct 2024 22:52
Replied by Lcvette on topic Probe Basic - intermittent erratic probing

Probe Basic - intermittent erratic probing

Category: QtPyVCP

Great news! Glad you got it sorted! 25 is a bit fast for small holes, I would recommend finding a balance to be able to achieve full acceleration in small holes to ensure the probe event is at speed for best consistency. But finding the sweet spot is easy now that you're not getting errors.
  • spumco
  • spumco
16 Oct 2024 22:42
Replied by spumco on topic Control Box Design

Control Box Design

Category: Milling Machines

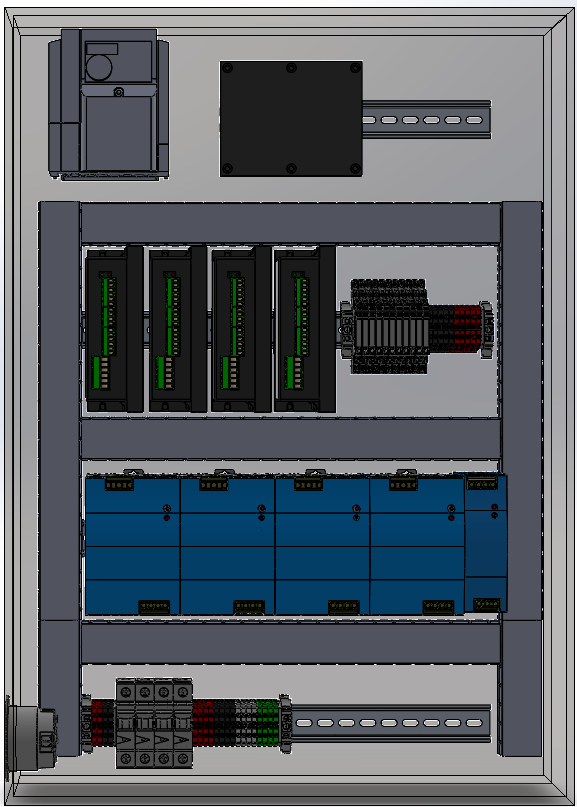
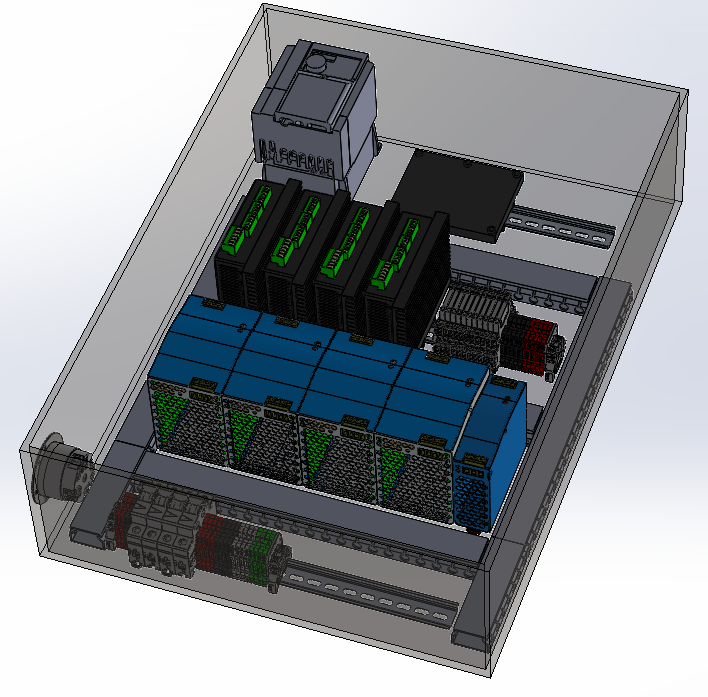
Power supplies & VFD up top
Then drives
Then controller and field IO at bottom.  Field IO cables exit through bottom of case with drip-legs.  Saves running lots of conductors all the way across the panel.

Vent the top of the enclosure if possible (i.e. add a chip/splash guard over the vent), or the top of the door if not possible.

Fans at bottom or top (intake or exhaust opposite fans).

I prefer a positive pressure airflow (fans at bottom) rather than negative-pressure, but that's splitting hairs.

Basically - heat-producing parts at top, controller and sensitive IO as far away from VFD's and noisy servos as possible.

And if you haven't bought them yet, I'd suggest using a big toroidal PS for the steppers rather than a bunch of switching supplies.
  • Vair8
  • Vair8
16 Oct 2024 22:35
Control Box Design was created by Vair8

Control Box Design

Category: Milling Machines

Hey All! First post here.  I've built a few plasma tables before, but I'm converting my first mill over.  Its an old lagun knee mill, I hadn't done all the research before I started buying components because I figured it couldn't be that much different from a plasma table but here we are and I bought closed loop steppers but wish I would've gone servos. 

But on to the actual point, I'm trying to build this box out really nice this time around, and am trying to plan it all as best I can before I start mounting and moving stuff 10 times.  I was hoping some of you with some experience might chime in and tell me if something I am doing is either just not going to work, or not optimal. 


Here's my list of parts:
VFD:  Mitsubishi D700
Controller: Mesa 7i96S
Stepper Drivers: CL86T Closed Loop Drivers (Stepper online)
Steppers: Nema  34 12 Nm
Din Relays (10) For eventual accessories (mist, air burst, power draw bar)
Power Supplies: 4 - 48v,  1 - 12v,  1 -5v
Breakers: 1 - 30 amp,  1 - 20 amp

The Mesa card will be up on the top row, leaving room for a daughterboard later if needed/wanted
I figured pneumatics should go in a second box to isolate in case of water.  
Only thing I'm really concerned about is if the VFD is ok to be that close to my controller.  Not sure if it'll cause any RF interference or anything.

Thanks for any advice!
  • phillc54
  • phillc54's Avatar
16 Oct 2024 22:30
Replied by phillc54 on topic Update failure

Update failure

Category: Plasmac

LinuxCNC no longer supports Buster, the last Buster master branch build was July 6th.
buildbot.linuxcnc.org/dists/buster/maste...inary-amd64/?C=M;O=D

To get the latest master branch you would be better off "upgrading" to Bookworm, packages are available on the other buildbot:
buildbot2.highlab.com/

Having said that, it seems the other buildbot has not built master branch since Oct 5th...
 
  • spumco
  • spumco
16 Oct 2024 22:22
Replied by spumco on topic Probe Basic - intermittent erratic probing

Probe Basic - intermittent erratic probing

Category: QtPyVCP

Well that did the trick.

Removed the second slow probe, increased the fast probe speed to 8, and cut debounce back down to 2.

10 out of 10 clean probes!

Upped the speed to 25, re-calibrated, and it's still repeating perfectly.  Deviation between pocket probes is maybe 0.0001" 2 out of 10 sequential probes.  The other 8 of 10 are perfect repeats.

Even found a probe rotational position where X and Y are a perfect match.

Thanks a TON for the assistance.  Now I just need to figure out how to incorporate the probe's error signal in to the probing routines so it stops if the RF error is present during the probing.
  • tsaG
  • tsaG
16 Oct 2024 22:11

Tool length sensor direction change

Category: QtPyVCP

Hi!

I am using QTPyVCP and would like to use my tool length sensor. My CNC Router is set up in a way that it home the Z-Axis to the maximum upper Point is the maximum travel. This means a few millimeter above my bed is Z=0. This way, my Z will always be positive. As I understand, when using the ToolLength sensor in QtPyVCP it has to be the other way round, is that correct?

When Setting up the toollength tool. I set up my Position 20 Millimeter above my Sensor ( Z=70mm). However when trying to probe it just plunges to Z=0 and then moving in X/Y to the Sensor position (shouldnt it be the other way round?).

Is there a way to make it run with my Axis directions? Or should I switch my Z=0 direction?
Displaying 22636 - 22650 out of 22873 results.
Time to create page: 0.838 seconds
Powered by Kunena Forum