Hurco KMB-IS CNC update

More
6 years 2 months ago #177439 by CORBETT
Replied by CORBETT on topic Hurco KMB-IS CNC update


Leith,

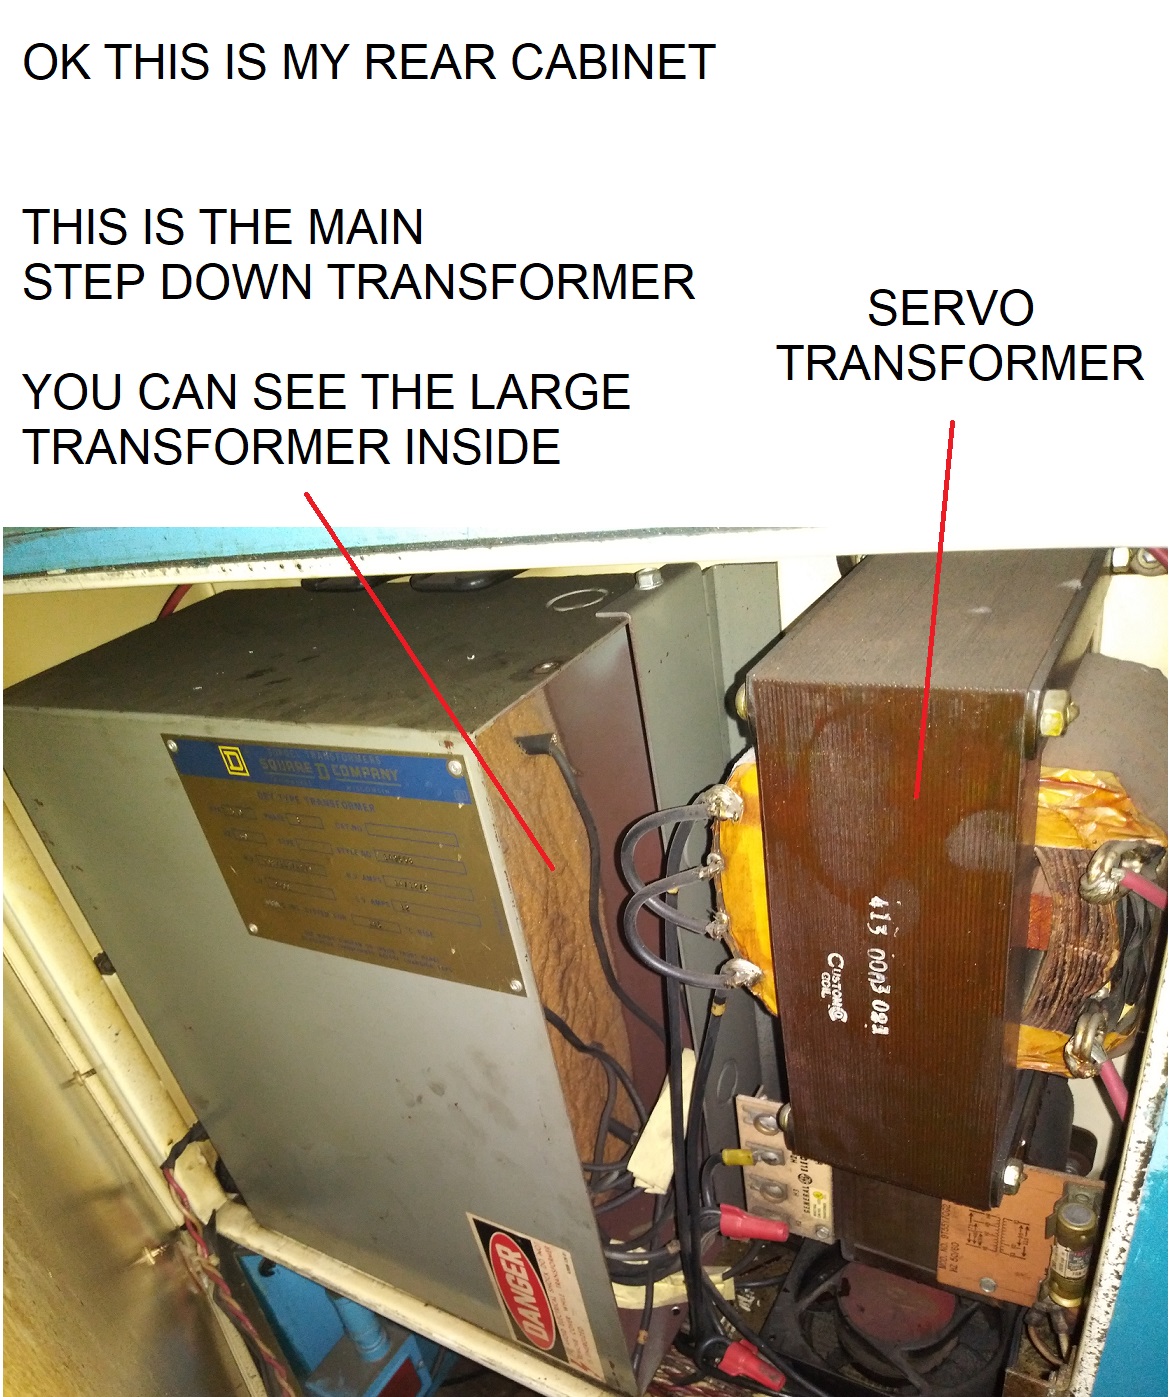
Ok yeah just saw the tag and it's 3phase with HV input. In one of the pics, you can see into the side of the gray Square D box and it has a huge transformer the size of the gray box. So yeah that would be the main machine step down transformer, as it would have to be bigger than the servo transformer anyway. Not only is it powering it but all of the machine power will be ran by the step down transformer.

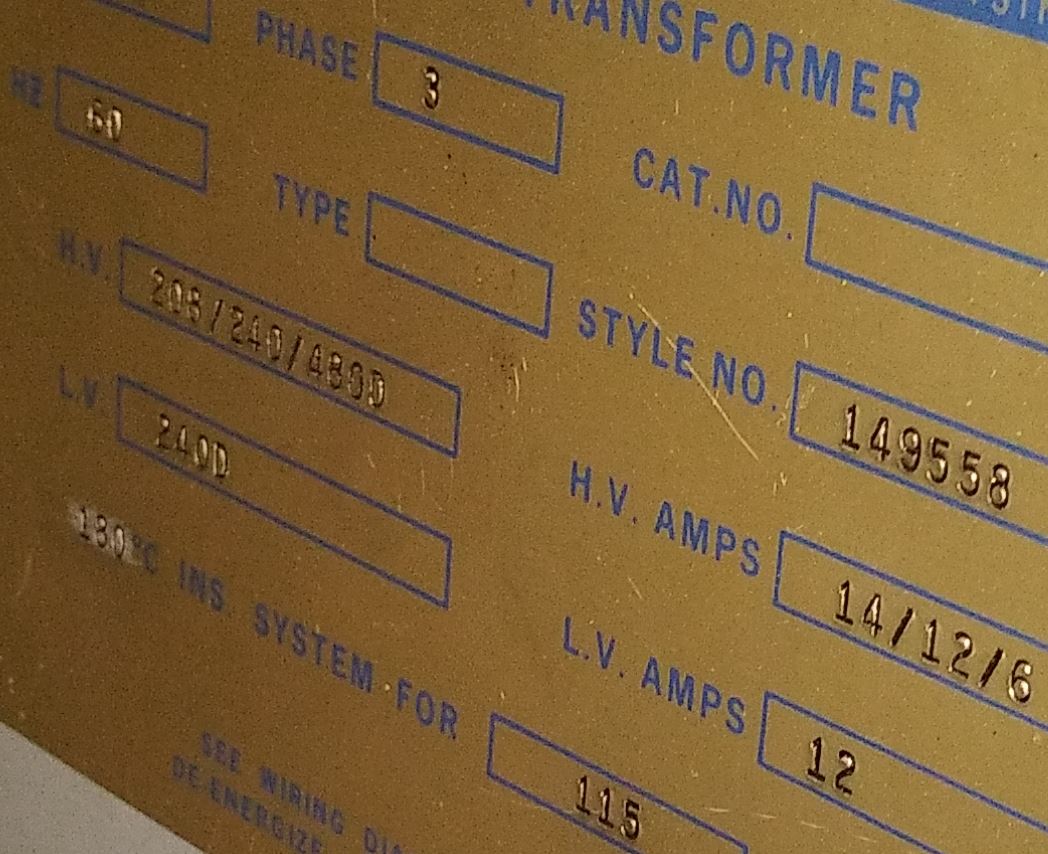
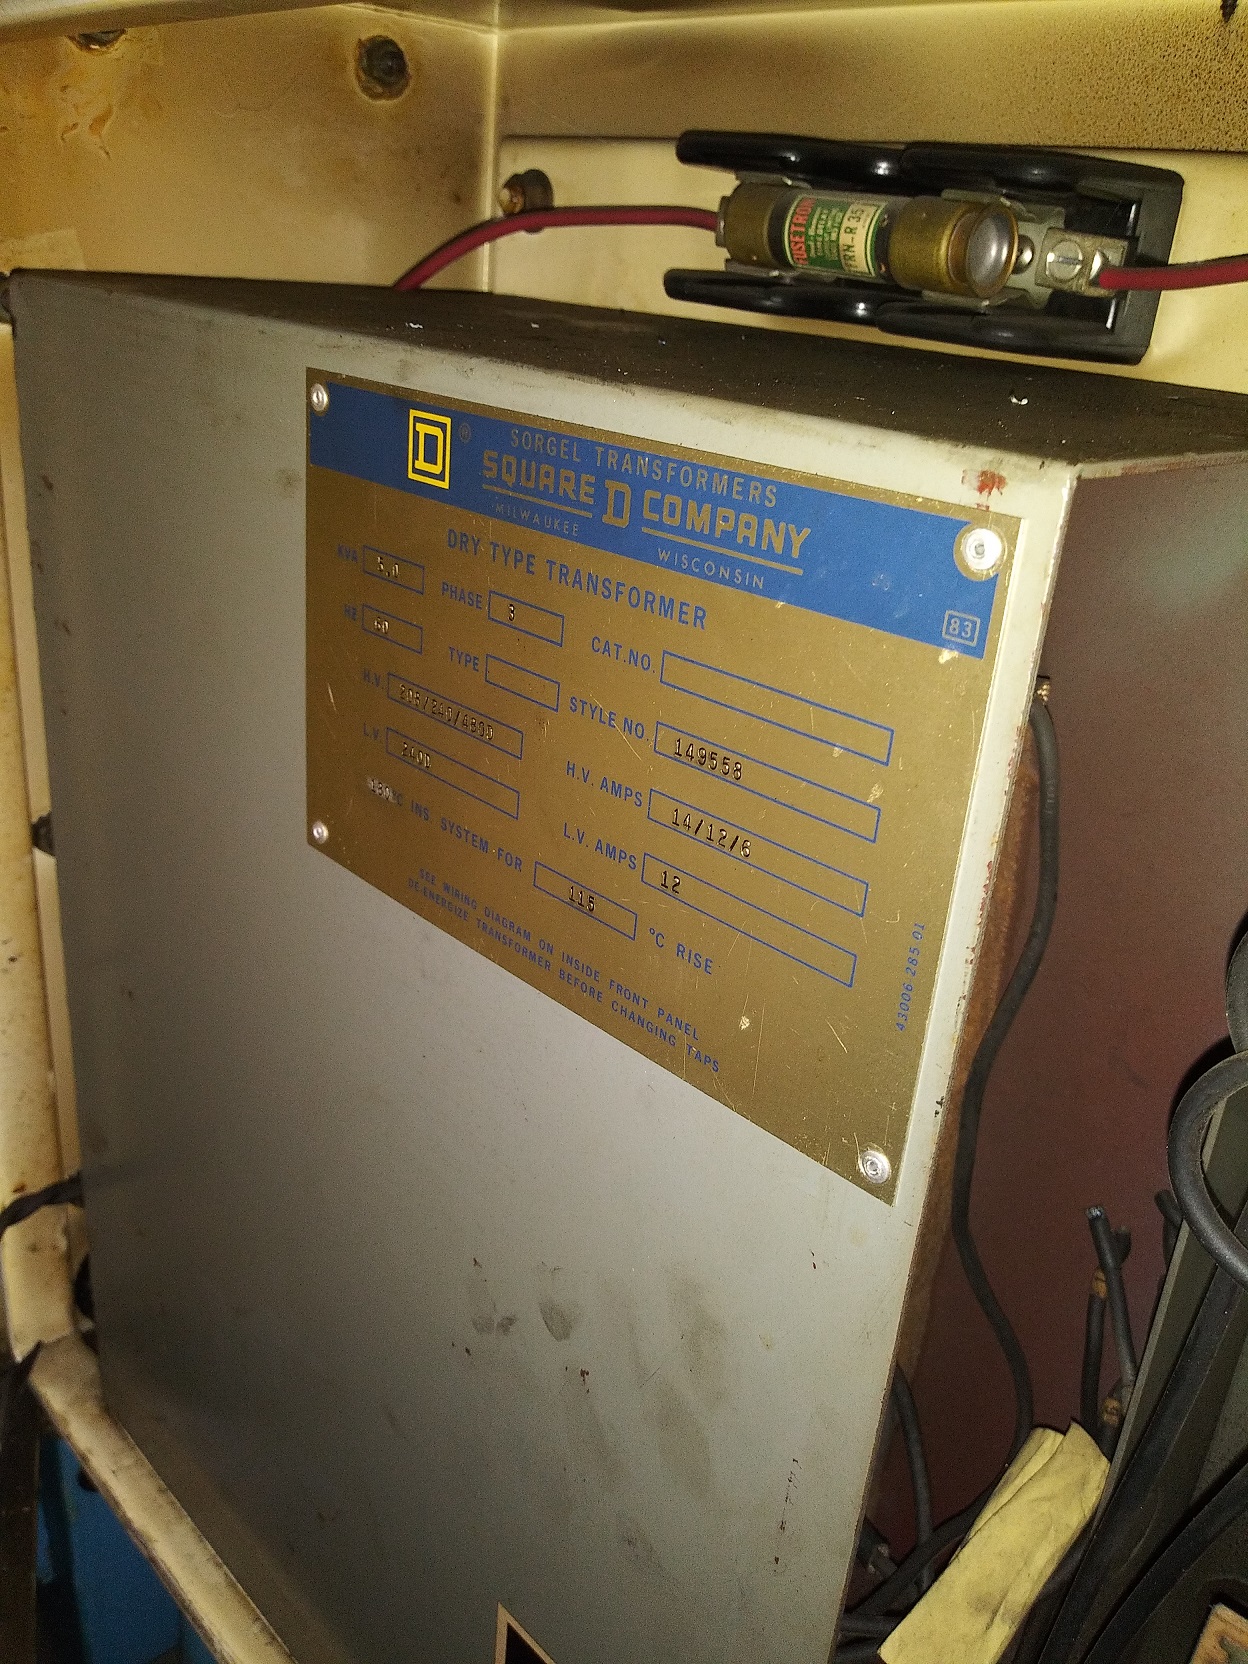
I can't make out the tag perfectly, so may have to go take pics again. but its showing:

HV" 208/220/480D
LV" 240D
KVA: 5.0
PHASE: 3
HV AMPS: 14/12/6
LV AMPS: 12

So yeah the large gray box is the main machine power step down transformer and the one on the right will be to the servo amp transformer. The smaller exposed transformer is definitely the servo transformer, I saw two red wires coming off the secondary side, and I only saw two wire supplying the primary, so that's it. Plus there were 4 taps on the primary with 2 input wires and 2 loops.

Give me a bit and I will up load pics. The lighting is getting bad here, so I may have to shut computer down for a bit.

Will be back,
Robert

Please Log in or Create an account to join the conversation.

More
6 years 2 months ago #177444 by CORBETT
Replied by CORBETT on topic Hurco KMB-IS CNC update
Ok here is another pic. I have more, but working on things.

Will be back later,
Robert


Please Log in or Create an account to join the conversation.

More
6 years 2 months ago #177446 by CORBETT
Replied by CORBETT on topic Hurco KMB-IS CNC update
Leith,

Ok here is a picture of the tag... not the best, but can read it. The top pic is blown up and cropped from the bottom pic.


Please Log in or Create an account to join the conversation.

More
6 years 2 months ago #177465 by CORBETT
Replied by CORBETT on topic Hurco KMB-IS CNC update

Leith,

Sorry I have not gotten more up, but I am way behind on paperwork and trying to bid a job this week... stretched thin LOL.


Just to kind of keep you on track, this is what I would be pushing to do.

Quick List:
1) E-stop
2) Proximity Switches (this will be later with Mesa board)
3) Oiler working and/or getting ways and ball screws coated with oil
4) Cap off all exposed wiring in the left cabinet, getting ready for power
5) Check wiring from Disconnect to the Main transformer, then following wiring and cap any exposed A/C power wires.
6) Air working, or temporarily bypass the air switch for E-stop chain. I don't recommend bypassing, you could forget to wire back up.
7) Check all of the wiring in the right cabinet to see if any A/C power needs capping off, or anything exposed like the left cabinet

This gets you close to powering the machine.


More detailed from the Quick List above:
1) Emergency Stop wired in, this is the first and foremost thing to do before firing up the power.... Like I said before this is super easy to do. I would find a way of temporarily mounting a E-Stop and that way you can wire directly into the TB-3 connector. Just simply a loop between two of the TB-3 connectors and the E-stop.

2) You really need the proximity switches wired next, but that will be down the road when you wire up the Mesa board. When you go to wire the Mesa board. E-stop is first and Proximity switches next. Somewhere down the line you will have the table take off and be glad to have either wired to keep from destroying the machine. I actually consider the proximity switches more critical at this stage as you never know what the servo's may do when setting everything up.... but E-stop is a must... safety first.

2) Keep the way oiler in the back of your mind and prep to get it working. You can coat the ways and ball screws with oil before trying to operate the servos, but can't move around much until you get oil flowing. This is critical... that is the life of the machine literally, especially your ball screws.

4) Cap off all of the wiring in the left panel so that you can prep to put power to the mill. If you want to be simple, you can just use electrical tape to temporarily cover all exposed ends/terminals. I am pretty anal about wiring and I usually cut and cap things with crimp terminals (barrels or caps) so there is no chance of touching or shorting anything.... but you should be tearing a lot of that wiring out, as the VFD will have very little wiring.

5) Check the step down transformer wiring and follow it back to the left cabinet. Should actually go back to the disconnect. You should be able to find any other wiring that powered the Parajust board and cap off. Once you figure out the wiring to the transformers and disconnect then you should be getting closer to put power to the machine. When I get a chance I will trace mine, but I am sure it will simply go from the disconnect to the stepdown transformer, and then take off from the step down to a few places such as the servo transformer, the left cabinet for powering the parajust board, and there will be a power leg that goes over to the right cabinet to power the power supply, hour meter, timer for the oiler, coolant contactor, acc contractor and so forth.

6) Air working to get the E-stop chain working. The air pressure switch need pressure to close and make the chain connection for the E-stop loop. I would not bypass it as it is easy to forget and not wire it back up.

7) Follow the A/C wiring into the right cabinet and make sure there is nothing exposed. It should be white and red wires twisted together going through out the cabinet. Such as to the hour meter at the rear of machine, power to the timer for the oiler solenoid, then there will be power to the power supply, power to the line filters, and power to the contactors. There will be another set of red wires that come from the servo transformer to the servo amps, but that is the 80V and separate, but still need to check for anything exposed.


Once you are comfortable with everything, then you are getting close to putting power and seeing what is going to happen. You technically will not get the power working to the servo amps unless the K5 relays are working. This is assuming the aftermarket work was done correctly and tied back into Hurco's original wiring. But once you are close to power, I can tell you what steps to take from there.


Also on a tangent, you may want to find a old desktop computer or whatever you are comfortable using and put LinuxCNC on and start getting use to how it operates. LCNC has a simulator so that you can tinker to get a feel for it. You may have already done this.


Sorry I have not gotten more tonight, but I am super behind on paperwork and got to get things done in the next few days. I will try to get more together, but I have to have a quote together for the Air Force by this weekend, so I am super busy.


I will be back tomorrow, hope the previous post have helped. Up way too late again, LOL.

Robert
The following user(s) said Thank You: Wynoose66

Please Log in or Create an account to join the conversation.

More
6 years 2 months ago #177466 by CORBETT
Replied by CORBETT on topic Hurco KMB-IS CNC update
One thing I missed and should have asked before is have you been into the rear cabinet to see if the original transformers are still there or either missing or both missing? I know you said the servo transformer is hanging off the back, but wanted to know if the original was there still.

Please Log in or Create an account to join the conversation.

More
6 years 2 months ago - 6 years 2 months ago #177522 by CORBETT
Replied by CORBETT on topic Hurco KMB-IS CNC update
Leith,

One thing I did not mention last night is that the Y and Z have belts, but X is directly coupled to the ball screw.

Yes if you feel safer removing them by all means do so to avoid getting hurt or have an axis crash. I did not, but I had the E-stop and Proximity switches working to shunt the amps, so I was not worried about crashing.

Also, I am beginning to think that someone at Colorado State tried to fix the machine and hence the transformer hanging off the back.

I can speak from experience as we have bought machinery from Lockheed Martin, General Dynamics, Boeing, and several other defense contractors. I have personally been in several of these facilities more than once, as we are already cleared by the DOD for our day to day job, and they absolutely will not be adding a transformer hanging off the back. They are going to order and fix with correct parts from Hurco or get the correct type of part and replace. These are companies that follow the rules because of liability and they do not want to ruffle the waters with the DOD. I believe someone tried to make a fix as I doubt CSU would have spent the money required to have it serviced and repaired. Defense contractors have money to throw at the machines, but universities usually will not spend on machinery. I know that some of the tech schools/colleges received machinery as a gift and a lot of them do not have the money allocated to spend on repairs.

Also, yes the machine could have been fully functional. DOD requires defense contractors to "Time Out" machinery. What that means is that they would buy a brand new machine say in 1983, the machine no matter if it is brand new and just sitting there will be "Timed Out" in 20 years or whatever the DOD requires for that particular machine. I have a feeling the machine was totally working when CSU received it. All of our machinery that we bought was fully operational. Just as an example, we bought a Monarch VMC that cost General Dynamics $267K brand new, and we bought it for $100... YES I SAID $100. The machine was fully operational and still in tolerance, the mill itself weighed 23,000 lbs plus tons of tooling. General Dynamics told me that the machine was excellent and simply timed out, and if not for the time out would be on the floor still making parts. We bought a Cincinnati Milacron T3 robot from Lockheed, the machine had very very low hours. It cost Lockheed $515K new, and we bought it fully functional for $500.... Now keep in mind we are also riggers and fully insured to go into these facilities and get the machines, so that is why most people cannot get these deals. Our insurance is ridiculously priced. They may have the capability to move it, but cannot get into the facility. So I fully believe the machine was working coming from Lockheed.

I have a feeling it's a repair gone bad or never finished. I would trace the power wires from the Max 430's backwards as there should be a contactor somewhere. There has to be something somewhere to break power to the amps during a E-stop. Too bad I not closer to you, I could show you a lot of wiring and what it does.


Just some thoughts on my opinion. I am super busy, will be back later,
Robert
Last edit: 6 years 2 months ago by CORBETT.

Please Log in or Create an account to join the conversation.

Time to create page: 0.104 seconds
Powered by Kunena Forum