Gmocappy question and idea about custom screen
- Grotius
-
 Topic Author
- Offline
- Platinum Member
-

Less
More
- Posts: 2419
- Thank you received: 2348
02 Feb 2018 22:14 #105341
by Grotius
Gmocappy question and idea about custom screen was created by Grotius
Hi linux users,
I have a idea and a question. Maybe difficult question to solve simple.
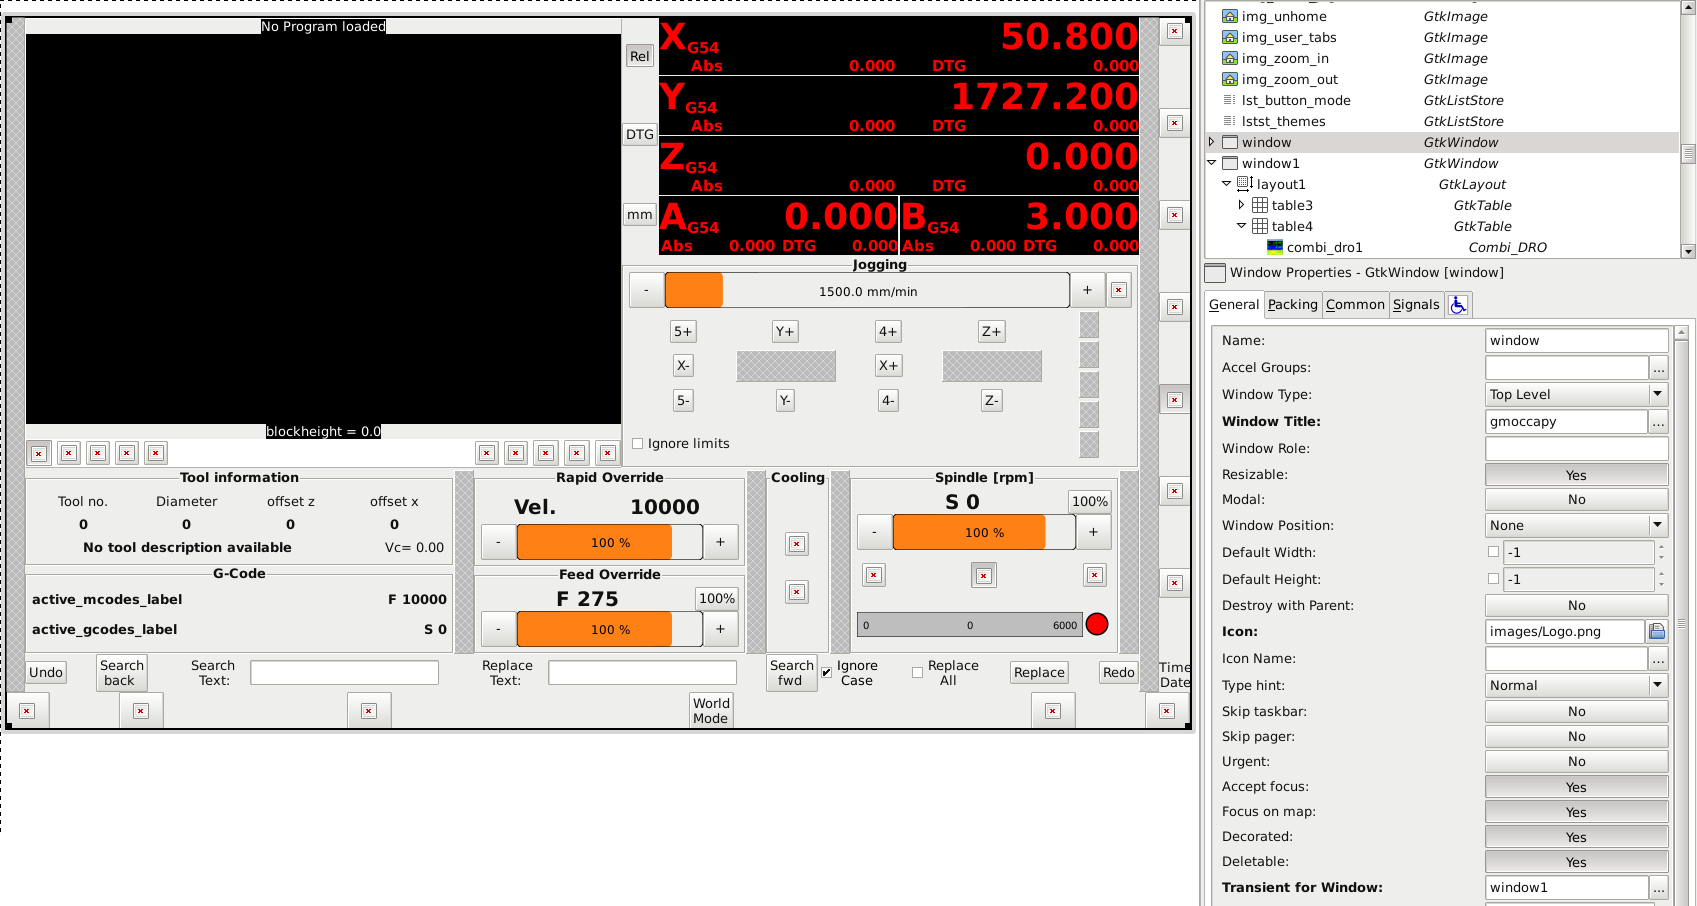
I have a custom screen made for test. Loaded in Gmocappy by the trick transient for window1. See picture right down corner
how to add extra window and rename window....
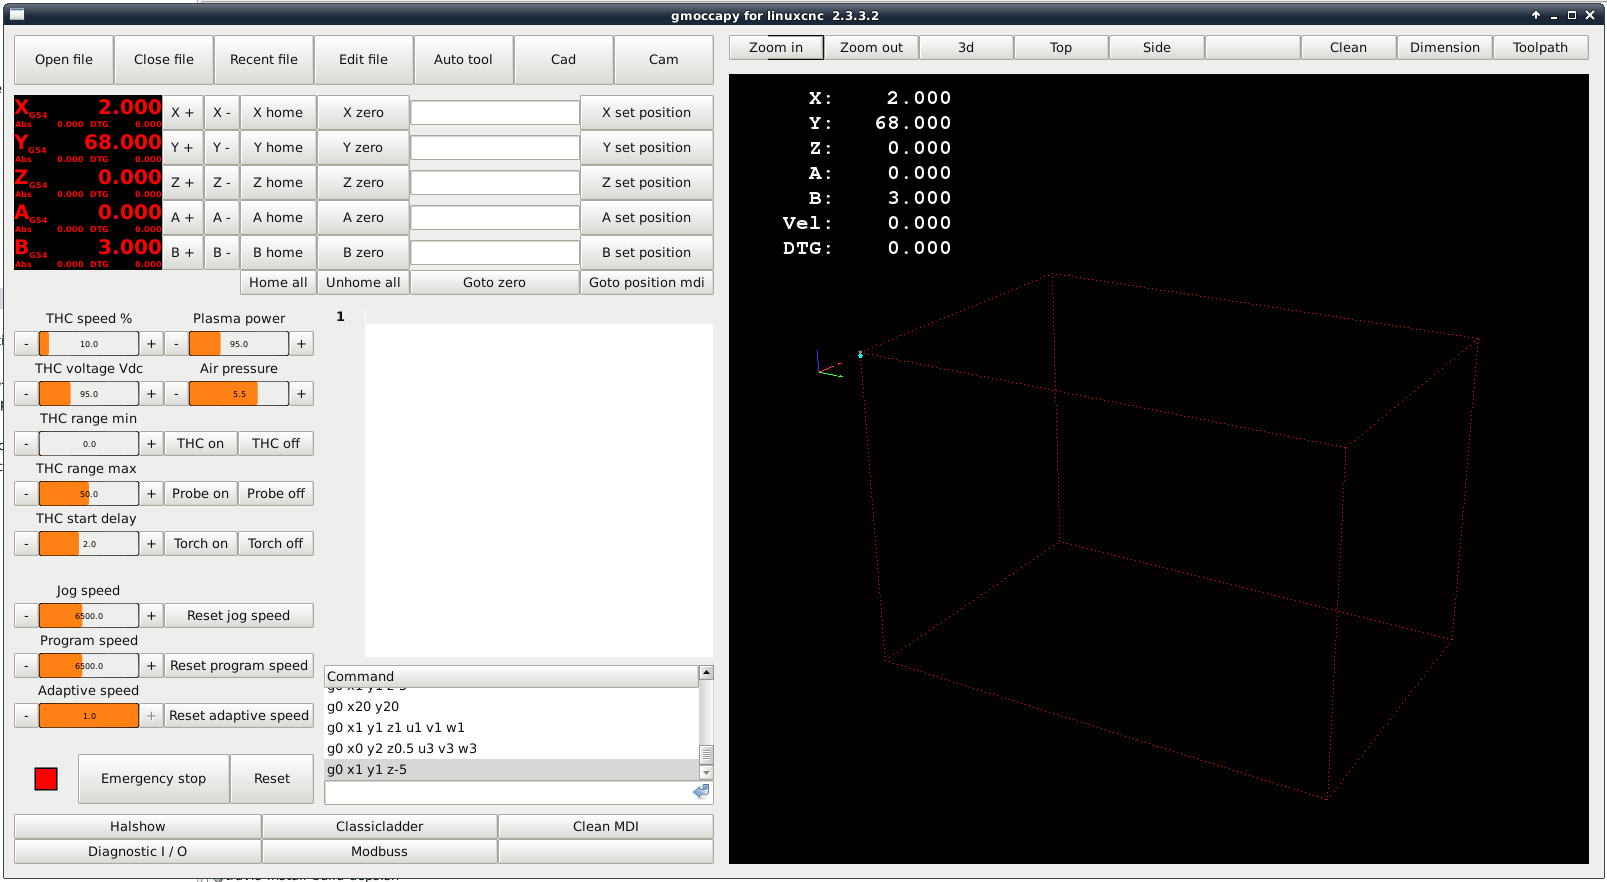
Okey test screen lookes like this, it will be a plasma screen in the future with plasma system coupled on modbuss :
No button's are working at this moment. So what we can do is add some code to the Gmocappy python file.
But that is lot's of work, and changing orginal code is not alway's the best way. The code is good written, so in my opinion for
now better stay off i think. Maybe solve connecting button's other way.....
Now the question :
How to make this screen button's working with the orginal Gmocappy code?
Maybe the best way is :
from gmocappy import chakazulu
And than in the chakazulu python file, make all the connenction's.
How would you do that?
I have a idea and a question. Maybe difficult question to solve simple.
I have a custom screen made for test. Loaded in Gmocappy by the trick transient for window1. See picture right down corner
how to add extra window and rename window....
Okey test screen lookes like this, it will be a plasma screen in the future with plasma system coupled on modbuss :
No button's are working at this moment. So what we can do is add some code to the Gmocappy python file.
But that is lot's of work, and changing orginal code is not alway's the best way. The code is good written, so in my opinion for
now better stay off i think. Maybe solve connecting button's other way.....
Now the question :
How to make this screen button's working with the orginal Gmocappy code?
Maybe the best way is :
from gmocappy import chakazulu
And than in the chakazulu python file, make all the connenction's.
How would you do that?
Please Log in or Create an account to join the conversation.
- cmorley
- Offline
- Moderator
-

Less
More
- Posts: 7341
- Thank you received: 2164
03 Feb 2018 00:33 #105345
by cmorley
Replied by cmorley on topic Gmocappy question and idea about custom screen
IMHO you are doing this in a hard way.
Rather then trying to change Gmoccapy to a completely different screen,
Why not use Gscreen to learn how screen building works.
Gmoccapy was in the beginning a Gscreen skin - they work at the core very similarly.
Gmoccapy by now use much different code to do the things it does but it still is basically a very fancy GladeVCP panel.
If you build a small basic screen in Gscreen, you would learn a lot about how PYGTK based screens are built.
This in fact what Gscreen was built for - for people to build custom screens.
After that, then If you decided that you would prefer to use Gmoccapy's code to build a custom screen you would have a pretty good idea how it works.
Between the linuxcnc manual example and the sample screens plus a few questions, I'm sure you could get your sample screen to do some useful stuff with not a lot of work and infact the GLADE work you have done doesn't have to go to waste.
And also Gscreen was made so you can keep yor customizations separate from linuxcnc code changes so updates would erase your work.
Norbert and I put a lot of work into Gscreen and gladevcp widgets, i hope others find it useful.
Chris M
The following user(s) said Thank You: Mike_Eitel
Please Log in or Create an account to join the conversation.
- Grotius
-
Topic Author
- Offline
- Platinum Member
-
Less
More
- Posts: 2419
- Thank you received: 2348
03 Feb 2018 22:36 #105377
by Grotius
Replied by Grotius on topic Gmocappy question and idea about custom screen
Hi Chris,
Thanks for your comment's.
I also have done a gscreen and a touchy screen replacement earler today, just the way like with gmocappy.
Just to look at the difference of programming and test if it works.
If i use the Gscreen, it works also very good.
It is a very good idea to separate the code in relation to future update's.
My problem is that i want to do, too much at the code i think. I want to get started with a minimal linuxcnc code example.
And then add the code for the program step by step.
Maybe you can help me a little bit to get started with minimal requirements.
After the update, my jt tutorial program don't work anymore, it for me difficult to find out what is missing on that project.
I like to go with that project.
Please Log in or Create an account to join the conversation.
- cmorley
- Offline
- Moderator
-
Less
More
- Posts: 7341
- Thank you received: 2164
03 Feb 2018 23:31 #105379
by cmorley
Replied by cmorley on topic Gmocappy question and idea about custom screen
The minimalist code is no code at all:
linuxcnc.org/docs/2.7/html/gui/gscreen.h..._sheet_custom_screen
Then by adding some code:
linuxcnc.org/docs/2.7/html/gui/gscreen.html#_adding_features
Now I will Admit that documentation leave a lot of options unsaid - I find it hard to decide what was most important to know next. Gscreen has much builtin code that can be used but it's not necessary to - you can add new code to the handler file.
I haven't looked at JT's code in a long while but I believe it was made before Gscreen was completely usable.
I would use the GLADE editor to build your screen as close as you can get to what you want using gladevcp widgets and no code. Then you start to use code to do the things that are not directly supported by gladevcp widgets.
For instance gladevcp doesn't directly allow jogging with buttons - you must add some code if you wish that.
These windows that you added to Gmoccapy - you could save them to a configuration as 'tester.glade' and use Gscreen to load it up as a linuxcnc screen. - the docs link above shows how to do that. Then just start experimenting with gladevcp widgets and then if you like, some python code in the handler file.
Chris M
Please Log in or Create an account to join the conversation.
- Grotius
-
Topic Author
- Offline
- Platinum Member
-
Less
More
- Posts: 2419
- Thank you received: 2348
04 Feb 2018 18:41 - 04 Feb 2018 20:32 #105411
by Grotius
Replied by Grotius on topic Gmocappy question and idea about custom screen
Hi Chris,
Many thanks for your time. You are a good guy, i like that !!
Today i have worked for several hours to set up the custom gscreen tutorial.
That is working good. The screen works directly with a glade screen. The difficulty was for me the tester.py file.
Did not get the keybindings working, in the terminal they have callback. Also the jog function's where to difficult to
copy from orginal gscreen or my jt tutorial. The way of direct jogging with one button was problem for me to solve.
Later this day i started again with a gmocappy screen replacement on the transient way. This was working directly.
And adding function's go's very rapid. Now i got things working in 30 min, see picture.
What i don't like at the ini file is alway's error's on the limit's if you run a example g-code. My prefer to linux is to set the
limit's to -1 (unlimited) User's can bring limit's theirselves with setting up. Also confusing in the ini file is multiple max and min value's
on one axis. This is very confusing, because double value's why that? If there are comment's in the ini user's can understand why....
I would prefer to stay simple.
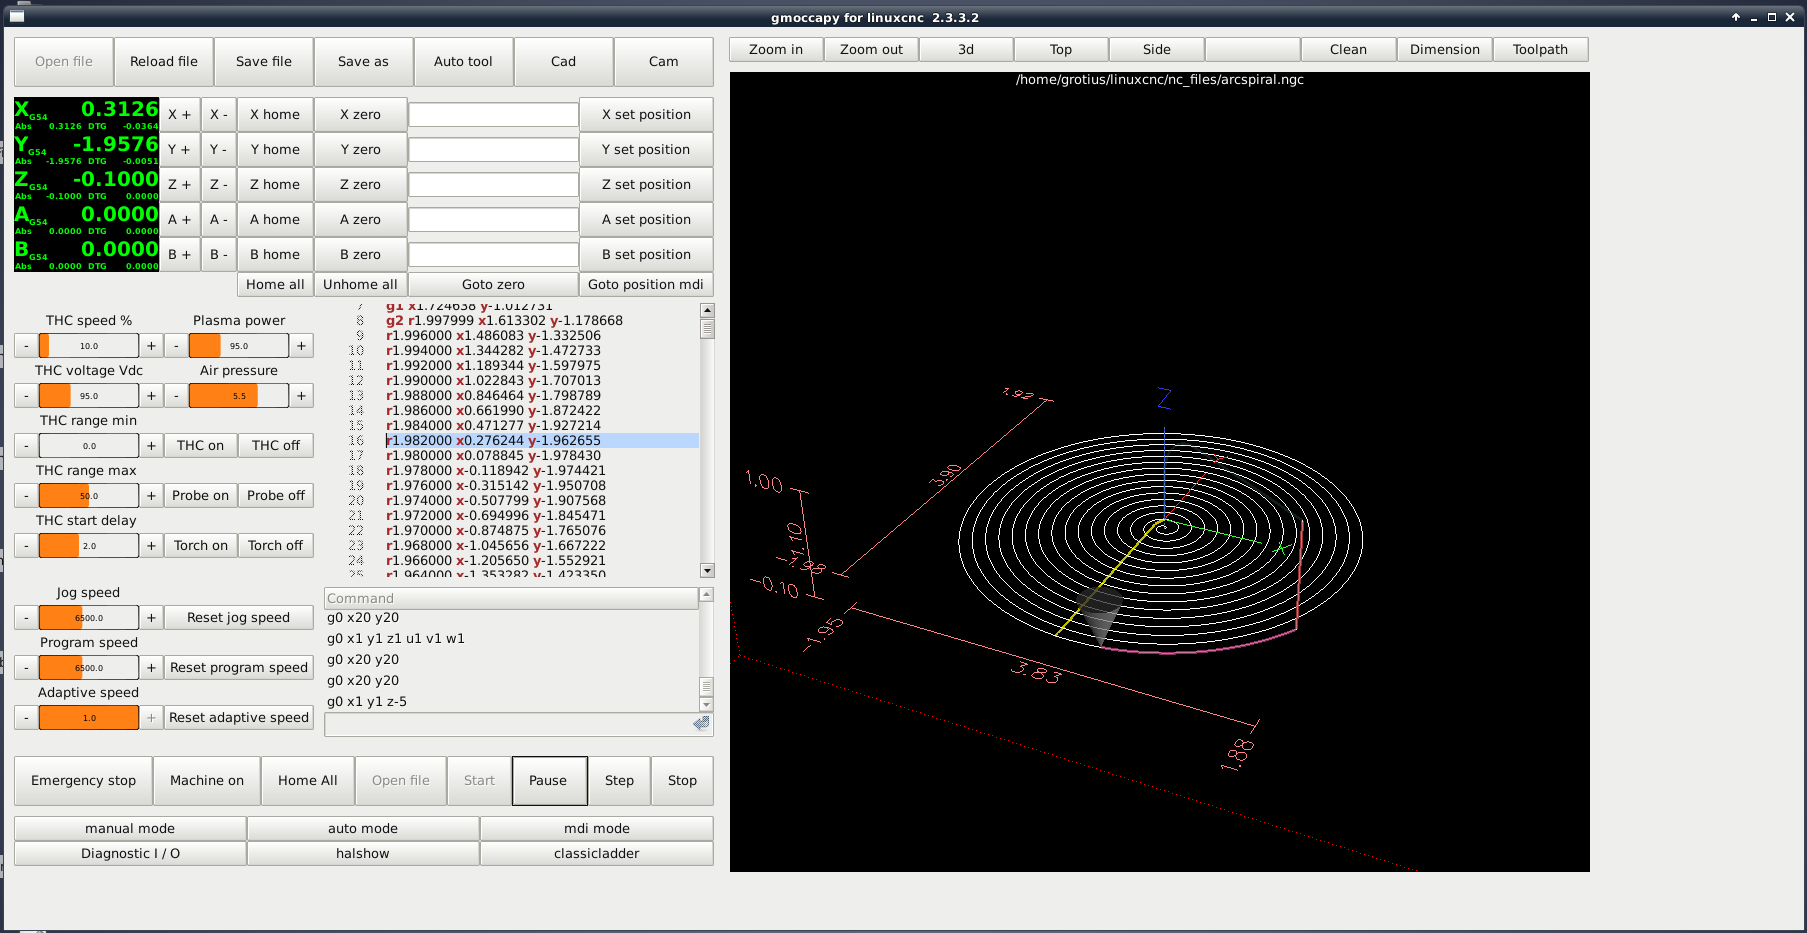
This program was running in about 30 minutes, without changing any python code.
I have a idea for future linuxcnc happyness ;
If you have a gscreen custom program with transient window setup, for example window10.
This window contains all the basic things with behind the separeted python code.
The gscreen sim contains a text file with all the button command's, the german would say : Fertig.
Linuxcnc user's fill in the window1 with the glade program on their needs.
I think then you are master kenoby, Chris.

Last thing : make the nice dro's editable by text entry + enter. It saves a extra text entry box and a lot of time.
I would i can can do that for the Linux society.
Many thanks for your time. You are a good guy, i like that !!
Today i have worked for several hours to set up the custom gscreen tutorial.
That is working good. The screen works directly with a glade screen. The difficulty was for me the tester.py file.
Did not get the keybindings working, in the terminal they have callback. Also the jog function's where to difficult to
copy from orginal gscreen or my jt tutorial. The way of direct jogging with one button was problem for me to solve.
Later this day i started again with a gmocappy screen replacement on the transient way. This was working directly.
And adding function's go's very rapid. Now i got things working in 30 min, see picture.
What i don't like at the ini file is alway's error's on the limit's if you run a example g-code. My prefer to linux is to set the
limit's to -1 (unlimited) User's can bring limit's theirselves with setting up. Also confusing in the ini file is multiple max and min value's
on one axis. This is very confusing, because double value's why that? If there are comment's in the ini user's can understand why....
I would prefer to stay simple.
This program was running in about 30 minutes, without changing any python code.
I have a idea for future linuxcnc happyness ;
If you have a gscreen custom program with transient window setup, for example window10.
This window contains all the basic things with behind the separeted python code.
The gscreen sim contains a text file with all the button command's, the german would say : Fertig.
Linuxcnc user's fill in the window1 with the glade program on their needs.
I think then you are master kenoby, Chris.
Last thing : make the nice dro's editable by text entry + enter. It saves a extra text entry box and a lot of time.
I would i can can do that for the Linux society.
Last edit: 04 Feb 2018 20:32 by Grotius.
Please Log in or Create an account to join the conversation.
- cmorley
- Offline
- Moderator
-
Less
More
- Posts: 7341
- Thank you received: 2164
05 Feb 2018 23:59 #105466
by cmorley
Replied by cmorley on topic Gmocappy question and idea about custom screen
Ok good info there.
What was the issue the the tester_handler.py file?
I will try to add some jogging code to the docs.
Chris M
What was the issue the the tester_handler.py file?
I will try to add some jogging code to the docs.
Chris M
Please Log in or Create an account to join the conversation.
- Grotius
-
Topic Author
- Offline
- Platinum Member
-
Less
More
- Posts: 2419
- Thank you received: 2348
06 Feb 2018 00:15 #105470
by Grotius
Replied by Grotius on topic Gmocappy question and idea about custom screen
Hi Chris,
I have worked on the custom gscreen today.
I am now able to jog the x axis plus and min with screen button's. So i can expand this function for the other axis.
I was working on the jog_speed control to add this to the jog command. But i think i do something wrong. It's working
but not responding to the jog_speed widget. It's only full speed.
Maybe you know what to do.
If this is working i can add the adaptive speed control. I'm programming on this version now.
I think if i have the example i can expand the jog example to program override the same way.
I have added the files.
Thank you.
Please Log in or Create an account to join the conversation.
- cmorley
- Offline
- Moderator
-
Less
More
- Posts: 7341
- Thank you received: 2164
06 Feb 2018 01:28 - 06 Feb 2018 03:41 #105474
by cmorley
Replied by cmorley on topic Gmocappy question and idea about custom screen
Actually the jogging speed control was working (if you set it low enough)
Ok There are a couple things going on here I think.
First the main thing is test.ini is an imperial based config so linuxcnc is expecting inches per second.
So I would I would find a suitable metric based config and change under the [DISPLAY] heading:
DISPLAY = gscreen -c tester -d
Or you could change tester to anything else as long as the GLADE and handler file use the same eg:
if DISPLAY = gscreen -c grotius -d
then the GLADE file needs to be :
grotius.glade
and the handler file:
grotius_handler.py
Next problem: continuous_jog_velocity is expecting velocity in units per minute
so :
continous_jog doesn't accept a velocity setting, it accepts axis and direction.
so change:
self.emc.continuous_jog(0,self.widgets.jog_speed.get_value()/60)
should be:
self.emc.continuous_jog(0,1)
and
self.emc.continuous_jog(0,self.widgets.jog_speed.get_value()/-60)
should be:
self.emc.continuous_jog(0,-1)
So now we must set jog velocity.
In the GLADE file add a signal to call the function (and add this function to the handler file):
The last thing is we must set the initial setting of the jog velocity.
under the function:
def initialize_widgets(self):
add:
I will attach the modified files.
So I guess I should add a 'metric_tester.ini' to make this easier for metric based people.
Please test the supplied metric INI file and tell me if the metric settings are reasonable.
and then i'll put that on my list.
Chris M
Ok There are a couple things going on here I think.
First the main thing is test.ini is an imperial based config so linuxcnc is expecting inches per second.
So I would I would find a suitable metric based config and change under the [DISPLAY] heading:
DISPLAY = gscreen -c tester -d
Or you could change tester to anything else as long as the GLADE and handler file use the same eg:
if DISPLAY = gscreen -c grotius -d
then the GLADE file needs to be :
grotius.glade
and the handler file:
grotius_handler.py
so :
continous_jog doesn't accept a velocity setting, it accepts axis and direction.
so change:
self.emc.continuous_jog(0,self.widgets.jog_speed.get_value()/60)
should be:
self.emc.continuous_jog(0,1)
and
self.emc.continuous_jog(0,self.widgets.jog_speed.get_value()/-60)
should be:
self.emc.continuous_jog(0,-1)
So now we must set jog velocity.
In the GLADE file add a signal to call the function (and add this function to the handler file):
def on_jog_speed_value_changed(self, widget,value):
        self.emc.continuous_jog_velocity(velocity = self.widgets.jog_speed.get_value())
The last thing is we must set the initial setting of the jog velocity.
under the function:
def initialize_widgets(self):
add:
# set the initial linear jog rate at the jog_speed initial value.
        self.emc.continuous_jog_velocity(velocity = self.widgets.jog_speed.get_value())
I will attach the modified files.
So I guess I should add a 'metric_tester.ini' to make this easier for metric based people.
Please test the supplied metric INI file and tell me if the metric settings are reasonable.
and then i'll put that on my list.
Chris M
Last edit: 06 Feb 2018 03:41 by cmorley.
Please Log in or Create an account to join the conversation.
- Grotius
-
Topic Author
- Offline
- Platinum Member
-
Less
More
- Posts: 2419
- Thank you received: 2348
06 Feb 2018 21:51 - 07 Feb 2018 00:19 #105509
by Grotius
Replied by Grotius on topic Gmocappy question and idea about custom screen
Hi Chris,
Many thanks !!!
Now also the program override widget is working include a program speed reset button.
It was not easy, but in the end it is working. I must search and interact (make a code combination) with your gscreen.py and jt-tutorial and previous grotius.py program. It takes some experience to solve the code.
Also added zoom_in and zoom_out and view_3d button. Also added view 3d to startup screen. This looks nice.
Also halshow and halmeter is working. Classicladder i must first load real time in Hal file to get working. This i do later.
For external program halshow i had to add :
Thanks to error report's while loading linuxcnc program, solving of problem's go's quite good.
Okey, tommorrow i wil add some more funtion's to the screen.
The ini file is working good. i have disabled shared home. This give's errors when you do multiple homing commands.
Many thanks, Chris
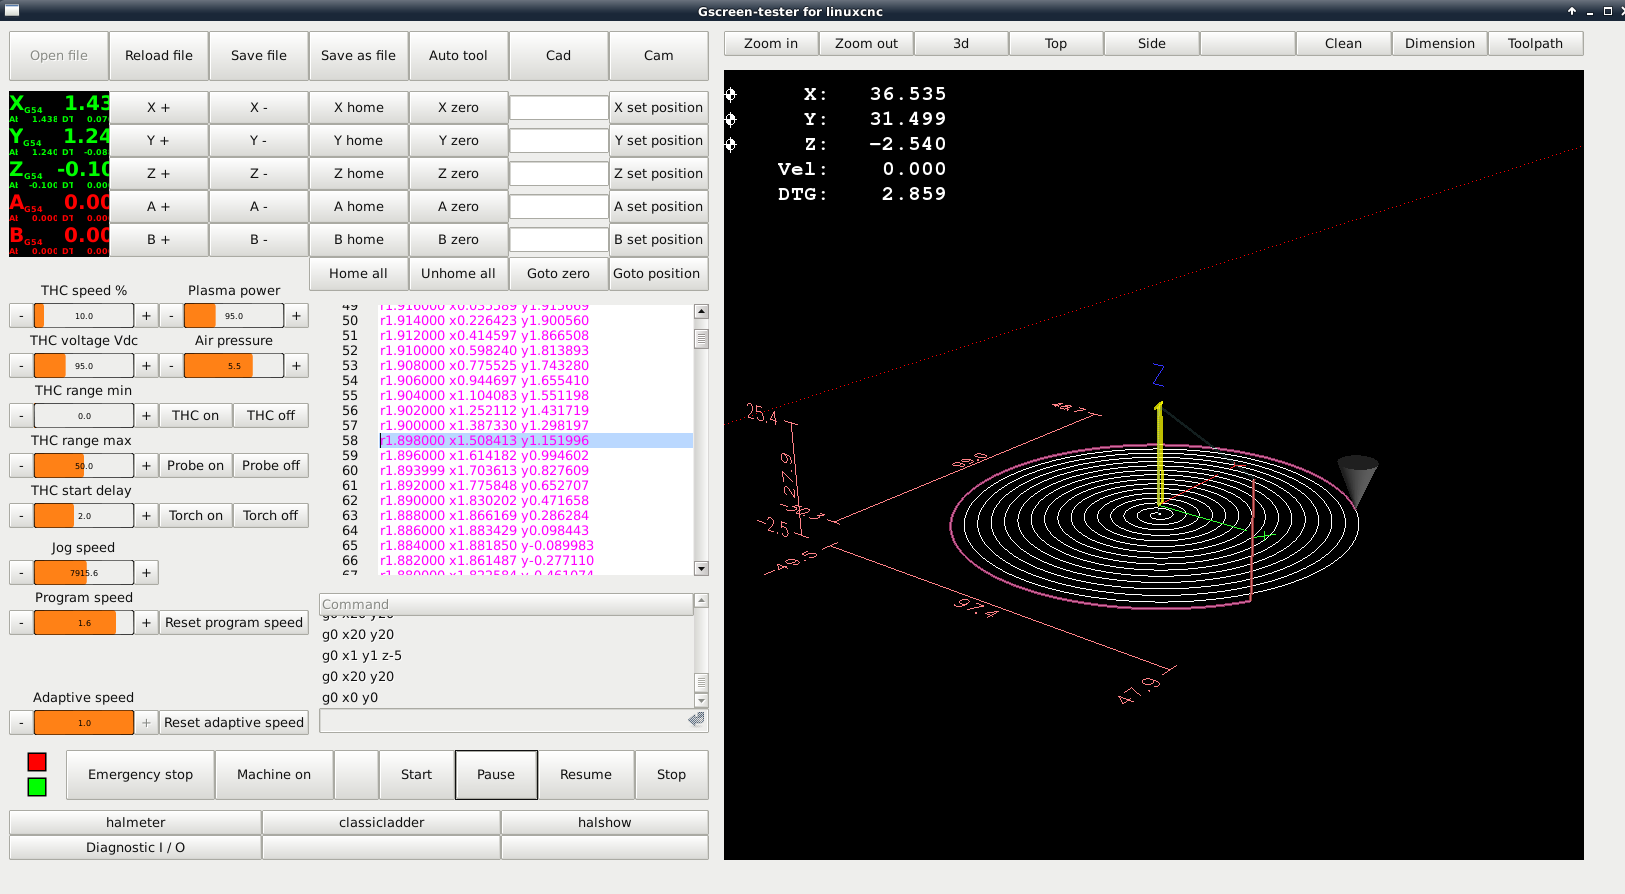
Hmm, now i see the difference in dro and gremlin dro. It is not important at this stage. In glade the dro is in metric.
So i think this is good. Tomorrow i will look if the gremlin (screen plot) is set to mm.
Chris, what about your opinion. Norbert also want's to help. I think he could do the Hypertherm Modbuss connection.
Then i send him the hypertherm for testing and setting up. How do you think about that? I don't know exactly how to do
this from a standard desktop pc with serial port to the hypertherm and setting up the connections, read in .. read out. etc.
Maybe buy a modbuss test device. I can also sent the hypertherm to you. You can also do this if you want. I will make
a financial support, also for your help. In wich country do you live at the moment?
If that it's working, that would be great. I will test the adaptive speed later this week.
Update :
I solved the gremlin dro to display in mm unit's.
Update:
In program the adaptive speed is also working.
The code :
Many thanks !!!
Now also the program override widget is working include a program speed reset button.
It was not easy, but in the end it is working. I must search and interact (make a code combination) with your gscreen.py and jt-tutorial and previous grotius.py program. It takes some experience to solve the code.
Also added zoom_in and zoom_out and view_3d button. Also added view 3d to startup screen. This looks nice.
Also halshow and halmeter is working. Classicladder i must first load real time in Hal file to get working. This i do later.
For external program halshow i had to add :
import os
# path to TCL for external programs eg. halshow
try:
    TCLPATH = os.environ['LINUXCNC_TCL_DIR']
except:
    pass
Thanks to error report's while loading linuxcnc program, solving of problem's go's quite good.
Okey, tommorrow i wil add some more funtion's to the screen.
The ini file is working good. i have disabled shared home. This give's errors when you do multiple homing commands.
It works good !and tell me if the metric settings are reasonable.
Many thanks, Chris
Hmm, now i see the difference in dro and gremlin dro. It is not important at this stage. In glade the dro is in metric.
So i think this is good. Tomorrow i will look if the gremlin (screen plot) is set to mm.
Chris, what about your opinion. Norbert also want's to help. I think he could do the Hypertherm Modbuss connection.
Then i send him the hypertherm for testing and setting up. How do you think about that? I don't know exactly how to do
this from a standard desktop pc with serial port to the hypertherm and setting up the connections, read in .. read out. etc.
Maybe buy a modbuss test device. I can also sent the hypertherm to you. You can also do this if you want. I will make
a financial support, also for your help. In wich country do you live at the moment?
If that it's working, that would be great. I will test the adaptive speed later this week.
Update :
I solved the gremlin dro to display in mm unit's.
def initialize_widgets(self):
        self.gscreen.init_show_windows()
        # set the initial linear jog rate at the jog_speed initial value.
        self.emc.continuous_jog_velocity(self.widgets.jog_speed.get_value())
        # set the initial program speed override.
        self.emc.feed_override(self.widgets.program_speed.get_value())

        self.widgets.gremlin.current_view = 'p'
        self.widgets.gremlin.set_current_view()
        ############ here i solve the mm gremlin dro : ##############3
        self.widgets.gremlin.set_property('metric_units',True)
Update:
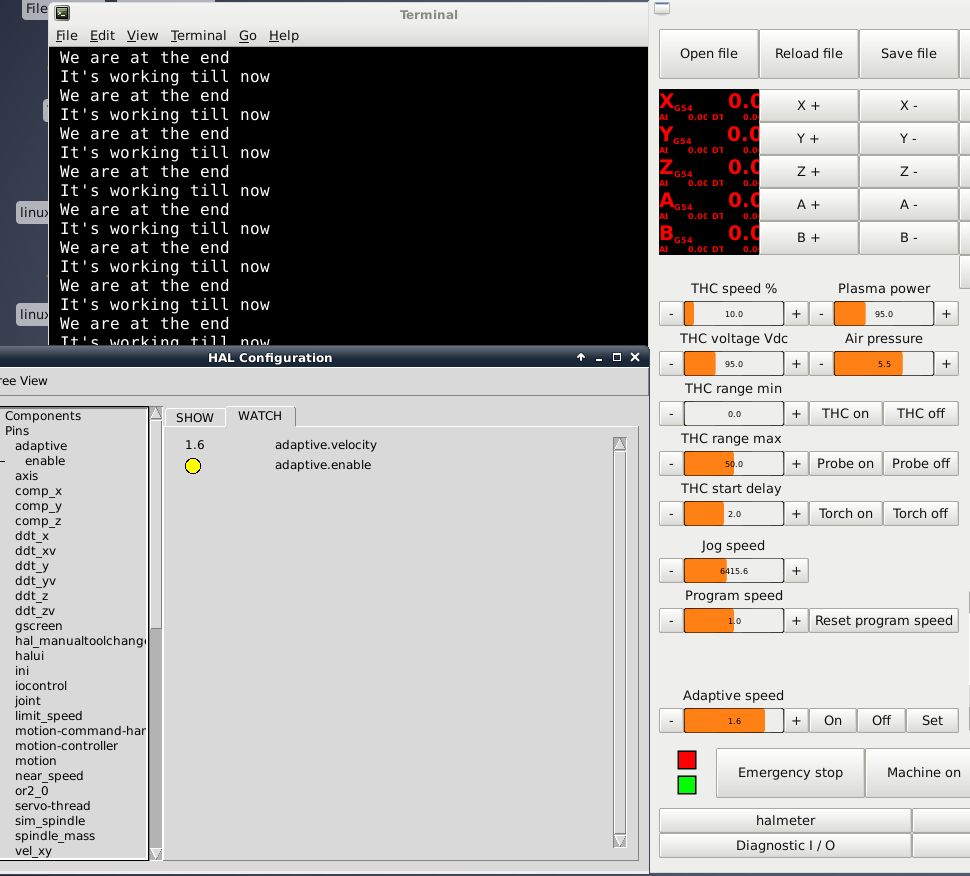
In program the adaptive speed is also working.
The code :
            self.h = hal.component("adaptive")
            self.h.newpin("enable", hal.HAL_BIT, hal.HAL_IN)
            self.h.newparam("velocity", hal.HAL_FLOAT, hal.HAL_RO)

    #adaptive_speed section
    #turn on/off the adaptive speed widget
    def on_adaptive_speed_on_pressed(self, widget, data=None):
        self.h['enable'] = 1  #adaptive_speed.enable must be coupled in custom_hal file
    def on_adaptive_speed_off_pressed(self, widget, data=None):
        self.h['enable'] = 0  #adaptive_speed.enable must be coupled in custom_hal file
    ##
    # Hal example :
    # net systemlink0 adaptive.enable motion.adaptive-feed
    # motion.adaptive-feed : http://linuxcnc.org/docs/html/man/man9/motion.9.html

    def on_adaptive_speed_value_changed(self, widget, data=None):
        print " It's working till now "
        #self.entry1 = self.widgets.get_value("entry1")
        self.h['velocity'] = self.widgets.adaptive_speed.get_value()
        print " We are at the end "
Last edit: 07 Feb 2018 00:19 by Grotius.
Please Log in or Create an account to join the conversation.
- cmorley
- Offline
- Moderator
-
Less
More
- Posts: 7341
- Thank you received: 2164
07 Feb 2018 03:40 #105517
by cmorley
Replied by cmorley on topic Gmocappy question and idea about custom screen
I am glad you are having success!
I think you are using master version of linuxcnc.
If you are, I will point out that typing 'HALSHOW' in the MDI edit line will launch Halshow.
Also 'HALMETER' 'CLASSICLADDER' and 'STATUS' - there may be a couple more.- This may be nicer then all the buttons.
As for the modbus - I have made a driver for a VFD over serial port before. What I need is documentation of protocol.
Do you have access of that?
I added tester_metric.ini and some jogging documentation to master branch to help future screen builders - thank you for the feedback.
Chris M
Please Log in or Create an account to join the conversation.
Time to create page: 0.234 seconds