Gmocappy question and idea about custom screen
- Grotius
-
 Topic Author
- Offline
- Platinum Member
-

- Posts: 2419
- Thank you received: 2348
Thank you for this info, i did not know this option.
My question was maybe wrong asked. I mean how to start linuxcnc in Ubuntu with terminal running at side to catch error's.
I will change my forum name to "bug builder" soon.
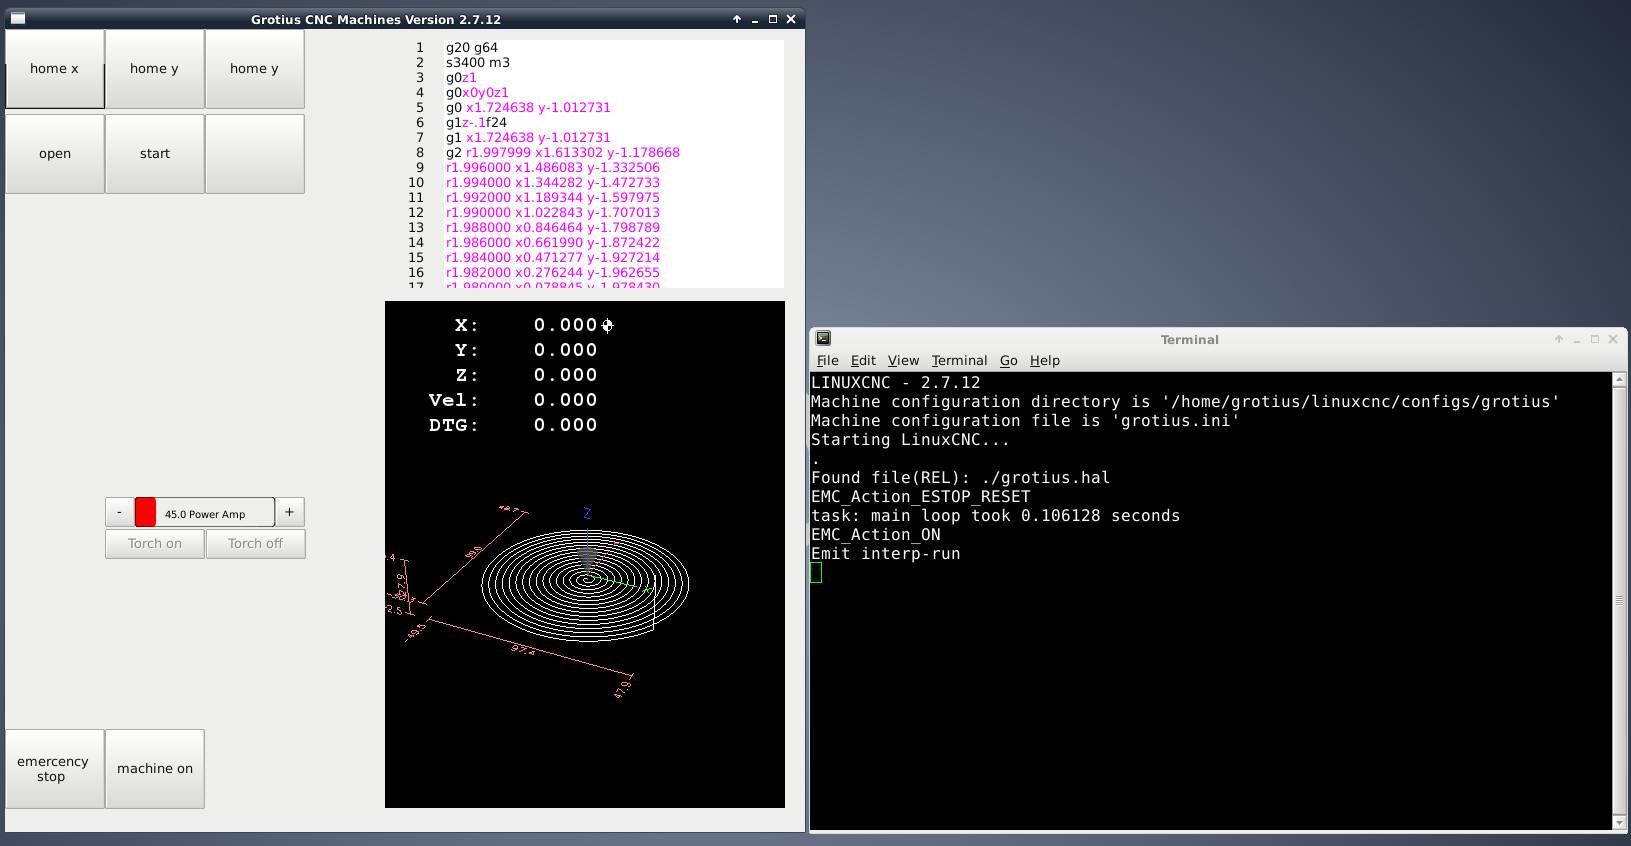
I have discovered a tiny bug this evening.
I started with a clean install of linuxcnc on a hard disk from the install cd.. No compiling, simple install.
Then i updated the installation. I made the most simple program in Glade. When you use in Glade the VCP home widget for
all axis, the value is -1. Then nothing happen's. When u use value 0 for x - axis, system is working.
So i thing the -1 factor is now in a bug, i have no other explenation for this.
Multiple homing command's are going good. This is nice.
The same is for mdi commando's via glade mdi widget. This is also not working. The M3 and M5 for example are not executing.
Strange....
Please Log in or Create an account to join the conversation.
- Todd Zuercher
-

- Away
- Platinum Member
-
- Posts: 4761
- Thank you received: 1462
Is that not what your asking for?
Please Log in or Create an account to join the conversation.
- Grotius
-
Topic Author
- Offline
- Platinum Member
-
- Posts: 2419
- Thank you received: 2348
Sorry for your time. In Ubuntu i can not start up with terminal by side. But i will find that out.
Now i am working on a other hard disk with terminal by side and minimal program to trigger all the bug's.
I have a comment for the linux online documentation :
This is only working :
speedcontrol.set_property("color", gtk.gdk.Color("#FF8116"))
In docu online files linuxcnc.org/docs/gladevcp:speedcontrol you only find :
Using gobject to set the above listed properties:
[widget name].set_property("color","#FF00FF")
But this is not working at all. It misses the " gtk.gdk" text.
Also the docu misses the following information to program the speedcontrol.py widget with python code from linuxcnc program :
In top of program :
from gmoccapy import widgets
In class :
self.widgets = widgets.Widgets( self.builder )
I am searching to do it without import gmocappy. Maybe i find a way.
Gscreen has not implemented the widget's so unfortunality i cannot look behind the scene's over there.
It's alway's nice to have comparisment.
To go for a short while back to a basic almost empty program, you can get really far in short time and solve many issue's step by step.
Python program's with 800 lines or more are difficulter to handle in finding out specific item's you want to understand.
Okey, now the color changing of speedcontrol.py i have tested hufter proof, code is running very good :
def on_torch_on_pressed(self, widget, data=None):
    print " torch on "
    self.c.mode(linuxcnc.MODE_MDI)
    self.c.wait_complete()
    self.c.mdi("M3 S1")
    self.widgets.power.set_value(20)
    self.widgets.power.set_property("color", gtk.gdk.Color("#FF8116"))

  def on_torch_off_pressed(self, widget, data=None):
    print " torch off "
    self.c.mode(linuxcnc.MODE_MDI)
    self.c.wait_complete()
    self.c.mdi("M5 S1")
    self.widgets.power.set_value(100)
    self.widgets.power.set_property("color", gtk.gdk.Color("#FF0000"))
If i click on torch on and torch off in very short time during long time, it's going good !!

I have the Rs485 component's to test coming time the power output to the plasma inverter.
My plan is to make a Grotius brand plasma inverter better then Hypertherm. Hypertherm has big issue's
at the moment. I don't like to say that as a gold supplier of Hypertherm for several years. So i make my own plan,
just like Thermal Dynamic's. I will test the nesting software of Thermal Dynamics very soon. The bug is, it's only available for window's. My electical specialist friend is now making the Grotius brand plasma inverter ready for serial RS485.
To this person : forum.linuxcnc.org/cb-profile/grijalvap
I can make the RS485 connection in Python code.
Now the dxf to gcode over 1mb files capacity integrated would be perfectly, i hope someone will help !!
The issue of inner and outher contour offset is i think is the most difficult in making a nesting program.
Please Log in or Create an account to join the conversation.
- Grotius
-
Topic Author
- Offline
- Platinum Member
-
- Posts: 2419
- Thank you received: 2348
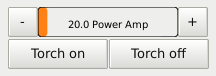
Related to the 4 question's yesterday, i solved question 1 and question 2 :
Question 1.
When i simulate a g-code and press pause the machine stops moving. Okey at that moment i want to simulate a torch or spindle restart.
This is not possible when in auto mode. Is there a tiny trick to make this possible. I also try this in the axis program. Result is the same.
Question 2.
When i change color's to the speedcontrol widget for example red to green, when program is running i sometimes get a error : Bad drawable pixmap.... It describes also there is a program bug.
Also the speedcontrol widget update is different from hal value when pressing.
I solved this problem by adding a secundairy update sequence. I would say the python code of speedcontrol.py should do this for you.
Solution question 1 and question 2 :
When you want to restart the torch or spindle in running program, it only works in pause.
To my confusing you cannot do a M3 mdi command. This is not working. I don't know why?
I tried this also in axis, it has the same issue. In Gmocappy the plasma torch start is working, but this is not done
with m3 command. So for simple user's a m3 command in pause mode would be a great thing to realise in my opinion.
I would prefer also to integrate the m4 and m5 macro the same time.
In my tiny program i get this working by adding the following code :
def on_torch_on_pressed(self, widget, data=None):
    print " torch on "
    self.c.spindle( 1, self.widgets.power.get_value())
    self.widgets.power.set_property("color", gtk.gdk.Color("#5dff00"))
    x = self.widgets.power.get_value()
    self.widgets.power.set_value(x+0)

  def on_torch_off_pressed(self, widget, data=None):
    print " torch off "
    self.c.spindle( 1, 0 )
    self.widgets.power.set_property("color", gtk.gdk.Color("#ff2e00"))
    x = self.widgets.power.get_value()
    self.widgets.power.set_value(x+0)
In above example, the spindle speed or in my case plasma power is the value of the speedcontrol widget. " self.widgets.power.get_value() " Also when torch is on, speedcontrol widget is turning green. When torch is off,
speedcontrol widget color is turning red. To update the color of the widget i have to do a extra update code wich is basically empty,
but nessecery. I would think there is some code missing in the speedcontrol.py code.
The speedconrol.py update code for changing colors :
x = self.widgets.power.get_value()
self.widgets.power.set_value(x+0)It only set's a unchanged value. But color's are changing.
Within this program i get no errors about :
So this is also good news. This errors where at the ubuntu version. But now i am on linuxcnc cd with all updates working.when program is running i sometimes get a error : Bad drawable pixmap.... It describes also there is a program bug.
Complete program included :
Okey now i added the homing all function in Python code.
In glade i added a button with the handler : on_home_all_pressed
So i glade i don't use the home mdi widget anymore. For inexperienced users, glade with the standard
widget's are great to start with. You don't have to explore difficult code.
Normally you can do for all axis the factor : -1
But somehow this is not working.
def on_home_all_pressed(self, widget, data=None):
    print " home all "
    self.c.home(-1)
To solve this issue do separate axis homing, this goes good, multiple homing also good :
def on_home_all_pressed(self, widget, data=None):
    print " home all "
    self.c.home(0)
    self.c.home(1)
    self.c.home(2)
This is very nice.
Please Log in or Create an account to join the conversation.
- Grotius
-
Topic Author
- Offline
- Platinum Member
-
- Posts: 2419
- Thank you received: 2348
@Project update,
Related to the 4 question's yesterday, i solved question 1 and question 2 :
Question 1.
When i simulate a g-code and press pause the machine stops moving. Okey at that moment i want to simulate a torch or spindle restart.
This is not possible when in auto mode. Is there a tiny trick to make this possible. I also try this in the axis program. Result is the same.
Question 2.
When i change color's to the speedcontrol widget for example red to green, when program is running i sometimes get a error : Bad drawable pixmap.... It describes also there is a program bug.
Also the speedcontrol widget update is different from hal value when pressing.
I solved this problem by adding a secundairy update sequence. I would say the python code of speedcontrol.py should do this for you.
Solution question 1 and question 2 :
When you want to restart the torch or spindle in running program, it only works in pause.
To my confusing you cannot do a M3 mdi command. This is not working. I don't know why?
I tried this also in axis, it has the same issue. In Gmocappy the plasma torch start is working, but this is not done
with m3 command. So for simple user's a m3 command in pause mode would be a great thing to realise in my opinion.
I would prefer also to integrate the m4 and m5 macro the same time.
In my tiny program i get this working by adding the following code :
def on_torch_on_pressed(self, widget, data=None):
    print " torch on "
    self.c.spindle( 1, self.widgets.power.get_value())
    self.widgets.power.set_property("color", gtk.gdk.Color("#5dff00"))
    x = self.widgets.power.get_value()
    self.widgets.power.set_value(x+0)

  def on_torch_off_pressed(self, widget, data=None):
    print " torch off "
    self.c.spindle( 1, 0 )
    self.widgets.power.set_property("color", gtk.gdk.Color("#ff2e00"))
    x = self.widgets.power.get_value()
    self.widgets.power.set_value(x+0)
In above example, the spindle speed or in my case plasma power is the value of the speedcontrol widget. " self.widgets.power.get_value() " Also when torch is on, speedcontrol widget is turning green. When torch is off,
speedcontrol widget color is turning red. To update the color of the widget i have to do a extra update code wich is basically empty,
but nessecery. I would think there is some code missing in the speedcontrol.py code.
The speedconrol.py update code for changing colors :[/code]x = self.widgets.power.get_value() self.widgets.power.set_value(x+0)
It only set's a unchanged value. But color's are changing.
Within this program i get no errors about :So this is also good news. This errors where at the ubuntu version. But now i am on linuxcnc cd with all updates working.when program is running i sometimes get a error : Bad drawable pixmap.... It describes also there is a program bug.
Complete program included :
Okey now i added the homing all function in Python code.
In glade i added a button with the handler : on_home_all_pressed
So i glade i don't use the home mdi widget anymore. For inexperienced users, glade with the standard
widget's are great to start with. You don't have to explore difficult code.
Normally you can do for all axis the factor : -1
But somehow this is not working.def on_home_all_pressed(self, widget, data=None): print " home all " self.c.home(-1)
To solve this issue do separate axis homing, this goes good, multiple homing also good :def on_home_all_pressed(self, widget, data=None): print " home all " self.c.home(0) self.c.home(1) self.c.home(2)
This is very nice.
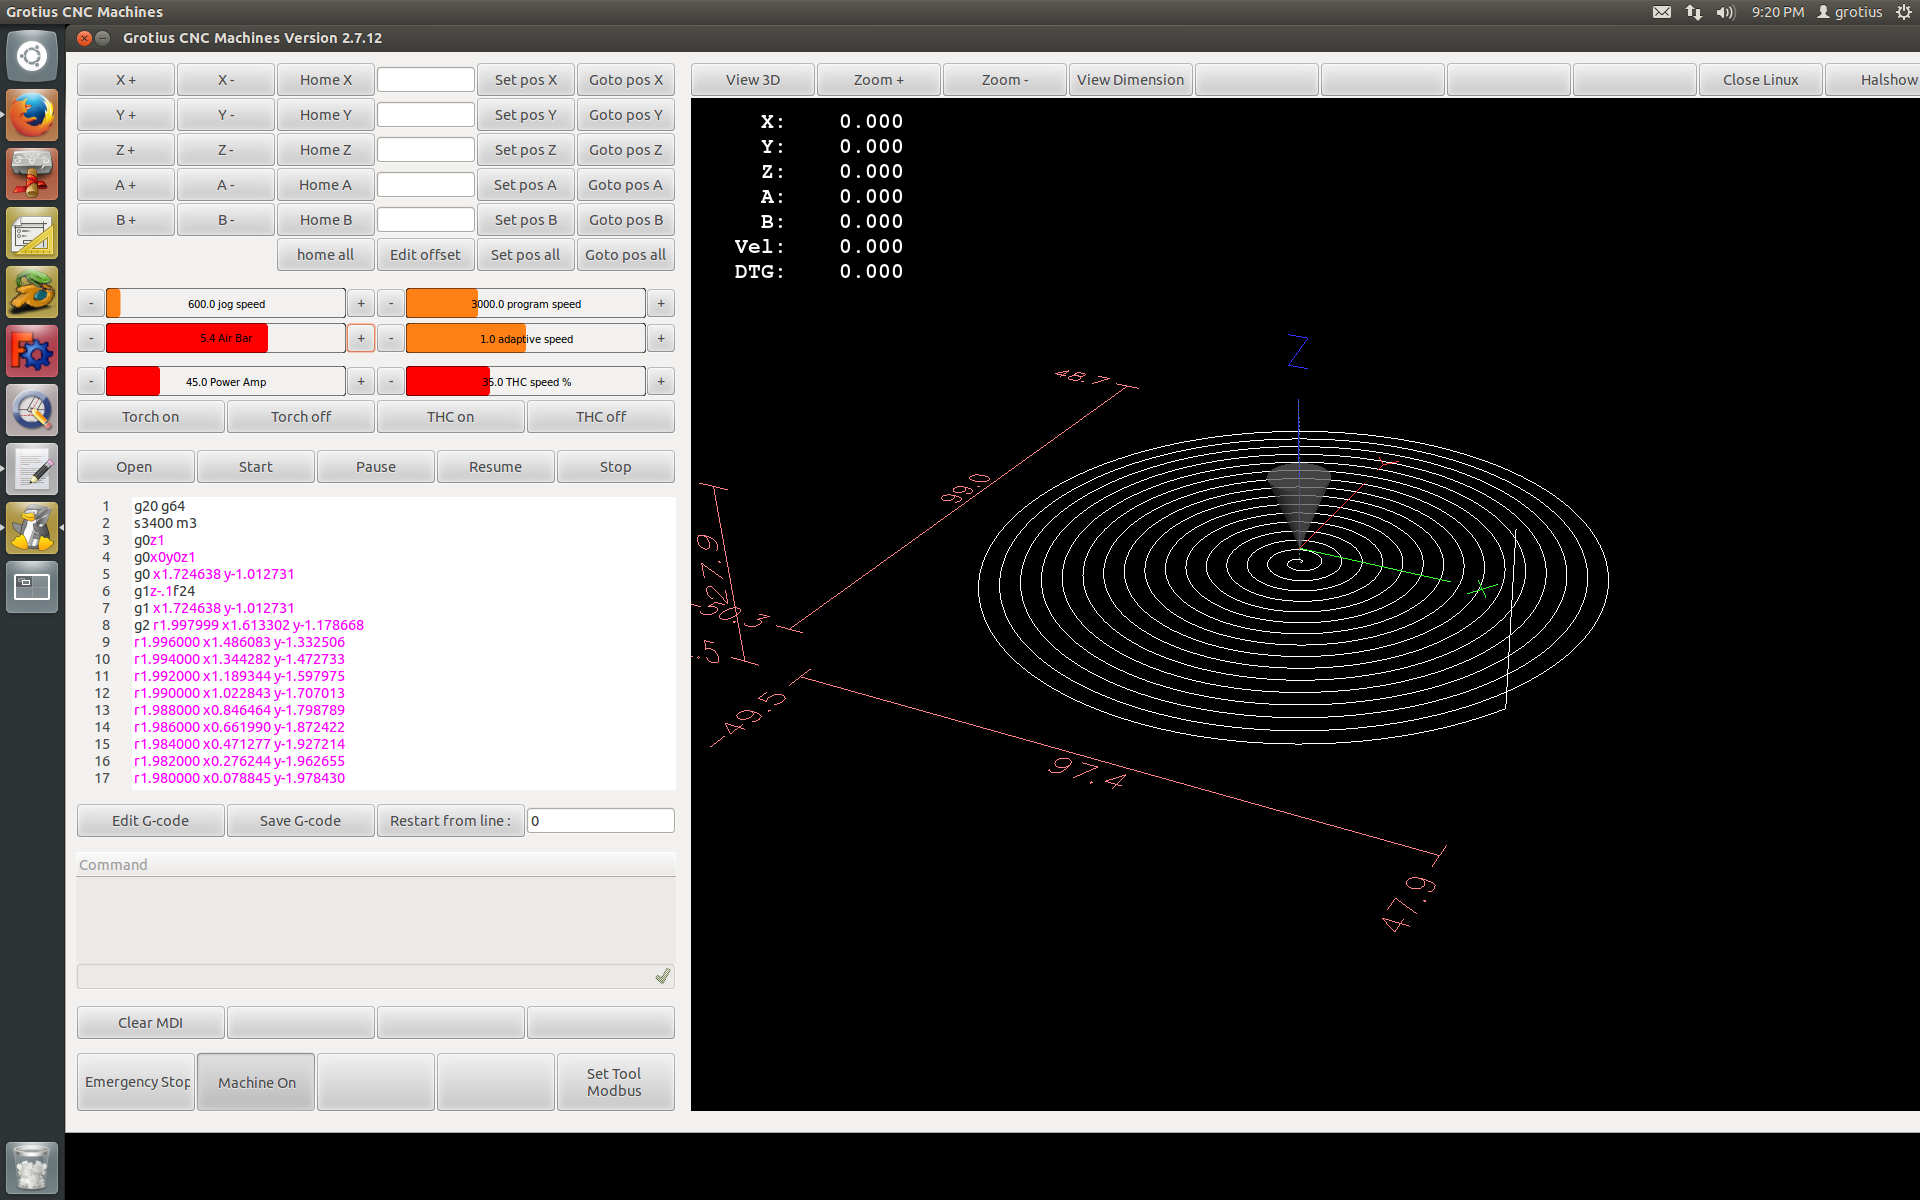
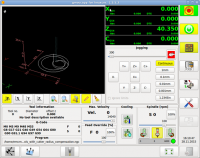
Okey screen now looks like this :
For this tiny program you can type in terminal : halshow
Then you can see if your programmed value's are reality.
I am thinking about what to investegate next....
Please Log in or Create an account to join the conversation.
- Grotius
-
Topic Author
- Offline
- Platinum Member
-
- Posts: 2419
- Thank you received: 2348
If you have a dxf drawing file : drawing.add(dxf.line((0, 0), (10, 0), color=7))
If you look at the gcode for this : X0 Y0, X10 Y0, (color=7)
If you add the g-code first to the dxf file with automated python function you can have following example :
dxf.line((0, 0), (10, 0), color=7))
G01 X0 Y0  (color=7)
G01 X10 Y0  (color=7)
Okey what to do when you want to load this in linuxcnc?
We add comments sign () to the file
(dxf.line((0, 0), (10, 0), color=7)))
G01 X0 Y0  (color=7)
G01 X10 Y0  (color=7)
And g-code is ready within orginal dxf file. You can do also visa versa to edit dxf file in cad system. I take now a # expression as example.
dxf.line((0, 0), (10, 0), color=7))
#G01 X0 Y0  (color=7)
#G01 X10 Y0  (color=7)
This is a very basic example. But in the end it would be nice to have a linuxcnc application to program cad cam....
Please Log in or Create an account to join the conversation.
- Grotius
-
Topic Author
- Offline
- Platinum Member
-
- Posts: 2419
- Thank you received: 2348
@project update :
This weekend i did wonderfull steps with linuxcnc.
My tiny program was working excellent and with the terminal by side, i could see
everything was going well. My know how of programming and fixing things is growing each week. For my personal feeling i am
now at 10% of know how of python code. It can be much better. But i think it practicing will bring you to next level.
I did the first Hypertherm RS485 python code test. Okey i learned from this. I must get my hard disk to workplace soon to test it in real life with the powermax 45xp. I will change the python code a bit, because with no modbuss connection linuxcnc will not start up. So i will make a modbus start command i think connected with the machine emergency brake button. For the python modbuss file and the usb rs485 device, i get no secundairy errors. So i think it will go good in future.
Okey i was looking to read dxf files and write gcode.
The best Python code i found until now to begin with :
The python code that does the work for searching circle's in a dxf file. This is a very fast code :
### drilling ###################################################################
    def write_drilling_code(self):
        dxfFile=open(self.dxfFilename)
        dxfEntities=dxfFile.next()
        while dxfEntities.strip()!='ENTITIES':
            dxfEntities=dxfFile.next()
        inLine=False
        for readLine in dxfFile:
            readLine=readLine.strip()
            if readLine=='ENDSEC':
                break
            elif inLine==True:
                inData=dict.fromkeys(['8','10','20','40'],0.0)
                while readLine!='0':
                    if readLine in inData:
                        inData[readLine]=dxfFile.next().strip()
                    readLine=dxfFile.next().strip()
                if inData['8'].upper()=='HOLES':
                    x=(round(float(inData['10']),self.precision))
                    y=(round(float(inData['20']),self.precision))
                    holeSize=round((float(inData['40'])*2),self.precision)
                    name='holeSize%s'%(str(holeSize).replace('.',''))
                    getattr(self,name).append([x,y])
                inLine=False
            else:
                if readLine=='CIRCLE':
                    inLine=True
        dxfFile.close()
Okey for the test i have made a drawing in qcad with one circle, diameter 100mm. I opened the dxf file and found this in the very big file :
8
holes #layer
100 #i don't know, but it looks the diameter of circle.
AcDbCircle
 10 #x position
33.0
 20 #y position
29.0
 30 #i don't know
0.0
 40 #radius of circle
50.0
I did execute the dxf2holes.py file, it's working very, very good.
You have also a file named cam.py
This file is invented by a professor. But on my 2 linux system's none is working.
On linuxcnc system, it can't read the module Freecad.....
On ubunto system, it can't read my Freecad email traffic.....
So it looks like this is crap. But it has the toolpath offset's, so that's why i think it's important.
Other item is, it's depended of freecad library. The code is not very independent written. It's not really stripping the dxf file in core.
The dxf to holes python file :
To execute this file, make it executable and type in terminal : python dxf2holes.py
Okey also included a dxf file with one circle of diameter 100mm, to test fast.
Please Log in or Create an account to join the conversation.
- Grotius
-
Topic Author
- Offline
- Platinum Member
-
- Posts: 2419
- Thank you received: 2348
At the moment i have running a modbus device on linuxcnc, controlled directly with python code.
It's a 4 channel analog output controller. It costed 1 week in the evening hours to get this working.
Also i mentioned that you have to use "sudo linuxcnc" to give the superuser permissions to linuxcnc.
I have modified the file : "sudo visudo" for logging in Linuxcnc automaticly with superuser account without typing password.
So finally, i am very far with the project at the moment.
For those who also want to build a modbuss device working with python on linuxcnc i can make a sample configuration.
Please Log in or Create an account to join the conversation.
- Grotius
-
Topic Author
- Offline
- Platinum Member
-
- Posts: 2419
- Thank you received: 2348
I have impressed the importand code lines that are needed for modbus.
You need to add some python librarie's. The library adding in Ubuntu is the easyest way (also time boring and cost lot's of figur out work to do).
I found out the library adding, based on the installation of the linuxcnc cd is difficult to do.
The python code below, you can play around and merge it with gmocappy or gscreen source code.
In other words it is a gmcocappy and gscreen compatible code solution.
For merging with Gscreen code, i think you need to add : from gmoccapy import widgets
Start program code :
#!/usr/bin/env python
from __future__ import division
import sys, os
BASE = os.path.abspath(os.path.join(os.path.dirname(sys.argv[0]), ".."))
libdir = os.path.join(BASE, "lib", "python")
datadir = os.path.join(BASE, "share", "linuxcnc")
sys.path.insert(0, libdir)
xmlname = os.path.join(datadir,"grotius.glade")
import sys
import math
import pygtk
pygtk.require("2.0")
import gtk
import linuxcnc, hal
import gremlin
import gladevcp.makepins
import gobject
import hal, time
from gmoccapy import widgets
import pymodbus
import serial
from pymodbus.pdu import ModbusRequest
from pymodbus.client.sync import ModbusSerialClient as ModbusClient #initialize a serial RTU client instance
from pymodbus.transaction import ModbusRtuFramer
from pymodbus.constants import Endian # Needed for 32-bit float value (2 registers / 4 bytes)
from pymodbus.payload import BinaryPayloadDecoder # Needed for 32-bit float value (2 registers / 4 bytes)
from pymodbus.payload import BinaryPayloadBuilder # Needed for 32-bit floats writing to register
from pymodbus.payload import BinaryPayloadBuilder, BinaryPayloadDecoder
method = "rtu"
port = "/dev/ttyUSB0"
baudrate = 9600
stopbits = 1
bytesize = 8
parity = "N"
timeout = 0.01
retries = 2
client = ModbusClient(method = method, port = port, stopbits = stopbits, bytesize = bytesize, parity = parity, baudrate = baudrate, timeout = timeout, retries = retries)
connection = client.connect()
try:
# path to TCL for external programs only needed for halshow button
TCLPATH = os.environ
except:
pass
class grotius_gui(object):
def __init__(self, inifile):
self.builder = gtk.Builder()
self.builder.add_from_file(xmlname)
self.builder.connect_signals(self)
self.version = os.environ
self.ini_file_path = os.environ
self.ini_file_object = linuxcnc.ini(self.ini_file_path)
self.machine_name = self.ini_file_object.find('EMC', 'MACHINE')
self.cnc = linuxcnc
self.widgets = widgets.Widgets(self.builder)
self.c = linuxcnc.command()
self.s = linuxcnc.stat()
self.error = linuxcnc.error_channel()
self.halcomp = hal.component("grotius_gui")
self.panel = gladevcp.makepins.GladePanel(self.halcomp, xmlname, self.builder, None)
self.halcomp.ready()
self.window = self.builder.get_object('main_window')
self.window.set_title(self.machine_name + ' Version ' + self.version)
self.window.show_all()
def on_your_button_pressed(self, widget, data=None): #add a button in glade with handler....
connection = client.connect()
x = self.widgets.power.get_value() #"power" is the name of speedcontrol widget in glade !!
self.widgets.power.set_value(x+0)
#200 ampere is max = 10 Vdc
#factor *20
y = x / 20
client.write_register(15, float(4095 / 10) * y, unit=1)
print " set power "
a = self.widgets.airpressure.get_value() #"airpressure" is the name of speedcontrol widget in glade !!
self.widgets.airpressure.set_value(a+0)
#8 bar is max = 10 Vdc
#factor *1.25
b = a * 1.25
client.write_register(16, float(4095 / 10) * b, unit=1)
client.close()
print " set air pressure "
def __getitem__(self, item):
return getattr(self, item)
def __setitem__(self, item, value):
return setattr(self, item, value)
def report_gcode_error(self, result, seq, filename):
import gcode
error_str = gcode.strerror(result)
error = 'G-Code error in ' + os.path.basename(filename) + ' Near line ' + str(seq) + ' of ' + filename + ' ' + error_str
grotius_gui.update_statusbar(error)
# run the program
if __name__ == "__main__":
if len(sys.argv) > 2 and sys.argv[1] == '-ini':
hwg = grotius_gui(sys.argv[2])
else:
hwg = grotius_gui()
# load a postgui file if one is present in the INI file
postgui_halfile,inifile = grotius_gui.postgui(hwg)
if postgui_halfile:
res = os.spawnvp(os.P_WAIT, "halcmd", ["halcmd", "-i",inifile,"-f", postgui_halfile])
if res: raise SystemExit, res
gtk.main()
End program code
Things to buy to get it working :
analog digital converter 4 channel
usb to rs485
Wiring diagram that works :
USB to Rs485 modbus device, only 2 connection's are needed to 4 channel ad converter device :
Tx- => 485A
Tx+ => 485B
Rx+ => empty
Rx- => empty
Gnd => empty
5-12V => empty
4 channel ad converter inputs :
VIN+ => 24Vdc powersupply +
VIN- => 24Vdc powersupply -
485A => Tx-
485B => Tx+
4 channel ad converter outputs :
A00 com => output gnd / -
A00 U+ => output 0-10 Vdc with very high presision, for example : 7.18 Vdc
A00 I+ => empty
Okey the sudo visudo configuration :
GNU nano 2.2.6                                                     File: /etc/sudoers.tmp

#
# This file MUST be edited with the 'visudo' command as root.
#
# Please consider adding local content in /etc/sudoers.d/ instead of
# directly modifying this file.
#
# See the man page for details on how to write a sudoers file.
#
Defaults        env_reset
Defaults        secure_path="/usr/local/sbin:/usr/local/bin:/usr/sbin:/usr/bin:/sbin:/bin"

# Host alias specification

# User alias specification

# Cmnd alias specification

# User privilege specification
root    ALL=(ALL:ALL) ALL

# Members of the admin group may gain root privileges
%admin ALL=(ALL) ALL

# Allow members of group sudo to execute any command
%sudo   ALL=(ALL:ALL) ALL

# See sudoers(5) for more information on "#include" directives:

#includedir /etc/sudoers.d

grotius ALL=NOPASSWD: ALL
Type in terminal : sudo visudo
See, i added the line at the bottom of the code grotius ALL=NOPASSWD: ALL
grotius is username, so use your own user name.
Okey close and save with keyboard button : ctrl + x, after that, hit enter.
Now you are superuser without typing password.
")
Project now looks like this :
Later this week i add the thcud component for torch height control. I will also investegate the offset branche... I did not before.
Maybe i will make a modbuss torch height controller with voltage divider, i think this is much easeyer for the future.
Please Log in or Create an account to join the conversation.
- newbynobi
-
- Offline
- Platinum Member
-
- Posts: 1931
- Thank you received: 394
your way of starting as root is horrible!
@all, please do not do that, it is a hugh security problem! You may also get other problems running linuxcnc!
What is the reason you are doing this???
If I do find time i can post tomorow a python code for modbus running as normal user!
Norbert
Please Log in or Create an account to join the conversation.