Gmocappy question and idea about custom screen
- Grotius
-
 Topic Author
- Offline
- Platinum Member
-

- Posts: 2419
- Thank you received: 2348
Attached is the Hypertherm Serial protocoll. I have xnet account by Hypertherm so i can see all the doc's and order online.
When i order a hypertherm with serial interface i also order a serial cable :
Hypertherm order nr. 223239 Serial interface RS-485 to 9-pin D-sub Connector 7.6 meter.
I can also order a serial upgrade set for build in :
Hypertherm order nr. 228539 Upgrade Kit : Serial Interface Port (RS-485)
At the moment i have the serial cable. But i think i need a rs232 to rs485 converter to send the command's over
the standard com1 pc port. Im a thinking correct this way?
Tonight i will work to the custom screen and try to add some more function's.
Thank you for the comment's. It's really helpfull.
Please Log in or Create an account to join the conversation.
- Grotius
-
Topic Author
- Offline
- Platinum Member
-
- Posts: 2419
- Thank you received: 2348
I had to change speedcontrol.py to add a negative value for the adaptive feed widget, named speedcontrol widget in glade.
To do this, i had have done some research before.
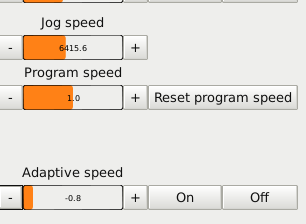
You see, you can set a negative value. In glade this is not possible. Normal you can't do this, unless you change 1 text line in
the speedconrol.py file. Located : linuxcnc../lib/python/gladevcp/speedcontrol.py
Oke what to change in that file? Look ad this comment code i added to the custom gscreen python file :
#Open speedcontrol.py in directory : /home/grotius/linuxcnc../lib/python/gladevcp/speedcontrol.py
#Change hard settings :
#        'min' : (gobject.TYPE_FLOAT, 'Min Value', 'The min allowed value to apply',
#        -10.0, 99999.0, 0.0, gobject.PARAM_READWRITE | gobject.PARAM_CONSTRUCT),
#In gmocappy they set negative value like this :   self.widgets.spc_jog_vel.set_property("min", -10)
#In custom gscreen here, the widged is called : adaptive_speedadd the intitial code to the widget.
Gmocappy has trouble not with negative jogging widget's, but with negative override value's. I don't know why that is...
I think Norbert know's this.
In the glade file you don't have to change anything.
The custom gscreen python code is now expanded with setting the speedcontrol widget to negative value.
Also you have to tune the widget in setting speed and incremental ( speed in millisec. and incremental in 10 times or 100 times or what you want )
So here the code :
self.widgets.adaptive_speed.set_property("min", -1)
self.widgets.adaptive_speed.set_property("max", 1)
self.widgets.adaptive_speed.set_value(0)
#increment
self.widgets.adaptive_speed.set_property("increment", 0.1)
#inc_speed
self.widgets.adaptive_speed.set_property("inc_speed", 100)
I think the linuxcnc software developpers will pick this up and merge it into the next linux version. For now we have to do it by this way. And it's working very good. Also the widget looks nice and is ready for touchscreen use i read somewhere.
Please Log in or Create an account to join the conversation.
- rodw
-

- Offline
- Platinum Member
-
- Posts: 12032
- Thank you received: 4104
One is via a RS232 to RS485 or a USB to RS485 adapter and adopt a modified VFD driver interface. I think this is the way Chris has done it before.
The other way is to use a Mesa card with a bitfile that exposes the RS422 smart serial port interface. This should allow communication via the RS485 protocol via a 4 wire interface (which is what the Hypertherm has). Once the Mesa UART is enabled, there are two functions exposed to read and write to the UART using a custom HAL component. To set the Hypertherm parameters, It would be just a matter of formatting your data packets per the document Grotius has shared and calling the function. For a commercial machine you are probably not going to be using a parallel port as you will want a lot more inputs, so I think this is a much nicer solution plus it is in real time. Just write a component that has pins for air pressure, current etc and then send those values out the UART. PCW has written a bitfile for the 7i76e and I've checked everything comes up OK but don't have a Hypertherm so have not moved forward with this. (it is on the forum somewhere.)
Please Log in or Create an account to join the conversation.
- Grotius
-
Topic Author
- Offline
- Platinum Member
-
- Posts: 2419
- Thank you received: 2348
I had a discuss with Hyperherm Europe today. I had to sell this high defenition system to a customer :

But Hypertherm has not responded in time. Now i lost customer i think.
I also advised a Thermal Dynamics 200amp's Ultracut system. This is also very good.
I think the modbuss works the same to this inverter. And in future we can add true hole technology to Linuxcnc hihi.
After we made a basic plasma program, we can add a 4th and 5th axis to make a tcp toolpath.
Please Log in or Create an account to join the conversation.
- tommylight
-

- Away
- Moderator
-

- Posts: 21738
- Thank you received: 7428
Nice job.
Tom
Please Log in or Create an account to join the conversation.
- cmorley
- Offline
- Moderator
-
- Posts: 7341
- Thank you received: 2164
Hi Chris,
Attached is the Hypertherm Serial protocoll. I have xnet account by Hypertherm so i can see all the doc's and order online.
When i order a hypertherm with serial interface i also order a serial cable :
Hypertherm order nr. 223239 Serial interface RS-485 to 9-pin D-sub Connector 7.6 meter.
I can also order a serial upgrade set for build in :
Hypertherm order nr. 228539 Upgrade Kit : Serial Interface Port (RS-485)
At the moment i have the serial cable. But i think i need a rs232 to rs485 converter to send the command's over
the standard com1 pc port. Im a thinking correct this way?
Tonight i will work to the custom screen and try to add some more function's.
Thank you for the comment's. It's really helpfull.
For my serial vfd which requires RS-485 I used a RS-232 tp RS-485 converter (Which was from the opto-22 company.) and a USB to RS-232 cable.
I have tried a small self powered converter that goes from USB to RS-232 to RS 485 but it didn't seem to work (wrong voltage levels??) I didn't try very hard.
Building a custom bitfile for a MESA sserial card would be excellent and I'd like to experiment on doing that and a couple other projects but it is a steep learning curve and I have not found the time and deterioration to try.
Building a python/USB based program would be easiest and surely quickest.
I live in Western Canada, since you asked
")
Chris M
Please Log in or Create an account to join the conversation.
- rodw
-
- Offline
- Platinum Member
-
- Posts: 12032
- Thank you received: 4104
Building a custom bitfile for a MESA sserial card would be excellent and I'd like to experiment on doing that and a couple other projects but it is a steep learning curve and I have not found the time and deterioration to try.
Chris, if you ask PCW nicely, I'm sure he'd build the bit file for you. Well he did for me in this thread
forum.linuxcnc.org/27-driver-boards/3328...th-uart?limitstart=0
Andy has already done the heavy lifting as per the links to the component in the thread above. There is an example talking to a modbus instrument using this here linuxcnc.org/docs/devel/html/man/man9/mesa_pktgyro_test.9.html
Anyway, sorry for taking you off topic
Please Log in or Create an account to join the conversation.
- Grotius
-
Topic Author
- Offline
- Platinum Member
-
- Posts: 2419
- Thank you received: 2348
For the modbuss, i saw Classicladder has the implementation of modbuss already. I tried to set up external emergency stop with
i/o pins, and it works.
The communication with modbuss and hal is quite easy to set up, I remember.
On youtube a German linux user has done a video. Maybe it is Norbert. He has done modbus with windows and with mesa.
If you then adapt a test device just like the German did. I think it's quite good to figur out if it's working.
In Mach3 he did a modbuss example and this works. So in Linux it would also work.
I must order some component's to ensure the good voltage for rs485. Personally i worked with usb interface cards before. It was
a problem on windows. They lost connection through several hours, relating to dangerous behavoure. Maybe Linux works different, but i have to try. I think the com1 pc port would be perfect to start with.
Is there a standard linux way or example to communicate with modbuss via com1?
I have never tried a mesa configuration but i am open for this option. Most important for me is to build hufter proof
machines.
@Chris, maybe i come and visit you in Canada. Do you have a hotel in the place?
I dont't like wild animal's, like bear's and sharks. But in Canada i can carry shotgun with me in the wild or at the lake?
@Rodw,
You are Mesa fan i think. Do advise me to order a piece over there. The Linuxcnc software become's the greatest software ever.
@Tommylight,
Thanks. It's up to Chris. He is the great brain behind this possibility of software customization. This bring's years of
cutting experience and machine building in combination to years of software development. And in the end. It will hopely last
for the coming 10 years.
My idea is to change the chinese inverters to fully integrated circuit's with the pc. So then build custom plasma inverters.
Only use the chinese inverter blocks and circuit's inside.
I think that wil be a next thing to do when this software is tested for several month's and ready for end users.
Also there is a new problem in the marked upcoming for several time. The fake nozzle and electrode component's from China companies. They cost 10 times less then orginal spare parts. Hypertherm has 2 mont's ago won a case to a China copy factory.
But the copy problem of orginal Hypertherm spare parts is quite big at this moment.
Okey back to topic,
Yesterday i added a few new lines in the python program, this is basis for THC function. (torch height controller)
I have tested the THCUD funtion orginally written by JT. I also have compiled the THCUD module to different working modules before, i will make a example of how to do this later.
Testing of machine set up go's good when you have a complete set up of motors next to you, while your wife is sitting on the cough with no underwair. Then your view is perfect.
#thc function, this has to do with the linuxcnc thcud component and is connected in postgui.hal file
       self.c = hal.component("thc")
       self.c.newpin("enable", hal.HAL_BIT, hal.HAL_IN)
       self.c.newparam("velocity", hal.HAL_FLOAT, hal.HAL_RO)
Okey here we have a pin and a parameter. The pin is for enable the function with yes or no. The parameter is for passing the value,
like 0 or 2 or 10 or 15524454. Float is for big value's. Bit is for yes or no. Only 1 or 0.
Okey next we add :
##
    #THC function on or off, see thcud component in postgui.hal => link method over there : thc_on.enable
    #For more info visit : http://linuxcnc.org/docs/html/man/man9/thcud.9.html
    def on_thc_on_pressed(self, widget, data=None):
        self.c['enable'] = 1
        #set directly the velocity value to the parameter, widgets don't update that for you unles you press them :
        self.c['velocity'] = self.widgets.thc_speed.get_value()
    def on_thc_off_pressed(self, widget, data=None):
        self.c['enable'] = 0
    def on_thc_speed_value_changed(self, widget, data=None):
        self.c['velocity'] = self.widgets.thc_speed.get_value()
You see i make a self.c ---- The other function was a self.h ---- This was a other function, so i have chose a new letter "c" it could be "x" also. It works always.
If you open up halshow you can see it's working. Perfect.... So if you want you can do everything you want with linuxcnc.
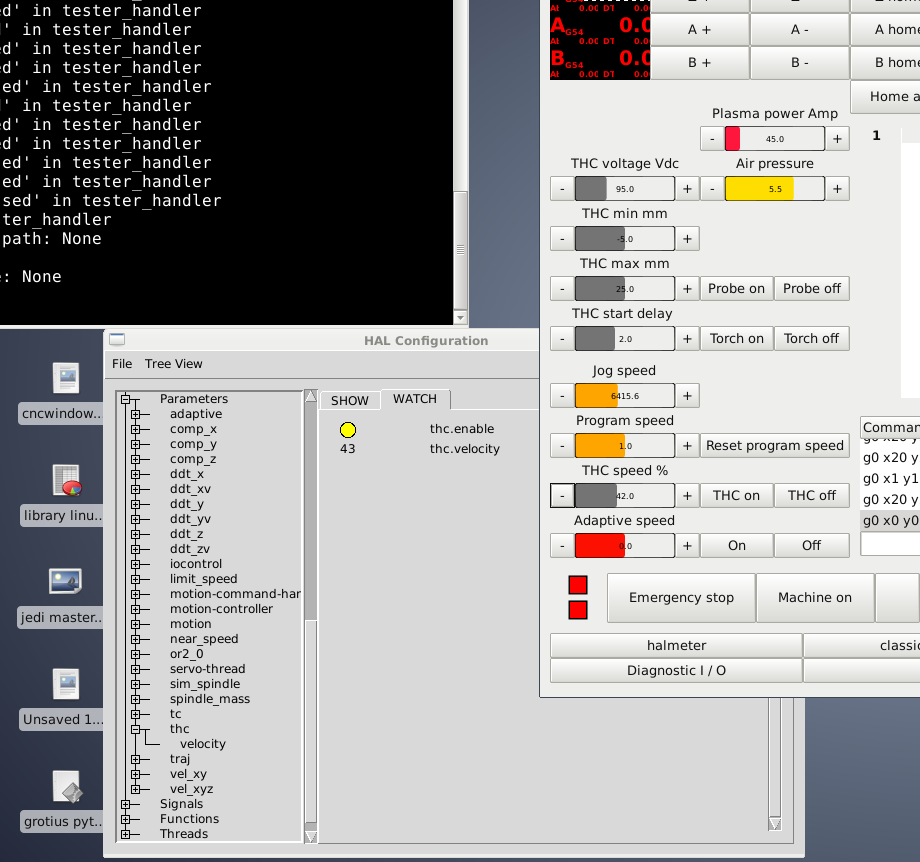
I changed the colors of the widget's if they are on. That saves a color led. In fact the led is integrated in the speedcontrol widget.
So that's cool !!!
The widget is value 42, the halshow is 1 digit different. This is no problem. It has to do with the way of upgrading the widget in the code.
@Update,
Next issue i have now is to do MDI commands with button.
So before the linux joint update is go's like this :
#y-axis buttons
  def on_program_y_zero_pressed(self, widget, data=None):
     self.command.mode(self.cnc.MODE_MDI)
self.command.mdi("G10 L20 P1 Y0")You see i tried it several way's :
#Plasma torch on and off signals :
    def on_torch_on_pressed(self, widget, data=None):
       #nice way is to do it with mdi command M3
       self._MDI = 1
       self.emc.mdi = "M3 S1"

       print " torch on pressed "
    def on_torch_off_pressed(self, widget, data=None):
       #nice way is to do it with mdi command M5
       self._MDI = 1
       self._MDI = ("M5 S0")
       print " torch off pressed "

    def on_goto_zero_pressed(self, widget, data=None):
       self.emc.mdi = "G0 X0 Y0 Z0"
       self._MDI = 1
       self._MDI = ("G0 X0 Y0 Z0")
But that is a fact of searching in new code...
@Update, problem solved :
The goto zero button was the simplest way to begin with :
def on_goto_zero_pressed(self, widget, data=None):
       self.command.mode(linuxcnc.MODE_MDI)
       self.command.wait_complete()
       self.command.mdi("G0 X0 Y0 Z0")
       print " goto zero pressed "
I had to import some things.
import linuxcncAnd had to add linuxcnc command....
See the line :
def __init__(self, halcomp,builder,useropts,gscreen):
            self.emc = gscreen.emc
            self.data = gscreen.data
            self.widgets = gscreen.widgets
            self.gscreen = gscreen
            #for mdi, you have to add this :
            self.command = linuxcnc.command()
So now the mdi command are working, great !!!
For those who are interested, latest gscreen project file's are included.
Feel free to add special feature's, or expand this to your own project.
The keyboard function's are not implented yet. So you can slam the keyboard, but at this moment it is not working.
Maybe tommorrow, hihi.
@Chris,
I am using the adaptive feed master version of linuxcnc. Can you load it up for me to the git?
I have a download link for you, if it's not possible to download please inform me, then the download limit is reached.
www.grotius-cnc-machines.nl/product/linux-cnc-adaptive-speed/
Please Log in or Create an account to join the conversation.
- cmorley
- Offline
- Moderator
-
- Posts: 7341
- Thank you received: 2164
The best way to do development work is to creat a github account and clone linuxcnc then do your branch work there.
Then if appropriate, send a pull request. Someone will hopefully audit your request and if accepted they will pull in the changes to linuxcnc.
The reverse-run branch (I think thats what you are using) is of course not in master.
Chris M
Please Log in or Create an account to join the conversation.
- cmorley
- Offline
- Moderator
-
- Posts: 7341
- Thank you received: 2164
Building a custom bitfile for a MESA sserial card would be excellent and I'd like to experiment on doing that and a couple other projects but it is a steep learning curve and I have not found the time and deterioration to try.
Chris, if you ask PCW nicely, I'm sure he'd build the bit file for you. Well he did for me in this thread
forum.linuxcnc.org/27-driver-boards/3328...th-uart?limitstart=0
Andy has already done the heavy lifting as per the links to the component in the thread above. There is an example talking to a modbus instrument using this here linuxcnc.org/docs/devel/html/man/man9/mesa_pktgyro_test.9.html
Anyway, sorry for taking you off topic
Sorry I wasn't clear, I'm interested in custom FPGA programing using smart serial. You can do almost anything in FPGA if you have space.
But that is an interesting idea using the MESA UART option - so much , so little time
Chris M
Please Log in or Create an account to join the conversation.