Gmocappy question and idea about custom screen
- rodw
-

- Offline
- Platinum Member
-

- Posts: 12032
- Thank you received: 4104
@Rodw,
You are Mesa fan i think. Do advise me to order a piece over there. The Linuxcnc software become's the greatest software ever.
Yes, I am a bit of a mesa fan. I tried with a parallel port and failed very early in the piece so I regrouped and purchased a Mesa 7i76e (and a Mesa THCAD-10). I have found the 7i76e has been really amazing and have just about used all of its 32 inputs. Plus it drives my stepper motors at nearly double the speed I could get out of them. Being able to connect to the control box via an ethernet cable I think is a real advantage. The 7i76e might not be the right card for you . I assume you are using servo drives but if they are step and direction drives, a few people have used them with additional cards for the encoders but I'm not the one to advise you.
Please Log in or Create an account to join the conversation.
- Grotius
-
 Topic Author
- Offline
- Platinum Member
-
- Posts: 2419
- Thank you received: 2348
Okey i have a idea to start up the Hypertherm power adjustment. I will bring the Hypertherm to a friend, a electronic expert
to make a 0-10 volt input for the power adjuster at the front panel. Nice thing to know. Only the xp45 can go down to 10 amp's
for perfect engraving. The 65, 85 and 105 only can back to 20 or 25. So that is a big problem at the moment. And also
Hypertherm has a few issue's going at the moment.
Maybe my friend can search a little bit for a solution.
I also have a chinese inverter customized with robotic duramax torch. This works also with pilot start. So i think i will bring this inverter first to him. (cheapest way). And let him build a simple 0-10V spindle input. And i will make the connection to the THC module.
I will make a new cover with water cooling at this inverter. It will make the inverter 100% power duty cycle.
Also a relay with a 0-10V secundairy air pressure ventil.
So you can do with "M3 S1" command the :
-plasma power ( S0 = 0 amps / S450 = 45.0 amps. )
So if you activate the secundairy relais the PWM output go's over other line. It changes to air pressure ventil :
-air pressure power ( S0 = 0 bar or psi / S450 = 4.5 bar or psi )
The automated air pressure regulator can best be placed before the inverter pressure in.
But at torch it is the best. Then you have more real power. In long leads you see difference in plasma startup time.
And we are done.
And spindle speed works also with Mesa.
@Rodw,
I will contact Mesa. I see JT is the only distrubitor of Mesa. Maybe i can follow this as distributor in Europe.
I think i want to go with Linux for a very long time. I can't go back now any more. And if my exerience grow's i can
be a good feedback for customers.
I am now making a new machine that i can use with linux. So i can implement Mesa directly.
@Chris,
Every evening i do several button's. It go's very good. I have a few quistion's on my list. If i cannot solve this i will ask you how
to solve..
Yesterday i saw on the git that you have done much work on gscreen !!
Please Log in or Create an account to join the conversation.
- rodw
-
- Offline
- Platinum Member
-
- Posts: 12032
- Thank you received: 4104
If you were going into production, I am sure Mesa would deal direct with you .
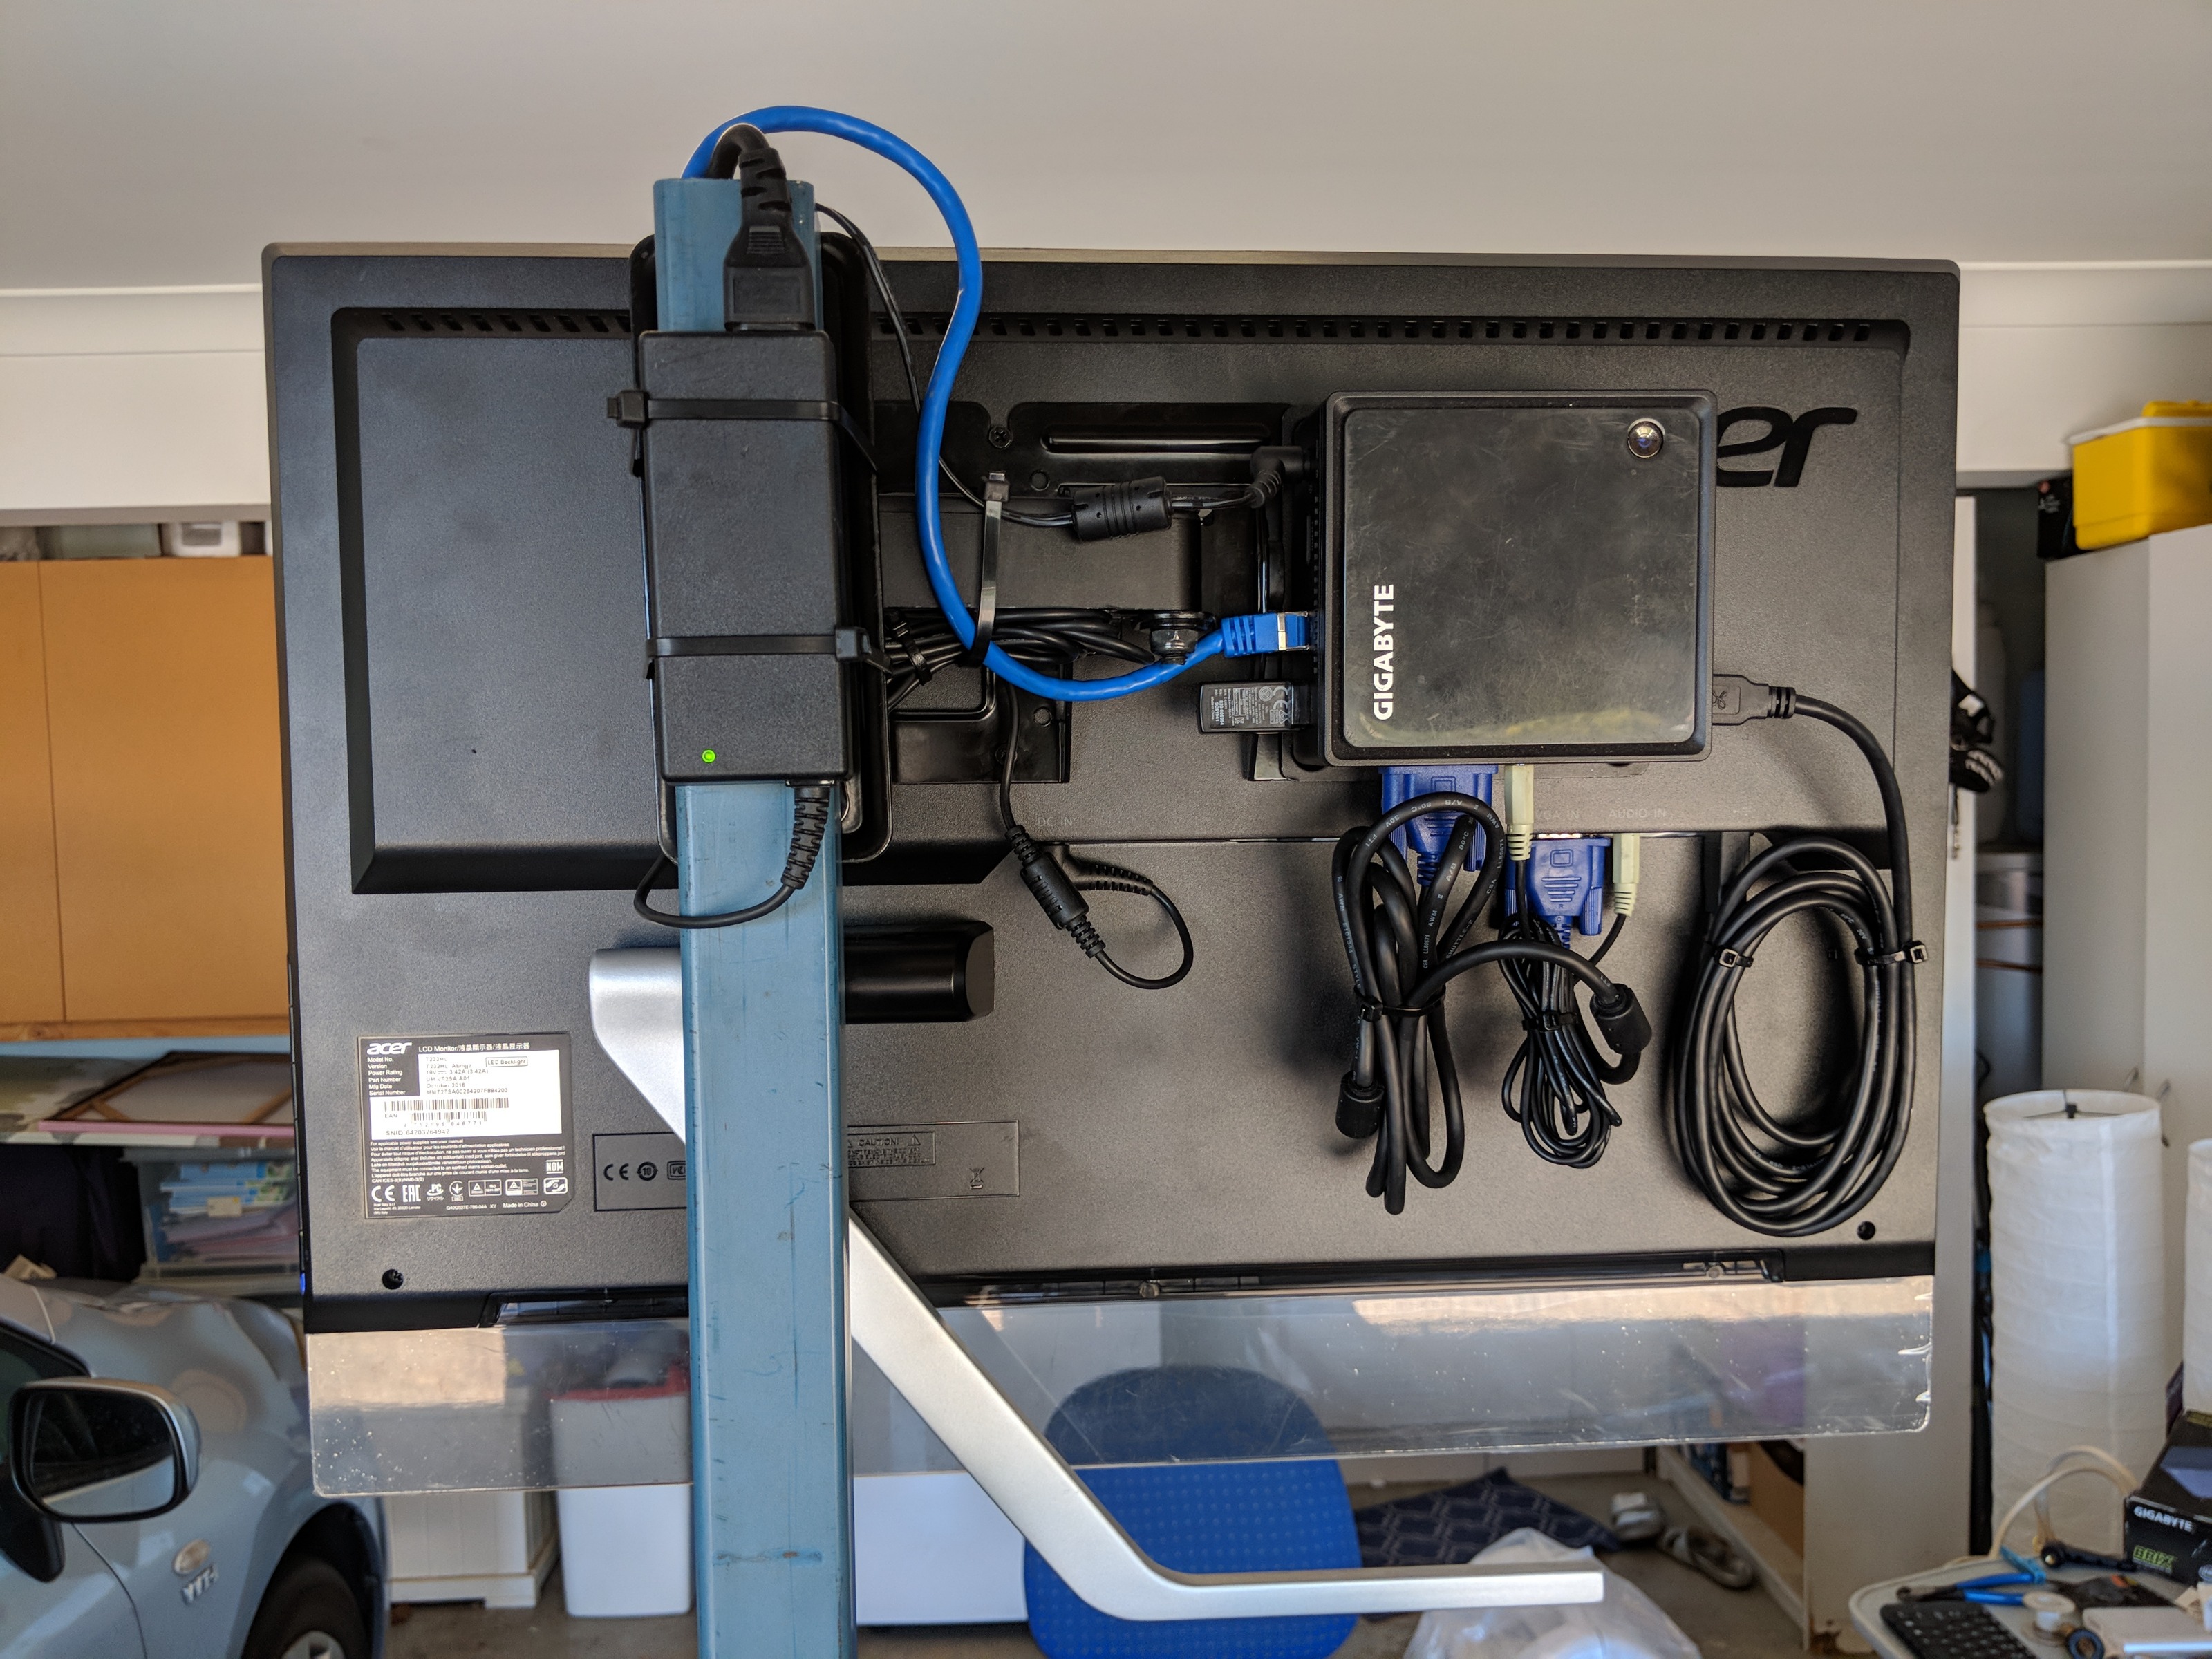
Still off topic but I did a bit of tidying up today and here is why I like the Mesa 7i76e and Gmocappy (with Linux onboard keyboard).
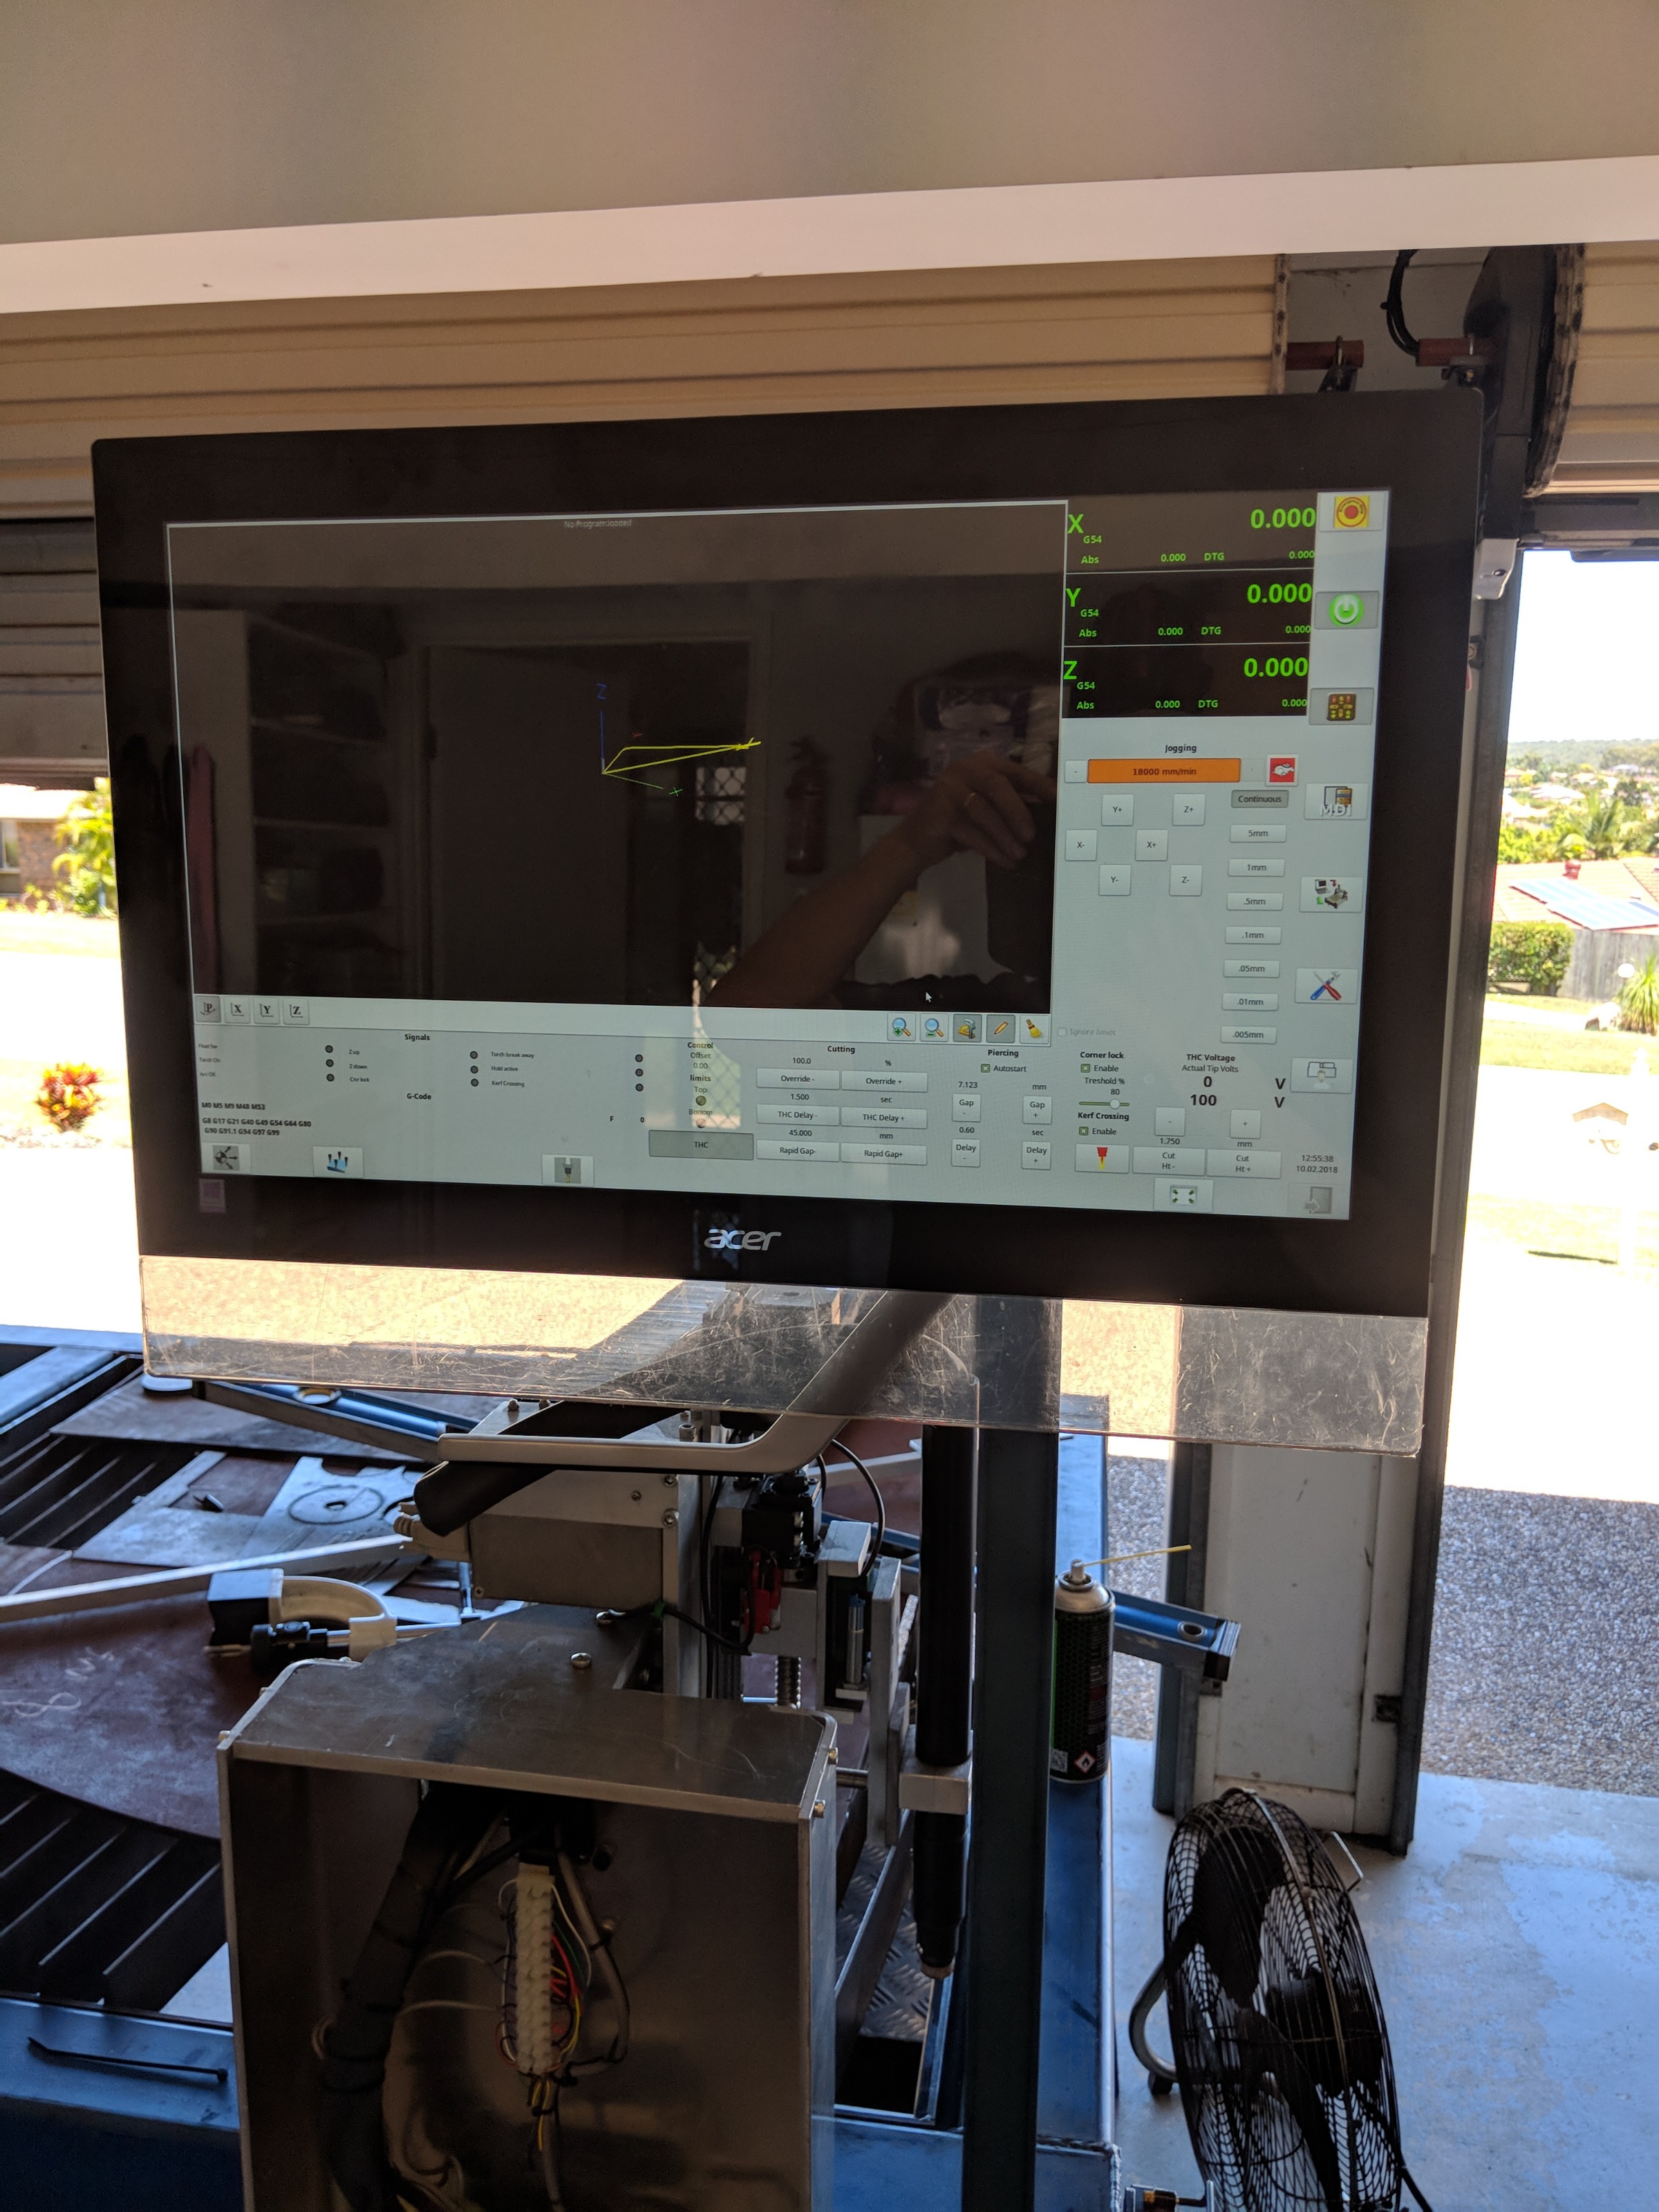
The touch screen and the Ethernet connection to the control box makes for a very tidy install as I just needed to get the ethernet cable and power for the monitor and PC up the support post.
Please Log in or Create an account to join the conversation.
- Grotius
-
Topic Author
- Offline
- Platinum Member
-
- Posts: 2419
- Thank you received: 2348
Excuse me for my late responce. Your pc set up including touch screen looks very compact. Nice.
This looks up to date. Okey i have a little idea for your screen.
If you want to start a drawing or cam program in your Gmocappy application without closing the screen down. You can add a user button.
Your code for this button :
In this case button name : cam_program
Handler signal in glade : on_cam_program_pressed
##### ACTIVATE EXTERNAL PROGRAM ###########################################

    def on_cam_program_pressed(self, widget, data=None):
            p = os.popen( "/home/grotius/sheetcamtng/run-sheetcam &" )
            print " open cam program "
You can do this for every program you want to open in your application. Next step for me is to integrate dxf2gcode.py
This wil take some time.
I have done much work to my screen. What i want to know is how to open or activate a secudairy glade screen with a button in the same project. Can be a file close window or whatever.
Okey this is solved :
def on_test_pressed(self, widget, data=None):
        self.widgets.window2.show()
        print " test pressed "
I mentioned that multiple homing commands can be a problem. Then the error is "not in joint mode", but i will look after this to solve.
Also the adaptive speed function works great !.
I want to get a solution for making a button m3 command when program is running. Also i want to change plasma power in auto mode, this is the parameter spindlespeed. I will look for a solution.
Please Log in or Create an account to join the conversation.
- rodw
-
- Offline
- Platinum Member
-
- Posts: 12032
- Thank you received: 4104
I mentioned that multiple homing commands can be a problem. Then the error is "not in joint mode", but i will look after this to solve.
I did have problems homing about 12 months ago but Norbert solved that. The problem was it was possible to home one side of the gantry as the GUI's were still catching up with the changes to the joint axis homing for gantries becasue the joint numbers were not hardcoded to correlate to each axis.. I think also that the core LCNC code was modified at that time so that if you attempt to home a joint that was part of a joint axes (eg gantry), it now homes all of the joints in the axis instead of tearing the gantry apart.
Essentially, joint mode is not required on a gantry (but might be on a robot or hexapod). Part of the solution is to prevent selection of joint mode in your ini file by removing kinstype=both from this line
KINEMATICS = trivkins coordinates=YYXZPersonally, I would just get rid of the individual joint homing buttons and just use a home all button. Master branch has no pins to home each axis but it does have a home all pin. Thats all I use. I think I'm going to mount some buttons and warning indicators on the bottom of my monitor as the ones on my control box are not easy to access so I might hardwire in a home all button as well.
With your M3 problem, I'm not so convinced that using S to control current is the right way to go but it does make it simple. Using M68 allows you to modify your python handler to capture settings from gcode and then you have the ability to also set the same parameters from the GUI as well as Gcode. You can fold multiple parameters into the same M68 command by association of parameters to a numeric range. (eg 4000-4999 is 0-999 amps and 400-499 is 0-99 amps). Perhaps the handler can drive the spindle PWM signal directly? It would be worth exploring that.
I just checked, and in my M68 handler I have a stub for setting amps (where command is the M68 parameter).
            #get preset Amps not actually used yet
             elif 410 <= command < 500 or 4000 <= command < 4201:
                   if command >= 4000:
                        command = command - 4000
                   else:
                        command = command - 400
                   #nothing else to do here for now
Please Log in or Create an account to join the conversation.
- Grotius
-
Topic Author
- Offline
- Platinum Member
-
- Posts: 2419
- Thank you received: 2348
Okey, i did not know that. I use master branche so far i know. But i can do home command's for each separate axis.Master branch has no pins to home each axis but it does have a home all pin.
After the update to joint's, they had to do a update for how to.... I you search it you almost find nothing.
The code is now so far, i can almost step over to stand alone.
So this week i try to test the old grotius stand alone on itselfs. I know now how to do the joint update.
To do the code step by step yourself, you see possibilities.
For fun i thought how fast can i ping to google with real time kernel using root command and a button in linuxcnc :
def on_root_command_pressed(self, widget, data=None):

         while True:
               hostname = "google.com" #example
               response = os.system("ping -c 1 " + hostname)

               if response == 0:
                  print hostname, 'is up!'
               else:
                  print hostname, 'is down!'
               time.sleep(0)
This thing is running at 0-1 ms.
It's really fun to know how things are working and what you can do with a linuxcnc controller.
Many thanks for the M68 commando.
I can manipulate g-code now, but i cannot do a M68 command in auto mode.
Hmm, there is a solution, bit i have to think.
You see also window2 pop up if you press the test button.
If you press then root command, it will do a ping. I did also loading a webbrowser, but this placed in a glade window
takes more time. This can be handy for see the M or G commando list
I think the M3 command can be solved in the custom.hal file, but i will look to solve it in a .comp file. For real time
you can compile it just like the THCUD file is a compiled file. I have done this before.
The endless loop funcion also works :
Please Log in or Create an account to join the conversation.
- rodw
-
- Offline
- Platinum Member
-
- Posts: 12032
- Thank you received: 4104
I can manipulate g-code now, but i cannot do a M68 command in auto mode.
Hmm, there is a solution, bit i have to think.
This post explains how you can send a value from gcode and the GUI
forum.linuxcnc.org/plasma-laser/32691-settings-from-g-code-file
So you don't send an M68 from the GUI, you use M68 to set the value in the GUI and use the GUI value to set the hardware...
Please Log in or Create an account to join the conversation.
- Grotius
-
Topic Author
- Offline
- Platinum Member
-
- Posts: 2419
- Thank you received: 2348
I have looked at your given forum link. On a Sunday i can read this carefully.
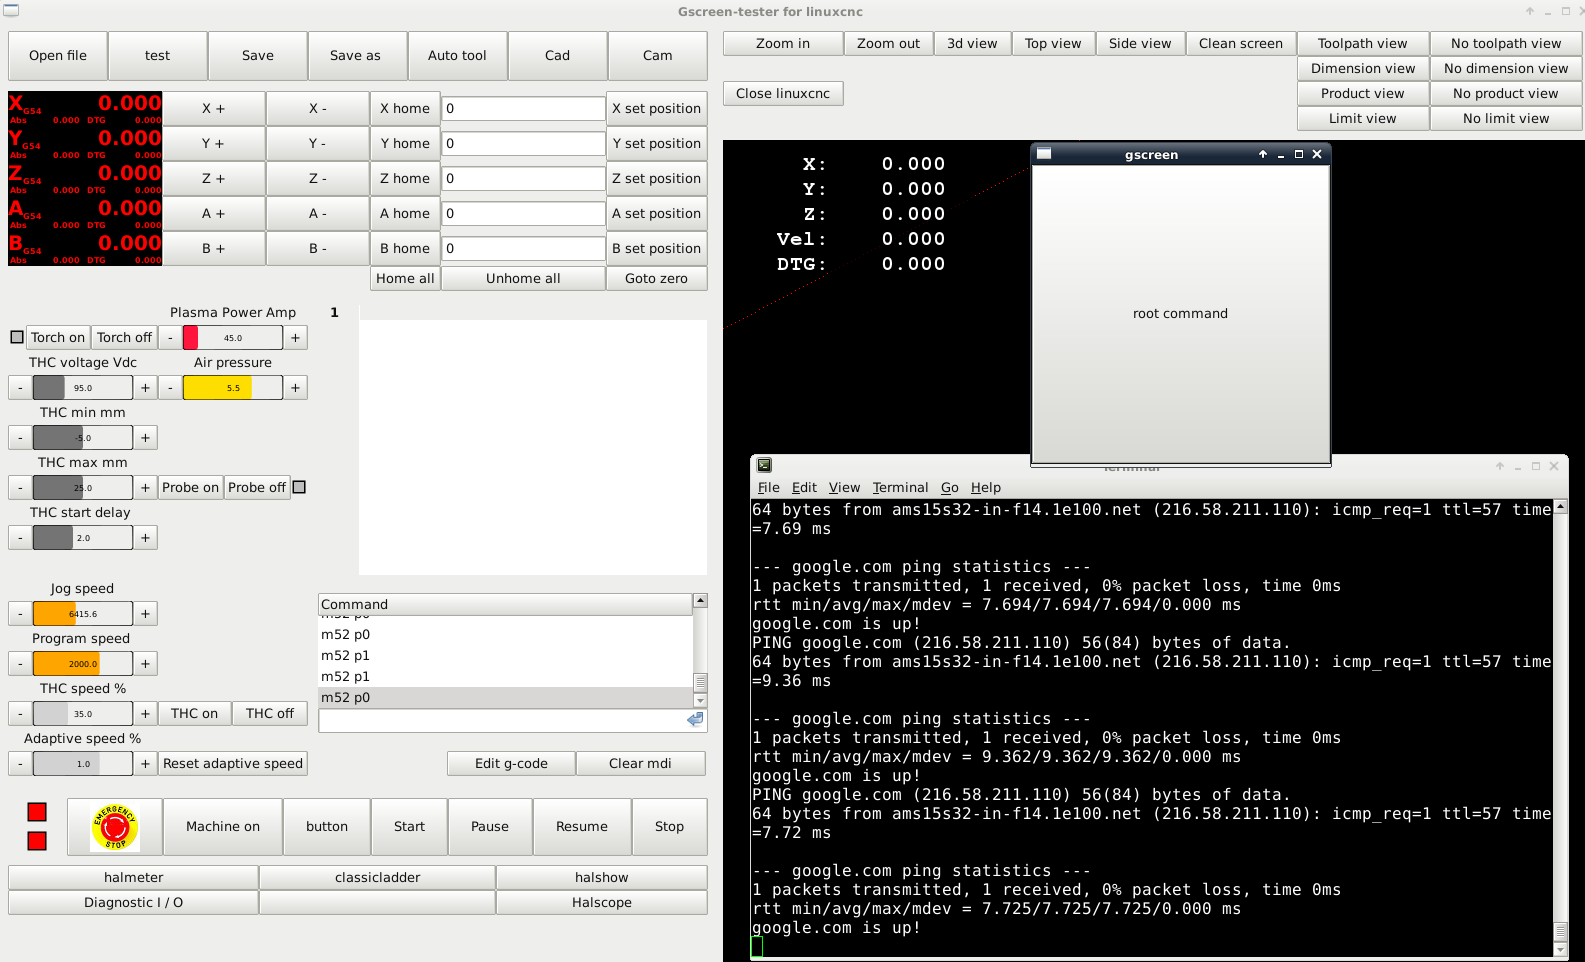
At this moment i have the old grotius gui updated and working sinds 5 minutes.
So finally i have a stand alone appliction working.
I was lucky i had the directory structure good in one time, with placing the files at the good place in the system.
When loading the old linux version i get this picture :
So i did yes.
And to my surprice is was giving messages on the terminal during startup.
For those who also want to update, i had 2 major issue's to solve :
1. The stand alone gremlin from the jt-tutorial was not working, so i deleted all this in the code. And add a glade gremlin widget.
2. Change code, important is to use linuxcnc in code, then most of errors will be gone. :
orginal :
def on_jog_y_plus_pressed(self, widget, data=None):
    self.command.mode(self.cnc.MODE_MANUAL)
    self.command.jog(self.cnc.JOG_CONTINUOUS, 1, self.builder.get_object("jog_speed").get_value()/60)
updated :
def on_jog_x_plus_pressed(self, widget, data=None):
    print " x plus pressed "
    self.command.mode(linuxcnc.MODE_MANUAL)
    self.command.jog(linuxcnc.JOG_CONTINUOUS, 0, 0, self.builder.get_object("jog_speed").get_value()/60)
Okey directory places :
Linuxcnc file structure stand alone application, bases on old JT Tutorial :
Bin => grotius.py
Config => sims => grotius => Your ini, hal, custom.hal files....
Share => linuxcnc => grotius.glade
Now i will make the gscreen project update to stand alone application.
For the screen.
I have much work to do. The layout is made different then Gmocappy and Gscreen.I like your interface screen. very nice and clean.
I use a fixed layout. This is easeyer to develop and change. The way i do the screen design is like a mach3 screen designer.
But i am learning fast at this moment.
Everything is in a speed now i understand the program language a little bit.
I hope the keybindings will work, i will check it.
Please Log in or Create an account to join the conversation.
- Grotius
-
Topic Author
- Offline
- Platinum Member
-
- Posts: 2419
- Thank you received: 2348
this to a good working application. But if you delete some stuff, you have a working application. And this is very important info.
It has also a old file directory, here stay's the not updated files.
In the application the x+ button is working. Also home all axis is working and emergency and machine on also working.
Keybindings not working, have to see what the issue is.
Don't forget to make the grotius.py file executable in the bin directory. Your error will be no permission in startup dialog.
Please Log in or Create an account to join the conversation.
- Grotius
-
Topic Author
- Offline
- Platinum Member
-
- Posts: 2419
- Thank you received: 2348
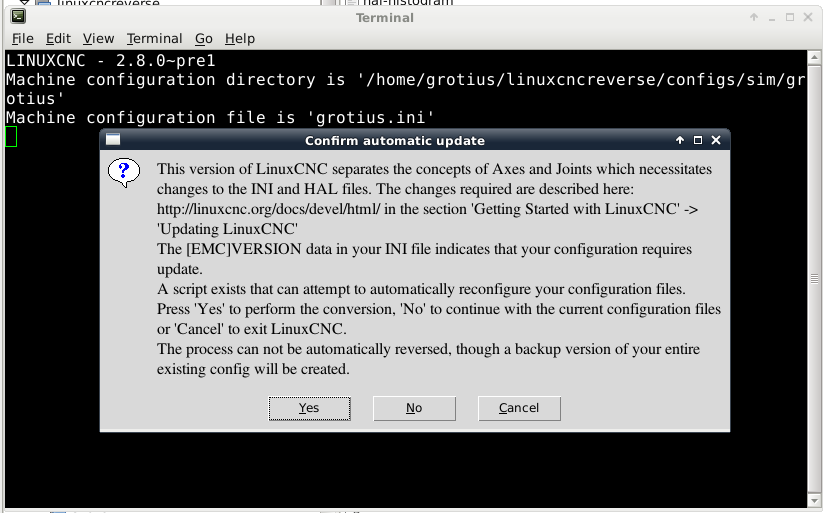
I have now the program stand alone running. Only strange startup message is :
How is it possible to release some buttons during startup procedure ?
Still the joint mode is a problem. Multiple homing command's are not possible.
I need a python text to set the axis in joint mode.
But for the rest, it seems to work good.

Please Log in or Create an account to join the conversation.