- LinuxCNC
- Installing LinuxCNC
- Complete HOW-TO Linux Mint 18.1 32/64 RTAI or PREEMPT with RIP install or deb
Complete HOW-TO Linux Mint 18.1 32/64 RTAI or PREEMPT with RIP install or deb
- cncnoob1979
-
 Topic Author
- Offline
- Platinum Member
-

- Posts: 403
- Thank you received: 75
I have tested all of these instructions and have always updated Linux Mint to the latest available. You do not need to worry that updating Linux Mint 18.1 will break the following HOW-To's. I would recommend that you upgrade to the latest software via apt or software manager.
Note: You will need a minimum of 8.8 GB to install Linux Mint 18.1
Issuing the command below in a terminal window is the easiest way in my opinion.
sudo apt-get dist-upgradeUsers are frequently reporting that the following dependencies are sometimes required. If you get this error please follow the steps listed below to fix this issue.
dpkg-checkbuilddeps: error: Unmet build dependencies: libgnomeprintui2.2-dev python-support tcl8.4-dev tk8.4-dev
To fix the issue above please use this code:
sudo add-apt-repository 'deb http://mirrors.kernel.org/ubuntu precise main universe'
sudo apt-get update
sudo apt-get install libgnomeprintui2.2-dev python-support tcl8.4-dev tk8.4-dev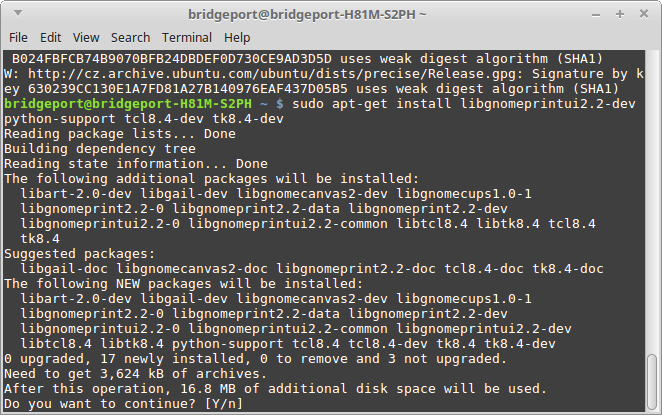
Add this repository for these few dependencies only. Once you have added these and built linuxcnc I would highly suggest you remove this source because it is a precise based repo and you would only want this repo for the few sources you need to install linuxcnc.
To search for other files you may need I suggest you look here:
https://launchpad.net/ubuntu/NOTE: POST 1 is a RIP, a rip is for testing/running the software in place [think a portability build] it is not a typical full install of the program. If you want the program to work as on the live CD, then start at post 2. I would recommend that you read through POST 1 for explanations on the steps required.
Post 1 = PREEMPT RT all source code building and installing LinuxCNC as a RIP.
Post 2 = PREEMPT RT all source code building installing as .deb
Post 3 = RTAI Kernel install via apt, LinuxCNC build from source installing as a deb.
Post 4 = Just Give Me the CODE!!
POST 1 = USPACE PREEMPT RIP install from source without the use of .debs
NOTE: My Ramblings Start Here
Credits are given to all forum members here; including: PCW, rodw, andypugh, Todd Zuercher, tommylight and multiple others here on the forum; this community is awesome and I always feel that I can get help with any question however “silly” it might be.
Linux speak is difficult and it is a huge learning curve. LinuxCNC is not Linux – Period! It is a PROGRAM and since most users do not use Linux and are/were avid Windows user it is a huge undertaking to complete the transition to LinuxCNC. When you install LinuxCNC you have to understand the difference between what is LinuxCNC and what is Linux. Linux comes in a huge amount of “flavors” and each system is different than the next. Most issues arise from not understanding Linux, not LinuxCNC. At least for the install portion – Once installed –configuration—will be the next hurdle.
Please understand it is very difficult for someone to speak Newbie when you are no longer a newbie. The key in my mind- is understanding the entire process so you know what question to research prior to asking for help. Google is no help at all if you cannot form the question to ask it.
If you only want to copy paste commands and refuse to understand the build/install process required -- then you will have trouble, period. Frustration is going to happen, but we are all here to help you. I’m not a programmer or coder ect.. I am a regular person who enjoys his hobby and have struggled as much as you.
My Goal is to ease this transition for Newbies like myself to LinuxCNC; thereby helping build this great community – I’m giving back what I have learned. This is targeted to the audience of newbies that want a better desktop than is provided via the Live CD install. LinuxCNC community is not able to update to another distribution because of copy write concerns “branding ect..”. There are other threads in the forum discussing this issue further.
Not to discredit the live cd install process, but new guys like me enjoy the new “cutting edge” and shiny stuff
") So I hope I haven’t given any insult or disrespect to the huge undertaking performed by this community to build a live cd; by streamlining the install process and making installing extremely simple. As a testament --my personal experience using the live CD; I was up about an hour with LinuxCNC.
So I hope I haven’t given any insult or disrespect to the huge undertaking performed by this community to build a live cd; by streamlining the install process and making installing extremely simple. As a testament --my personal experience using the live CD; I was up about an hour with LinuxCNC.I’m a hobbyist and since I enjoy breaking everything I have; I started tinkering with it now I’m running with mint 18.1 among other distro’s with multiple kernels to test.
NOTE: My Ramblings END Here
Installing LinuxCNC and Linux Mint 18.1 (should work on most Mint and Linux Editions)
Download the ISO for Mint from here: linuxmint.com/download_all.php
The Distro I am using and this how to concerns; 18.1 32bit with Mate Desktop.
You can search Google for how to make an usb stick bootable with the above image or burn to disc. I personally use the command ‘dd’ to transfer the image to usb.
Install as usual > I install the 3rd party stuff [if you install 3rd party you may have to remove ndiswrapper and virtual box later on].. Also don’t overlook the autologin radio button in the same screen as where you input your username and password during install. After the install completes, reboot the computer and once inside of the desktop-- go ahead and install dependencies: you can copy and paste this entire command and paste it into terminal.
--Dependencies Install
Dependencies have packages/files that another program depends on – hence the name. When compiling code some files need to be linked to the compiler. Windows users are accustomed to having a program that just installs and basically includes everything to just work, sometimes
. Have you ever installed a windows program that said xyz.dll or C++ distro is required? This is the basic idea with Linux. When you issue the configure command, configure looks for files that the program stated it needs, also known as library’s. Sometimes a distro will no longer support older dependencies and that program was upgraded at one point or another. When that happens it becomes a search for the dependency your program requires. It can get quite painful when you can’t find it and have to go on a search.NOTE: Issue this command by copy/paste into terminal.
To update Linux Mint 18.1 to the latest software issue:
sudo apt-get dist-upgradesudo apt-get install devscripts build-essential imagemagick texlive-font-utils tcl8.6-dev tk8.6-dev libxaw7-dev libncurses-dev libreadline-gplv2-dev dblatex groff python-dev python-tk libglu1-mesa-dev libgtk2.0-dev asciidoc source-highlight libboost-python-dev texlive-lang-cyrillic debhelper texlive-lang-french texlive-lang-spanish texlive-lang-german libmodbus-dev dvipng libusb-1.0-0-dev graphviz inkscape python-numpy python-imaging-tk python-gtkglext1 tclreadline blt bwidget libtk-img tclx libudev-dev gstreamer0.10-plugins-base python-vte libqt4-dev libssl-dev texlive-lang-polish w3c-linkchecker libxenomai-dev git python-pil.imagetkNOTE: Go into package manager and remove ndiswrapper and virtual box. If these are not installed then don't worry about it, at worse case during the build process you get warnings and will not break the build if you elect to not removed these packages.
--New Kernel Install
The Kernel is just a brain for the operating system Linux. Distributions (Distro’s)-aka “Flavor” are only a collection of applications put together and released, such as MINT. Some distros change the behavior of where things are installed or some of the functions. That is why open source runs the world. Think android, iOS, Mac and the infrastructure of the internet. Windows has a kernel too, but people do not commonly build windows kernels. Another kernel allows you to use new features and updates while supporting new hardware, hence the 4.8 kernel I chose. In our case we use it for real time purposes. Also at the same time building the “drivers” into the kernel. Doing this means that a driver (think Wi-Fi, network and USB) does not “break” real time handling.
NOTE: For this entire process you will be in the root of your home folder. Example - if your name is sam, you will be in the sam folder.
NOTE: You can either choose to use your browser to download the kernel and patch or use the command ‘wget’.
The Kernel is located here: kernel.org/pub/linux/kernel/ The RT Patch is under kernel.org/pub/linux/kernel/projects/rt/
I chose to use 4.8.11 and patch 4.8.11 rt7 which is the latest patch for 4.8.11. You can try another kernel if you like.
CAUTION: In the xconfig step you MUST select the proper kernel if 64 bit, Very first option! If 32 bit you can leave this blank, the build will default to 32bit.
CAUTION: You MUST at the minimum select "Fully Preemptable Kernel" in the "Processor Types and Features" section. You can use the search function to find this easy.
wget ftp://ftp.kernel.org/pub/linux/kernel/v4.x/linux-4.8.11.tar.xz
wget https://www.kernel.org/pub/linux/kernel/projects/rt/4.8/older/patch-4.8.11-rt7.patch.gz
tar -xpf linux-4.8.11.tar.xz
gunzip patch-4.8.11-rt7.patch.gz
cp patch-4.8.11-rt7.patch linux-4.8.11
cd linux-4.8.11
cat patch-4.8.11-rt7.patch | patch -p1
make xconfig
make -j8
sudo make modules_install
sudo make install
After completing the build / install it will update the boot loader for your new kernel. (takes about 45 min for me)
NOTE: After a reboot you can select which kernel using the grub menu you see prior to loading Mint.
NOTE: Under the advance options for … ect
I like to use grub-customizer to make my selection of kernel persistent. You can read about it here;
ubuntuhandbook.org/index.php/2016/04/install-grub-customizer-ubuntu-16-04-lts
You can add it as a ppa like this:
sudo add-apt-repository ppa:danielrichter2007/grub-customizer
sudo apt-get update
sudo apt-get install grub-customizer
grub-customizer
Launch Grub-Customizer and you can then use it to select your kernel as a default boot option. Do not select the fail safe’s (fallbacks).
Reboot your computer selecting the new kernel however you have chosen to do that.
--Downloading and Building Linuxcnc
After a reboot issue:
uname -rMake sure you are in your new RT kernel prior to continuing, should be obvious because packaged kernels state -generic.
This is for information on the build process. Read this to understand the process.
You need to clone LinuxCNC into your home folder. Using the common naming scheme of linuxcnc-dev for the folder name. This will pull all branches including master into the linuxcnc-dev folder. Once executed it will be placed into your home folder. (If you were in your home folder when you issued the command). If you do not issue a git-checkout command during the build process you will build the current master branch. But for now let’s concentrate on just making sure we can build LinuxCNC.
Now let’s pull LinuxCNC into our folder linuxcnc-dev (should be in home directory when issue this command)
git clone git://github.com/linuxcnc/linuxcnc.git linuxcnc-devOnce you have “pulled” LinuxCNC into your home folder under linuxcnc-dev the next step is to check build dependencies:
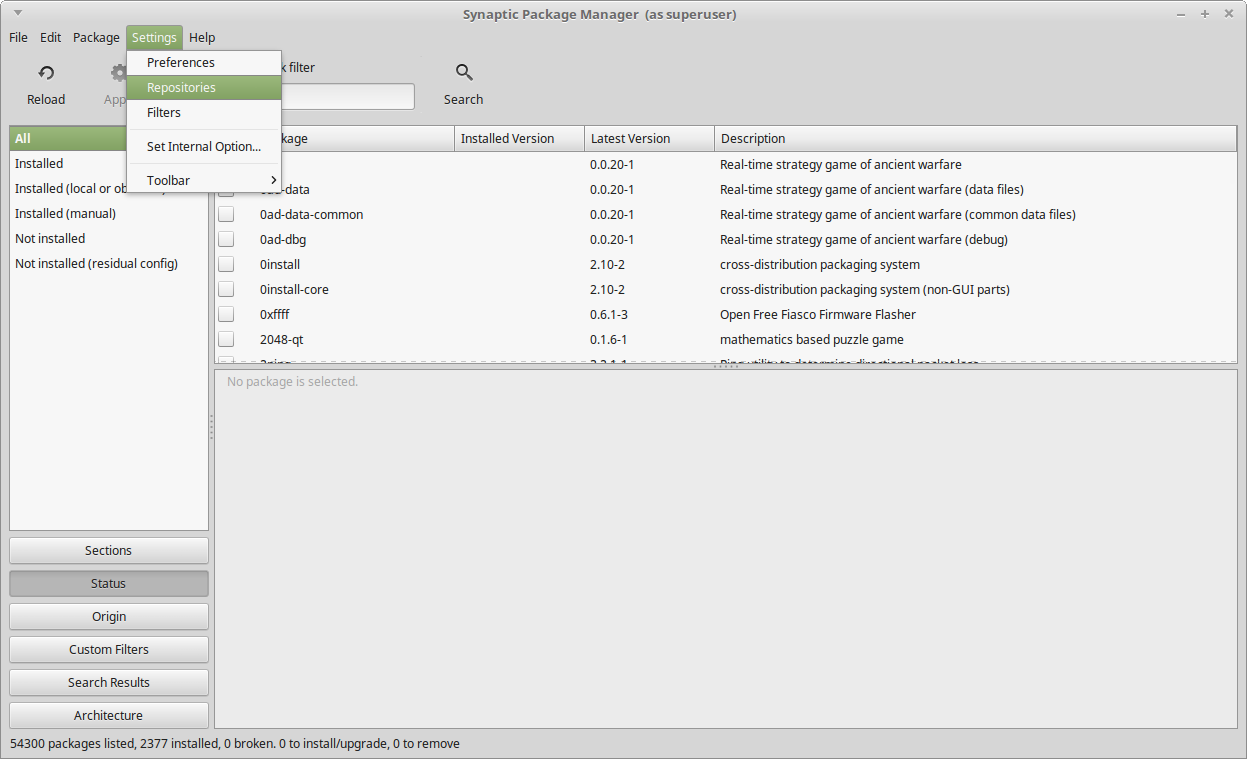
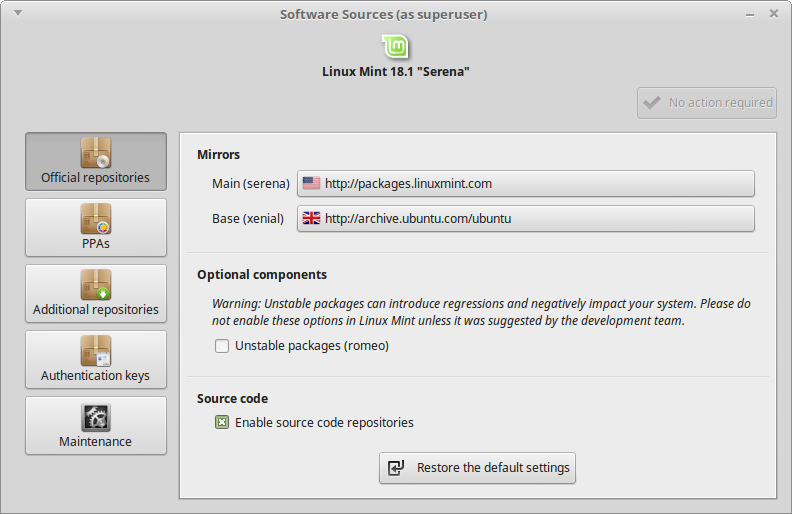
NOTE: You need to enable source repositories and apt-get update for the next steps using ./configure uspace. If you do not you will not be able to complete this step. Package Manager>Settings>Repositories> Check Mark - Enable Source Code Repositories.
NOTE: If you miss the step of [sudo apt-get update] and on a fresh install it is possible that apt does not know you have enabled the source code repositories and will fail complaining you may need to update apt.
sudo apt-get update
cd linuxcnc-dev
cd debian
./configure uspace
cd ..
dpkg-checkbuilddeps
Commonly reported dependency:
dpkg-checkbuilddeps: error: Unmet build dependencies: libgnomeprintui2.2-dev python-support tcl8.4-dev tk8.4-dev
To fix the issue above please issue this code:
sudo add-apt-repository 'deb http://mirrors.kernel.org/ubuntu precise main universe'
sudo apt-get update
sudo apt-get install libgnomeprintui2.2-dev python-support tcl8.4-dev tk8.4-dev
Install whatever it is complaining about using the “sudo apt-get install package_name”.
Once all build dependencies are satisfied you can complete the build process. For the scope of this how to I'm going to cover RIP builds. For a Run in Place Build (RIP) of Master Branch go into your linuxcnc-dev/src directory.
NOTE: You can issue a git-checkout to build something other than master. Such as:
git checkout 2.7Preempt-RT Kernel or sim:
 git checkout 2.7  [what ever branch you want, or skip this step for master]
 ./autogen.sh
 ./configure --with-realtime=uspace
 make clean
 make -j2    [the number of cpu cores you have- speeds up compiling-Parallel compilation]
 sudo make setuid
to run the LinuxCNC go back to the top level directory, and issue:
 . scripts/rip-environment
 ./linuxcnc
linuxcnc.org/docs/devel/html/code/building-linuxcnc.html
If you get an warning as below:
update-initramfs: Generating /boot/initrd.img-4.8.11-rt7
W: Possible missing firmware /lib/firmware/i915/kbl_guc_ver9_14.bin for module i915
W: Possible missing firmware /lib/firmware/i915/bxt_guc_ver8_7.bin for module i915
Warning: No support for locale: en_US.utf8bugs.launchpad.net/ubuntu/+source/linux-firmware/+bug/1611124
I will edit the main post to answer your questions so to keep the information in one post, as not to scatter it. Also, don't be shy to correct me. I'm a newbie after all
Correct information is more important that what I thought was correct. Disregard my spelling, grammar and all around writing style~! 
Please Log in or Create an account to join the conversation.
- cncnoob1979
-
Topic Author
- Offline
- Platinum Member
-
- Posts: 403
- Thank you received: 75
Post 1 = PREEMPT RT all source code building and installing LinuxCNC as a rip
Post 3 = RTAI Kernel install via apt, LinuxCNC build from source installing as a deb.
Post 4 = Just Give Me the CODE!!
Install Linux Mint as usual > I install the 3rd party stuff [if you install 3rd party you will have to remove ndiswrapper and virtual box later on]..
--Dependencies Install
To update Linux Mint 18.1 to the latest software issue:
sudo apt-get dist-upgradeNOTE: Issue this command by copy/paste into terminal.
sudo apt-get install devscripts build-essential imagemagick texlive-font-utils tcl8.6-dev tk8.6-dev libxaw7-dev libncurses-dev libreadline-gplv2-dev dblatex groff python-dev python-tk libglu1-mesa-dev libgtk2.0-dev asciidoc source-highlight libboost-python-dev texlive-lang-cyrillic debhelper texlive-lang-french texlive-lang-spanish texlive-lang-german libmodbus-dev dvipng libusb-1.0-0-dev graphviz inkscape python-numpy python-imaging-tk python-gtkglext1 tclreadline blt bwidget libtk-img tclx libudev-dev gstreamer0.10-plugins-base python-vte libqt4-dev libssl-dev texlive-lang-polish w3c-linkchecker libxenomai-dev git python-pil.imagetkNOTE: Go into package manager and remove ndiswrapper and virtual box. If these are not installed then don't worry about it, at worse case during the build process you get warnings and will not break the build if you elect to not removed these packages.
--New Kernel Download
NOTE: For this entire process you will be in the root of your home folder. Example - if your name is sam, you will be in the sam folder.
NOTE: You can either choose to use your browser to download the kernel and patch or use the command ‘wget’.
The Kernel is located here: kernel.org/pub/linux/kernel/
The RT Patch is located here: kernel.org/pub/linux/kernel/projects/
I chose to use 4.8.11 and patch 4.8.11 rt7 which is the latest patch for 4.8.11. You can try another kernel if you like.
CAUTION: In the xconfig step you MUST select the proper kernel if 64 bit, Very first option! If 32 bit you can leave this blank, the build will default to 32bit.
CAUTION: You MUST at the minimum select "Fully Preemptable Kernel" in the "Processor Types and Features" section. You can use the search function to find this easy.
In this posting I will cover building .deb packages for LinuxCNC and for the Linux kernel. The process is the same except for a few last lines. You'll notice that instead of the make ; make modules_install ; make install, this is replaced with Debian packager.
-Kernel creating a .deb to install
Copy / Paste these commands in sequence.
wget ftp://ftp.kernel.org/pub/linux/kernel/v4.x/linux-4.8.11.tar.xz
wget https://www.kernel.org/pub/linux/kernel/projects/rt/4.8/older/patch-4.8.11-rt7.patch.gz
tar -xpf linux-4.8.11.tar.xz
gunzip patch-4.8.11-rt7.patch.gz
cp patch-4.8.11-rt7.patch linux-4.8.11
cd linux-4.8.11
cat patch-4.8.11-rt7.patch | patch -p1
make xconfig
make -j4 deb-pkg
One executed **after the xconfig step** it will auto configure and compile - also sending this to the packager to create a deb file for you to install. Very easy! The benefits are being able to remove and reinstall the package easy. The down side is -- it does take awhile.
You will have multiple files created in your home folder. The files will be in your root home folder named linux-headers-4.9.4-rt2_4.9.4-rt2-2_i386.deb ; linux-image-4.9.4-rt2_4.9.4-rt2-2_i386.deb, modules and a multitude of others. You can tell via the size and naming scheme which to install. In my case I wanted to install the kernel headers, modules and also the actual kernel. My kernel package [.deb] was approximately 45MB.
To install the deb just click on the individual files and the package installer will open. Click install package and enter your su password. Do this for the headers, modules and the linux-image deb's.
After completing the build / install it will update the boot loader for your new kernel. (takes about 45 min for me)
NOTE: After a reboot you can select which kernel using the grub menu you see prior to loading Mint.
NOTE: Under the advance options for … ect
I like to use grub-customizer to make my selection of kernel persistent.
You can add it as a ppa like this:
sudo add-apt-repository ppa:danielrichter2007/grub-customizer
sudo apt-get update
sudo apt-get install grub-customizer
grub-customizer
Launch Grub-Customizer and you can then use it to select your kernel as a default boot option. Do not select the fail safe’s (fallbacks).
Reboot your computer selecting the new kernel however you have chosen to do that.
--Downloading and Configuring LinuxCNC
After a reboot issue:
uname -rMake sure you are in your new RT kernel prior to continuing, should be obvious because packaged kernels state -generic.
Now let’s pull LinuxCNC into our folder linuxcnc-dev (should be in home directory when issue this command)
git clone git://github.com/linuxcnc/linuxcnc.git linuxcnc-devOnce you have “pulled” LinuxCNC into your home folder under linuxcnc-dev the next step is to check build dependencies:
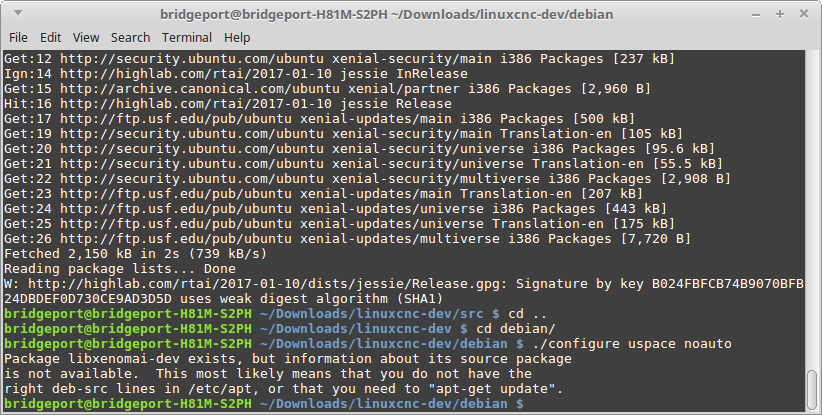
NOTE: You need to enable source repositories and apt-get update for the next steps using ./configure uspace. If you do not you will not be able to complete this step. Package Manager>Settings>Repositories> Check Mark - Enable Source Code Repositories.
HERE is a EXAMPLE of source code repositories not being enabled or not doing an apt-get update:

NOTE: If you miss the step of [sudo apt-get update] and on a fresh install it is possible that apt does not know you have enabled the source code repositories and will fail complaining you may need to update apt.
sudo apt-get update
cd linuxcnc-dev
cd debian
./configure uspace
This is what you are looking for SUCCESS!!:
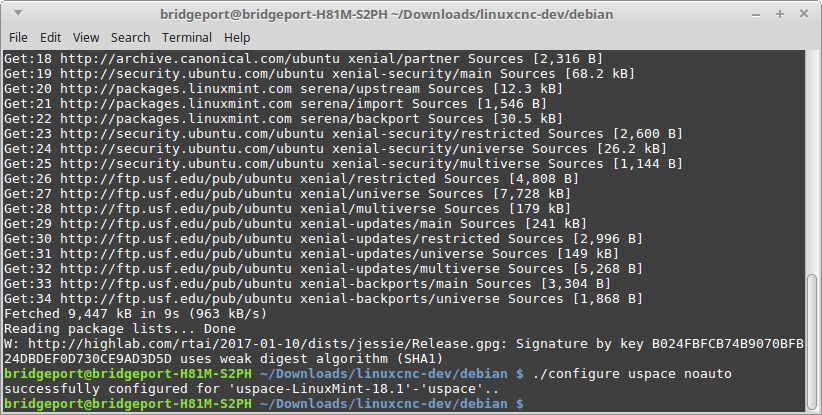
--Checking build dependencies
cd ..  [should now be inside of the root /linuxcnc-dev folder]
dpkg-checkbuilddeps
NOTE: Commonly reported dependency:
dpkg-checkbuilddeps: error: Unmet build dependencies: libgnomeprintui2.2-dev python-support tcl8.4-dev tk8.4-dev
To fix the issue above please issue this code:
sudo add-apt-repository 'deb http://mirrors.kernel.org/ubuntu precise main universe'
sudo apt-get update
sudo apt-get install libgnomeprintui2.2-dev python-support tcl8.4-dev tk8.4-dev
Install whatever it is complaining about using the “sudo apt-get install package_name”.
Once all build dependencies are satisfied you can complete the process. For a .deb install go into your linuxcnc-dev/src directory.
linuxcnc-dev/src/NOTE: You can issue a git-checkout to build something other than master. Such as:
git checkout 2.7--LinuxCNC creating a .deb to install
Here we have removed the setuid and there is no need to set an RIP environment. Using a deb to install has the benefits of being easily installed and used. It works exactly the same as the packaged one in the live-CD install.
Execute this code when you are ready to start building LinuxCNC, after checking build dependencies.
git checkout 2.7  [what ever branch you want, or skip this step for master]
debuild -uc -usNOTE: NOT REQUIRED IF THE ABOVE STEP WAS COMPLETED: Just for information, If you wold like to combine all these steps into a few lines: After cloning linuxcnc-dev and inside of the linuxcnc-dev/src/ directory ; You can check build dependencies / configure linuxcnc / and package into a deb the command's are this: This combines all the above commands to quickly build and configure. You will likely do this on subsequent installs.
git checkout 2.7 [what ever branch you want, or skip this step for master]
../debian/configure uspace ; debuild -uc -us
After completion you will have quite a few debs created here as well. You will have compiled all of the documentation and LinuxCNC.
In my case I needed the English doc's [linuxcnc-doc-en_2.8.0~pre1_all.deb] Also, the actual program [linuxcnc-uspace_2.8.0~pre1_i386.deb] around 4MB. You can delete the remainder or just keep them. I keep them in my Download folder. Install them as mentioned previously in the package manager.
NOTE: After completing the LinuxCNC install you will notice LinuxCNC is not listed in your Main Menu bar. The fix is to click on the menu bar select preferences [you might need to click all applications] > Main Menu > de-select CNC and each sub-menu listed under CNC, then re-select each one again. Thats it! All fixed.
Please Log in or Create an account to join the conversation.
- cncnoob1979
-
Topic Author
- Offline
- Platinum Member
-
- Posts: 403
- Thank you received: 75
Post 1 = PREEMPT RT all source code building and installing LinuxCNC as a rip
Post 2 = PREEMPT RT all source code building installing as .deb
Install Linux Mint as usual > I install the 3rd party stuff...
--Dependencies Install
NOTE: Issue this command by copy/paste into terminal.
To update Linux Mint 18.1 to the latest software issue:
sudo apt-get dist-upgradesudo apt-get install devscripts build-essential imagemagick texlive-font-utils tcl8.6-dev tk8.6-dev libxaw7-dev libncurses-dev libreadline-gplv2-dev dblatex groff python-dev python-tk libglu1-mesa-dev libgtk2.0-dev asciidoc source-highlight libboost-python-dev texlive-lang-cyrillic debhelper texlive-lang-french texlive-lang-spanish texlive-lang-german libmodbus-dev dvipng libusb-1.0-0-dev graphviz inkscape python-numpy python-imaging-tk python-gtkglext1 tclreadline blt bwidget libtk-img tclx libudev-dev gstreamer0.10-plugins-base python-vte libqt4-dev libssl-dev texlive-lang-polish w3c-linkchecker libxenomai-dev git python-pil.imagetkNOTE: I recommend going into package manager and removing ndiswrapper and virtual box. If these are not installed then don't worry about it, at worse case during a kernel build process you may get warnings, but this will not break the build, if you elected not to remove these packages.
--RTAI Kernel download and install via APT
WARNING: If using a 64Bit OS you must use the 4.1.0 kernel listed below. Or you must build a PREEMPTIVE RT 64bit Kernel listed in Posting 1&2 - I suggest Post 2. The RTAI 3.4.9 Kernel is for 32Bit OS's only.
In this section I will cover how to install the RTAI kernel. There are two versions for LinuxCNC tested by me. One being the 3.4.9 and the other 4.1, 4.1 is for testing only, so be warned. The 4.1.0 kernel was created by Sebastian Kuzminsky.
To get the 4.1 [32 bit or 64 bit] kernel via apt do;
sudo add-apt-repository 'deb http://highlab.com/rtai/2017-01-10/ jessie main'
wget http://highlab.com/rtai/2017-01-10/dists/archive-signing-key.gpg
sudo apt-key add archive-signing-key.gpg
sudo apt-get update

[finish with this section; for 64bit only]
sudo apt-get install linux-headers-4.1.0-1-rtai-amd64
sudo apt-get install rtai-modules-4.1.0-1
sudo apt-get install linux-image-4.1.0-1-rtai-amd64

[finish with this section; for 32bit only]
sudo apt-get install linux-headers-4.1.0-1-rtai-686-pae
sudo apt-get install rtai-modules-4.1.0-1
sudo apt-get install linux-image-4.1.0-1-rtai-686-pae
To get the 3.4 kernel [32 bit only] via apt do;
sudo apt-key adv --keyserver hkp://keys.gnupg.net --recv-key 3cb9fd148f374fef
sudo add-apt-repository "deb http://linuxcnc.org/ precise base 2.7-rtai"
sudo apt-get update
sudo apt-get install linux-headers-3.4-9-rtai-686-pae rtai-modules-3.4-9-rtai-686-pae linux-image-3.4-9-rtai-686-pae NOTE: After a reboot you can select which kernel using the grub menu you see prior to loading Mint.
NOTE: Under the advance options for … ect
I like to use grub-customizer to make my selection of kernel persistent. You can read about it here;
ubuntuhandbook.org/index.php/2016/04/ins...er-ubuntu-16-04-lts/
You can add it as a ppa like this:
sudo add-apt-repository ppa:danielrichter2007/grub-customizer
sudo apt-get update
sudo apt-get install grub-customizer
grub-customizer
Launch Grub-Customizer and you can then use it to select your kernel as a default boot option. Do not select the fail safe’s (fallbacks).
Reboot your computer selecting the new kernel however you have chosen to do that.
--Downloading and Configuring LinuxCNC
After a reboot issue:
uname -rMake sure you are in your new RTAI kernel prior to continuing, should be obvious because packaged kernels state -generic.
Now let’s pull LinuxCNC into our folder linuxcnc-dev (should be in home directory when issue this command)
git clone git://github.com/linuxcnc/linuxcnc.git linuxcnc-devOnce you have “pulled” LinuxCNC into your home folder under linuxcnc-dev the next step is to check build dependencies:
NOTE: You need to enable source repositories and apt-get update for the next steps using ./configure -r. If you do not you will not be able to complete this step. Package Manager>Settings>Repositories> Check Mark - Enable Source Code Repositories.
[This is using uspace not RTAI / commands are similar] EXPECTED ERROR of source code repositories that are not enabled or not doing an apt-get update:
NOTE: If you miss the step of [sudo apt-get update] and on a fresh install it is possible that apt does not know you have enabled the source code repositories and will fail complaining you may need to update apt.
sudo apt-get update
cd linuxcnc-dev
cd debian
./configure -r
[Example only [This is using uspace not RTAI / commands are similar] This is what you are looking for SUCCESS!!:

--Checking build dependencies
cd ..  [should now be inside of the root /linuxcnc-dev folder]
dpkg-checkbuilddeps
NOTE: Commonly reported dependency:
dpkg-checkbuilddeps: error: Unmet build dependencies: libgnomeprintui2.2-dev python-support tcl8.4-dev tk8.4-dev
To fix the issue above please issue this code:
sudo add-apt-repository 'deb http://mirrors.kernel.org/ubuntu precise main universe'
sudo apt-get update
sudo apt-get install libgnomeprintui2.2-dev python-support tcl8.4-dev tk8.4-dev
Install whatever it is complaining about using the “sudo apt-get install package_name”.
Once all build dependencies are satisfied you can complete the process. For a .deb install go into your linuxcnc-dev/src directory.
NOTE: You can issue a git-checkout to build something other than master. Such as:
git checkout 2.7--LinuxCNC creating a .deb to install
Here we have removed the setuid and there is no need to set an RIP environment. Using a deb to install has the benefits of being easily installed and used. It works exactly the same as the packaged one in the live-CD install.
Execute this code when you are ready to start building LinuxCNC, after checking build dependencies.
git checkout 2.7  [what ever branch you want, or skip this step for master]
debuild -uc -usNOTE: NOT REQUIRED IF THE ABOVE STEP WAS COMPLETED: Just for information, If you wold like to combine all these steps into a few lines: After cloning linuxcnc-dev and inside of the linuxcnc-dev/src/ directory ; You can check build dependencies / configure linuxcnc / and package into a deb the command's are this: This combines all the above commands to quickly build and configure. You will likely do this on subsequent installs.
git checkout 2.7 [what ever branch you want, or skip this step for master]
../debian/configure -r; debuild -uc -us
After completion you will have quite a few debs created here as well. You will have compiled all of the documentation and LinuxCNC.
In my case I needed the English doc's [linuxcnc-doc-en_2.8.0~pre1_all.deb] Also, the actual program [linuxcnc-uspace_2.8.0~pre1_i386.deb] around 4MB. You can delete the remainder or just keep them. I keep them in my Download folder. Install them as mentioned previously in the package manager.
NOTE: After completing the LinuxCNC install you will notice LinuxCNC is not listed in your Main Menu bar. The fix is to click on the menu bar select preferences [you might need to click all applications] > Main Menu > de-select CNC and each sub-menu listed under CNC, then re-select each one again. Thats it! All fixed.
Please Log in or Create an account to join the conversation.
- cncnoob1979
-
Topic Author
- Offline
- Platinum Member
-
- Posts: 403
- Thank you received: 75
Post 1 = PREEMPT RT all source code building and installing LinuxCNC as a rip
Post 2 = PREEMPT RT all source code building installing as .deb
Post 3 = RTAI Kernel install via apt, LinuxCNC build from source installing as a deb.
Enable Source Code repositories then:
sudo apt-get dist-upgradesudo apt-get install devscripts build-essential imagemagick texlive-font-utils tcl8.6-dev tk8.6-dev libxaw7-dev libncurses-dev libreadline-gplv2-dev dblatex groff python-dev python-tk libglu1-mesa-dev libgtk2.0-dev asciidoc source-highlight libboost-python-dev texlive-lang-cyrillic debhelper texlive-lang-french texlive-lang-spanish texlive-lang-german libmodbus-dev dvipng libusb-1.0-0-dev graphviz inkscape python-numpy python-imaging-tk python-gtkglext1 tclreadline blt bwidget libtk-img tclx libudev-dev gstreamer0.10-plugins-base python-vte libqt4-dev libssl-dev texlive-lang-polish w3c-linkchecker libxenomai-dev git python-pil.imagetk--Kernel install PREEMPTIVE RT
wget ftp://ftp.kernel.org/pub/linux/kernel/v4.x/linux-4.8.11.tar.xz
wget https://www.kernel.org/pub/linux/kernel/projects/rt/4.8/older/patch-4.8.11-rt7.patch.gz
tar -xpf linux-4.8.11.tar.xz
gunzip patch-4.8.11-rt7.patch.gz
cp patch-4.8.11-rt7.patch linux-4.8.11
cd linux-4.8.11
cat patch-4.8.11-rt7.patch | patch -p1
make xconfig
make -j8
sudo make modules_install
sudo make install
--Install with .deb
make -j4 deb-pkg--Kernel install RTAI 4.1 or 3.4.9
sudo add-apt-repository 'deb http://highlab.com/rtai/2017-01-10/ jessie main'
wget http://highlab.com/rtai/2017-01-10/dists/archive-signing-key.gpg
apt-key add archive-signing-key.gpg
sudo apt-get update
sudo apt-get install linux-image-4.1.0-1-rtai-amd64    [64bit only]
sudo apt-get install linux-image-4.1.0-1-rtai-686-pae  [32bit only]
sudo apt-get install rtai-modules-4.1.0-1
sudo apt-key adv --keyserver hkp://keys.gnupg.net --recv-key 3cb9fd148f374fef
sudo add-apt-repository "deb http://linuxcnc.org/ precise base 2.7-rtai"
sudo apt-get update
sudo apt-get install linux-headers-3.4-9-rtai-686-pae rtai-modules-3.4-9-rtai-686-pae linux-image-3.4-9-rtai-686-paeReboot
--LinuxCNC
git clone git://github.com/linuxcnc/linuxcnc.git linuxcnc-devsudo apt-get update
cd linuxcnc-dev
cd debian
./configure uspace [ or ./configure -r]
cd ..
dpkg-checkbuilddeps--Install as RIP
git checkout 2.7
./autogen.sh
./configure --with-realtime=uspace  [or --with-realtime=/usr/realtime-$VERSION]
make clean
make -j2
sudo make setuid
--Execute RIP environment
. scripts/rip-environment
./linuxcncgit checkout 2.7
debuild -uc -usPlease Log in or Create an account to join the conversation.
- rodw
-

- Offline
- Platinum Member
-
- Posts: 12047
- Thank you received: 4113
When building the kernel, it is very time consuming, particularly after the xconfig step. I rolled this into a bash script but I found that the sudo password timed out and when I got up in the morning, it was paused waiting for a password. So try this.
Save the following into a file called kernel-4.8.11.sh making sure you set your password
#!/bin/bash
wget ftp://ftp.kernel.org/pub/linux/kernel/v4.x/linux-4.8.11.tar.xz
wget https://www.kernel.org/pub/linux/kernel/projects/rt/4.8/older/patch-4.8.11-rt7.patch.gz
tar -xpf linux-4.8.11.tar.xz
gunzip patch-4.8.11-rt7.patch.gz
cp patch-4.8.11-rt7.patch linux-4.8.11
cd linux-4.8.11
cat patch-4.8.11-rt7.patch | patch -p1
make xconfig
make -j8
sudo -S <<< "password" make modules_install
sudo -S <<< "password" make install
then run bash ./kernel-4.8.11.sh
Now I have not tried the last 2 lines, but you should not need to enter your password and after xconfig, you can go to bed and let Linux do the heavy lifting for you!
The other shortcut is for those using a Mesa ethernet card. If you are like me while you are building your machine, you are forever powering down the Mesa card to change something. This breaks the network and the normal commands I used in Wheezy did not work in Mint. Save this into a file called netstart.sh
#!/bin/bash
sudo service network-manager stop
sudo rm /var/lib/NetworkManager/NetworkManager.state
sudo service network-manager start
Then run bash ./netstart.sh to restart your network.
Please Log in or Create an account to join the conversation.
- bevins
-
- Offline
- Platinum Member
-
- Posts: 1947
- Thank you received: 338
#!/bin/bash
sudo service network-manager stop
sudo rm /var/lib/NetworkManager/NetworkManager.state
sudo service network-manager start
Then run bash ./netstart.sh to restart your network.
Shouldn't there be a "service network-manager restart" command?
Please Log in or Create an account to join the conversation.
- Rolquin
- Offline
- New Member
-

- Posts: 9
- Thank you received: 0
I have not been complete this step: Package Manager>Settings>Repositories> Check Mark - Enable Source Code Repositories.
For some reason the check mark option is not active in synaptic manager.
Is there any way to get this option active ?
Thanks.
Please Log in or Create an account to join the conversation.
- rodw
-
- Offline
- Platinum Member
-
- Posts: 12047
- Thank you received: 4113
#!/bin/bash
sudo service network-manager stop
sudo rm /var/lib/NetworkManager/NetworkManager.state
sudo service network-manager start
Then run bash ./netstart.sh to restart your network.
Shouldn't there be a "service network-manager restart" command?
Bevins, There is, last line...
Please Log in or Create an account to join the conversation.
- rodw
-
- Offline
- Platinum Member
-
- Posts: 12047
- Thank you received: 4113
I have not been complete this step: Package Manager>Settings>Repositories> Check Mark - Enable Source Code Repositories.
I think you are looking in Synaptic, not Package Manager. Remember that everything in Linux is configured via text files and Package Manager and Synaptic are GUI interfaces to allow you to edit the relevant text files with less pain.. These 2 programs kind of overlap and there are others as well.
Please Log in or Create an account to join the conversation.
- cncnoob1979
-
Topic Author
- Offline
- Platinum Member
-
- Posts: 403
- Thank you received: 75
Is package manager asking you for your su password when you open it?
You should have a screen like so:
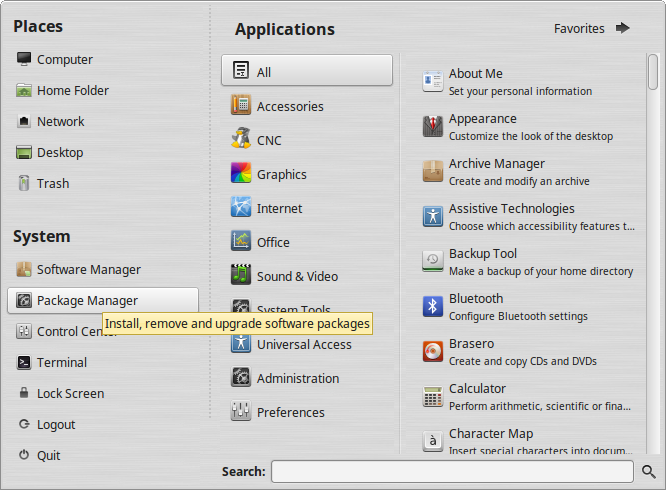
EDIT: sorry I said synaptic; meant synaptic package manager in my response.
Please Log in or Create an account to join the conversation.
- LinuxCNC
- Installing LinuxCNC
- Complete HOW-TO Linux Mint 18.1 32/64 RTAI or PREEMPT with RIP install or deb