Touch Plate Explanation please
- Aciera
-

- Offline
- Administrator
-

Less
More
- Posts: 4615
- Thank you received: 2042
27 Nov 2020 14:27 - 27 Nov 2020 14:31 #190443
by Aciera
Replied by Aciera on topic Touch Plate Explanation please
In cases like this it is often useful to start your config from the terminal. So open a terminal window and type (make sure the path is correct for your system) and then see if there are any errors in the terminal window:
$ linuxcnc linuxcnc/configs/Router/Router.ini
So this way, one thing I found is this:
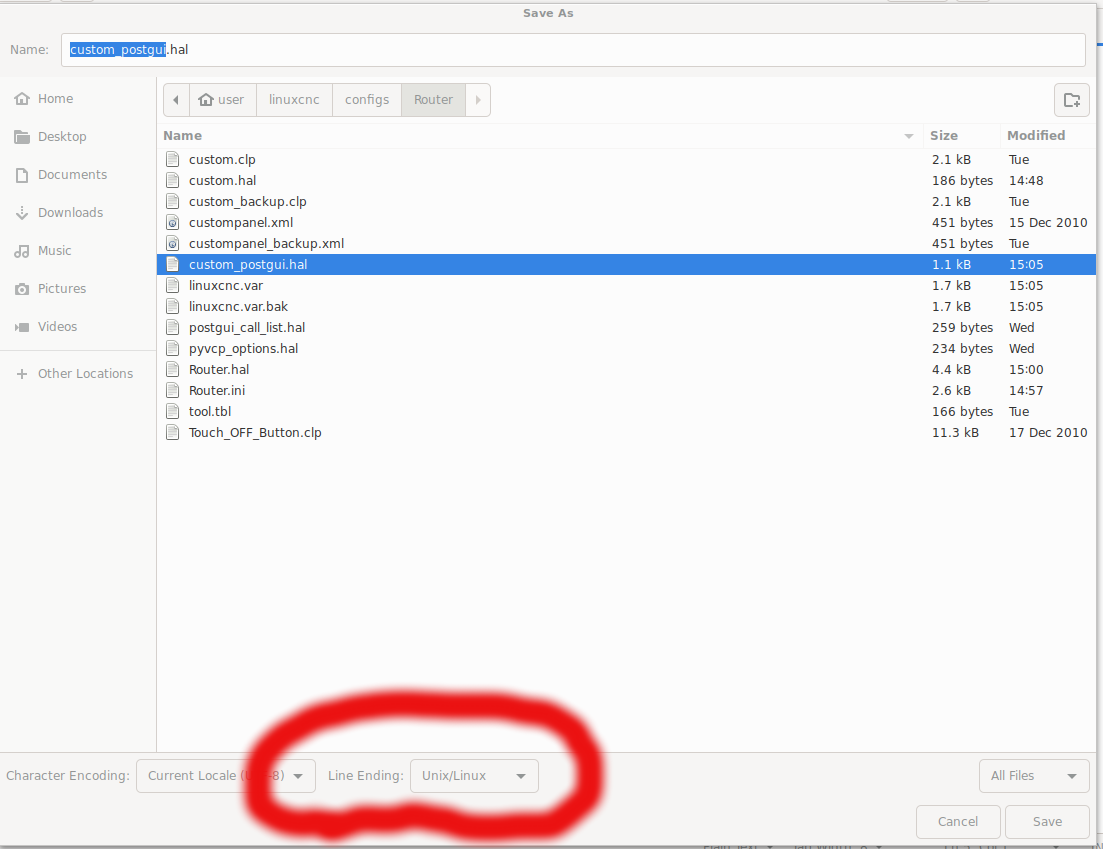
Looks like you edited your file with something else than a plain text editor.
So open "custom_postgui.hal" up in gedit and choose Save As end then for "Line Ending" at the bottom of the window :
Then:
You are loading to classicladders. I'm not even sure that is allowed but maybe its ok. custom.clp doesn't load for me at all.
So may be try to change
loadusr classicladder --nogui custom.clp
to
loadusr classicladder custom.clp
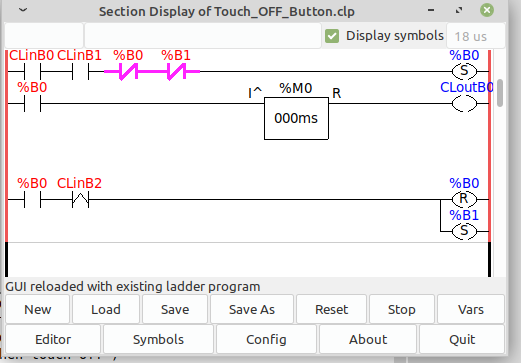
as this will load a window with the ladder gui so you can see what is happening when you try stuff.
[edit]
looks like this:
$ linuxcnc linuxcnc/configs/Router/Router.ini
So this way, one thing I found is this:
custom_postgui.hal:6: Warning: File contains DOS-style line endings.Looks like you edited your file with something else than a plain text editor.
So open "custom_postgui.hal" up in gedit and choose Save As end then for "Line Ending" at the bottom of the window :
Then:
You are loading to classicladders. I'm not even sure that is allowed but maybe its ok. custom.clp doesn't load for me at all.
So may be try to change
loadusr classicladder --nogui custom.clp
to
loadusr classicladder custom.clp
as this will load a window with the ladder gui so you can see what is happening when you try stuff.
[edit]
looks like this:
Attachments:
Last edit: 27 Nov 2020 14:31 by Aciera.
Please Log in or Create an account to join the conversation.
- shortcircuit48
- Offline
- Premium Member
-

Less
More
- Posts: 131
- Thank you received: 3
27 Nov 2020 15:45 - 27 Nov 2020 15:54 #190456
by shortcircuit48
Replied by shortcircuit48 on topic Touch Plate Explanation please
I followed the terminal commands and I post results which did not show any errors.
I had on early doors used a text editor until I remebered gedit I have managed to load the Classic ladder and it looks like what you have posted but I am all at sea with this. I will potter about/search google until I get something that will be informative, hopefully.
Certainly keeping the brain active.
Thanks again
Last edit: 27 Nov 2020 15:54 by shortcircuit48.
Please Log in or Create an account to join the conversation.
- Aciera
-

- Offline
- Administrator
-

Less
More
- Posts: 4615
- Thank you received: 2042
27 Nov 2020 16:13 - 27 Nov 2020 16:33 #190458
by Aciera
Replied by Aciera on topic Touch Plate Explanation please
Ok your path is different:
Go to ~/linuxcnc/configs/Router
type ls and you should see all the files just like in your screenshot.
then try
and that should start your machine config.
[edit]
As for what you're seeing:
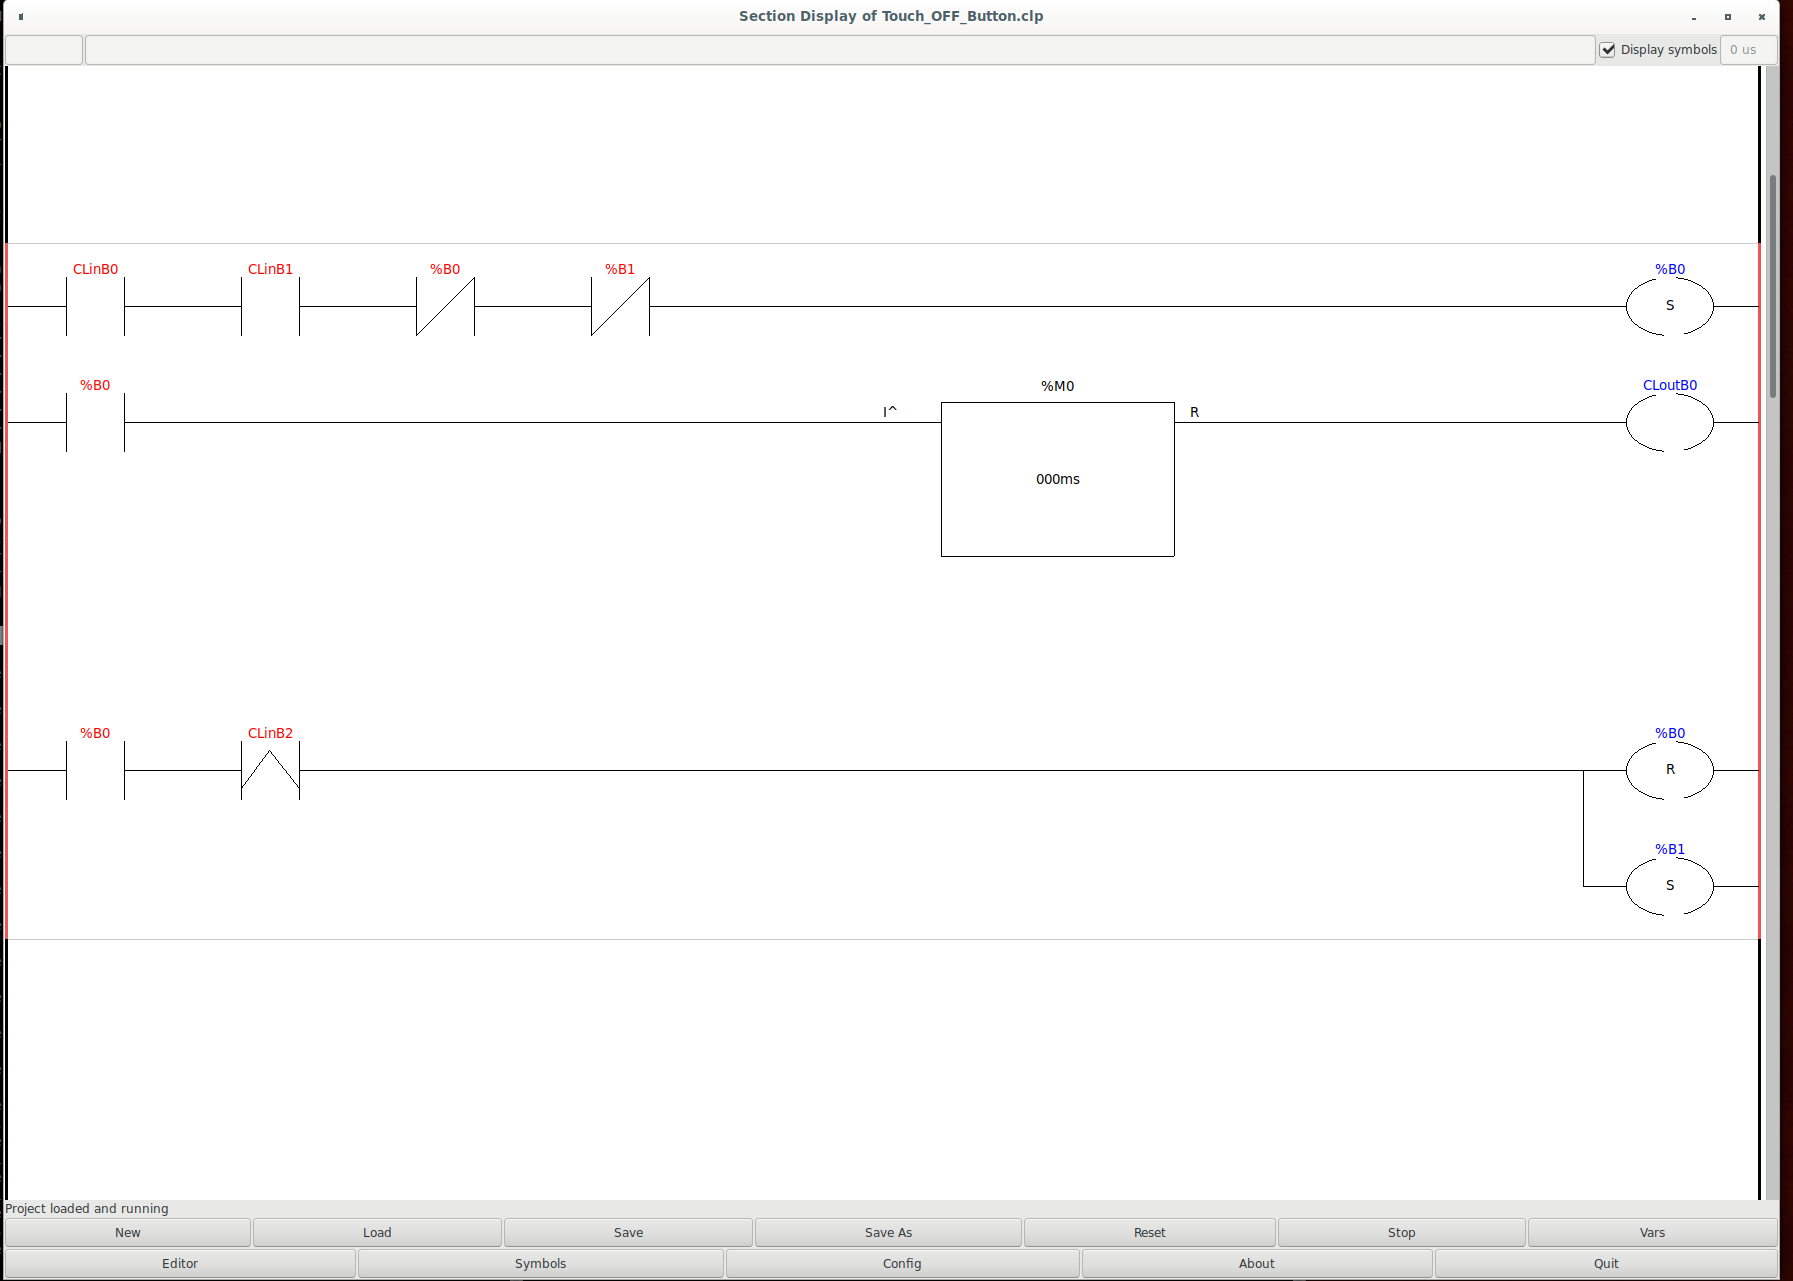
"CLinB0" is this in your custom_postgui.hal : net remote-z-axis-touchoff classicladder.0.in-00 <= pyvcp.z-axis-touchoff
"CLinB1" is: net mode halui.mode.is-mdi => classicladder.0.in-01
"CLinB2" is: #net in_pos motion.motion-inpos => classicladder.0.in-02 (so this will never turn to true because it's commented out!)
"CLoutB0" is: net z-touchoff classicladder.0.out-00 => halui.mdi-command-00
"CLoutB1" is: net z-zero classicladder.0.out-01 => halui.mdi-command-01
"CLoutB2" is: #net rapid-away classicladder.0.out-02 => halui.mdi-command-02 (which is also commented out for some reason)
The whole diagram is fairly easy to understand. Its just like an electric circuit:
-| |- is a normally open switch, so it needs to go TRUE to let the signal pass from left to right.
-|/|- is a normally closed switch, so it needs to be FALSE to let the signal pass from left to right.
-( ) is an output
-(S) means if the signal reaches it all the way from the left side of the window is sets the corresponding output to TRUE
-(R) means if the signal reaches it all the way from the left side of the window it set the corresponding output to FALSE
then you also have some timer blocks that create delays and such.
The nice thing is you can watch what happens as you press the buttons.
Have a look if those lines in your "custom_postgui.hal" should really be commented out (the leading #).
Go to ~/linuxcnc/configs/Router
type ls and you should see all the files just like in your screenshot.
then try
linuxcnc Router.iniand that should start your machine config.
[edit]
As for what you're seeing:
"CLinB0" is this in your custom_postgui.hal : net remote-z-axis-touchoff classicladder.0.in-00 <= pyvcp.z-axis-touchoff
"CLinB1" is: net mode halui.mode.is-mdi => classicladder.0.in-01
"CLinB2" is: #net in_pos motion.motion-inpos => classicladder.0.in-02 (so this will never turn to true because it's commented out!)
"CLoutB0" is: net z-touchoff classicladder.0.out-00 => halui.mdi-command-00
"CLoutB1" is: net z-zero classicladder.0.out-01 => halui.mdi-command-01
"CLoutB2" is: #net rapid-away classicladder.0.out-02 => halui.mdi-command-02 (which is also commented out for some reason)
The whole diagram is fairly easy to understand. Its just like an electric circuit:
-| |- is a normally open switch, so it needs to go TRUE to let the signal pass from left to right.
-|/|- is a normally closed switch, so it needs to be FALSE to let the signal pass from left to right.
-( ) is an output
-(S) means if the signal reaches it all the way from the left side of the window is sets the corresponding output to TRUE
-(R) means if the signal reaches it all the way from the left side of the window it set the corresponding output to FALSE
then you also have some timer blocks that create delays and such.
The nice thing is you can watch what happens as you press the buttons.
Have a look if those lines in your "custom_postgui.hal" should really be commented out (the leading #).
Last edit: 27 Nov 2020 16:33 by Aciera.
Please Log in or Create an account to join the conversation.
- shortcircuit48
- Offline
- Premium Member
-

Less
More
- Posts: 131
- Thank you received: 3
27 Nov 2020 19:06 #190466
by shortcircuit48
Replied by shortcircuit48 on topic Touch Plate Explanation please
Well, nearly there.
I can start programme from terminal.
Went through the custom_postgui.hal and edited
I can get the touch-off button to work but I have to do a G92.2 manually first.
Although I saw changes in the ladder monitor I did not see the switches closing.
Will continue to attempt to resolve.
Thanks again
I can start programme from terminal.
Went through the custom_postgui.hal and edited
I can get the touch-off button to work but I have to do a G92.2 manually first.
Although I saw changes in the ladder monitor I did not see the switches closing.
Will continue to attempt to resolve.
Thanks again
Please Log in or Create an account to join the conversation.
- shortcircuit48
- Offline
- Premium Member
-

Less
More
- Posts: 131
- Thank you received: 3
27 Nov 2020 22:08 #190473
by shortcircuit48
Replied by shortcircuit48 on topic Touch Plate Explanation please
Hopefully I have worked this out and would be grateful for confirmation
MDI_COMMAND = G38.2 Z-2 f16
MDI_COMMAND = G92 Z0.25
MDI_COMMAND = G0 Z0.75
MDI_COMMAND = G92 x2 y-.5
The first command takes the probe down to the touch plate a maximum of 2mm at a rate of 16.
When the plate touches the second command memorises where it is and then adjust the position by 0.25mm which is the thickness of the touch plate being the workpiece zero.
The third command raises the probe 0.75mm
The fourth command has nothing to do with the probe but allows a new X and Y points to be set on the work surface at a new start point (I m not sure about this. I changed to X=0 and Y=0 and this set a new home zero)
Grateful for any comments to correct me if my assumptions are incorrect.
Please Log in or Create an account to join the conversation.
- Aciera
-

- Offline
- Administrator
-

Less
More
- Posts: 4615
- Thank you received: 2042
28 Nov 2020 08:36 #190493
by Aciera
Replied by Aciera on topic Touch Plate Explanation please
Sounds correct to me.
I guess you have already found this:
linuxcnc.org/docs/html/gcode/g-code.html
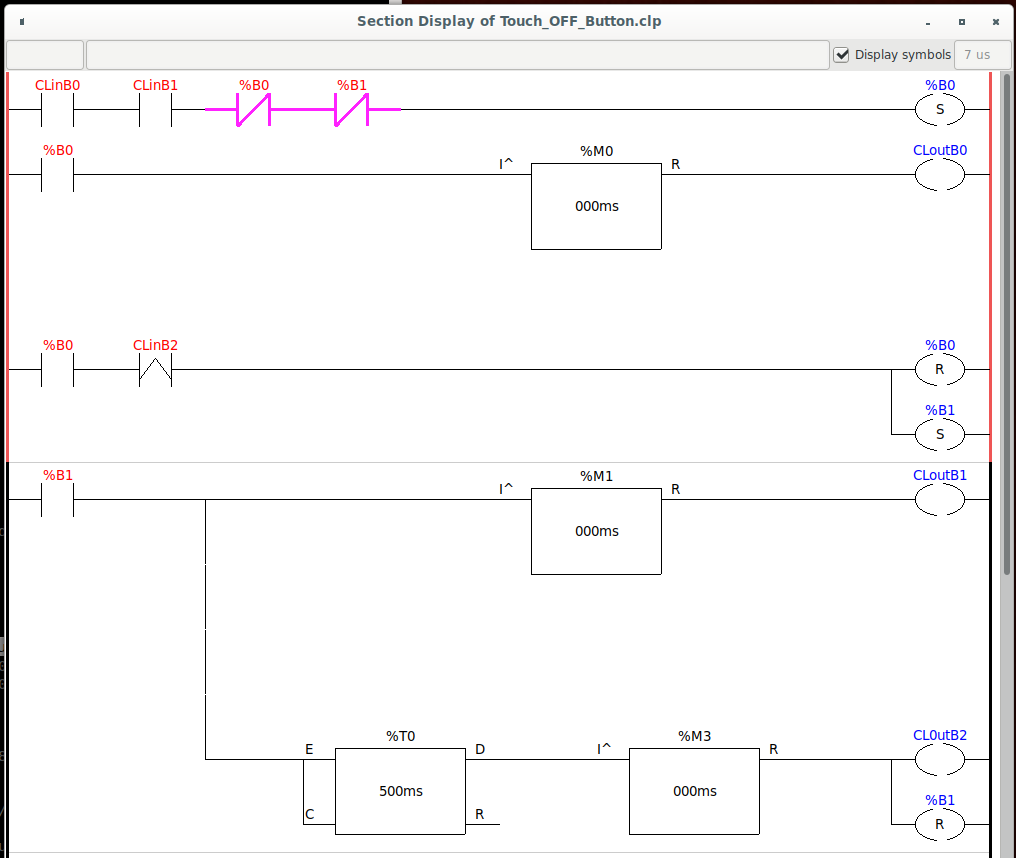
Touch_OFF_Button.clp (I deleted the empty rungs so its nice and compact): If you are in MDI mode (CLinB1) and press the button on the screen (CLinB0) it automatically steps through the MDI commands 1,2 and 3 one after the other with short delays in between.
Just for general housekeeping: I would comment out loading that ladder at the bottom in Router.hal as I don't see it doing anything useful. But maybe you know why it is there?
# Load Classicladder without GUI (can reload LADDER GUI in AXIS GUI
loadusr classicladder --nogui custom.clp
Attachments:
Please Log in or Create an account to join the conversation.
- shortcircuit48
- Offline
- Premium Member
-

Less
More
- Posts: 131
- Thank you received: 3
28 Nov 2020 08:53 - 28 Nov 2020 09:01 #190496
by shortcircuit48
Replied by shortcircuit48 on topic Touch Plate Explanation please
Thanks again and yes I had that link but eventually took time to read and understand.
As I said previously, "I can get the touch-off button to work but I have to do a G92.2 manually first" Is this normal?
&.
"Although I saw changes in the ladder monitor I did not see the switches closing." I did observe that LinB1 does not close unless I operate as above?
Thanks again.
Edit How am I classed as an "Expert Boarder"?
Last edit: 28 Nov 2020 09:01 by shortcircuit48.
Please Log in or Create an account to join the conversation.
- Aciera
-

- Offline
- Administrator
-

Less
More
- Posts: 4615
- Thank you received: 2042
28 Nov 2020 09:01 #190497
by Aciera
You mean it does not close unless you do a manual G92.2 first? It should turn on as soon as you enter MDI mode.
Replied by Aciera on topic Touch Plate Explanation please
I did observe that LinB1 does not close unless I operate as above?
You mean it does not close unless you do a manual G92.2 first? It should turn on as soon as you enter MDI mode.
Please Log in or Create an account to join the conversation.
- shortcircuit48
- Offline
- Premium Member
-

Less
More
- Posts: 131
- Thank you received: 3
28 Nov 2020 09:39 - 28 Nov 2020 09:39 #190498
by shortcircuit48
Replied by shortcircuit48 on topic Touch Plate Explanation please
Correct. To get the touch button to work I have to manually do G92.2 first and only once as I can re-touchoff again.
Last edit: 28 Nov 2020 09:39 by shortcircuit48.
Please Log in or Create an account to join the conversation.
- Aciera
-

- Offline
- Administrator
-

Less
More
- Posts: 4615
- Thank you received: 2042
28 Nov 2020 10:42 #190501
by Aciera
Replied by Aciera on topic Touch Plate Explanation please
Just checked and sure enough just switching to the MDI window does not turn halui.mode-is-mdi pin on. It only turns on after a command has been issued, that is ANY command followed by the enter key.
Now this seems to be a quirk of the axis GUI because in gmoccapy, which I use, halui.mode-is-mdi comes on as soon as I change into the MDI tab in the GUI.
Now this seems to be a quirk of the axis GUI because in gmoccapy, which I use, halui.mode-is-mdi comes on as soon as I change into the MDI tab in the GUI.
Please Log in or Create an account to join the conversation.
Time to create page: 0.143 seconds

