
- Posts: 5711
- Thank you received: 2100
Another plasma component...
- phillc54
- Offline
- Platinum Member
-

Less
More
7 years 4 months ago #136870
by phillc54
Cheers, Phill.
Replied by phillc54 on topic Another plasma component...
Yes, that is how it is supposed to work. You will need to adjust the Delay value in the THC frame of the run tab to tune it to your requirements, probably start at about 1 second and move around from there. This is to give the arc voltage time to stabilise before it obtains the sample voltage.So quick question. I was reading through the readme because I was wondering if “auto volts” did what I hoped it would. There is not much listed about it but what exzactly is it and how is it properly used. I’m hoping it’s somthing that will sample the stable voltage right after it starts cutting at a specified height. It would then associate the cutstart height with the sampled voltage and hold that voltage.
Cheers, Phill.
Please Log in or Create an account to join the conversation.
- islander261
- Offline
- Platinum Member
-
Less
More
- Posts: 757
- Thank you received: 216
7 years 4 months ago #136878
by islander261
Replied by islander261 on topic Another plasma component...
Guys
While this isn't Plasmac specific it seems we do drift into general plasma procedures often here. If you want details on cutting accurate small holes look up the sales sheets on Hypertherm's "True Hole Technology" also look on plasmaspider, user seanp has posted extensively on his work using simple air plasma.
The generally accepted method to get good holes from 37mm dia. and down to material thickness with minimal taper using an air plasma is:
1, Use recommended cutting current for consumables.
2. Use fixed (no THC) recommended cutting height for consumables.
3. Cut at 60% to 70% of recommended feed rate for consumables and material.
4. Start lead in at or near center of hole.
5. Use perpendicular lead in.
6. No lead out, either a slight over burn or early torch off depending on what works best for you.
You will need to experiment to get exact hole size because the kerf with this method will be wider than your usual straight cut.
John
Please Log in or Create an account to join the conversation.
- rodw
- Offline
- Platinum Member
-
Less
More
- Posts: 12170
- Thank you received: 4153
7 years 4 months ago #136879
by rodw
JTK, If you click through to the Gmocappy setup screen you can fire up halscope and gather some data about your machine while cutting. Here is an example I stole from my Spaceship plasma thread
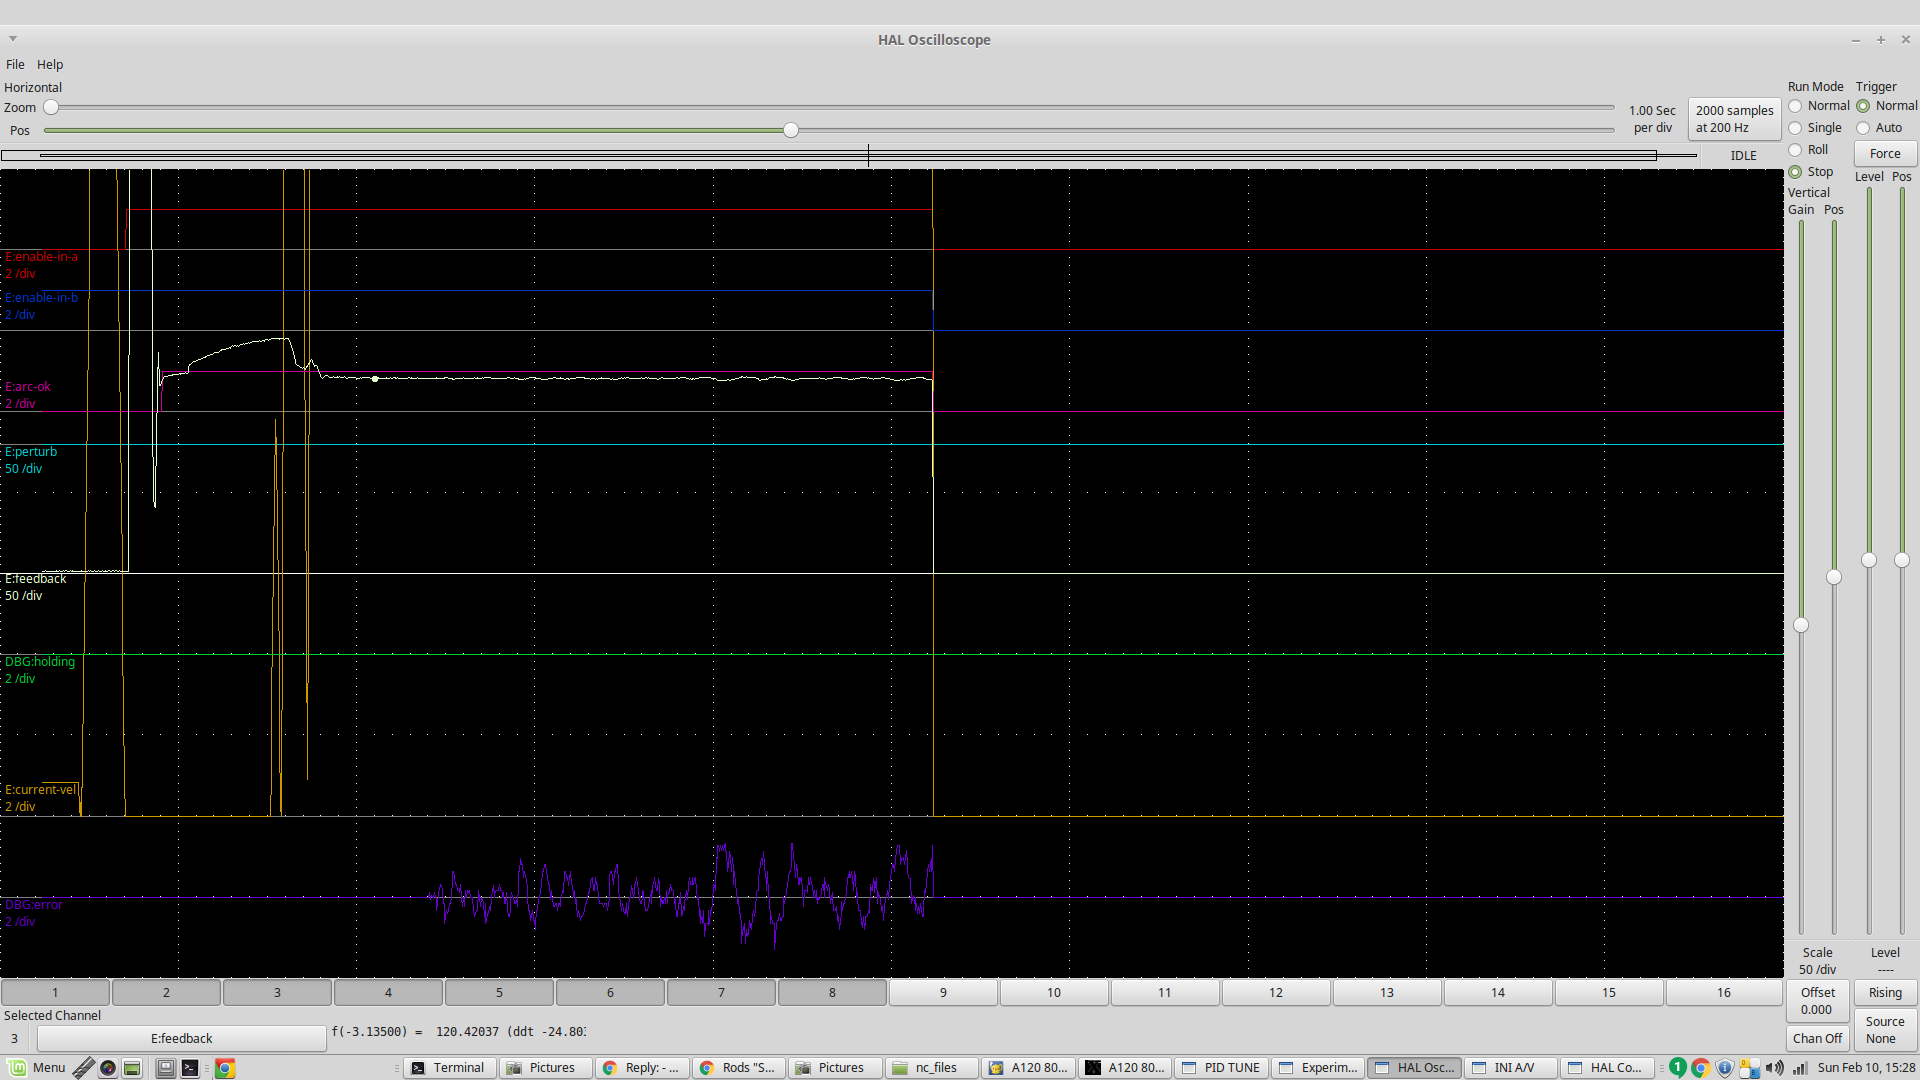
Here the green line is the cut voltage and you can see it peak on the pierce and than fall back to a stable voltage.
The blue line represents the error between actual and commanded voltage which starts as the THC turns on (at the white dot) 1.5 seconds into the cut. Its that initial peak that you must wait out before enabling torch voltage sampling. I might add, I have been doing this for a long time pre plasmac with my own component. I've never relied on the cut chart voltage. I settled on 1.5 seconds before sampling and that does not change much with material thickenss or amperage.
Replied by rodw on topic Another plasma component...
JTknives wrote: So quick question. I was reading through the readme because I was wondering if “auto volts” did what I hoped it would. There is not much listed about it but what exzactly is it and how is it properly used. I’m hoping it’s somthing that will sample the stable voltage right after it starts cutting at a specified height. It would then associate the cutstart height with the sampled voltage and hold that voltage. So if I said .06 cut height it would start the cut at .060 off the sheet and remember that voltage and try and hold it till it has to start another cut. I guess the issue I have is I’m using a plasma thatsnot “rated” for cnc so I’m kinda making up voltages as I go. It would be much handier to spec heights. And considering I’m doing my ohmic sencing right off the nozzle it would alow for electrode wear and compensate by upping the voltage.
Thanks guys
JTK, If you click through to the Gmocappy setup screen you can fire up halscope and gather some data about your machine while cutting. Here is an example I stole from my Spaceship plasma thread
Here the green line is the cut voltage and you can see it peak on the pierce and than fall back to a stable voltage.
The blue line represents the error between actual and commanded voltage which starts as the THC turns on (at the white dot) 1.5 seconds into the cut. Its that initial peak that you must wait out before enabling torch voltage sampling. I might add, I have been doing this for a long time pre plasmac with my own component. I've never relied on the cut chart voltage. I settled on 1.5 seconds before sampling and that does not change much with material thickenss or amperage.
Please Log in or Create an account to join the conversation.
- rodw
- Offline
- Platinum Member
-
Less
More
- Posts: 12170
- Thank you received: 4153
7 years 4 months ago #136880
by rodw
Replied by rodw on topic Another plasma component...
And on this page of my buildup, I posted the Hypertherm hole cutting presentation. Well worth a read.
forum.linuxcnc.org/show-your-stuff/32029...tter-build?start=460
forum.linuxcnc.org/show-your-stuff/32029...tter-build?start=460
Please Log in or Create an account to join the conversation.
- rodw
- Offline
- Platinum Member
-
Less
More
- Posts: 12170
- Thank you received: 4153
7 years 4 months ago #136882
by rodw
I might mention that the first three lines of the screen dump I posted on the previous page came from the SeanP's work on Plasmaspider. So try them. (Sheetcam has the ability to set a series of rules that can be added to the cutting operation.
Replied by rodw on topic Another plasma component...
islander261 wrote: Guys
While this isn't Plasmac specific it seems we do drift into general plasma procedures often here. If you want details on cutting accurate small holes look up the sales sheets on Hypertherm's "True Hole Technology" also look on plasmaspider, user seanp has posted extensively on his work using simple air plasma.
The generally accepted method to get good holes from 37mm dia. and down to material thickness with minimal taper using an air plasma is:
1, Use recommended cutting current for consumables.
2. Use fixed (no THC) recommended cutting height for consumables.
3. Cut at 60% to 70% of recommended feed rate for consumables and material.
4. Start lead in at or near center of hole.
5. Use perpendicular lead in.
6. No lead out, either a slight over burn or early torch off depending on what works best for you.
You will need to experiment to get exact hole size because the kerf with this method will be wider than your usual straight cut.
John
I might mention that the first three lines of the screen dump I posted on the previous page came from the SeanP's work on Plasmaspider. So try them. (Sheetcam has the ability to set a series of rules that can be added to the cutting operation.
Please Log in or Create an account to join the conversation.
- phillc54
- Offline
- Platinum Member
-
Less
More
- Posts: 5711
- Thank you received: 2100
7 years 4 months ago - 7 years 4 months ago #136942
by phillc54
Replied by phillc54 on topic Another plasma component...
Posted in haste...
Last edit: 7 years 4 months ago by phillc54.
The following user(s) said Thank You: islander261
Please Log in or Create an account to join the conversation.
Moderators: snowgoer540
Time to create page: 0.212 seconds