Rods "Spaceship" Scratch built Plasma Cutter build
- rodw
-
 Topic Author
- Away
- Platinum Member
-

Less
More
- Posts: 12035
- Thank you received: 4107
10 Feb 2019 05:51 - 10 Feb 2019 06:20 #126125
by rodw
Replied by rodw on topic Rods "Spaceship" Scratch built Plasma Cutter build
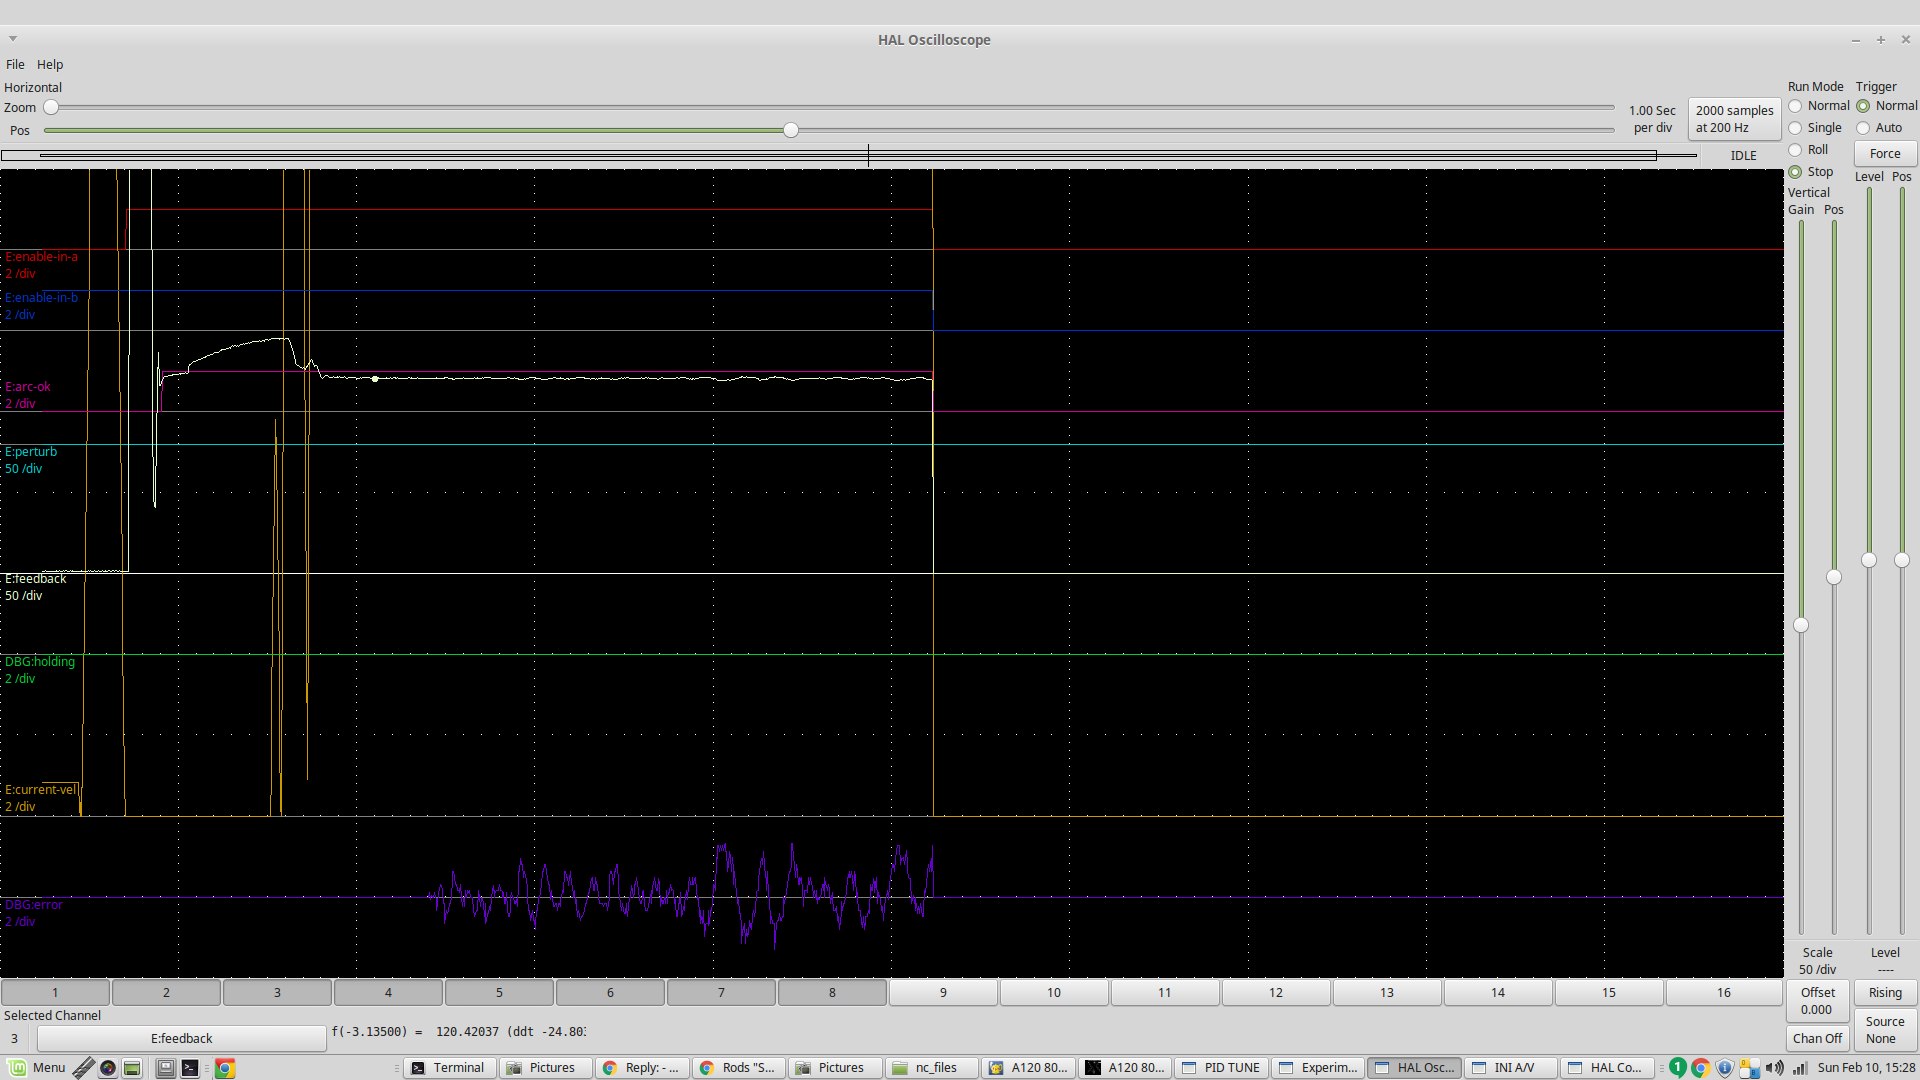
Well I got my remap in place so now we know the desired cut speed set with the F Command and revised the Sheetam generated cut file so I can retire to airconditioned comfort to work on the post processor.
John, I think you are really on the money. Sampling the torch voltage is a major factor in creating a predictable environment.Here is the last cut today sampled at 120.544 volts. Now if it was worked of the book settings of 130mm, there would be an immediate attempt to adjust the torch height by about a mm.
EDIT: I was a bit wrong there. Looking at the cut chart again, the book setting is 120 volts so the actual volts was only out by 0.45%.
So I'll grab a photo of the parts I''ve cut and you guys can be the judge. but I am happy with the result.
Last edit: 10 Feb 2019 06:20 by rodw.
Please Log in or Create an account to join the conversation.
- rodw
-
Topic Author
- Away
- Platinum Member
-
Less
More
- Posts: 12035
- Thank you received: 4107
10 Feb 2019 06:19 - 10 Feb 2019 06:22 #126126
by rodw
Replied by rodw on topic Rods "Spaceship" Scratch built Plasma Cutter build
Well, its not every day you have access to a photo studio in your plasma workshop

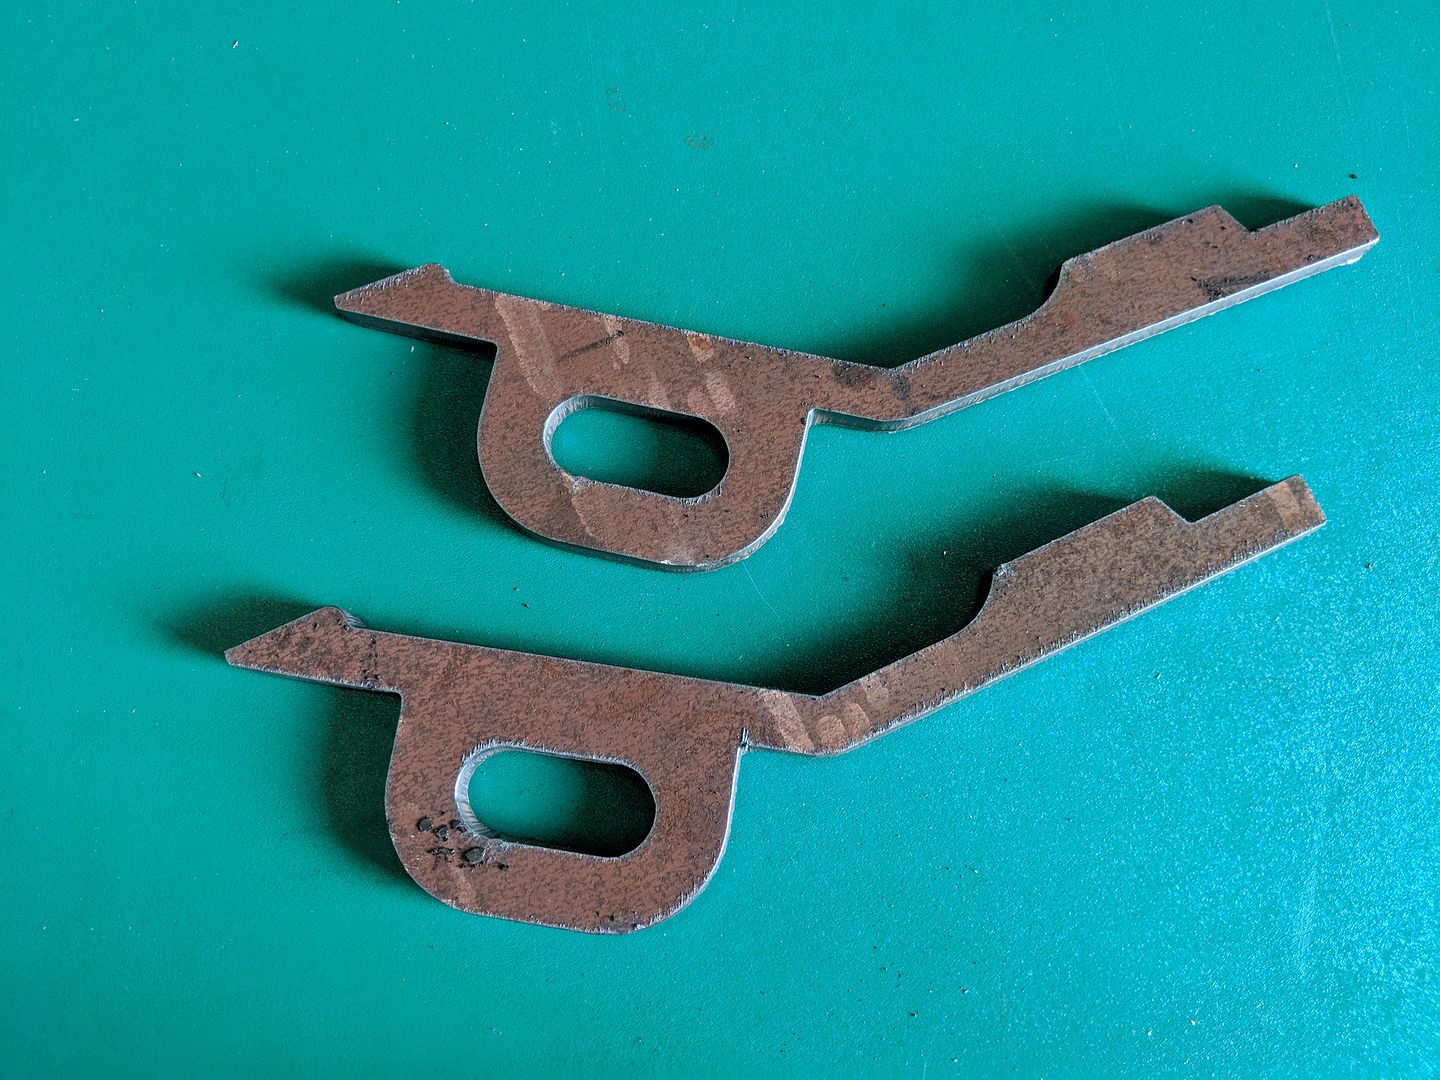
Anyway, the one I cut this afternoon is on top. with the underside showing after I gave it a few hits with a hammer to knock the dross off.
There is a couple of the same part I cut on Friday below it to show what each side looks like before knocking the dross off. There is very little in the way of striations in the cut so I think these are pretty good but I have any experience to judge it with.
I did find out that a 10mm hole in 8mm steel is asking too much. I'd like to slow the speed down on holes if I can make it happen in sheetcam automagically. The marked holes to drill are way deeper than what I got from my old plasma cutter from turning off the arc as soon as I got an ArcOK.
This is 80 amps at 1775mm per minute. Once the post processor is cleaned up, I'll try at some other amperage setting as I finished the soul destroying job of entering the mild steel cut charts into sheetcam yesterday...
Last edit: 10 Feb 2019 06:22 by rodw.
Please Log in or Create an account to join the conversation.
- tommylight
-

- Offline
- Moderator
-

Less
More
- Posts: 21739
- Thank you received: 7429
10 Feb 2019 12:50 #126141
by tommylight
Replied by tommylight on topic Rods "Spaceship" Scratch built Plasma Cutter build
Thnx Rod, i saw the GUI and i am pretty sure i have bumped into it somewhere somehow before, that should be the EO testing stuff right ?
Those cuts look nice.
Those cuts look nice.
Please Log in or Create an account to join the conversation.
- islander261
- Offline
- Platinum Member
-
Less
More
- Posts: 757
- Thank you received: 216
10 Feb 2019 16:17 #126153
by islander261
Replied by islander261 on topic Rods "Spaceship" Scratch built Plasma Cutter build
Rod
I would consider the TD cut charts as starting places for your cut parameters. Myself and other have found they are not nearly as good as the ones HT supplies.
No striations is a good indication that the THC isn't working too hard. The dross looks like normal low speed type which shouldn't be too tightly bound to the work piece. I would check actual cut height and adjust volts as needed. Check air pressure and current setting, I know the frustration of the TD pots and knobs. I put a pencil mark on the dial face so I can set at the same spot every time. Then try increasing speed in about 5% steps until the dross goes away. Cutting over air you should be able to achieve dross free cuts on rectilinear parts on 8mm HR steel. If you get to the point of having lagging cuts in the corners slow back down a bit. You may want to use a lower cut current for 8mm. Usually when production isn't an issue the lowest cut current that will work yields the best cut quality.
The arcok signal from the TD power supply is really slow to come on. I use no pierce delay on 2mm and still get a start divot.
Small inside circles (holes) will need a speed reduction between 40% and 70% to get good straight sides and adjust the kerf width used or hole size to get the required diameter spot on. Yes there will be dross. You are going to have to cut a bunch of holes to find the correct settings for your system. Lots of discussion about this over on plasmaspider. You can either use SC cut rules for holes or do as I do and just have another tool defined.
John
Please Log in or Create an account to join the conversation.
- Grotius
-

- Offline
- Platinum Member
-
Less
More
- Posts: 2419
- Thank you received: 2348
10 Feb 2019 20:47 - 10 Feb 2019 22:05 #126173
by Grotius
Replied by Grotius on topic Rods "Spaceship" Scratch built Plasma Cutter build
Hi,
Rod, nice to see you cutting again !! I hope you get out the best of your machine and that you can build up some plasma experience.
This is orginal footage of NASA
109:21:07 Aldrin: Did you get the MESA out?
109:21:09 Armstrong: I'm going to pull it now. (Pause)
109:21:18 Armstrong: Houston, the MESA came down all right.
109:21:22 McCandless: (This is) Houston. Roger. We copy. Standing by for your TV.
109:22:48 McCandless: Okay. Neil, we can see you (on the TV) coming down the ladder now. (Pause)
109:24:23 Armstrong: That's one small step for (a) man; one giant leap for mankind. (Long Pause)
I will contact the TD if we can shorten the arc-ok time. But, i was thinking.
With Analog in 0-10volt you can do your own ark-ok. So i think that is a more integrated way to go on with arc-ok.
I will ask TD for the arc-ok timing diagram. That is more important. It can be that they have used something we don't expect.
Rod, thanks for letting me in with C coding. I started a new project, reading in dxf data to make a fast dxf2gcode converter.
I will work on this coming mont's. Ethercat is succesfull now. And OpenCV is doing more then Beckhoff presented at ISE.
So i am very exited about our power.
See my code. It's basic, but I am still learning every day. At some day i will be as good as Andy.
I think one day, we will become legend's. Just like Elon Musk. He opensourced his patent's. He is on the good way.
Part of the message is hidden for the guests. Please log in or register to see it.
Rod, nice to see you cutting again !! I hope you get out the best of your machine and that you can build up some plasma experience.
This is orginal footage of NASA
109:21:07 Aldrin: Did you get the MESA out?
109:21:09 Armstrong: I'm going to pull it now. (Pause)
109:21:18 Armstrong: Houston, the MESA came down all right.
109:21:22 McCandless: (This is) Houston. Roger. We copy. Standing by for your TV.
109:22:48 McCandless: Okay. Neil, we can see you (on the TV) coming down the ladder now. (Pause)
109:24:23 Armstrong: That's one small step for (a) man; one giant leap for mankind. (Long Pause)
I will contact the TD if we can shorten the arc-ok time. But, i was thinking.
With Analog in 0-10volt you can do your own ark-ok. So i think that is a more integrated way to go on with arc-ok.
I will ask TD for the arc-ok timing diagram. That is more important. It can be that they have used something we don't expect.
Rod, thanks for letting me in with C coding. I started a new project, reading in dxf data to make a fast dxf2gcode converter.
I will work on this coming mont's. Ethercat is succesfull now. And OpenCV is doing more then Beckhoff presented at ISE.
So i am very exited about our power.
See my code. It's basic, but I am still learning every day. At some day i will be as good as Andy.
I think one day, we will become legend's. Just like Elon Musk. He opensourced his patent's. He is on the good way.
Warning: Spoiler!
Part of the message is hidden for the guests. Please log in or register to see it.
Attachments:
Last edit: 10 Feb 2019 22:05 by Grotius.
The following user(s) said Thank You: tommylight, rodw
Please Log in or Create an account to join the conversation.
- rodw
-
Topic Author
- Away
- Platinum Member
-
Less
More
- Posts: 12035
- Thank you received: 4107
10 Feb 2019 22:07 #126175
by rodw
Replied by rodw on topic Rods "Spaceship" Scratch built Plasma Cutter build
Thanks guys,
John, I appreciate your feedback. I have not deviated off 80 amps as thats what I dialed in the PID at and also I have not got a Sheetcam post that works. I wrote it last night so I should be good to go. Then I'll try different amperages. I was unable to get rid of the low speed dross at 80 amps.
The ArcOK is a lot faster than I'm used to and the plot shows between 0.2 to 0.3 seconds. I'll plot one of the spot holes as it terminates as soon as the ArcOK signal arrives.
Yes, I want to experiment with holes. I think you can automate that adjustment in Sheetcam post processor based on an arc radius so I'll see where that takes me too.
Grotius, thanks for your help too. C is an amazing language, very efficient. Read code written by others (Say LinuxCNC) and you will learn a lot. When you find something you don't understand , google it. Also if you do not yet understand pointers, you must learn that now. Then structures and pointers to structures where you see the -> construct. They are also vital! I once wrote an inventory system for an apple packing shed that fitted into a 64k handheld barcode reader terminal. Every byte counted so I learnt what is the efficient way to do things.
Please Log in or Create an account to join the conversation.
- rodw
-
Topic Author
- Away
- Platinum Member
-
Less
More
- Posts: 12035
- Thank you received: 4107
10 Feb 2019 22:12 #126176
by rodw
Forgot to mention Beefy used a ACS758 current sensor wired into the electrodes at one stage so he could watch for the rise in arc voltage and decide at what point to synthesise an ArcOK signal. This gave him a much faster response. I have one here but its only 50 amps. Pay for postage and its yours! (But ebay might be cheaper than our postage....)
Replied by rodw on topic Rods "Spaceship" Scratch built Plasma Cutter build
The arcok signal from the TD power supply is really slow to come on. I use no pierce delay on 2mm and still get a start divot.
Forgot to mention Beefy used a ACS758 current sensor wired into the electrodes at one stage so he could watch for the rise in arc voltage and decide at what point to synthesise an ArcOK signal. This gave him a much faster response. I have one here but its only 50 amps. Pay for postage and its yours! (But ebay might be cheaper than our postage....)
Please Log in or Create an account to join the conversation.
- Grotius
-
- Offline
- Platinum Member
-
Less
More
- Posts: 2419
- Thank you received: 2348
10 Feb 2019 22:23 - 10 Feb 2019 22:24 #126177
by Grotius
Replied by Grotius on topic Rods "Spaceship" Scratch built Plasma Cutter build
Yes, I want to experiment with holes. I think you can automate that adjustment in Sheetcam post processor based on an arc radius so I'll see where that takes me too.
In sheetcam use code snipped. You can add a code snipped for small shapes like a cirlce. You can decrease speed's for shapes. You can do a slower lead in or lead out etc. But if you really want to experiment with holes, i can give you a tip.
Make a power connection to your TD. Then do a hot start, cut, and slope down. Try this for fun, just like a welding application.
It's really efficient, because 90% of the cutting path, the used power is too high. I think you can call this synergic plasma.
Last edit: 10 Feb 2019 22:24 by Grotius.
Please Log in or Create an account to join the conversation.
- rodw
-
Topic Author
- Away
- Platinum Member
-
Less
More
- Posts: 12035
- Thank you received: 4107
11 Feb 2019 02:19 #126188
by rodw
Replied by rodw on topic Rods "Spaceship" Scratch built Plasma Cutter build
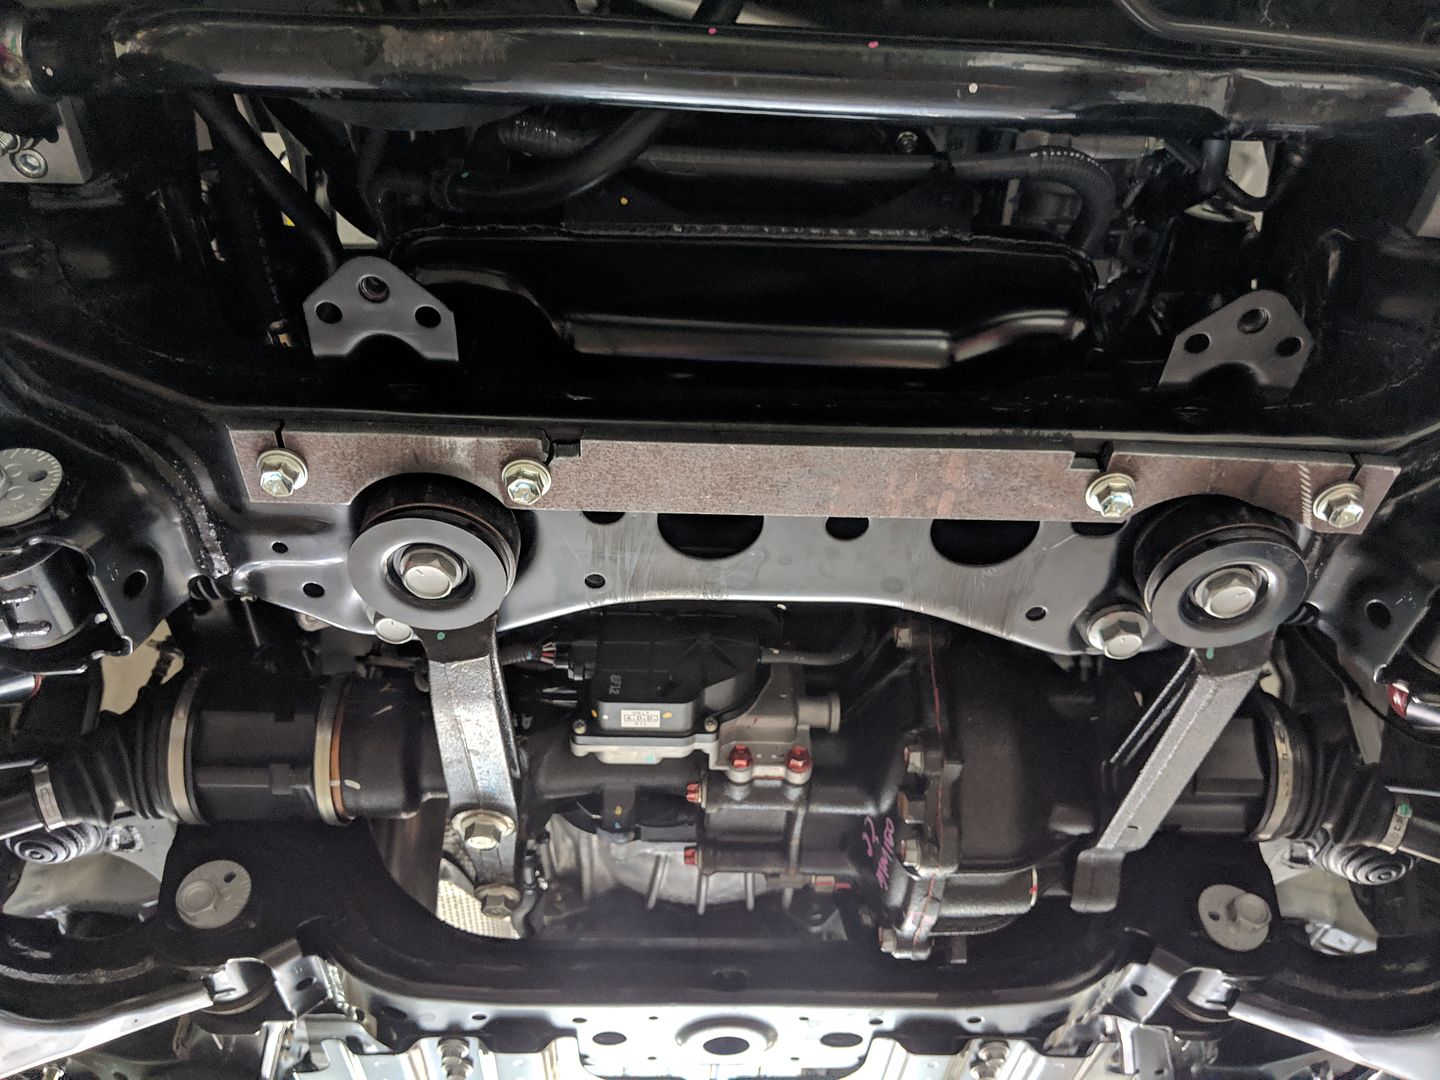
Well I have found I can't draw parts for nuts. Which is why I wanted to try this part first. A friend suggested not to pierce for the holes and just cut a slot into them which worked pretty well. I did have to clean them out with a drill. You'll see the breakaway got some exercise at the end of the cut. I have to work out how to write a kerf crossing component. Sheetcam chose a very odd place to start and there was no steel there at the end of the cut.
There is a render of the completed assembly earlier back on the thread. The cut part bolted up for fit (with the aid of an angle grinder. At least the bolt holes were in the right place! Bloody car parts, you assume they are symetric but they aren't.
These ones I knew were OK.
Anyway, at least I can get parts going super easy with Sheetcam now so I can try different settings.
Please Log in or Create an account to join the conversation.
- racedirector
- Offline
- Elite Member
-

Less
More
- Posts: 231
- Thank you received: 42
11 Feb 2019 11:12 #126194
by racedirector
Replied by racedirector on topic Rods "Spaceship" Scratch built Plasma Cutter build
Wow you guys, I never knew plasma was so hard. Was thinking of building one in the future, no so sure now.
Great work getting yours running Rod, mighty impressed!!!
Great work getting yours running Rod, mighty impressed!!!
The following user(s) said Thank You: rodw
Please Log in or Create an account to join the conversation.
Time to create page: 0.454 seconds