Work with probe
- JohnnyCNC
-

- Offline
- Platinum Member
-

Less
More
- Posts: 570
- Thank you received: 111
09 Dec 2021 22:40 #228746
by JohnnyCNC
Replied by JohnnyCNC on topic Work with probe
I found this. It might help.
SiegX3.hal
#3d Probe
net deb-probe-in debounce.2.0.in <= hm2_5i25.0.7i76.0.0.input-11-not
net probe-in debounce.2.0.out
net probe-in => or2.probe_in.in1
# Tool-Setter-Sense
net deb-toolsetter-in debounce.2.1.in <= hm2_5i25.0.7i76.0.0.input-12-not
net toolsetter-in debounce.2.1.out
net toolsetter-in => or2.probe_in.in0
custom_postgui.hal
net toolsetter-out or2.probe_in.out => motion.probe-input qtdragon.hal_led_probe
Please Log in or Create an account to join the conversation.
- myval
- Offline
- Premium Member
-

Less
More
- Posts: 137
- Thank you received: 7
16 Dec 2021 22:28 #229208
by myval
Replied by myval on topic Work with probe
Right thanks it kind of makes sense but hmmm what happens when you touch off the 3d probe on tool setter?
I have not had time to wire it up and try it so just my imagination plays tricks on me I guess.
I have not had time to wire it up and try it so just my imagination plays tricks on me I guess.
Please Log in or Create an account to join the conversation.
- JohnnyCNC
-

- Offline
- Platinum Member
-

Less
More
- Posts: 570
- Thank you received: 111
16 Dec 2021 23:00 #229214
by JohnnyCNC
Replied by JohnnyCNC on topic Work with probe
The only time I touch off on the tool setter is when I am running a program and after a tool change there is a tool in the spindle that has a zero length
in the tool table. The zero length indicates that the tool needs to me measure and it automatically goes over to the tool setter and measures the tool.
If tool that was just loaded into the spindle has a length > 0 in the tool table it goes directly to cutting the part.
The only time the 3D probe is in the spindle is when I just put a piece of stock in the vice and need to locate it. I run the appropriate probe routine from the probe screen in QTDragon to get the X,Y,Z.
John
Please Log in or Create an account to join the conversation.
- myval
- Offline
- Premium Member
-

Less
More
- Posts: 137
- Thank you received: 7
16 Dec 2021 23:43 #229218
by myval
Replied by myval on topic Work with probe
Ok that all make sense but how do you set the 3d probe length. It might be stupid question but it just does not click in my noggin.
because if you set Z with unknown 3d probe length the Z be all over the shop.
Or am I missing something or am too complicated.
because if you set Z with unknown 3d probe length the Z be all over the shop.
Or am I missing something or am too complicated.
Please Log in or Create an account to join the conversation.
- JohnnyCNC
-

- Offline
- Platinum Member
-

Less
More
- Posts: 570
- Thank you received: 111
17 Dec 2021 02:33 - 17 Dec 2021 02:44 #229257
by JohnnyCNC
Replied by JohnnyCNC on topic Work with probe
Here is my post that contains the details of what I did and how it works.
Detailed post
Basically the of my spindle is tool length zero. I record the position of the spindle nose on the tool setter. All tool lengths are calculated from that point to where the spindle nose is when a tool is touching the tool setter. I also measured the effective length of the 3D probe and recorded that value so that when I touch off on a piece of stock the math can be done to know the position where the tool will touch the stock top.
John
Last edit: 17 Dec 2021 02:44 by JohnnyCNC.
Please Log in or Create an account to join the conversation.
- itsme
- Offline
- Senior Member
-

Less
More
- Posts: 78
- Thank you received: 21
17 Dec 2021 18:59 #229329
by itsme
Replied by itsme on topic Work with probe
Hi John!
Thank you for your work! I like your workflow. Where can your files be found?
Thank you for your work! I like your workflow. Where can your files be found?
Please Log in or Create an account to join the conversation.
- myval
- Offline
- Premium Member
-

Less
More
- Posts: 137
- Thank you received: 7
17 Dec 2021 21:25 #229340
by myval
Replied by myval on topic Work with probe
I might be bit dumb to be honest, my brain is still not lined up.
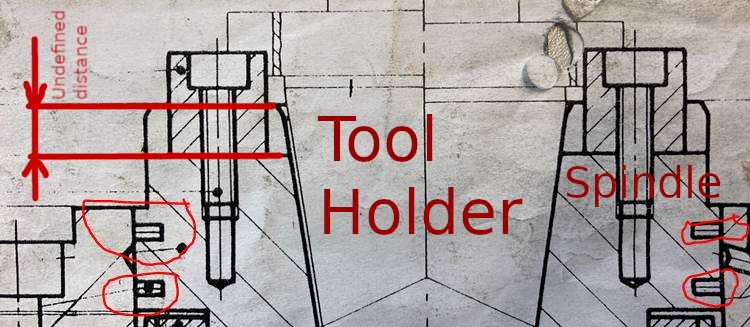
trouble I see is that the tools don't really sit in the spindle cone in exactly the same height from the spindle some tool holders I have might have been reground and they sit slightly in (my guess why they sit different) so I don't have any exact reference point/ height on tool holders from the spindle, one of them being the tool holder for the 3d probe.
One way would be to make a cone to sit the toolholder in and take reference from that cone since they all would sit in that cone the same but different from the actual spindle.
That is why I thought the easiest way would be to touch of the 3d probe on the tool setter but how do I know which input actually triggered the touch? I am not sure if I am explaining my self well.
Here is a quick sketch of what the problem I have is The dimension on the left is not really reliable and that is the main problem I don't understand. It is a cutaway of my exact spindle with toolholder in it.
Attachments:
Please Log in or Create an account to join the conversation.
- Todd Zuercher
-

- Away
- Platinum Member
-

Less
More
- Posts: 4727
- Thank you received: 1447
17 Dec 2021 21:37 - 17 Dec 2021 21:46 #229341
by Todd Zuercher
Replied by Todd Zuercher on topic Work with probe
True your tool holders taper diameters might not be terribly consistent from one tool holder to the next. But the point is that once inserted each tool holder should insert the same amount each time. It doesn't really matter that tool holder #1 is a different length than tool holder #2. It only matters that tool holder #1 inserts the same every time it is used. Even if you are using a measuring stand to measure tool offsets off of the machine. if tool number 2 inserts a 1/4" shallower than tool #1. The offsets measured at the stand would still be 1/4" different between tool #1 and #2 at the tool stand same as in the spindle.
PS: This is a problem with most ISO taper tools, and there is some inconsistency inherent to it especially when dirt contamination, high loads, high speeds, or high temperatures get involved. If it bothers you that much sell your machine and buy a newer one that uses HSK tool holders.
PS: This is a problem with most ISO taper tools, and there is some inconsistency inherent to it especially when dirt contamination, high loads, high speeds, or high temperatures get involved. If it bothers you that much sell your machine and buy a newer one that uses HSK tool holders.
Last edit: 17 Dec 2021 21:46 by Todd Zuercher. Reason: Added PS
Please Log in or Create an account to join the conversation.
- myval
- Offline
- Premium Member
-

Less
More
- Posts: 137
- Thank you received: 7
17 Dec 2021 22:04 #229343
by myval
Replied by myval on topic Work with probe
That is exactly right but the problem I am still having is how do I get exact Z offset for the 3d probe.
Tools are obvious I will touch them off on the tool setter and I don't care if there are differences between tool holders as long as the tip of the tool get touched off on the setter.
I still can not get the 3d probe in my head. I can not touch it off on the tool setter since I would not know if 3d tripped it or tool setter tripped it, since they go into the same input.
I can not measure it since I don't have the reference height from ,well, anything fixed on the machine.
I don't feel I am relaying the problem well enough or I am not absorbing the solution well enough.
Please Log in or Create an account to join the conversation.
- cmorley
- Offline
- Moderator
-

Less
More
- Posts: 7293
- Thank you received: 2130
18 Dec 2021 00:50 #229356
by cmorley
Replied by cmorley on topic Work with probe
I don't know for sure, but I wonder if he sets the 3d probe as a tool number and sets a Z offset for it. That offset would be set at the table surface (the same surface the tool setter is referenced from) then your 3dprobe is relative to the toolsetter.
The following user(s) said Thank You: myval
Please Log in or Create an account to join the conversation.
Time to create page: 0.162 seconds

