Search Results (Searched for: )
- meister
- meister
08 Aug 2024 05:55
Replied by meister on topic LinuxCNC-RIO - RealtimeIO for LinuxCNC based on FPGA (ICE40 / ECP5)
LinuxCNC-RIO - RealtimeIO for LinuxCNC based on FPGA (ICE40 / ECP5)
Category: Computers and Hardware

- fery15sty
- fery15sty
08 Aug 2024 04:06
- onceloved

08 Aug 2024 03:42
Replied by onceloved on topic EtherCAT i/o board for spindle, estop and mpg
EtherCAT i/o board for spindle, estop and mpg
Category: EtherCAT
- NTULINUX

08 Aug 2024 03:24
Replied by NTULINUX on topic New and Working RTAI debs for 2.9
New and Working RTAI debs for 2.9
Category: Installing LinuxCNC
- uugp
- uugp
08 Aug 2024 02:31
Replied by uugp on topic New and Working RTAI debs for 2.9
New and Working RTAI debs for 2.9
Category: Installing LinuxCNC
- PCW

08 Aug 2024 00:18
- cakeslob
- cakeslob
08 Aug 2024 00:16 - 08 Aug 2024 00:21
Replied by cakeslob on topic Remora - ethernet NVEM / EC300 / EC500 cnc board
Remora - ethernet NVEM / EC300 / EC500 cnc board
Category: Computers and Hardware
- PCW
08 Aug 2024 00:06
- tommylight

08 Aug 2024 00:04
Replied by tommylight on topic Latency Test OK, dennoch Fehlermeldung
Latency Test OK, dennoch Fehlermeldung
Category: Deutsch
- Alexandrion
- Alexandrion
07 Aug 2024 23:33
Replied by Alexandrion on topic Spindle.0.at-speed False not inhibiting motion
Spindle.0.at-speed False not inhibiting motion
Category: HAL
- Muftijaja
- Muftijaja
07 Aug 2024 23:29
Replied by Muftijaja on topic Latency Test OK, dennoch Fehlermeldung
Latency Test OK, dennoch Fehlermeldung
Category: Deutsch
- Mecanix
- Mecanix
07 Aug 2024 23:28
Replied by Mecanix on topic LinuxCNC-RIO - RealtimeIO for LinuxCNC based on FPGA (ICE40 / ECP5)
LinuxCNC-RIO - RealtimeIO for LinuxCNC based on FPGA (ICE40 / ECP5)
Category: Computers and Hardware
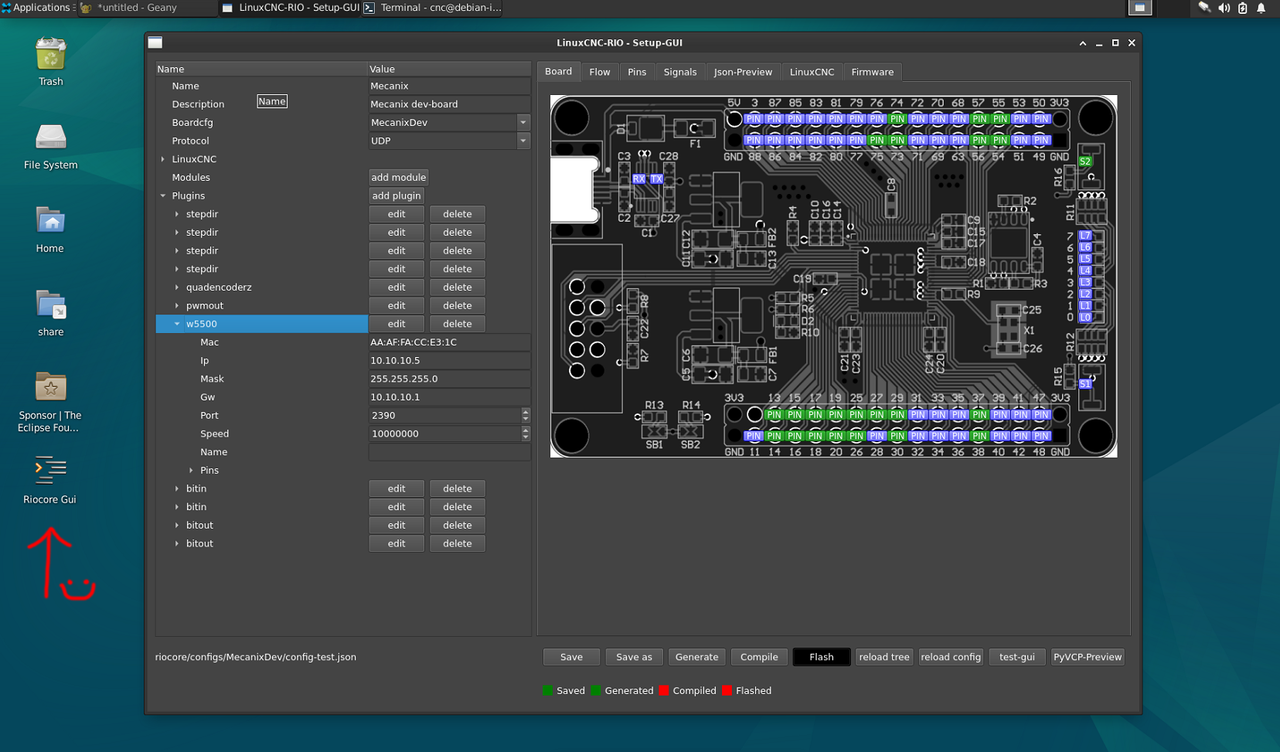
- Mecanix
- Mecanix
07 Aug 2024 23:16
Replied by Mecanix on topic LinuxCNC-RIO - RealtimeIO for LinuxCNC based on FPGA (ICE40 / ECP5)
LinuxCNC-RIO - RealtimeIO for LinuxCNC based on FPGA (ICE40 / ECP5)
Category: Computers and Hardware
- Project_Hopeless

07 Aug 2024 23:14
- PCW
07 Aug 2024 23:03
Replied by PCW on topic Question regarding shielding
Question regarding shielding
Category: General LinuxCNC Questions
Time to create page: 1.028 seconds