2nd stage of Crusader II retrofit
- OT-CNC
- Offline
- Platinum Member
-

Less
More
- Posts: 617
- Thank you received: 75
24 Jun 2018 16:34 #112823
by OT-CNC
Replied by OT-CNC on topic 2nd stage of Crusader II retrofit
Doesn't look too bad on the pictures. I think you can get to the P2 connector with a ribbon cable. But I don't think you'll need to worry about that connection unless you plan on adding a bunch more ios. The 7i77 is good for 6 axis so you should be fine if you're adding a fourth down the road. Mesa sells the din rail clips for the daughter cards which I like. This way you can slide the 7i77 along the din rail for an ideal mounting position.
Please Log in or Create an account to join the conversation.
- andypugh
-

- Offline
- Moderator
-

Less
More
- Posts: 19875
- Thank you received: 4642
25 Jun 2018 09:55 #112837
by andypugh
There is adequate clearance there to lead the ribbon-cable adaptor out. And a home-made bracket could mount another DB25 above the audio connectors.
If you got one of these: www.amazon.co.uk/dp/B07BQ2KJDQ/ you could just drill a couple of holes for the audio jacks and epoxy it them. Or mount it almost anywhere else.
Replied by andypugh on topic 2nd stage of Crusader II retrofit
It has 3/8 of an inch clearance now but I would never be able to connect to the second connection on the 5i25 in this position (as in possible 4th axis) but mounting to the back squeezes the 7i77 and connections.
There is adequate clearance there to lead the ribbon-cable adaptor out. And a home-made bracket could mount another DB25 above the audio connectors.
If you got one of these: www.amazon.co.uk/dp/B07BQ2KJDQ/ you could just drill a couple of holes for the audio jacks and epoxy it them. Or mount it almost anywhere else.
The following user(s) said Thank You: jamby
Please Log in or Create an account to join the conversation.
- jamby
- Offline
- Elite Member
-

Less
More
- Posts: 235
- Thank you received: 6
25 Jun 2018 17:27 #112855
by jamby
Replied by jamby on topic 2nd stage of Crusader II retrofit
Andy
Good idea, glad you said something I was unaware that such a connector was available.
Any idea if 35watts is enough to power the gigabyte GIGABYTE J1900N mother board?
Thanks
Jim
Good idea, glad you said something I was unaware that such a connector was available.
Any idea if 35watts is enough to power the gigabyte GIGABYTE J1900N mother board?
Thanks
Jim
Please Log in or Create an account to join the conversation.
- andypugh
-
- Offline
- Moderator
-
Less
More
- Posts: 19875
- Thank you received: 4642
25 Jun 2018 18:09 #112857
by andypugh
min-box suggest a 90W picoPSU.
But if you are using an SSD and not plugging power-hungry devices in to the USB. And if you already have the 35W supply, you might as well try it and see.
Replied by andypugh on topic 2nd stage of Crusader II retrofit
Any idea if 35watts is enough to power the gigabyte GIGABYTE J1900N mother board?
min-box suggest a 90W picoPSU.
But if you are using an SSD and not plugging power-hungry devices in to the USB. And if you already have the 35W supply, you might as well try it and see.
Please Log in or Create an account to join the conversation.
- jamby
- Offline
- Elite Member
-
Less
More
- Posts: 235
- Thank you received: 6
27 Jun 2018 17:52 #112932
by jamby
Replied by jamby on topic 2nd stage of Crusader II retrofit
yeah
The little guy won't power the mother board and a sata hard drive so, while making a 90 mile trip to see the dentist I stopped by and picked up a LSR-150-12 and it has no problems.
Jim
The little guy won't power the mother board and a sata hard drive so, while making a 90 mile trip to see the dentist I stopped by and picked up a LSR-150-12 and it has no problems.
Jim
Please Log in or Create an account to join the conversation.
- andypugh
-
- Offline
- Moderator
-
Less
More
- Posts: 19875
- Thank you received: 4642
27 Jun 2018 18:15 #112934
by andypugh
Replied by andypugh on topic 2nd stage of Crusader II retrofit
I thought that an actual HDD might push things over the edge, which is why I mentioned the SSD.
Please Log in or Create an account to join the conversation.
- jamby
- Offline
- Elite Member
-
Less
More
- Posts: 235
- Thank you received: 6
27 Jun 2018 20:24 #112938
by jamby
Replied by jamby on topic 2nd stage of Crusader II retrofit
There was a moment of indecision about SSD/stronger power supply
PS won.
PS won.
Please Log in or Create an account to join the conversation.
- jamby
- Offline
- Elite Member
-
Less
More
- Posts: 235
- Thank you received: 6
30 Jun 2018 03:02 #113118
by jamby
Replied by jamby on topic 2nd stage of Crusader II retrofit
Hey
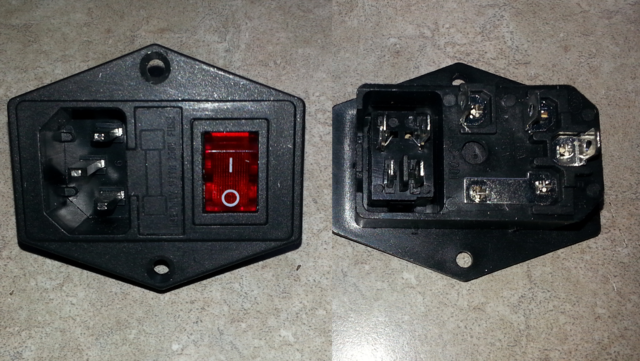
I am looking ahead at how to bring in the A/C power. I have the plug in the picture below and it has three blades on the back (kind of hard to see in the picture), one for ground, one for base, and the load passing thru the fuse. Then there are four more blades attached to the rocker switch, two on each end.
Guessing that:
Ground == stick a bolt in the aluminium case and connect all the ground lines to it.
Base & Load == connect to all the power supplies and the out going plug (leads to the monitor)
Planning on running everything thru the fuse and only turn the rocker off when I want everything off. There's a momentary switch on the panel to start the PC, another power switch, latching, for the 7i77 D/C power supplies which will be shut down any time its going into hibernation (when its not being used for weeks at a time). I don't know what to do with the mother board power supply as all the desktops in the house have power to there power supplies 24/7.
As always, hope this makes some sense.
Jim
Please Log in or Create an account to join the conversation.
- jamby
- Offline
- Elite Member
-
Less
More
- Posts: 235
- Thank you received: 6
30 Jun 2018 23:52 - 30 Jun 2018 23:54 #113146
by jamby
Replied by jamby on topic 2nd stage of Crusader II retrofit
Well I am getting closer. Most of the machining is done except for some drilling and tapping of brackets so its time to do a test fit and try controlling the machine. If everything goes well then its wire up the power supplies and try to figure out how to wire in all the switches.
Some pictures of the progress.
Some pictures of the progress.
Last edit: 30 Jun 2018 23:54 by jamby.
Please Log in or Create an account to join the conversation.
- jamby
- Offline
- Elite Member
-
Less
More
- Posts: 235
- Thank you received: 6
06 Jul 2018 22:02 - 06 Jul 2018 22:03 #113610
by jamby
Replied by jamby on topic 2nd stage of Crusader II retrofit
Hey
Well while testing at each step the Y axis jog has stopped working. I don't know how to test it to determine if its in my wiring, the 7i77 card, or the westamp card. It has been working until yesterday morning.
With the machine and controller powered up all 3 axis display movement on the scales in linuxcnc. With them powered up you can not be move them by hand including Y. All others jog but Y doesn't move while the cutter on the linuxcnc display does.
I've checked the connection at TB5 DRV1 and the westamp card with no visible problems. My ability's with a VTM aren't the best so I decided to wait until someone can give me some ideas.
Thanks
Jim
Last edit: 06 Jul 2018 22:03 by jamby.
Please Log in or Create an account to join the conversation.
Time to create page: 0.160 seconds