Advanced Search

Search Results (Searched for: )

  • rodw
  • rodw's Avatar
15 Jan 2025 21:53

Linuxcnc 2.9.2 and 2.93 images for Raspberry Pi 4b & 5

Category: Installing LinuxCNC

I have a 4b that is bricked like this.
Try updating the firmware using the Pi Imager. That may work. Otherwise I have no solution
  • ncysys
  • ncysys
15 Jan 2025 21:47

Allen Bradley Ultra 100/200 servo drive software

Category: Driver Boards

Hi

I too downloaded the zip file on Jan. 2025, but it didn't extract correctly also

Please check the files and provide a new link to the repaired files.

Thanks
  • gekonko
  • gekonko's Avatar
15 Jan 2025 21:42

Error message "Radius to end of arc differs....etc etc"

Category: General LinuxCNC Questions

Hello,
i get the same error in QtplasmaC v2.9-238.314 RIP with EN (and SK) locale and Metric system. I have tryed to change CENTER_ARC_RADIUS_TOLERANCE_MM for my machine, but without luck. It seems that this tolerance stays default and does not change. Unfortunately, I cannot change generated tolerance from this cad/cam. This software is prahistoric but I am bound to it because it has functions for generating custom hvac components and nesting. Problem is that generated files from this cad/cam are only with 0.1mm accuracy. 


the error is reasonably small for my application

 
changed ini file, I have also tried to use bigger tolerance = 0.5

 
this is how the workpiece should look like.


File Attachment:

File Name: 00937001nok_lcnc.ngc
File Size:0 KB


  • spumco
  • spumco
15 Jan 2025 21:28
Replied by spumco on topic Stepperonline A6 etherCAT servo kit anyone?

Stepperonline A6 etherCAT servo kit anyone?

Category: Computers and Hardware

I have found this combo and read somewhere that they are somehow rebranded Leadshine, they comes with a good documentation (For what I can understand). 


Late response, but the A6 series are rebranded Inovance SV660's.  The Ethercat version is SV660N.

Inovance offers both 17-bit and 23-bit encoder motors, but Stepperonline appears to only offer the 17-bit version.

Stepperonline's "T6" servos are rebranded Leadshine EL6's.  Looks like they've dropped the "T7" series of ethercat drives which were available last year.

Side note: From a couple YT vids I watched, Tormach appears to be using Inovance SV660N's in the MX1500.  They also appear to have made their own breakout board to use the SV660N's onboard IO, rather than buying (or building) a separate dedicated ethercat IO board.

No idea what the spindle drive is; maybe an Inovance ethercat VFD.

With four drives (X/Y/Z/ATC), this would give them 20 inputs and 12 outputs... not including assignable IO from the spindle drive.
  • gene_weber
  • gene_weber's Avatar
15 Jan 2025 20:38 - 16 Jan 2025 14:32
Replied by gene_weber on topic Raspberry Pi OS PREEMPT RT 6.13 Kernel Cookbook

Raspberry Pi OS PREEMPT RT 6.13 Kernel Cookbook

Category: Installing LinuxCNC

Create the base .config file for the Raspberry Pi 4 64-bit:
KERNEL=kernel8
make bcm2711_defconfig

NOTE: For a Raspberry Pi 5 64-bit the lines should be:
KERNEL=kernel_2712
make bcm2712_defconfig


Make / launch the menuconfig utility:
Install the required package:
sudo apt install libncurses5-dev
make menuconfig

Under General Setup, select: Fully Preemptible Kernel (Real-Time)Exit and Save.


Change Local version name. vi .config and change the following line:
CONFIG_LOCALVERSION="-v8"
To:
CONFIG_LOCALVERSION="-v8_full_preempt"


Build the kernel and log the output (Note this took over 2 hr 10 min):
make -j6 Image.gz modules dtbs 2>&1 | tee make.log

NOTE: During the compilation process the temperature of the ARM processor increased from ~30°C to as high as 43°C. I have a heat-sink and cooling fan on my Pi. If you don't, you may want to keep an eye on the temp (/usr/bin/vcgencmd measure_temp). The maximum rating on the Pi is 85°C.


Install the kernel modules onto the boot media and log the output:
sudo make -j6 modules_install 2>&1 | tee install.log

create a backup image of the current kernel, install the fresh kernel image, overlays, README, and unmount the partitions:
sudo cp /boot/firmware/$KERNEL.img /boot/firmware/$KERNEL-backup.img
sudo cp arch/arm64/boot/Image.gz /boot/firmware/$KERNEL.img
sudo cp arch/arm64/boot/dts/broadcom/*.dtb /boot/firmware/
sudo cp arch/arm64/boot/dts/overlays/*.dtb* /boot/firmware/overlays/
sudo cp arch/arm64/boot/dts/overlays/README /boot/firmware/overlays/


Reboot the Raspberry Pi to run the new kernel:
sudo reboot

Check kernel after reboot:
uname -a
    Linux raspberrypi 6.13.0-rc7-rt3-v8_full_preempt+ #1 SMP PREEMPT_RT Tue Jan 14 12:49:46 EST 2025 aarch64 GNU/Linux


From the LinuxCNC downloads page , download LinuxCNC Uspace 2.9.3 arm64 .

Install the Gdebi installer:
sudo apt install gdebi
Run the Gdebi installer and install linuxcnc-uspace_2.9.3_arm64.deb

EDITED 1/16/25: Changed image to X11 pre-optimization latency.
Ran a baseline latency test before making any jitter optimizations.
latency-histogram --nobase --sbins 1000
    Note: Using POSIX realtime


I checked the real-time attributes of the latency-histogram process (the process ID for this run was 10527):
chrt -p 10527
    pid 10527's current scheduling policy: SCHED_OTHER
    pid 10527's current scheduling priority: 0

I had thought the policy would be SCHED_FIFO, or SCHED_RR. But even after I added CPU isolation it remains SCHED_OTHER.

I will probably create a separate thread about jitter optimization.
  • gene_weber
  • gene_weber's Avatar
15 Jan 2025 20:36 - 16 Jan 2025 13:53

Raspberry Pi OS PREEMPT RT 6.13 Kernel Cookbook

Category: Installing LinuxCNC

I'm posting the steps I executed to build and install a PREEMPT RT Linux kernel in Raspberry Pi OS for my Pi 4B for two reasons.
  1. Hopefully it helps someone trying to do this or something similar. I appreciate the pointers I got from alangibson, cornholio, and rodw
  2. This is the first Linux kernel I've ever built. So I open this up to comments and suggestions.

NOTE: Version 6.13 of the Linux kernel is under development and could have bugs / issues. So far it's been stable for me, but your mileage may vary.

I started with a fresh installation of Raspberry Pi OS on my Pi 4B.

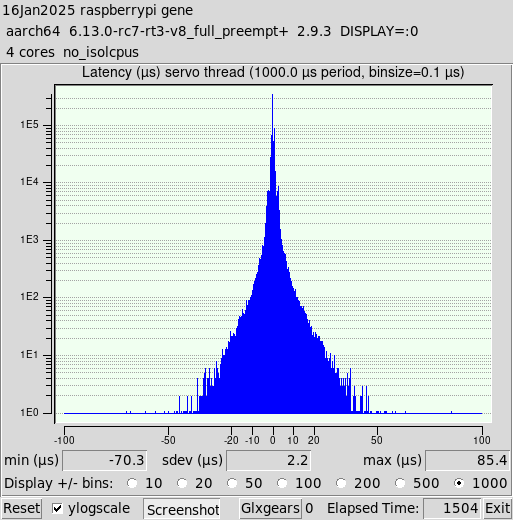
1/16/25 Edit: Based on responses after the initial post it was clear that the Wayland display protocol is non-optimal for LinuxCNC. A comparison of the baseline pre-optimized jitter was conducted where the only difference is the display protocol, Wayland vs X11. The latency histograms for each are included in those posts, and show a dramatic difference with X11 inducing significantly less jitter. Wayland is the default in the current Raspberry Pi OS, but is easily changed to X11.

You can check the session type:
echo $XDG_SESSION_TYPE
    wayland

Launch Rasp-config command line tool in a terminal:
sudo raspi-config
Arrow down to "Advanced Options", and enter.
Arrow down to "Wayland                 Switch between X and Wayland backends", and enter.
If not on the line that says "W1 X11     Openbox window manager with X11 backend", arrow to it and enter.
The popup should say "Openbox on X11 is active" and have "Ok" highlighted. Enter.
It will return to the main screen. Use left-righ arrows to select "Finish". Enter.
Popup asks if you would like to reboot now, with "Yes" highlighted. Enter.

After reboot:
echo $XDG_SESSION_TYPE
    x11


Raspberry Pi's documentation on how to build a kernel was used as the guideline for this process:

Download the source code for the 6.13 Raspberry Pi kernel:
git clone -b rpi-6.13.y --depth=1 https://github.com/raspberrypi/linux

Install the needed build dependencies:
sudo apt install bc bison flex libssl-dev make


Download the RT patches for v6.13 and the signature file. Starting here , select the tarballs link at bottom left of page. From the list of versions, select the 6.13 link .
Download the patch file patch-6.13-rc6-rt3.patch.gz:
curl -OL https://cdn.kernel.org/pub/linux/kernel/projects/rt/6.13/patch-6.13-rc6-rt3.patch.gz
Download the signature file patch-6.13-rc6-rt3.patch.sign:
curl -OL https://cdn.kernel.org/pub/linux/kernel/projects/rt/6.13/patch-6.13-rc6-rt3.patch.sign

cd ~/Downloads

Verify the signature of the patch file. These were committed by Sebastian Andrzej Siewior.
mkdir .gnupg
vi .gnupg/gpg.conf

Add the following two lines:
auto-key-locate wkd,dane,local
auto-key-retrieve

Get the public key for "Sebastian Andrzej Siewior <This email address is being protected from spambots. You need JavaScript enabled to view it.>"
gpg --locate-keys [email]bigeasy@linutronix.de[/email]

Unzip the patch file:
gzip -d patch-6.13-rc6-rt3.patch.gz

Verify signature:
gpg2 --verify patch-6.13-rc6-rt3.patch.sign
    gpg: assuming signed data in 'patch-6.13-rc6-rt3.patch'
    gpg: Signature made Thu 09 Jan 2025 05:04:09 AM EST
    gpg:                using RSA key 57892E705233051337F6FDD105641F175712FA5B
    gpg: Good signature from "Sebastian Andrzej Siewior <This email address is being protected from spambots. You need JavaScript enabled to view it.>" [unknown]
    gpg: WARNING: This key is not certified with a trusted signature!
    gpg:          There is no indication that the signature belongs to the owner.
    Primary key fingerprint: 6425 4695 FFF0 AA44 66CC  19E6 7B96 E816 2A8C F5D1
         Subkey fingerprint: 5789 2E70 5233 0513 37F6  FDD1 0564 1F17 5712 FA5B


Go back to the linux directory created by the git clone:
cd ~/linux
Patch the 6.13 RT kernel:
patch -p1 < ~/Downloads/patch-6.13-rc6-rt3.patch
    patching file arch/arm/Kconfig
    patching file arch/arm/kernel/module-plts.c
    patching file arch/arm/kernel/traps.c
    patching file arch/arm/mm/fault.c
    patching file arch/arm64/kernel/ftrace.c
    patching file arch/arm64/kernel/traps.c
    patching file arch/loongarch/kernel/ftrace_dyn.c
    patching file arch/loongarch/kernel/unwind_orc.c
    patching file arch/powerpc/Kconfig
    patching file arch/powerpc/include/asm/stackprotector.h
    patching file arch/powerpc/include/asm/thread_info.h
    patching file arch/powerpc/kernel/interrupt.c
    patching file arch/powerpc/kernel/trace/ftrace.c
    patching file arch/powerpc/kernel/trace/ftrace_64_pg.c
    patching file arch/powerpc/kernel/traps.c
    patching file arch/powerpc/kvm/Kconfig
    patching file arch/powerpc/lib/vmx-helper.c
    patching file arch/powerpc/platforms/pseries/Kconfig
    patching file arch/powerpc/platforms/pseries/iommu.c
    patching file arch/s390/kernel/dumpstack.c
    patching file arch/x86/kernel/callthunks.c
    patching file arch/x86/kernel/dumpstack.c
    patching file arch/x86/kernel/unwind_orc.c
    patching file arch/xtensa/kernel/traps.c
    patching file drivers/gpu/drm/i915/Kconfig
    patching file drivers/gpu/drm/i915/display/intel_crtc.c
    patching file drivers/gpu/drm/i915/display/intel_cursor.c
    patching file drivers/gpu/drm/i915/display/intel_display_trace.h
    patching file drivers/gpu/drm/i915/display/intel_vblank.c
    patching file drivers/gpu/drm/i915/gt/intel_execlists_submission.c
    patching file drivers/gpu/drm/i915/gt/uc/intel_guc.h
    patching file drivers/gpu/drm/i915/i915_request.c
    patching file drivers/gpu/drm/i915/i915_trace.h
    patching file drivers/gpu/drm/i915/i915_utils.h
    patching file drivers/tty/serial/8250/8250_core.c
    Hunk #1 succeeded at 403 (offset 15 lines).
    Hunk #2 succeeded at 411 (offset 15 lines).
    Hunk #3 succeeded at 541 (offset 15 lines).
    patching file drivers/tty/serial/8250/8250_port.c
    Hunk #4 succeeded at 3317 (offset 9 lines).
    Hunk #5 succeeded at 3350 (offset 9 lines).
    Hunk #6 succeeded at 3409 (offset 9 lines).
    Hunk #7 succeeded at 3475 (offset 9 lines).
    Hunk #8 succeeded at 3618 (offset 9 lines).
    Hunk #9 succeeded at 3628 (offset 9 lines).
    patching file include/linux/kallsyms.h
    patching file include/linux/module.h
    patching file include/linux/preempt.h
    patching file include/linux/serial_8250.h
    patching file kernel/cfi.c
    patching file kernel/jump_label.c
    patching file kernel/kprobes.c
    patching file kernel/ksysfs.c
    patching file kernel/livepatch/core.c
    patching file kernel/module/internal.h
    patching file kernel/module/kallsyms.c
    patching file kernel/module/main.c
    patching file kernel/module/tracking.c
    patching file kernel/module/tree_lookup.c
    patching file kernel/module/version.c
    patching file kernel/sched/core.c
    patching file kernel/static_call_inline.c
    patching file kernel/trace/bpf_trace.c
    patching file kernel/trace/trace.c
    patching file kernel/trace/trace_kprobe.c
    patching file lib/bug.c
    patching file lib/dump_stack.c
    patching file localversion-rt
  • programador
  • programador's Avatar
15 Jan 2025 20:18

How do I control the speed and acceleration of the analog output of the 7i77 ?

Category: Advanced Configuration

You still did not answer what the Z motion range was?
Answer: Sorry, I didn't understand the question, due to the automatic language translator. But you got it right, 50mm, in the photo below.


regarding the model code it worked! the Z axis movement works without error. Thank you


  • PCW
  • PCW's Avatar
15 Jan 2025 19:19

How do I control the speed and acceleration of the analog output of the 7i77 ?

Category: Advanced Configuration

You still did not answer what the Z motion range was

Anyway say its 50 mm and using the /32 tap that's
a encoder scale of ~415

When tuning you need to loosen the following error limits
and have some reasonable output scale value:TYPE = LINEAR
HOME = 0.0
FERROR = 50
MIN_FERROR = 50
MAX_VELOCITY = 25.0
MAX_ACCELERATION = 750.0
P = 50.0
I = 0.0
D = 0.0
FF0 = 0.0
FF1 = 1.0
FF2 = 0.0
BIAS = 0.0
DEADBAND = 0.0
MAX_OUTPUT = 0.0
ENCODER_SCALE = 415 # estimate with THCAD /32 and 50 mm full motion
OUTPUT_SCALE = 10
OUTPUT_MIN_LIMIT = -10.0
OUTPUT_MAX_LIMIT = 10.0
#MIN_LIMIT = -100.0
#MAX_LIMIT = 0.01
MIN_LIMIT = -15000.0 # these should be some reasonable numbers one you get the encoder scale correct
MAX_LIMIT = 15000.0
HOME_OFFSET = 0.0
loadrt offset
addf offset.0.update-feedback servo-thread
addf offset.0.update-output servo-thread

setp offset.0.offset -5671.078   # for /32net z-pos-fb_with_offset <= hm2_7i96s.0.encoder.00.velocity #New Line
net z-pos-fb_with_offset => offset.0.in
net z-pos-fb <= offset.0.out
net z-pos-fb => joint.1.motor-pos-fb
net z-index-enable joint.1.index-enable <=> hm2_7i96s.0.encoder.00.index-enable
net z-pos-rawcounts <= hm2_7i96s.0.encoder.00.rawcounts


  • Finngineering
  • Finngineering
15 Jan 2025 19:16
Replied by Finngineering on topic Un-lobotomizing a Maho MH600T

Un-lobotomizing a Maho MH600T

Category: CNC Machines

Quite some time since the last update. And I have put in a bit of work on the Maho as well. And struggled a bit with the linear scales.

The first step was to get all axes moving under power, and that was easy enough. The following was to install all linear scales and do a bit of cable routing through new cable chains instead of through the old hoses.


I installed a VFD for the main motor on top of the ram and fixed communication to it through Modbus and Mesa PktUART. I struggled a bit with that because of what I would say is a bug in the Mesa Modbus driver. There is a separate thread with that discussion
forum.linuxcnc.org/27-driver-boards/5432...v2d-firmware?start=0
Anyway, the VFD control of the motor now works.
 

I wired up almost all of the rest of the electrical equipment. The gearbox, hydraulic pump with sensors and so on all work, but still need configuration to work from the GUI buttons or G-code. I haven't decided yet whether to use the gearbox component from Rotary SMP. It expects some gearbox "search direction" inputs which are not present on my Maho. There are ways around that problem, though.

The linear scales have given me all kinds of issues, including:
 - approximately 0.5V voltage drop over the miniature circuit breaker, causing the scales to receive too low voltage and give too weak output signals
 - bad connection for the onboard fuse on one of the boards, also giving high voltage drop
 - mixed up negative/positive connections for the sin/cos/reference signals
 - a lot of noise when measuring the signals with an oscilloscope
After resolving those issues, I got everything working, except for the index signal on the vertical axis. That works erratically. I decided to order an EXE 602E interpolator to test, and with that one it works. To avoid getting stuck here, I ordered two more EXE 602E for the other axes. I haven't given up on my own boards though, but they may require a redesign to work in these conditions. Below a photo from the equipment during the height of troubleshooting.
 
The reason for the issue with the vertical axis is that the reference signal is a bit weaker and barely passes "0V" on that axis. Below oscilloscope traces of the X, Y (ram) and Z (vertical) axis. It might provide useful for somebody.


The machine is basically usable already now if I needed to. But I will try to finish all else than the operator panel before taking it into use for real. Because of upcoming work trips, progress will likely be slow again for a couple of months.
 
  • etoimene
  • etoimene
15 Jan 2025 19:16
Replied by etoimene on topic LinuxCNC with OKUMA OSP MX-55VA

LinuxCNC with OKUMA OSP MX-55VA

Category: Basic Configuration

Sorry guys! I did not realize I managed to post twice.
I have no idea how I managed to do it because it was definitely not intentional.

Plans have changed so next visit on Saturday. :(
  • Artur_1617
  • Artur_1617's Avatar
15 Jan 2025 19:08 - 15 Jan 2025 19:09
Replied by Artur_1617 on topic linuxcnc 2.9.2/2.9.3 toolchanger problem

linuxcnc 2.9.2/2.9.3 toolchanger problem

Category: Advanced Configuration

No I dont use them.
But some time ago I add to my config probe screen and now found in psng.hal this...

# Ensure all toolchange pins are free to use
unlinkp iocontrol.0.tool-number
unlinkp iocontrol.0.tool-prep-number
unlinkp iocontrol.0.tool-change
unlinkp iocontrol.0.tool-changed
unlinkp iocontrol.0.tool-prepare
unlinkp iocontrol.0.tool-prepared

net tool-change            probe.toolchange-change      <=   iocontrol.0.tool-change
net tool-changed           probe.toolchange-changed     =>   iocontrol.0.tool-changed
net tool-number            probe.toolchange-number      <=   iocontrol.0.tool-number
net tool-prep-number       probe.toolchange-prep-number <=   iocontrol.0.tool-prep-number
net tool-prep-loopback     iocontrol.0.tool-prepare     <=   iocontrol.0.tool-prepared
  • Aciera
  • Aciera's Avatar
15 Jan 2025 18:09 - 15 Jan 2025 18:11
Replied by Aciera on topic linuxcnc 2.9.2/2.9.3 toolchanger problem

linuxcnc 2.9.2/2.9.3 toolchanger problem

Category: Advanced Configuration

But still after change the tool popup screen to confirm like in manual change...
Any help with popup screen??


are you maybe still using the manualtoolchange component?
loadusr -W hal_manualtoolchange
  • programador
  • programador's Avatar
15 Jan 2025 18:07

How do I control the speed and acceleration of the analog output of the 7i77 ?

Category: Advanced Configuration

What is the Z motion range for 0 to 10V out from your sensor?

Response:
ranger 10364.831 hm2_7i96s.00.enconder.00.velocity
ranger 621866.8 hm2_7i96s.00.velocity-rpm
I am testing with jump 64 on the THCAD2 board.

Simulations with other jumpers:


advanced hydraulic cylinder THCAD2 jump128

1416.431 hm2_7i96s.00.enconder.00.velocity
84985.84 hm2_7i96s.00.velocity-rpm


recessed hydraulic cylinder THCAD2 jump128

6616.257 hm2_7i96s.00.enconder.00.velocity
396875.4 hm2_7i96s.00.velocity-rpm


advanced hydraulic cylinder THCAD2 jump64

2868.069 hm2_7i96s.00.enconder.00.velocity
172084.1 hm2_7i96s.00.velocity-rpm


recessed hydraulic cylinder THCAD2 jump64

13232.51 hm2_7i96s.00.enconder.00.velocity
793950.9 hm2_7i96s.00.velocity-rpm


advanced hydraulic cylinder THCAD2 jump32

5671.078 hm2_7i96s.00.enconder.00.velocity
340264.7 hm2_7i96s.00.velocity-rpm


recessed hydraulic cylinder THCAD2 jump32

26449.64 hm2_7i96s.00.enconder.00.velocity
1586979 hm2_7i96s.00.velocity-rpm


I put the value 800 in the scale encoder, but it continues to display a calculation error message on the axis, but the axis moves a little, below is the video showing the result


Regarding another question, sorry for my lack of knowledge, do you have any example of how to: feed the encoder velocity signal through LinuxCNCs
offset component to remove the offset at 0V ?


  • DieLimo
  • DieLimo
15 Jan 2025 18:01

Coordinate system in GUI does not match machine

Category: Basic Configuration

Thanks a lot for your two links and the tip with the StepConf. After changing the coordinate system to the near left side, I only had to invert one axis in the StepConf. Now everything works fine :)
  • Aciera
  • Aciera's Avatar
15 Jan 2025 17:59
Replied by Aciera on topic Kappa goniostat

Kappa goniostat

Category: Advanced Configuration

Hm, interesting. It might be worth considering an issue that usually only pops up once the machine is finished which is: How are you going to create gcode for this?
Displaying 19786 - 19800 out of 21715 results.
Time to create page: 0.817 seconds
Powered by Kunena Forum