Schaublin 125-CNC retrofit.
- smc.collins
- Offline
- Platinum Member
-

Less
More
- Posts: 723
- Thank you received: 139
02 Apr 2023 23:47 - 02 Apr 2023 23:58 #268129
by smc.collins
Replied by smc.collins on topic Schaublin 125-CNC retrofit.
I have added a joystick with rapid for X and Z and 2 jog wheels for fine adjust. I tried the whole pendant thing, not a fan for the lathe. Also my controls are just outside my chuck to the left. Once I get the new panel up and cleaned up versus my current hack job while waiting for material I will post a vid.
I see you have a tool changer, very interested to help you get that working. keep the videos coming too. good stuff
I see you have a tool changer, very interested to help you get that working. keep the videos coming too. good stuff
Last edit: 02 Apr 2023 23:58 by smc.collins.
The following user(s) said Thank You: RotarySMP
Please Log in or Create an account to join the conversation.
- RotarySMP
-
 Topic Author
- Offline
- Platinum Member
-
Less
More
- Posts: 1627
- Thank you received: 595
04 Apr 2023 13:43 - 04 Apr 2023 13:49 #268264
by RotarySMP
Replied by RotarySMP on topic Schaublin 125-CNC retrofit.
By pendant, I mean a pair of dedicated handwheels mounted to a housing down on the front rail which the machine cover runs one, down on the stand, like Schaublin did on the 125CCN. I only used one jog wheel with an X/Z switch on the mini lathe, and found it to be a PITA.
I saw you are working on a universal tool changer comp. Nice one. I will need to strip down and clean all the schmoo out of my tool changer, but think this is a prett simple one, with only a single control (Pneumatic valve for next tool), and two bits of feedback for the four positions. I haven't really got into it yet though.
I saw you are working on a universal tool changer comp. Nice one. I will need to strip down and clean all the schmoo out of my tool changer, but think this is a prett simple one, with only a single control (Pneumatic valve for next tool), and two bits of feedback for the four positions. I haven't really got into it yet though.
Last edit: 04 Apr 2023 13:49 by RotarySMP.
Please Log in or Create an account to join the conversation.
- smc.collins
- Offline
- Platinum Member
-
Less
More
- Posts: 723
- Thank you received: 139
04 Apr 2023 16:48 #268273
by smc.collins
Replied by smc.collins on topic Schaublin 125-CNC retrofit.
I'm first trying to capture all the various designs, probably going to end up with a few configurable programs, time will tell. post up the controls or schematics, I'll have a look.
and my control arrangement is similar, but my carriage isn't accessible , big enclosed lathe
and my control arrangement is similar, but my carriage isn't accessible , big enclosed lathe
The following user(s) said Thank You: RotarySMP
Please Log in or Create an account to join the conversation.
- RotarySMP
-
Topic Author
- Offline
- Platinum Member
-
Less
More
- Posts: 1627
- Thank you received: 595
05 Apr 2023 22:20 #268355
by RotarySMP
Replied by RotarySMP on topic Schaublin 125-CNC retrofit.
Thanks,
There is a single solenoid valve for effecting a tool change via air line D.
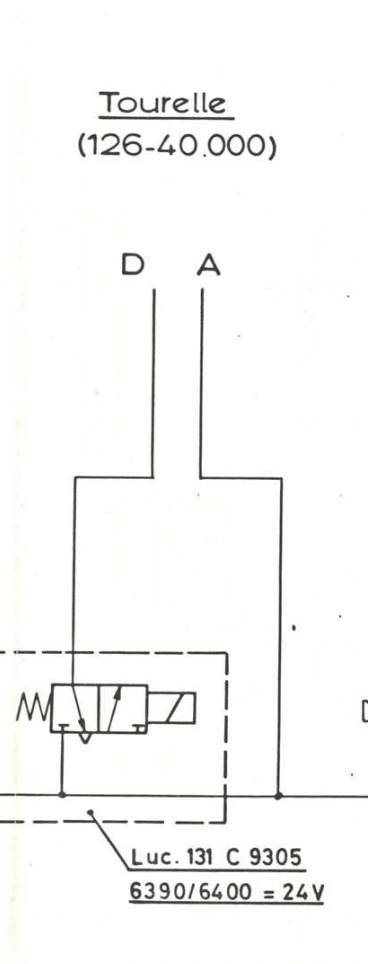
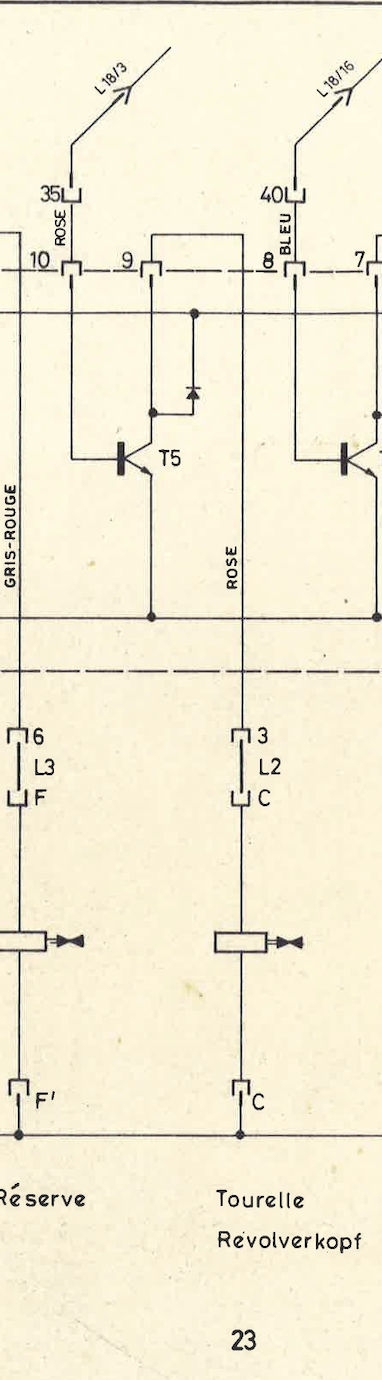
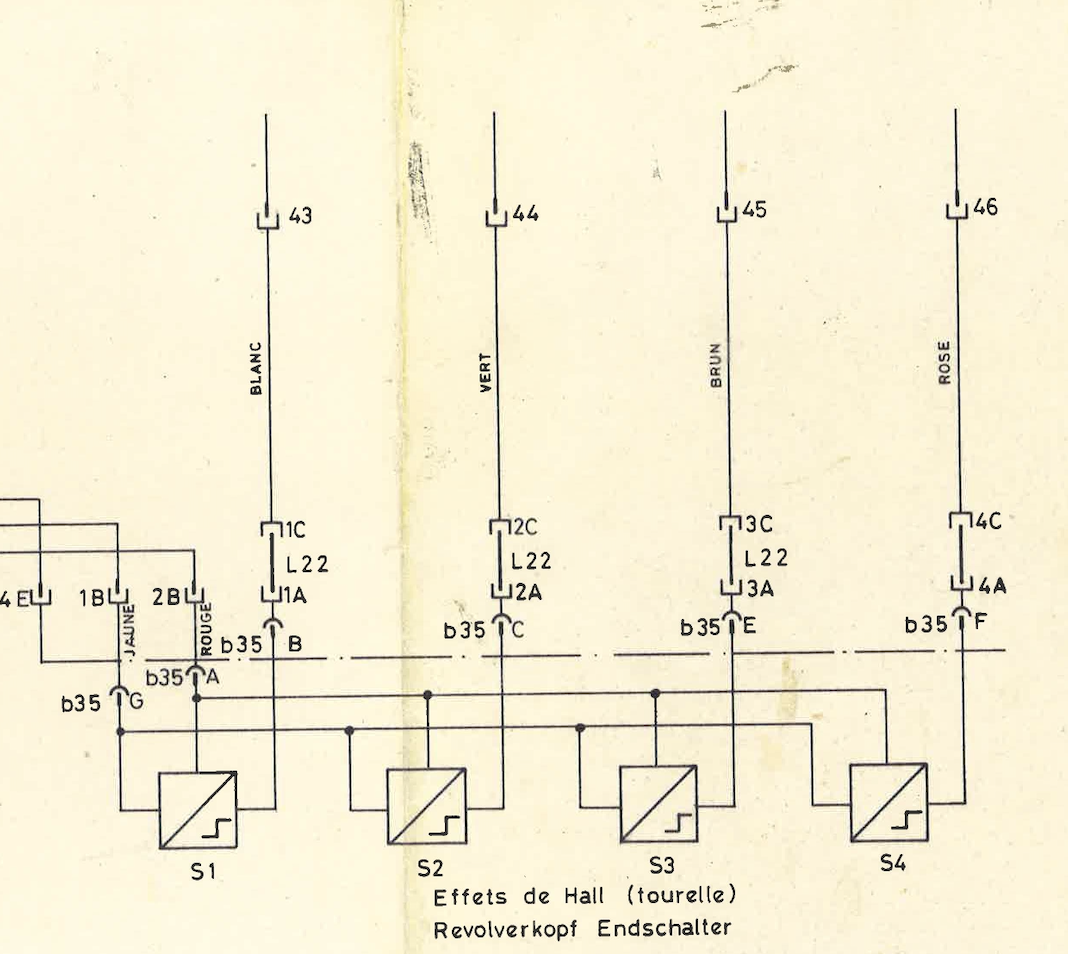
The feedback is from four hall sensors in the tool changer. (Sorry, I thought it was two bits).
There is always air pressure available via air line A, and knobs to actuate the valves to effect manual tool changes.
There is a single solenoid valve for effecting a tool change via air line D.
The feedback is from four hall sensors in the tool changer. (Sorry, I thought it was two bits).
There is always air pressure available via air line A, and knobs to actuate the valves to effect manual tool changes.
Attachments:
Please Log in or Create an account to join the conversation.
- smc.collins
- Offline
- Platinum Member
-
Less
More
- Posts: 723
- Thank you received: 139
05 Apr 2023 22:55 #268359
by smc.collins
Replied by smc.collins on topic Schaublin 125-CNC retrofit.
are there any locking or unlocking solenoids ? and do you happen to know the pattern of the sensors ?
Please Log in or Create an account to join the conversation.
- RotarySMP
-
Topic Author
- Offline
- Platinum Member
-
Less
More
- Posts: 1627
- Thank you received: 595
06 Apr 2023 05:32 #268383
by RotarySMP
Replied by RotarySMP on topic Schaublin 125-CNC retrofit.
Not yet, but I will ask the mate who just disassembled his.
The following user(s) said Thank You: smc.collins
Please Log in or Create an account to join the conversation.
- RotarySMP
-
Topic Author
- Offline
- Platinum Member
-
Less
More
- Posts: 1627
- Thank you received: 595
09 Apr 2023 10:56 #268658
by RotarySMP
What are your thoughts on my control panel ideas?
I have added my current .qet schematic for James. Needs renaming from TXT back to QET.
Replied by RotarySMP on topic Schaublin 125-CNC retrofit.
What are your thoughts on my control panel ideas?
I have added my current .qet schematic for James. Needs renaming from TXT back to QET.
The following user(s) said Thank You: tommylight
Please Log in or Create an account to join the conversation.
- spumco
- Offline
- Platinum Member
-
Less
More
- Posts: 2116
- Thank you received: 877
09 Apr 2023 16:29 #268685
by spumco
Mark,
My recently-completed mill panel below for inspiration. Some thoughts for you:
-Ralph
Replied by spumco on topic Schaublin 125-CNC retrofit.
Mark,
My recently-completed mill panel below for inspiration. Some thoughts for you:
- Toolchanger - do not put any controls near the toolchanger. You're asking for a pinched hand if you've got a drill or long boring bar in there. Put a 'next-tool' button on your MPG or control panel (or both). You and smc.collins are working on turret logic now, you should be able to set up a function that indexes to the next tool and updates LCNC.
- Use physical buttons for cycle start, stop, feedhold regardless of what gmoccapy has available through softkeys. Make them so you can have your finger on the button and know what it does without looking at it while you are watching the tool.
- Gmoccapy is nice (love the DRO), but industrial controls with softkey-type arrangements don't have softkeys that move the machine. Everything is for data input or menu selection - softkeys can't make the meat-cutting parts do their thing (except maybe in some buried sub-menu for settings or adjustment).
- Search the internet for pic of Siemens, Fanuc, Fagor, GSK, Haas, etc. (ignore Datron) and you'll see they have
- Softkeys (these are from the controller manufacturer)
- Dedicated buttons for functions that result in physical motion or similar (these are from the machine integrator)
- You have a 7i73 - that means you have, using a 4x8 matrix, 32 inputs that can be dedicated to specific machine funtions. Sky's the limit: M-codes, homing, parking positions, FRO/SRO up/down buttons, collet closer, etc. With relegendable keypad buttons you can fiddle to your heart's content until it's just the way you like it. Think steamdeck for CNC.
- Don't put the MPG on the sliding rail.
- Imagine touching off a fragile little boring bar. Do you want to be watching the tool for a whiff of a chip while your hands are down at your waist? Or having to look way down to see what jog increment you're in?
- Get a corded MPG pendant that hangs next to your control panel. It's right there like a built-in, but you can detach & hold it when you need to get up close for some reason. Much easier to look at your hands than over at the panel to double check a setting.
- Not a fan of the dual-MPG's for lathes. Personal preference, but I wouldn't plan on manually machining in two axes at once. It's a CNC.
- Enclosure
- Flip it the other way 'round (monitor cutout at bottom) and you now have a shallow, slightly angled box to mount your monitor. With plenty of space below the monitor for dedicated-function physical buttons
- Then cut off the (now-at-the-bottom) monitor section and fabricate a shallow hinged keyboard tray. Most of the time it'll be flipped up for typing, but you can flip it down to save some space in a tight workshop.
- Monitor - you're frugal (cheap); I respect that. But consider if that monitor dies - can you get a replacment that's identical in size? I suggest two options:
- Buy an industrial name-brand monitor (like ELO) that has a long lifecycle and is easily replacable via ebay (or new),
- Fabricate a sub-frame for the monitor that mounts to the enclosure. That way when you replace the monitor you can modify the sub-frame and not have to butcher the enclosure (with all the wiring inside). Make the sub-frame big enough that a new monitor can be an inch or so larger or smaller than your existing one.
-Ralph
The following user(s) said Thank You: RotarySMP
Please Log in or Create an account to join the conversation.
- RotarySMP
-
Topic Author
- Offline
- Platinum Member
-
Less
More
- Posts: 1627
- Thank you received: 595
09 Apr 2023 16:46 #268689
by RotarySMP
Replied by RotarySMP on topic Schaublin 125-CNC retrofit.
Hi Ralph,
Thanks for taking the time to give me your insights. That is a really helpful. I really like your control panel, It looks very practical.
I have a lot of comments through YT as well, and will need to work though it all in my head to see what gels together.
Thanks for taking the time to give me your insights. That is a really helpful. I really like your control panel, It looks very practical.
I have a lot of comments through YT as well, and will need to work though it all in my head to see what gels together.
The following user(s) said Thank You: spumco
Please Log in or Create an account to join the conversation.
- spumco
- Offline
- Platinum Member
-
Less
More
- Posts: 2116
- Thank you received: 877
09 Apr 2023 17:31 #268693
by spumco
Replied by spumco on topic Schaublin 125-CNC retrofit.
Make a cardboard mockup and pretend going through all the normal machining steps.
- Setup
- tool touchoffs
- measuring parts in situ
- programming
- editing programs
- Running a program
- Starting program
- Adjusting FRO/SRO while machining
- Single-blocking through the program
- Pausing/stopping
- Jogging away from part
The following user(s) said Thank You: RotarySMP, tommylight
Please Log in or Create an account to join the conversation.
Moderators: piasdom
Time to create page: 0.276 seconds